Release Testing Instructions WooCommerce 6.2
WooCommerce 6.2 includes:
- WooCommerce Admin Updates
- WooCommerce Blocks Updates
- WooCommerce Core Updates
- WooCommerce API Updates
On a new site, with English language settings:
- Go to WooCommerce home screen
- See that all Inbox notes are short in length (aproximately less than 320 characters).
- Go to setup wizard
- Choose "Johor - Malaysia" as store country
- Go through all steps until "Business details"
- Go to "Free features" tab
- Observe the "GET THE BASICS" header is NOT shown without any plugins
Change store Industry
- Go to the setup wizard
- Choose any store location that supports WCPay, such as any state in the US
- In the Industry step, make sure to not select CBD
- Proceed through the setup until the Business Details step
- Go to the "Free features" tab
- Observe WooCommerce Payments is displayed in the suggested extensions
- Without refreshing, go back to the Industry step
- Select CBD industry and click on continue until Business Details step again
- In the extension list, observe that WooCommerce Payments is NOT displayed.
Change store country
- Repeat steps 2~6
- Without refreshing, go back to the Store Details step
- Choose any store location that doesn't supports WCPay, such as Malaysia (MY)
- Go to Business Details step again
- In the extension list, observe that WooCommerce Payments is NOT displayed.
- Go to WooCommerce > Home.
- Press Add my products in the task list.
- Press Add manually.
- No PHP warning should be visible.
- Go to Business Features tab in Setup Wizard
- Deselect all extensions and reselect only 1
- Click continue
- Observe the other extensions are NOT re-selected before it navigates to the next screen
- Start with a fresh site with an unfinished task list
- Go to the WordPress Dashboard page
- Note as an admin that you can see the
WooCommerce Setupwidget - Create a user role that should not be able to manage WooCommerce but can view the dashboard (e.g., Author)
- Log in with that user and navigate to the dashboard.
- Note that the
WooCommerce Setupwidget is not visible
- Navigate to the WordPress dashboard
- Note that the correct number of tasks are shown (complete/total) for the
WooCommerce Setupwidget. The first number in the widget should indicate the next step you need to complete. For example, if you have already completed the first step (the "Store details" task), you should see "Step 2 of 6" in the widget. - Click on the action button
Start sellingand make sure you’re redirected to the correct page. Following the example from above, clickingStart sellingshould take you to theAdd my productspage. - Repeat this process for multiple tasks, taking special attention for the “store details/setup” task since it uses a custom URL passed via the API
Fix PhotoSwipe lightbox "close" triggering elements covered by it on mobile #31591
- Use Storefront or other theme that displays a menu toggle on narrow viewports
- Use a mobile device or simulator to open a single product page
- Open the photoswipe lightbox
- Ensure that the close button overlaps with the menu toggle (you might need to force some CSS margins to accomplish)
- Verify that tapping close does not trigger the menu toggle
2022 theme stylings for product and shop pages. #31536
- View shop and individual product page.
- Verify that the styling of these pages are consistent with the expected designs for the TT2 Theme.
Style My Account Pages for 2022 Theme #31575
- View all my account pages (with and without placing orders and having downloads)
- Log out and view login form.
- Verify that the styling of these pages are consistent with the expected designs for the TT2 Theme.
-
Go to the checkout page after adding a few products in the cart.
-
Make sure shipping and payment-related information is displayed properly.
-
Submit an empty form and make sure error messages are displayed properly.
Before After 

☝️ After vertical alignment of right column fixed, (applies) prices in bold, "sold by" alignment and text decoration fixed to match cart (Note: the vertical lines on the left of the after was a cropping mistake)
Basis of overlay used when processing Twenty Twenty-Two checkout. #31633
- Add products to the cart and proceed to the Checkout page.
- In the Checkout page, enter valid details to the Checkout form.
- Pay for the order.
- Notice that the blocked UI overlay (that 'greys out' the checkout form and displays a spinner after submitting the form) was visible.
- Verify that the blocked UI overlay appears in other places as well.
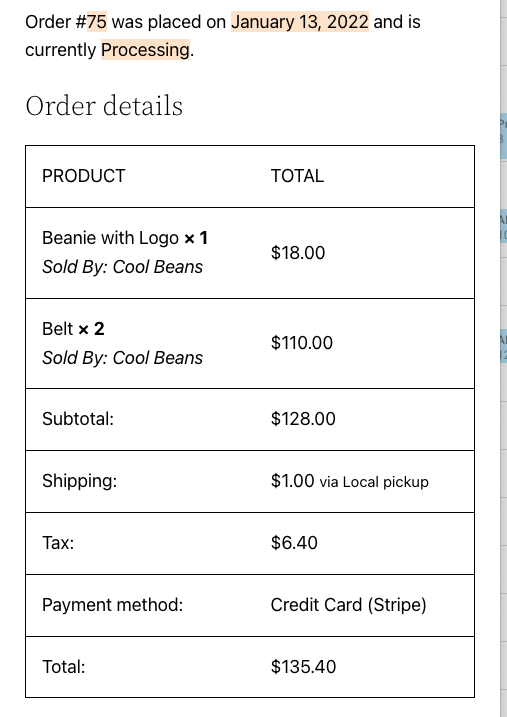
Fix order details table width on narrow viewports. #31634
- As a customer, add products to your cart and proceed to the Checkout page.
- Fill the Checkout form and submit. You should be taken to the Order Details page.
- Shorten the width of your browser's viewport.
- Verify that the order details table width is not too short as shown in the "After" screenshot below:
Before After 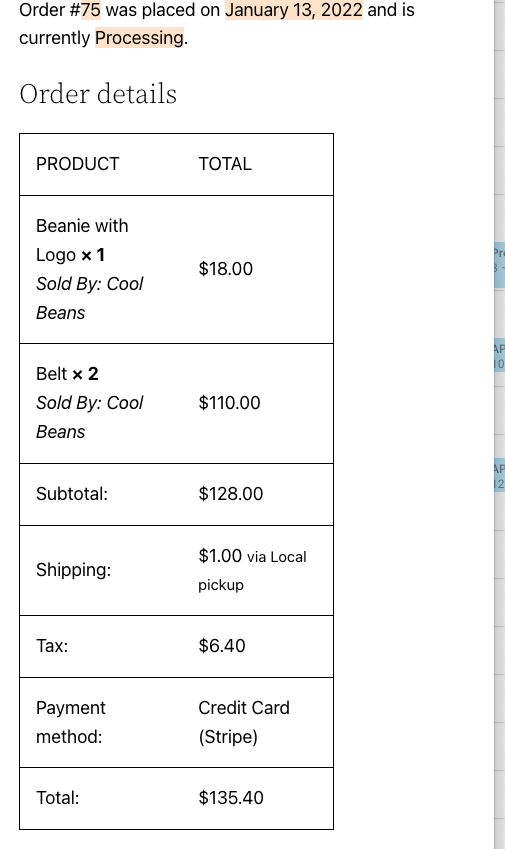
- Navigate to My Account > Orders > open the order.
- Shorten the width of your browser's viewport.
- Verify that the order details table width is not too short
Modify background color for elements #31631
- As a customer, create a new order.
- Navigate to My Account > Orders > open the order.
- Verify that text highlights have a salmon color taken from the TT2 Styles sheet.

- Take note of the Order ID.
- Login to WP Admin.
- Navigate to Pages > Add New.
- Add a "Shortcode" block in the page.
- Enter the shortcode
[woocommerce_order_tracking]and publish the page. - View that page.
- Enter the order ID and the email address in the order.
- Click "Track".
- Verify that text highlights have the same salmon color.
2002 Theme: Fix font sizes in single product tabs area, review form styling. #31632
-
Create a simple physical product that has weight and dimensions.
-
Also make sure that reviews are enabled in this product.
-
Add a review to this product.
-
As a customer, navigate to this product's page.
-
Verify that font sizes in single product tabs area and review form styling are correct. The expected styles can be found here. Tabs Area:
Before After 

Review form:
Before After 

☝️ After vertical alignment of right column fixed, (applies) prices in bold, "sold by" alignment and text decoration fixed to match cart (Note: the vertical lines on the left of the after was a cropping mistake)
Center product cards (2022 Theme) #31626
-
Verify the product cards in various places in the store, like in the Products and Product Category pages. Their alignment is now centered, font family is now sans-serif for the product titles as shown in the screenshot below:
After → centered, product title is sans-serif, color is primary accent color.

Before → left aligned, title is serif, color is black (not obviously a link).

Fix styling of "pay for order" form #31682
- Create a WooCommerce test site with WP 5.9 and Twenty Twenty-Two theme.
- Login to the Admin Dashboard and create an order that has "Pending payment" status.
- In the Order Details page, click on the "Customer payment page" link. It will take you to the "Pay for Order" page.
- Notice how the order details table looks like.
| Before | After |
|---|---|
 |
 |
 |
 |
2022 Theme: Fix Search Blocks #31687
- Set up a WooCommerce test site using WP 5.9 and the Twenty Twenty-Two theme.
- In either a new or existing page, add the WP "Search" block.
- Verify how the WP Search box looks like.
- In either a new or existing page, add the WP "Product Search" block.
- Verify how the WP "Product Search" box looks like.
- In the Shop page, click on one of the products.
- Verify that the "magnifier" icon at the top right of the product image is as expected (see screenshot below).
| Before | After |
|---|---|
 |
 |
 |
 |
 |
 |
- Add a new coupon in wp-admin → Coupons → Add New.
- Publish the coupon (since only published coupons will be available in the API response).
- In the API, run
GET /wp-json/wc/v3/coupons. - Confirm that the
statusfield is available in the API response.