Repository navigation
Installation
For a BC-250 that already runs Windows 11 Home or Pro, version 23H2, 24H2, 25H2 or 26H2 (Windows versions), with Secure Boot off and a monitor on the DisplayPort output:
- Open the Releases page. Under the newest release, click Assets to open its list of files.
- Download
amdgpu-wddm-tester-<version>.zip. Do not download "Source code": it does not hold the driver. -
Unpack the whole zip file to a local folder, for example
C:\amdgpu-wddm-tester. Right-click the zip file, select Extract All..., then Extract. The installer does not work from inside the zip file. - The unpacked folder holds one file,
setup.exe, and one folder,files. Double-clicksetup.exe. Accept the administrator prompt. - The window checks the computer and shows what it will change. Give the consent for Windows test mode. The window installs the driver. Before each restart it asks: click Restart now.
- Log on after each restart (two in total). The window starts again by itself: accept the administrator prompt.
- Do not close the small blue window in the top-left corner after logon: it confirms the start of the driver. At the end the setup window shows the result.
Without the window: open a command prompt as administrator, go to the folder files and type
install.cmd -Console. Type YES, and log on after each of the two restarts. Section 7 has the steps. The setup
window installs the driver only. For llama.cpp, Ollama or a model, use install.cmd.
The sections below explain each step, what to do when a step fails, and the settings of the BIOS and of Windows.
This page installs the amdgpu-wddm driver on an ASRock BC-250 with Windows 11. Read it once from start to end before you start. Each step takes a few minutes. The whole installation needs two restarts of Windows.
The driver is test-signed, so Windows must run in test mode. The installer turns test mode on and asks you first.
Use this package on a BC-250 only. On every other computer the installer stops and changes nothing there.
- An ASRock BC-250 board.
- An NVMe drive for Windows alone. Dual boot with Linux is not supported. If the board now runs a Linux distribution, Windows replaces it.
- A monitor with a DisplayPort input and a DisplayPort cable, connected to the board directly. This is the configuration the driver is tested on, with every resolution and the sound over DisplayPort.
- A monitor with an HDMI input works through a passive DP-to-HDMI adapter from release 0.7.216.100-tester.28 on, with limits: one picture mode (the mode that the board chose at power-on) and a restart of Windows after a cable change. From 0.7.216.100-tester.29 on, the sound goes over HDMI too. DP-to-DVI and DP-to-VGA adapters are not tested. Read the note in Troubleshooting.
- A keyboard on the board.
- Windows 11 x64 Home or Pro, version 23H2, 24H2, 25H2 or 26H2, installed and working. The table below gives the versions. During the Windows installation the board uses the Microsoft Basic Display Adapter of Windows, which draws the picture with the processor.
- A local account with administrator rights.
- 2 GB of free space on the system drive.
- The Microsoft Visual C++ 2015-2022 Redistributable (x64), from aka.ms/vs/17/release/vc_redist.x64.exe. The installer stops and tells you if it is missing.
- An internet connection on the board. The installer downloads the AMD GPU firmware from the linux-firmware project. Section 6 says what to do without an internet connection.
You do not need a second graphics card. The BC-250 GPU drives the monitor.
We support Windows 11 23H2 and every newer version that Microsoft releases to everyone. Use Windows 11 Home or Pro from the official Microsoft ISO file or the Media Creation Tool. Both give the newest version only: since September 2026 that is 26H2. You cannot choose an older version there, and Microsoft no longer offers 23H2 for download. Microsoft stopped the updates of 23H2 Home and Pro in November 2025. Install the newest version.
| Windows 11 | Build | Status |
|---|---|---|
| 26H2 | 26300 | Supported. The version that the Media Creation Tool gives now. tester.29 does not start the GPU here (Code 43). The next release fixes that. |
| 25H2 | 26200 | Supported. tester.29 does not start the GPU here (Code 43). The next release fixes that. |
| 24H2 | 26100 | Supported. tester.29 does not start the GPU here (Code 43). The next release fixes that. |
| 23H2 | 22631 | Supported. Our test board runs the driver on Windows 11 Pro 23H2 every day. One tester on a recent 23H2 build also got Code 43 with tester.29, and the next release fixes that too. |
| A newer version for everyone | Supported. | |
| IoT Enterprise LTSC 2024, Enterprise LTSC 2024 | 26100 | Not tested. These editions remove parts of Windows. Use Home or Pro. |
| Insider Preview (Canary, Dev, Beta) | Not supported. | |
| 22H2, 21H2 | 22621, 22000 | Not supported. Update Windows first. |
| Windows 10, Windows Server | Not supported. |
To see your version, push Win+R, type winver and push Enter.
Restart the board and push Del (or F2) to open the BIOS setup.
-
Secure Boot: off. Windows does not load a test-signed driver while Secure Boot is on. The stock BC-250
BIOS versions P2.00, P3.00 and P5.00 have no Secure Boot option: Secure Boot is not built in, so it is always
off and there is nothing to change. A modified BIOS can have the option, usually under Security > Secure Boot.
Set it to Disabled. The installer reads this setting and stops if it is on. On the stock BIOS the installer
shows Secure Boot
off (not built into the firmware)and names where it read that. To check it yourself, runConfirm-SecureBootUEFIin PowerShell as administrator:Falseor "not supported" means off. The red error "Variable is currently undefined" also means off: the stock BIOS gives it. - A modded BIOS is not tested. The driver is tested on the stock BIOS only. If your board has a modded firmware with a core unlock or other changes, the driver can behave in a way we have not seen.
Save and exit, usually with F10. The installer changes no BIOS or firmware setting.
The video memory is not a menu setting here. The board keeps a part of the machine memory for the GPU. On a stock BIOS this size is a firmware default and the menus of the setup do not offer it, so there is nothing to set. Our test board runs the stock BIOS P3.00, which keeps 8 GB, and that is the configuration the driver is tested on. A smaller frame buffer, for example 512 MB, is not tested, and most games then run out of video memory.
Install Windows 11 from the official Microsoft ISO file or the Microsoft Media Creation Tool. Write it to a USB stick, start the board from the stick and let Windows use the whole NVMe drive.
One step is not the normal one: the board has no TPM 2.0 and no Secure Boot, so Windows 11 Setup stops with a message that this PC cannot run Windows 11. The stick must switch that check off. Make the Windows 11 stick gives every step, from the download to the first logon.
Nothing else is special here. The picture comes from the firmware and then from the Microsoft Basic Display Adapter. The desktop is slow, because the processor draws it. This changes after the driver installation.
When Windows is on the desktop, make a local account with administrator rights, or use the account you made during the installation.
- Open the Releases page. The newest release is at the top. It has the label Pre-release, because every release of this driver is a tester release.
- Scroll down to the end of the release notes of that release, to the heading Assets. If you do not see a list of files under it, click Assets to open the list. GitHub shows the list closed for most releases.
- In the list, click the file
amdgpu-wddm-tester-<version>.zip, for exampleamdgpu-wddm-tester-0.7.216.100-tester.29.zip(about 93 MB). This is the driver package.- Do not download Source code (zip) or Source code (tar.gz). They hold the source files only, not the driver, and the installer is not in them.
- You do not need the other zip files of the list, for example
llama.cpp-hip-...zip, to install the driver. They are optional extras for language models. The release notes say how to use them.
- Unpack the whole zip file to a local folder, for example
C:\amdgpu-wddm-tester. Do not start the installer from inside the zip file and do not start it from a network drive. - From 0.7.216.100-tester.29 on, the unpacked folder holds two items:
setup.exe, which you double-click, and the folderfiles, which holds everything else.setup.exeneedsfilesnext to it. Do not copysetup.exeout on its own. To carry the package to another computer or to a memory stick, copy the whole unpacked folder. - Read
INSTALL.mdandRELEASE-NOTES.mdin the folderfiles. The release notes name the known issues of that release.
Before you start: make a backup of the data on the board that you want to keep. If BitLocker is on, write down your recovery key. Open a command prompt as administrator and type:
manage-bde -protectors -get C:
A dry run does every check and prints every change, and it changes nothing. Open a command prompt, go to the
folder files of the unpacked folder and type install.cmd -DryRun:
cd /d C:\amdgpu-wddm-tester\files
install.cmd -DryRun
The preflight table is the first thing the installer prints. Every line must show ok or warn. The start of
the output looks like this:
amdgpu-wddm tester installer - DRY RUN, nothing will be changed
   package: C:\amdgpu-wddm-tester\files
   install root: C:\Program Files\amdgpu-wddm

== Preflight
   [ok  ] package integrity      ...
Then the table has one line for each check, for example Windows, BC-250 GPU, Secure Boot, Visual C++ runtime, free space and GPU firmware. A command prompt that you did not start as administrator cannot read
Secure Boot, the boot options and BitLocker. The administrator line then shows warn, and these values read
as unknown. This is normal in a dry run. The real installation starts as administrator and reads the three
values.
A fail line stops the installer, and the table says what to correct. When the installer stops at preflight, it
has changed nothing. On a computer that is not a BC-250 the table holds this line, and the installer ends like
this. The name of the computer is cut out of the first line:
   [fail] BC-250 GPU             no device PCI\VEN_1002&DEV_13FE on this computer. This package is for the ASRock BC-250 only.

Preflight refused the installation: 1 check(s) failed. Nothing was changed.
The driver loads eight AMD firmware files from C:\BC250\firmware. The package does not contain them. The
installer downloads them, and the AMD licence text, from the linux-firmware project at a fixed commit, and it
checks the SHA256 of each file before it copies anything. If a file has a different SHA256, the installer stops
and changes nothing. INSTALL.md in the package lists every file, its address and its SHA256.
Without an internet connection on the board:
- Download the files on another computer, with the addresses from
INSTALL.md. Keep the file names. - Copy them to one folder on the board, for example
C:\amdgpu-wddm-firmware. - Open a command prompt as administrator in the folder
filesof the package. Start the installer with the firmware folder:install.cmd -FirmwareDir C:\amdgpu-wddm-firmware.
The setup window of the quick start runs the same phases and shows each stage. This section gives the steps on the command line.
- Open a command prompt as administrator. Go to the folder
filesof the unpacked folder and typeinstall.cmd -Console. With no switch,install.cmdopens the setup window instead.
cd /d C:\amdgpu-wddm-tester\files
install.cmd -Console
- Read the preflight table. Correct every
failline and start the installer again. -
Phase 1. The installer makes a System Restore point, if System Protection is on, and asks for permission
to turn on test signing. Type
YESto continue. If BitLocker is on, the installer asks whether you have the recovery key or whether it must suspend BitLocker for two restarts. Windows then restarts. - After you log on, the installer starts again by itself. Accept the administrator prompt. If it does not
start, run
install.cmdagain. - Phase 2. The installer downloads and checks the GPU firmware, installs the certificate, the driver, the user-mode drivers and the firmware, and writes the registry values. The picture does not change yet: the GPU changes to the new driver at the next start. The installer ends this phase with these lines, and Windows restarts:
Installation complete. After the restart, the installer verifies the driver by itself.

A restart is needed: the driver starts with its full configuration at the next start.
- Phase 3. After the second logon the installer verifies the driver and prints a table of checks. A good result ends with this line:
Verification passed. The BC-250 runs on the amdgpu-wddm driver.
You can run the verification again at any time. Start verify.cmd in C:\Program Files\amdgpu-wddm.
If the verification finds that the driver did not start, the installer collects the details by itself. It
writes one file, diagnostics-<time>.txt, next to its log in C:\ProgramData\amdgpu-wddm\installer, and prints
its path in its last lines. The setup window puts the same file into the support file that it saves. Send that
file with your report. Nothing is sent by itself.
After each logon a small blue window with a clock is shown in the top-left corner, for up to two minutes. It is the scheduled task "amdgpu-wddm start confirm". Do not close it.
The driver counts each start that is not confirmed. After two unconfirmed starts, Windows uses the Microsoft Basic Display Adapter again. This prevents a start loop. The task keeps the desktop drawing for at least one minute and then confirms the start. The same confirmation keeps the automatic clock control on.
You can also confirm a start yourself on the Home page of amdgpu-wddm Control.
"Test Mode" is shown in the lower-right corner of the desktop while test signing is on. This is normal.
Open the Start menu, type amdgpu-wddm Control and start it. The application has the language buttons English,
Polski, 日本語 and 한국어 in the top-right corner.
The pictures below come from a test reading of the application, not from a real board. Your values are different.

Home shows one status card: what is ready, and what needs your attention. Here the driver asks you to confirm this start. Below the card are the games you started and a short summary.
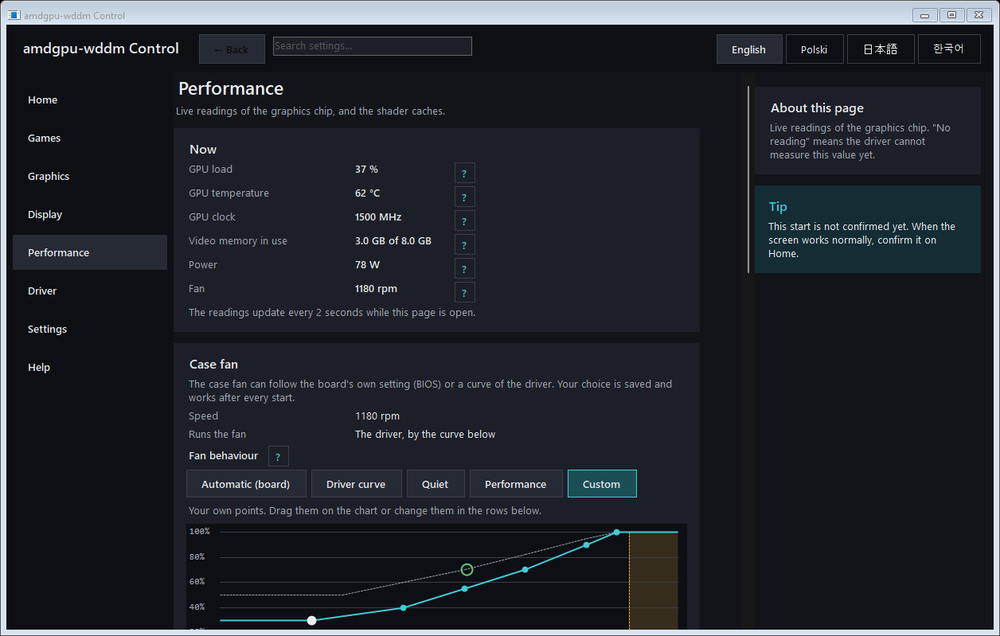
Performance shows the live readings of the graphics chip: load, temperature, clock, video memory, power and fan speed. The readings update every 2 seconds while the page is open.
The Case fan card below them gives the fan to the board (BIOS) or to the driver. The driver has the profiles Driver curve, Quiet, Performance and Custom. With Custom you drag your own points on the chart. The driver owns the fan only while it runs, and it gives the fan back to the board on every exit.
Below the fan card the page shows the shader caches. A shader cache keeps prepared graphics programs, so games start and load faster the next time.
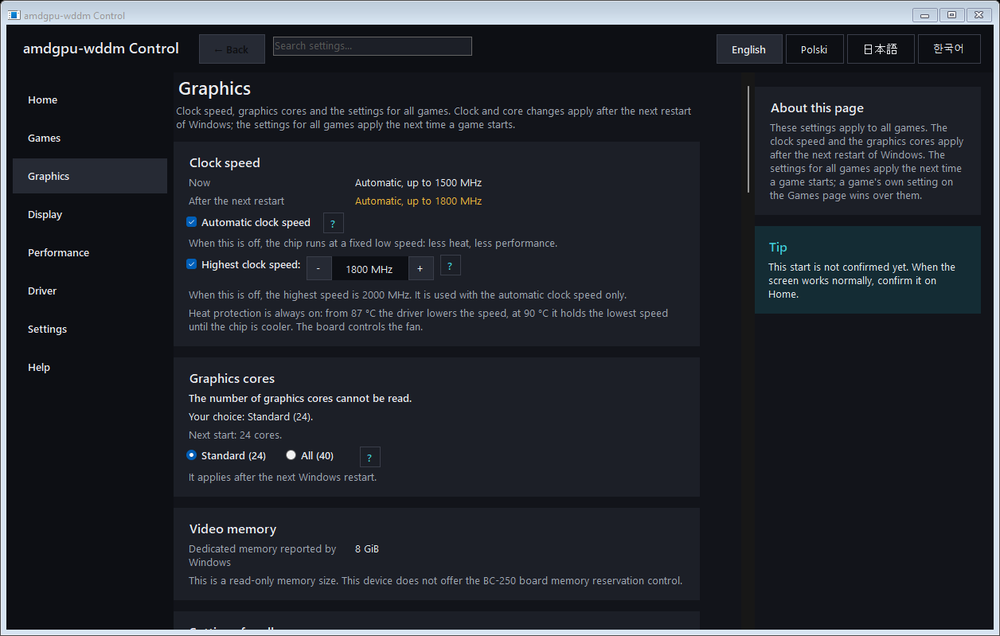
Graphics holds the clock speed, the graphics cores and the settings for all games. A change of the clock speed or of the cores applies after the next restart of Windows.
The GPU starts at 1000 MHz, it drops to 500 MHz when nothing uses it, and the automatic clock speed raises it under load, up to the highest clock speed on this card. The highest value of this release is 2000 MHz. Choose a lower value if the board locks up under load, and tell us. Heat protection is always on: from 87 °C the driver lowers the speed, and at 90 °C it holds the lowest speed until the chip is cooler.
The picture comes from a computer without a BC-250, so some cards there say that a value cannot be read. On a BC-250 the application reads the number of graphics cores and the video memory from the board.
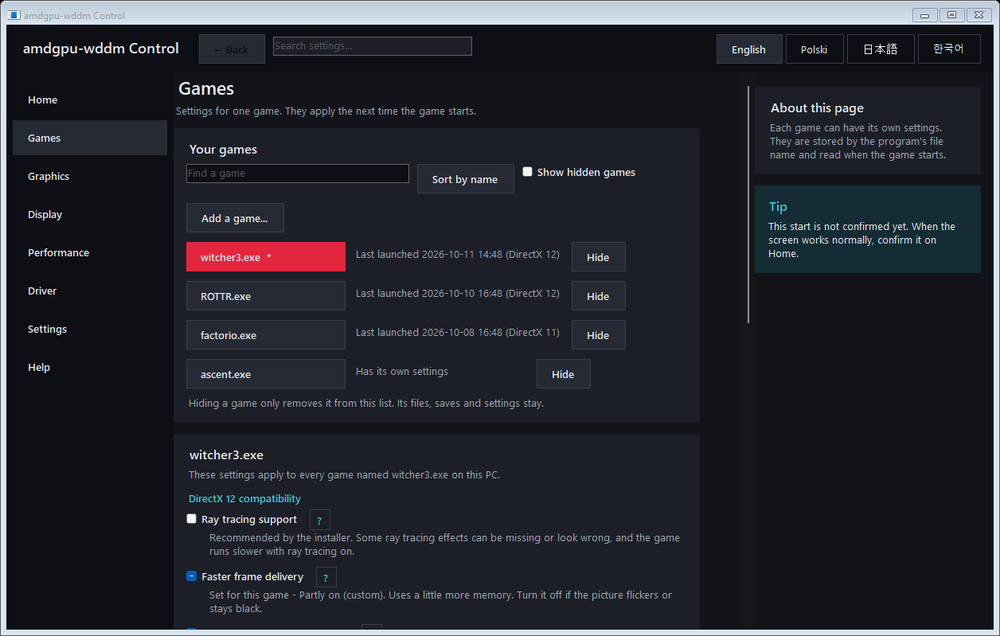
Each game can have its own settings. They are stored by the file name of the program and are read when the game starts. Start a game as usual first: the driver uses the recommended settings, and the game then appears in this list.
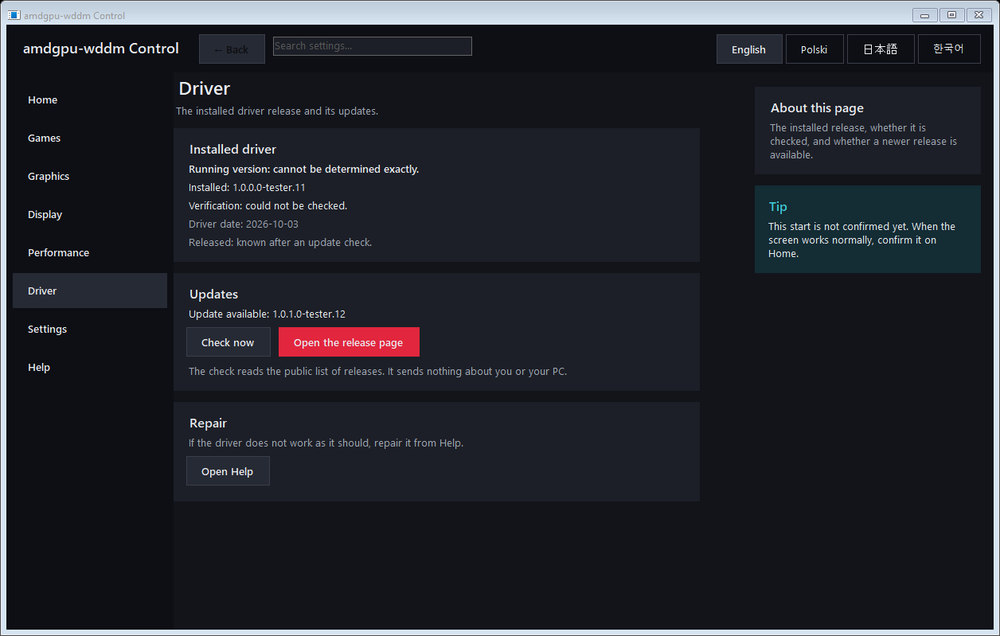
Driver shows the installed release, whether it is verified, and whether a newer release is available. The update check reads the public list of releases. It sends nothing about you or your computer. The version numbers in the picture come from a test reading.
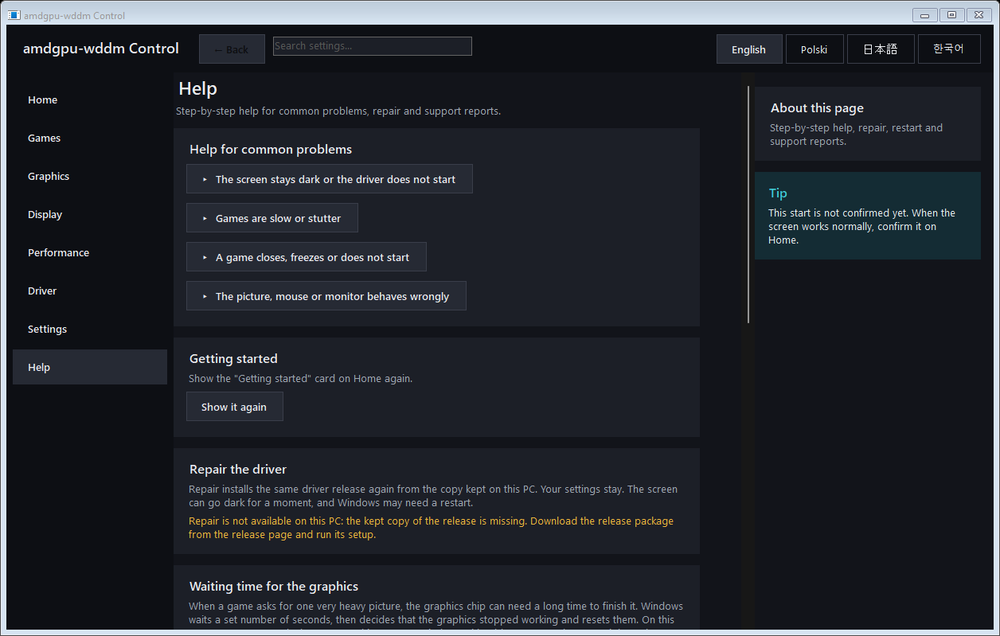
Help has step-by-step guides for common problems, the repair function, and the support report that you attach to a bug report. The card "Waiting time for the graphics" sets the time that Windows waits for a heavy picture before it resets the graphics.
- Download the new zip file and unpack the whole zip file to a new folder.
- Double-click its
setup.exe, or runinstall.cmdin its folderfilesas administrator. You do not have to uninstall first. - The installer shows
upgrading <old> -> <new>, keeps the files that did not change, replaces the others and restarts the computer.
An upgrade keeps the settings that you changed, for example the clock ceiling, the desktop route and the
settings of your games. The output shows each value as new, unchanged, KEPT (your value) or -> (a new
default).
A re-run of the release that is already installed and verified does nothing. To install the same release again,
use install.cmd -Repair in the folder files.
- Run
uninstall.cmdas administrator. It is in the folderfilesof the package and inC:\Program Files\amdgpu-wddm. - Type
YES. The uninstaller removes the driver, the files, the registry values, the scheduled task and the certificate. The GPU goes back to the Microsoft Basic Display Adapter. - The uninstaller asks whether it must turn test signing off again. You can answer in advance with
uninstall.cmd -DisableTestSigningoruninstall.cmd -KeepTestSigning. - Restart the computer. If BitLocker is on, have the recovery key ready: a change of the boot options can ask for it.
The uninstaller keeps C:\ProgramData\amdgpu-wddm\control, which holds the setting backups and the action log
of the Control application. Delete it yourself if you do not need it.
You can also use the System Restore point "amdgpu-wddm before install", if the installer made one.
The uninstaller of 0.7.216.100-tester.28 stops before it removes anything, and it leaves the installation as it
was. The simpler way out is to install 0.7.216.100-tester.29 or later first, because that installation brings a
fixed uninstaller. Then run uninstall.cmd again.
To remove 0.7.216.100-tester.28 without a newer installation, set the rights of its folder first. Open a command prompt as administrator and run:
icacls C:\ProgramData\amdgpu-wddm /inheritance:r /grant:r *S-1-5-32-544:(OI)(CI)F *S-1-5-18:(OI)(CI)F *S-1-5-32-545:(OI)(CI)RX
Then run uninstall.cmd again.