Repository navigation
How To Guides
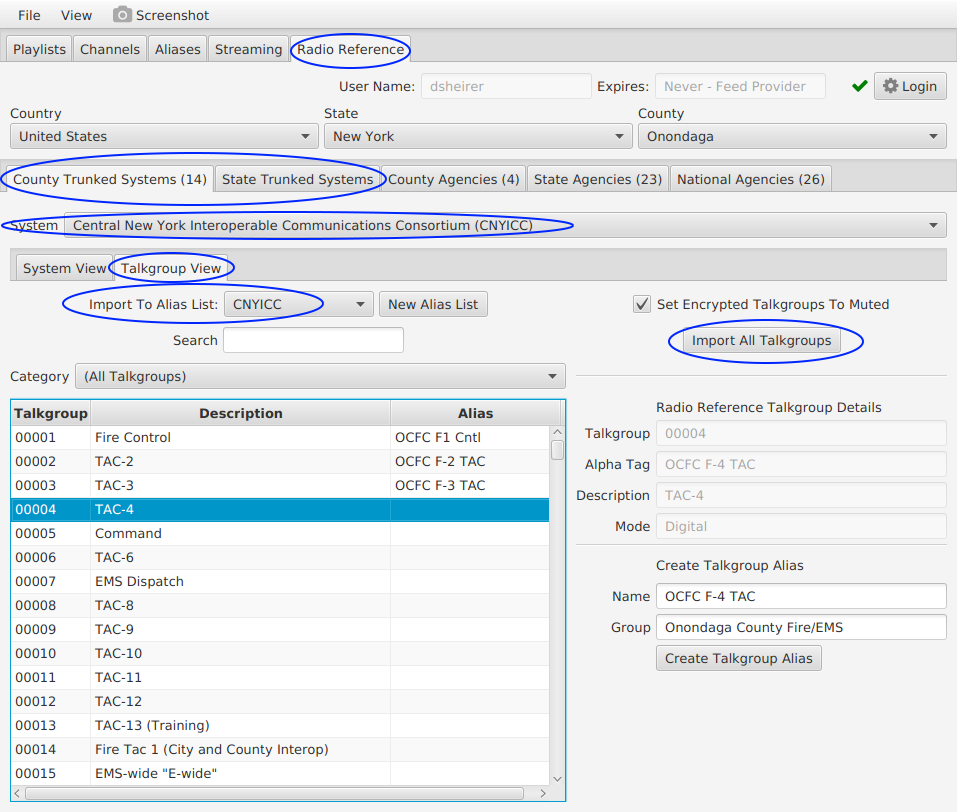
Step-by-step instructions for common tasks. In each guide, the numbered steps match the numbered callouts in the screenshot.
- Playlists & Channels
- Aliases
-
Streaming
- How To: Set Up an Audio Stream
- How To: Set Up Broadcastify Calls
- How To: Set Up a Broadcastify Feed
- How To: Set Up Rdio Scanner Streaming
- How To: Set Up Thinline Radio Streaming
- How To: Set Up OpenMHz Streaming
- How To: Assign Aliases to an Audio Stream
- How To: Broadcastify Calls - Manage Talkgroup Collisions Across Conventional Channels
- Radio Reference
- Tuners & Audio
Make a backup copy of your playlist before making big changes, or to experiment.
- Click the Playlists tab.
- Select the playlist you want to copy.
- Click Clone and enter a file name for the copy.
- To use the copy, select it and click Select.

You need at least one working, calibrated tuner, and the channel's frequency and protocol.
- Click the Channels tab.
- Click New and choose the decoder (protocol). The new channel is added to the table and selected.
- Enter a Name (and optionally a System and Site).
- In the Source section, enter the Frequency in MHz, for example
460.5. - In the Decoder section, adjust the protocol settings if needed. See Playlist Editor - Decoder Section.
- Click Save.
- Click Play to start decoding. The channel appears in the main window's Now Playing tab.
- Optional: choose an Alias List so that your aliases are applied to this channel's calls.

The NBFM decoder uses a noise squelch. Over FM, a transmission "quiets" the noise, and an empty channel is full of random noise. The squelch measures the noise in 10 ms windows and compares it to open and close thresholds.
- In the Playlist Editor Channels tab, click New and choose NBFM.
- Enter the Frequency and choose the Channel Bandwidth (12.5 or 25 kHz).
- Click Save, then Play.
- In the main window, select the channel in Now Playing and click the Channel tab below.

The squelch view has these controls:
- Noise open / close threshold sliders.
- Hysteresis open / close sliders, in units of 10 ms.
- Override: turns off the squelch and passes all audio.
- Reset: restores the default slider values.
How it works:
- The squelch opens when the noise stays above the open threshold for longer than the open hysteresis.
- The squelch closes when the noise stays below the close threshold for longer than the close hysteresis.
- The display scales noise from 0 to 10, so that "signal present" reads high (close to 10) and "no signal" reads lower and fluctuates (about 2 to 6). The audio is buffered for longer than the hysteresis, so no audio is lost while the squelch decides to open.
Adjusting:
- Watch the noise level with and without a transmission.
- If the squelch doesn't open on real transmissions, lower the open threshold to between the no-signal peaks and the signal level. Set the close threshold to match.
- If the audio breaks up during transmissions, lower the close threshold to about the peaks of the no-signal noise.
- Make the open hysteresis long enough that noise bursts don't open the squelch, and the close hysteresis long enough that brief fades don't close it.
To pass audio only when a specific CTCSS tone or DCS code is present, set Squelch Decoder Type in the channel's decoder settings. See Playlist Editor - NBFM.
NBFM calls have no talkgroup identifiers. To record, stream or prioritize them with aliases, have the channel attach a fixed talkgroup to every call.
- In the Channels tab, select (or create) your NBFM channel.
- Choose an Alias List, or click New Alias List to create one.
- In the Decoder: NBFM section, enter a Talkgroup To Assign (1 to 65,535). Click Save.
- In the Aliases tab, select the same Alias List and click New.
- Enter an Alias name. Click Add Identifier, choose NBFM > Talkgroup, and enter the same talkgroup value.
- Set Listen, Record, Streaming and actions as you want, and click Save.
- Start the NBFM channel with Play.
Create an alias list and an alias for a talkgroup. Select the same alias list in your channel configuration.
- Click the Aliases tab.
- Click the View By: Alias tab.
- Choose an Alias List, or click New Alias List.
- Click New. A new alias is created and opened in the editor.
- Enter the Alias name.
- Optional: enter a Group.
- Click Add Identifier, choose the protocol and identifier type (for example APCO-25 > Talkgroup), and enter the value.
- Click Save.

Tip: for trunked systems listed on Radio Reference, import all of the talkgroups at once. See How To: Import Talkgroups from Radio Reference.
Call audio is recorded per alias. The alias's alias list must be selected in the channel configuration. Recordings are saved to the recordings folder (View > Audio Recordings) in MP3 or WAVE format (see User Preferences - Record).
Option 1: View By: Alias
- Click the Aliases tab.
- Click the View By: Alias tab.
- Choose the Alias List.
- Select the alias.
- Turn on Record.
- Click Save.

Option 2: View By: Record (good for many aliases at once)
- Click the Aliases tab.
- Click the View By: Record tab.
- Choose the Alias List.
- Select one or more aliases in Don't Record Audio.
- Click > to move them to Record Audio.

- Click the Aliases tab.
- Click the View By: Alias tab.
- Choose the Alias List.
- Select the alias.
- Turn off Listen.
- Click Save.

After you set up a stream, choose which aliases to send to it. See How To: Assign Aliases to an Audio Stream. When a stream is enabled and saved, its status appears in the Stream Status column and in the main window's Streaming Status Panel.
For Icecast and Shoutcast servers.
- Click the Streaming tab.
- Click New and choose the server type, for example Icecast 2 (v2.4+).
- Enter a unique Name.
- Enter the Server host name.
- Enter the Port.
- Enter the Mount Point.
- Enter the User Name.
- Enter the Password.
- Turn on Enabled.
- Click Save.

- Click the Streaming tab.
- Click New and choose Broadcastify Call.
- Enter a unique Name.
- Enter your API Key.
- Enter your System ID.
- Turn on Enabled.
- Click Save.

Notes:
- sdrtrunk will stream any alias you assign. Assign only talkgroups that belong to the system identified by the system ID.
- If you stream two sites of the same system to two Broadcastify Calls configurations, assign each alias to only one of them. Otherwise the same call is uploaded twice. Duplicate call suppression can also help; see User Preferences - Call Management.
- Broadcastify can reject calls when your computer's clock is wrong. Keep your clock synchronized.
First log in to Radio Reference, so that your feeds appear in the New menu.
- Click the Streaming tab.
- Click New and choose your Broadcastify feed. The server, mount point, password and Feed ID are filled in from your account.
- Check the Feed ID.
- Turn on Enabled.
- Click Save.

- Click the Streaming tab.
- Click New and choose Rdio Scanner.
- Enter a unique Name.
- Enter your API Key.
- Enter the System ID.
- Enter your RdioScanner URL (host name, plus the port if it isn't 80 or 443).
- Turn on Enabled.
- Click Save.

- Click the Streaming tab.
- Click New and choose Thinline Radio.
- Enter a unique Name.
- Enter your API Key.
- Enter the System ID.
- Enter your Thinline Radio URL (host name, plus the port if needed).
- Turn on Enabled.
- Click Save.

For OpenMHz or your own trunk-server.
- Click the Streaming tab.
- Click New and choose OpenMHz.
- Enter a unique Name.
- Enter your API Key.
- Enter the System Short Name.
- Check the OpenMHz Upload Server (API). Change it only if you run your own trunk-server.
- Turn on Enabled.
- Click Save.

Option 1: from the alias editor
- Click the Aliases tab.
- Click the View By: Alias tab.
- Choose the Alias List.
- Select the alias.
- Expand the Streaming section.
- Select a stream in the Available list.
- Click > to move it to Selected, then click Save.

Option 2: from the streaming editor (good for many aliases at once)
- Click the Streaming tab.
- Select the stream.
- Click the Aliases tab below.
- Select one or more aliases in the Available list.
- Click > to move them to Selected.

When you send several P25 conventional (repeater) channels to one Broadcastify Calls stream, and they all use the same talkgroup (for example, talkgroup 1), the calls are indistinguishable. Give each channel its own streaming talkgroup:
| Channel | Original talkgroup | Stream as talkgroup |
|---|---|---|
| 123.456 MHz | 1 | 100 |
| 123.789 MHz | 1 | 200 |
| 123.543 MHz | 1 | 300 |
- Create a channel configuration for each frequency.
- Create a separate alias list for each channel (each with a unique name), and select it in that channel.
- In each alias list, create an alias with a Talkgroup identifier for the original talkgroup (for example, 1).
- Check that calls on each channel show the right alias in Now Playing.
- In each alias's Streaming section, select the Broadcastify Calls stream.
- In Stream this Alias as Talkgroup, enter that channel's streaming talkgroup (for example, 100).
The original talkgroup matches the alias for its own channel only, because each channel has its own alias list. When the call is streamed, the talkgroup value is replaced with the Stream this Alias as Talkgroup value.
These guides need a Radio Reference premium subscription.
Click the Radio Reference tab, then click Login:

- Enter your Radio Reference User Name.
- Enter your Password.
- Check Store Login Credentials to log in automatically at startup. Uncheck it to remove stored credentials and be asked each time.
- Click Test Connection. A green check mark means success.
- Click OK. Your user name and subscription expiration date appear at the top of the tab.

- Click the Radio Reference tab.
- Choose a Country.
- Choose a State (optional).
- Choose a County (optional).
- Click a result tab: County/State Trunked Systems or County/State/National Agencies.

First search Radio Reference for your area.
- Click County Trunked Systems or State Trunked Systems.
- Choose a System.
- Click the System View tab.
- Select a Site.
- Review the Frequencies and Configurations choices. The defaults are usually right.
- Choose an Alias List, or click New Alias List.
- Check Go To Channel Editor to open the new channel after it is created.
- Click Create Channel Configuration. Then click Play in the channel editor to start decoding.

- Click County Trunked Systems or State Trunked Systems.
- Choose a System.
- Click the Talkgroup View tab.
- Choose the Import To Alias List. Use the alias list that your channel configuration uses.
- Click Import All Talkgroups.
- Click County Agencies, State Agencies or National Agencies.
- Select an agency.
- Select a channel frequency.
- Review the System label.
- Review the Site label.
- Review the Name label.
- Check View Channel Editor After Create to open the new channel after it is created.
- Click Create.

- On the computer with the SDR, start rtl_tcp so that it accepts network connections, for example
rtl_tcp -a 0.0.0.0 -p 1234. - In sdrtrunk's Tuners tab, click Add Network Tuner.
- Choose Type
rtl-tcp, and enter the Host, Port and an initial Frequency (Hz). - Click Add.

- In the Tuners tab, select the tuner and set its frequency to cover the channels you want.
- Click Record. The editor shows the recording file and its size. Click Record again to stop.
- Click Add Recording Tuner and select the recording file. Enter the center frequency if sdrtrunk can't read it from the file name.
- Start channels as usual. sdrtrunk uses the recording tuner for channels inside its frequency range.
See Tuners - Recording Tuners.
P25, DMR and NXDN voice need the JMBE library.
- Open View > User Preferences.
- Select Decoder > JMBE Audio Library.
- Click Create Library (if shown), and follow the prompts. sdrtrunk downloads the JMBE source code and builds the library.
- Check that Current Version and File show the new library. Restart any decoding channels.