Recipe ‐ OptiDrone
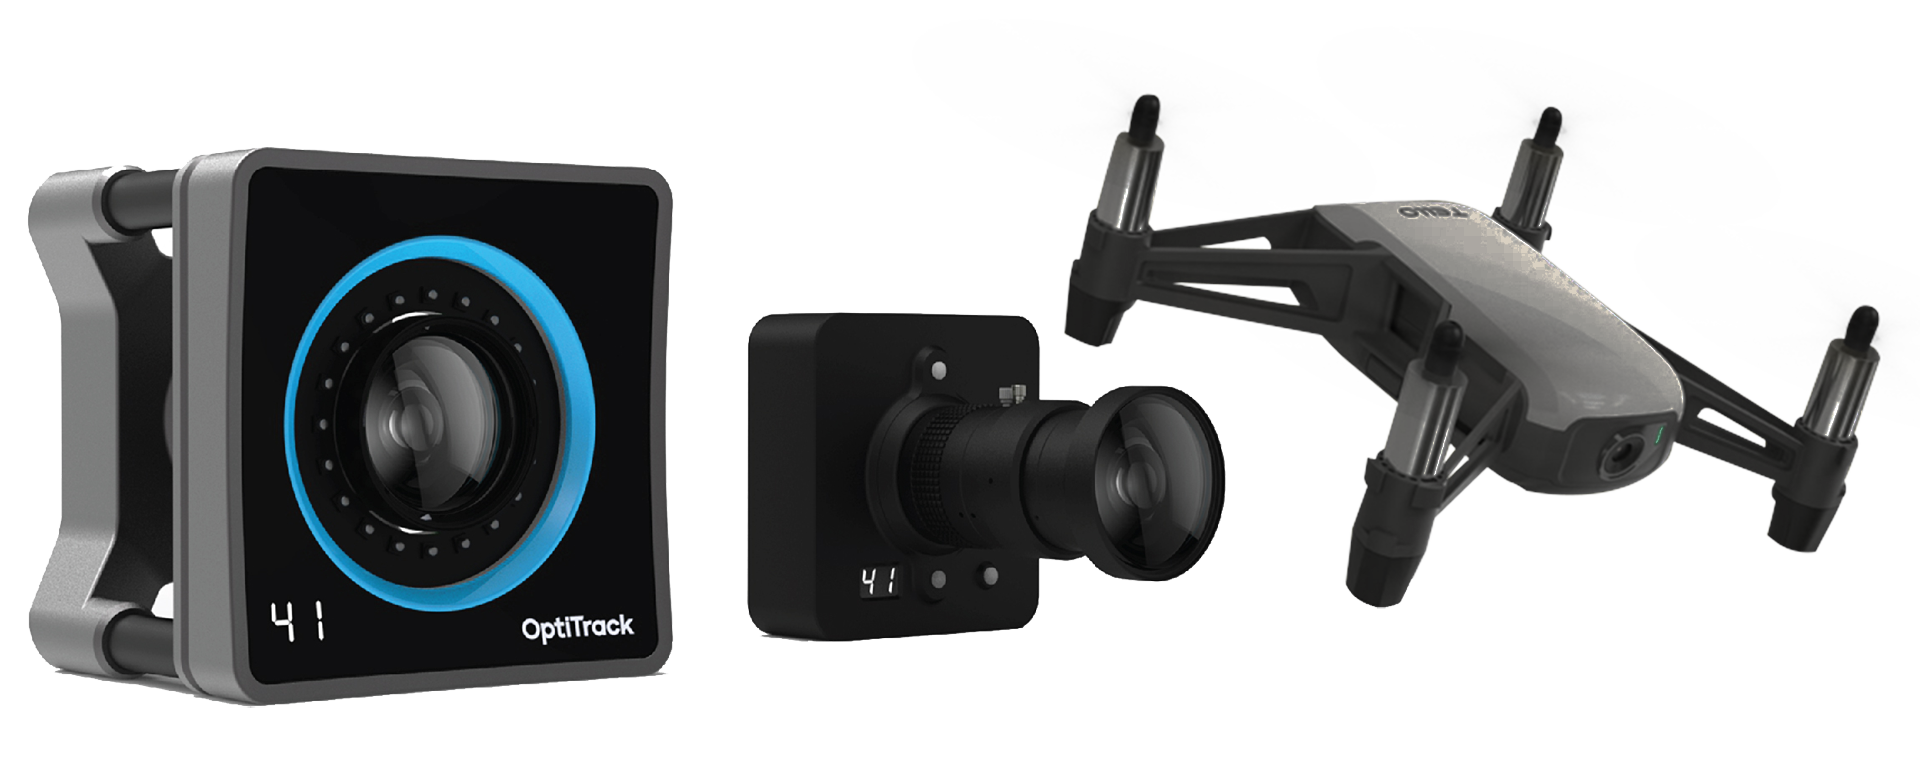
This Project aims to create a implementation of a combination of Drone-Tracking and Drone-Controlling. After the Setup has been completed, you will be able to get the accurate location of the Drone into the Unity-Scene while also sending control inputs to the Drone.
- A DJI-Tello Drone
- Multiple Batteries recommended
- Installed OptiTrack-System
- Tracking-Markers (for the Drone)
- Wand-Tool (or any other Object equipped with markers and trackable via Motive)
If two PCs are used - One running Motive + OptiTrack and the second one running Unity:
- A PC/Laptop with a dedicated LAN-Controller (available if the Laptop has a designated LAN-Port - compatibility with Adapters is not guaranteed)
- LAN Cable
- ... or any other Way of connecting to the PC, where Motive is running
- A dedicated WiFI-PCIe Network Card (no WiFi-Stick!) within the same PC/Laptop
- Alternatively: Two bridgeable WiFI-PCIe Network Cards
If Motive is running on the same PC as Unity and OptiTrack is set up and running:
- A dedicated WiFI-PCIe Network Card (no WiFi-Stick!) within the PC/Laptop running Motive
- Unity 2022.3.15f1 (other Versions may also be used -> check for compatibility with the used Plugins!)
- Motive (anyways used for OptiTrack)
- At least Windows 10 V.1511 (for Connection-Bridging if two WiFi-Cards are used)
- Unity OptiTrack-Plugin
- TelloForUnity (needs to be cloned -> described in the installation setup)
- Either use the downloaded Unity-Version or create the Project within the Unity-Hub
- The Unity-Hub is the recommended way to go and will therefore be explained in this section
- A UnityID is required to proceed. This process can be completed within the Unity-Hub or by creating a account here
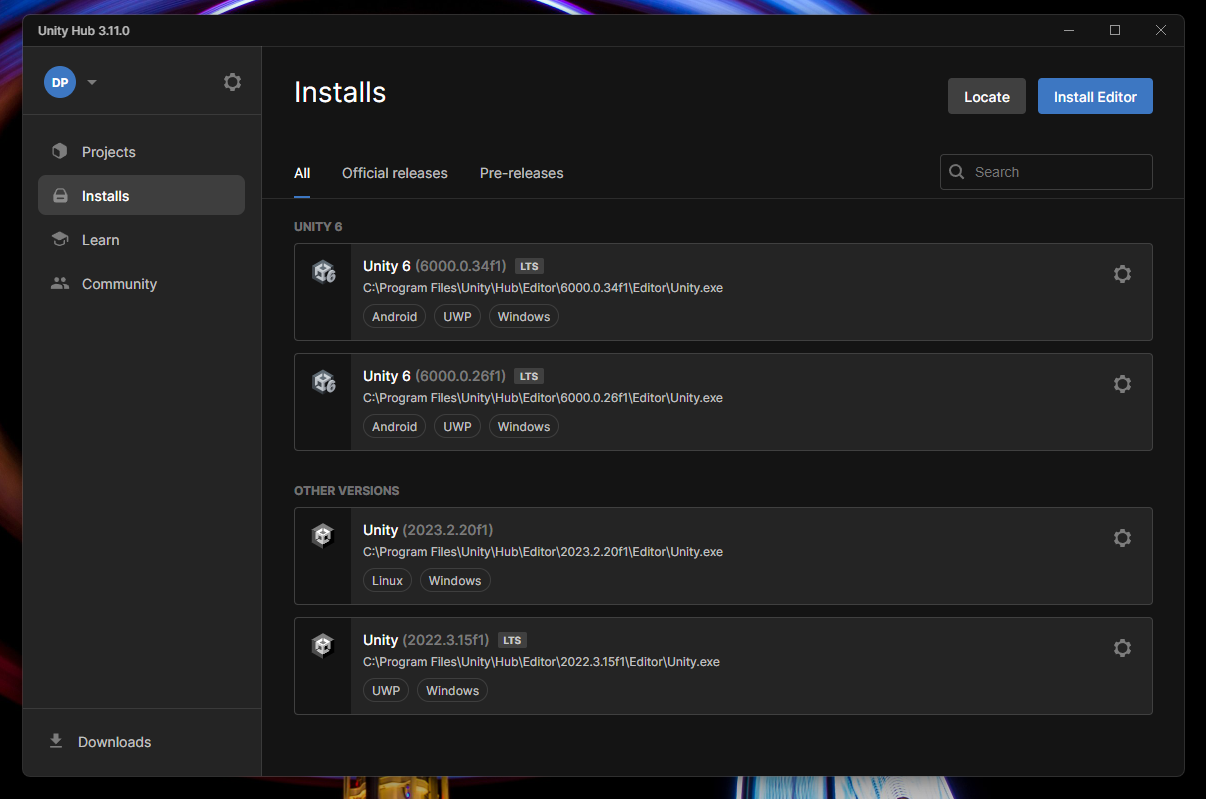
- Link the installed Editor to the Unity-Hub
- Installs -> Locate
- In most cases, the Editor is installed within the
C:\\Program Files\directory - Alternatively, the Editor can be installed through the Archive found in the Unity-Hub
- Ensure, that at least a personal License is active
- Account (arrow in the top left) -> Manage Licenses -> Add -> Get a free personal license
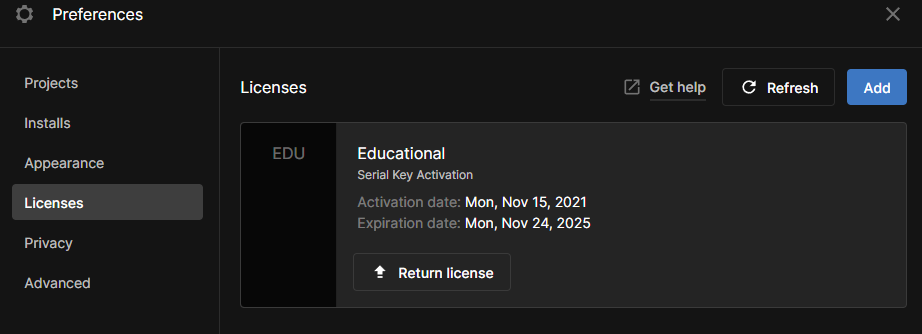
- Account (arrow in the top left) -> Manage Licenses -> Add -> Get a free personal license
- Create the new Project
- Projects -> New Project -> Select 2022.3.15f1 in the Version Selector -> Universal 3D -> Select a Name and the Location -> Create Project
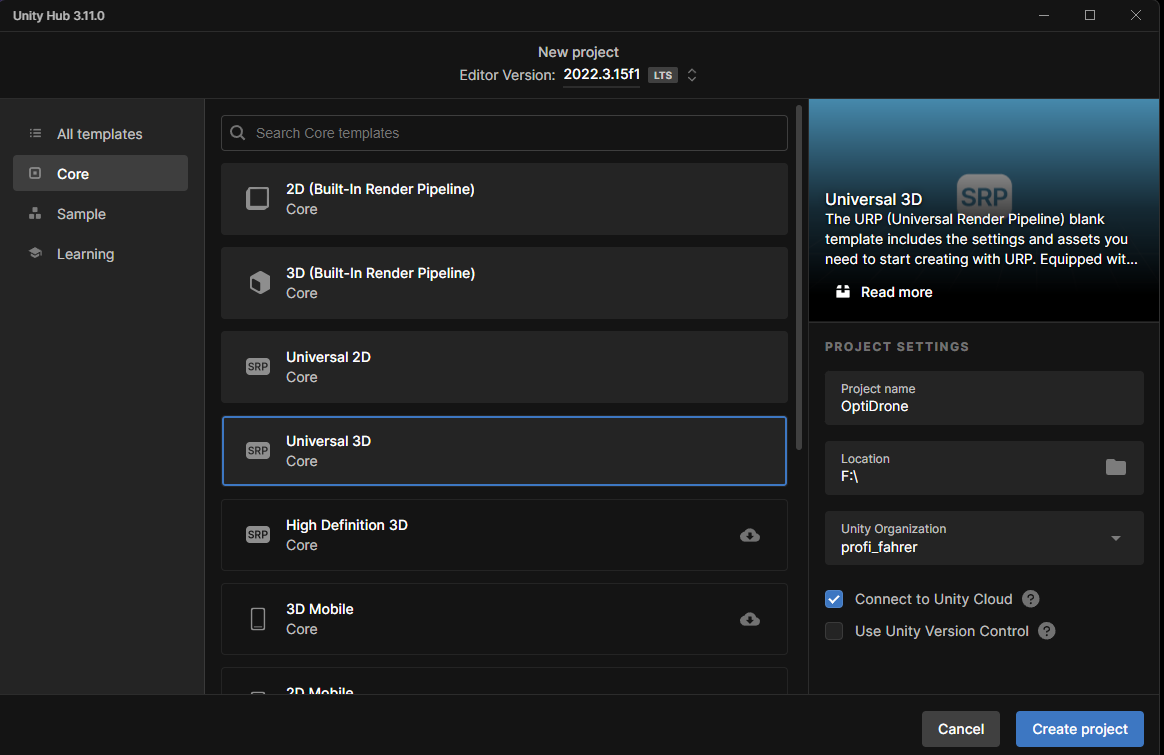
- Projects -> New Project -> Select 2022.3.15f1 in the Version Selector -> Universal 3D -> Select a Name and the Location -> Create Project
- Run the downloaded .unitypackage-File
- Ensure that only one instance of the Editor is running and that the Package Importer shows up
- Hit All and then Import
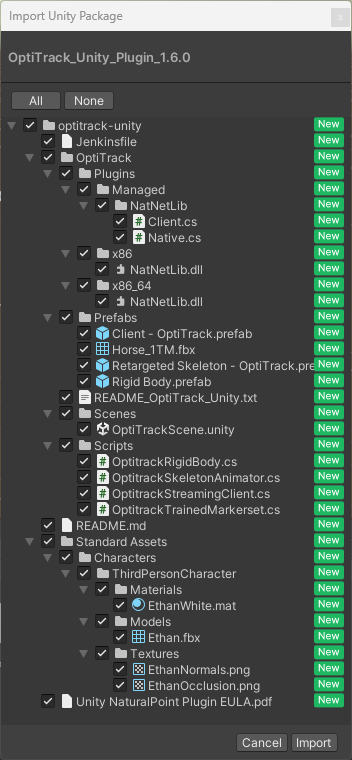
- Wait, until the Import-Process completes
- Clone the GitHub-Repo or download the Code as a ZIP-File
- Copy the Assets-Folder within
.\TelloForUnity\TelloUnityDemo\into your Project-Folder - The Console will now show an error, that the TelloLib is missing

- This is an error within GitHub, as the required folder cannot be cloned/downloaded
- To fix that, clone or download the TelloLib-Repo
- Copy the TelloLib-Folder (not the whole Repo!) into the Unity-Project
- Fix for the 'Tello' does not contain a definition for 'stopConnecting' Error
- Open the TelloController.cs-Script and change the Code in Line 101 from Tello.stopConnecting() to Tello.disconnect()
- Open the Tello.cs-Script on line 390 and make the disconnect function public
- It might be necessary to install Newtonsoft-JSON for the Project if is is not already installed as a System-Library within Windows
- Window -> Package Manager -> Plus-Icon (top left corner) -> Add package by name... -> com.unity.nuget.newtonsoft-json -> Add
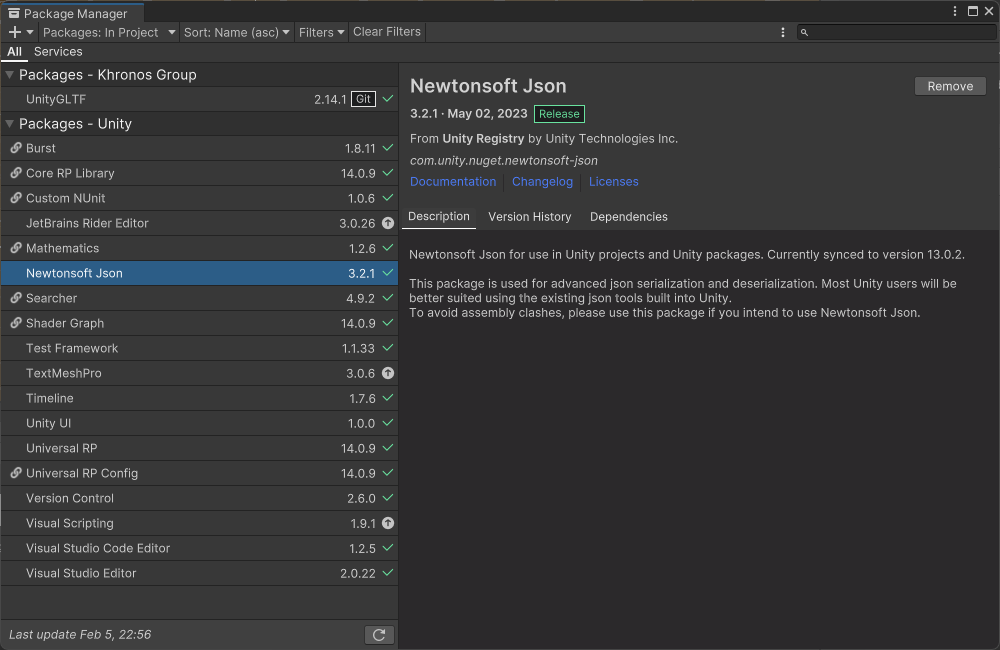
- Window -> Package Manager -> Plus-Icon (top left corner) -> Add package by name... -> com.unity.nuget.newtonsoft-json -> Add
You might want to add this Package to the Unity-Project if a custom model for the virtual Drone will be used. It is not required to proceed, as these changes will only be visual - the Code running in the background does not requre any specific RenderMesh
- Window -> Package Manager -> Plus-Icon (top left corner) -> Add package from GIT URL... -> https://github.com/KhronosGroup/UnityGLTF.git -> Add
You should now have an open 'SampleScene' without any Errors in the Console. Warnings about deprecated functions can be discarded at this time.
You can choose to create a new Scene, or to use the existing SampleScene. Visual aspects like Lighting is not important for the implementation of the project, and will for simplicity reasons therefore not be explained here.
-
Main Object for OptiTrack
- Create an empty GameObject and move it to the Origin of the Level (X=0, Y=0, Z=0)
- Suggested name: 'Origin(OptiTrack)'
- Attach the OptiTrack Streaming Client component to the GameObject
-
Settings for OptiTrack
- ServerAddress: IP of the OptiTrack-PC or localhost if Motive is running locally
- LocalAddress: IP of the own PC/Laptop for the OptiTrack Network Interface (will be described later)
- Connection Type: Unicast
- Draw Markers: Enable
- Draw Cameras: Enable
- Record on Play: Enable
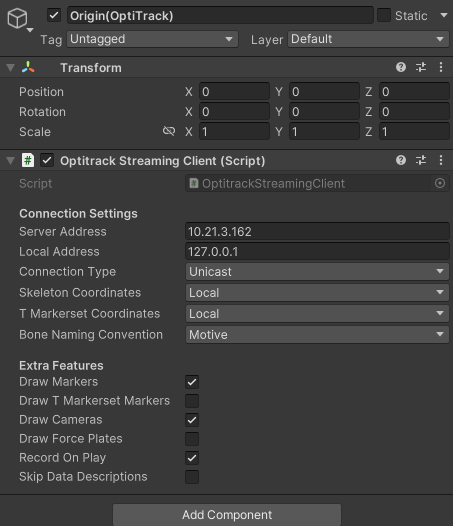
The IP-Address of the own PC/Laptop must be entered manually into the corresponding field, so that the communication between Unity and Motive can be handled. It is possible to obtain this IP automatically at every startup, but this requires the LAN Network Controller to be available for the system at any time - a typical LAN-Adapter will not register as a Network Device within Windows, so a PC/Laptop with a dedicated LAN-Port is recommended.
To implement the automatic obtainment of the IP-Address, you will have to edit the existing Script:- 'Three-Dot Menu' (top right corner of the component) -> Edit Script
- Add the following section of code to the script (e.g. before the Update-Function)
void Awake()
 {
    LocalAddress = Dns.GetHostEntry(Dns.GetHostName())
                   .AddressList.First(f => f.AddressFamily == System.Net.Sockets.AddressFamily.InterNetwork)
                   .ToString();
 }
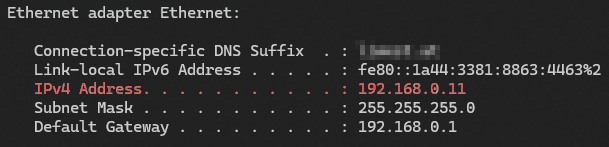
Hit Play within the Editor and check if the correct IP has been received (possible via CMD -> ipconfig /all). If yes, proceed with the next step. If no, follow the steps within the Troubleshooting-Section.
-
TelloController
- Create an empty GameObject and move it to the Origin of the Level (X=0, Y=0, Z=0)
- Attach the TelloController.cs-Script as a Component (included in the TelloLib-Repo)
using System.Collections; using System.Collections.Generic; using UnityEngine; using TelloLib; using System.Net.Sockets; using System.Net; using System.Threading; using System; public class TelloController : SingletonMonoBehaviour<TelloController> { private static bool isLoaded = false; private TelloVideoTexture telloVideoTexture; // FlipType is used for the various flips supported by the Tello. public enum FlipType { // FlipFront flips forward. FlipFront = 0, // FlipLeft flips left. FlipLeft = 1, // FlipBack flips backwards. FlipBack = 2, // FlipRight flips to the right. FlipRight = 3, // FlipForwardLeft flips forwards and to the left. FlipForwardLeft = 4, // FlipBackLeft flips backwards and to the left. FlipBackLeft = 5, // FlipBackRight flips backwards and to the right. FlipBackRight = 6, // FlipForwardRight flips forewards and to the right. FlipForwardRight = 7, }; // VideoBitRate is used to set the bit rate for the streaming video returned by the Tello. public enum VideoBitRate { // VideoBitRateAuto sets the bitrate for streaming video to auto-adjust. VideoBitRateAuto = 0, // VideoBitRate1M sets the bitrate for streaming video to 1 Mb/s. VideoBitRate1M = 1, // VideoBitRate15M sets the bitrate for streaming video to 1.5 Mb/s VideoBitRate15M = 2, // VideoBitRate2M sets the bitrate for streaming video to 2 Mb/s. VideoBitRate2M = 3, // VideoBitRate3M sets the bitrate for streaming video to 3 Mb/s. VideoBitRate3M = 4, // VideoBitRate4M sets the bitrate for streaming video to 4 Mb/s. VideoBitRate4M = 5, }; override protected void Awake() { if (!isLoaded) { DontDestroyOnLoad(this.gameObject); isLoaded = true; } base.Awake(); Tello.onConnection += Tello_onConnection; Tello.onUpdate += Tello_onUpdate; Tello.onVideoData += Tello_onVideoData; if (telloVideoTexture == null) telloVideoTexture = FindObjectOfType<TelloVideoTexture>(); } private void OnEnable() { if (telloVideoTexture == null) telloVideoTexture = FindObjectOfType<TelloVideoTexture>(); } private void Start() { if (telloVideoTexture == null) telloVideoTexture = FindObjectOfType<TelloVideoTexture>(); Tello.startConnecting(); } void OnApplicationQuit() { Tello.disconnect(); } // Update is called once per frame void Update () { if (Input.GetKeyDown(KeyCode.T)) { Tello.takeOff(); } else if (Input.GetKeyDown(KeyCode.L)) { Tello.land(); } float lx = 0f; float ly = 0f; float rx = 0f; float ry = 0f; if (Input.GetKey(KeyCode.UpArrow)) { ry = 1; } if (Input.GetKey(KeyCode.DownArrow)) { ry = -1; } if (Input.GetKey(KeyCode.RightArrow)) { rx = 1; } if (Input.GetKey(KeyCode.LeftArrow)) { rx = -1; } if (Input.GetKey(KeyCode.W)) { ly = 1; } if (Input.GetKey(KeyCode.S)) { ly = -1; } if (Input.GetKey(KeyCode.D)) { lx = 1; } if (Input.GetKey(KeyCode.A)) { lx = -1; } //Tello.controllerState.setAxis(lx, ly, rx, ry); } private void Tello_onUpdate(int cmdId) { //throw new System.NotImplementedException(); //Debug.Log("Tello_onUpdate : " + Tello.state); } private void Tello_onConnection(Tello.ConnectionState newState) { //throw new System.NotImplementedException(); //Debug.Log("Tello_onConnection : " + newState); if (newState == Tello.ConnectionState.Connected) { Tello.queryAttAngle(); Tello.setMaxHeight(50); Tello.setPicVidMode(1); // 0: picture, 1: video Tello.setVideoBitRate((int)VideoBitRate.VideoBitRateAuto); //Tello.setEV(0); Tello.requestIframe(); } } private void Tello_onVideoData(byte[] data) { //Debug.Log("Tello_onVideoData: " + data.Length); if (telloVideoTexture != null) telloVideoTexture.PutVideoData(data); } } -
Canvas for Drone Info (optional)
- Open the Master-Scene within Assets/Scenes as an additional scene (drag it into the empty space of the Hierarchy) and copy the Canvas-GameObject to the own Scene
- The Canvas will show the common instruction for manual flight, for Take Off and Landing and the current Battery SoC.
-
Recreation of the physical flying space (optional)
- You may recreate the current room, where the drone is flying for a better visual replication. I choose to simply measure the tracking area
from the origin and place a modified cube for every wall, so that it is easier to follow the virtual Drone within the space.
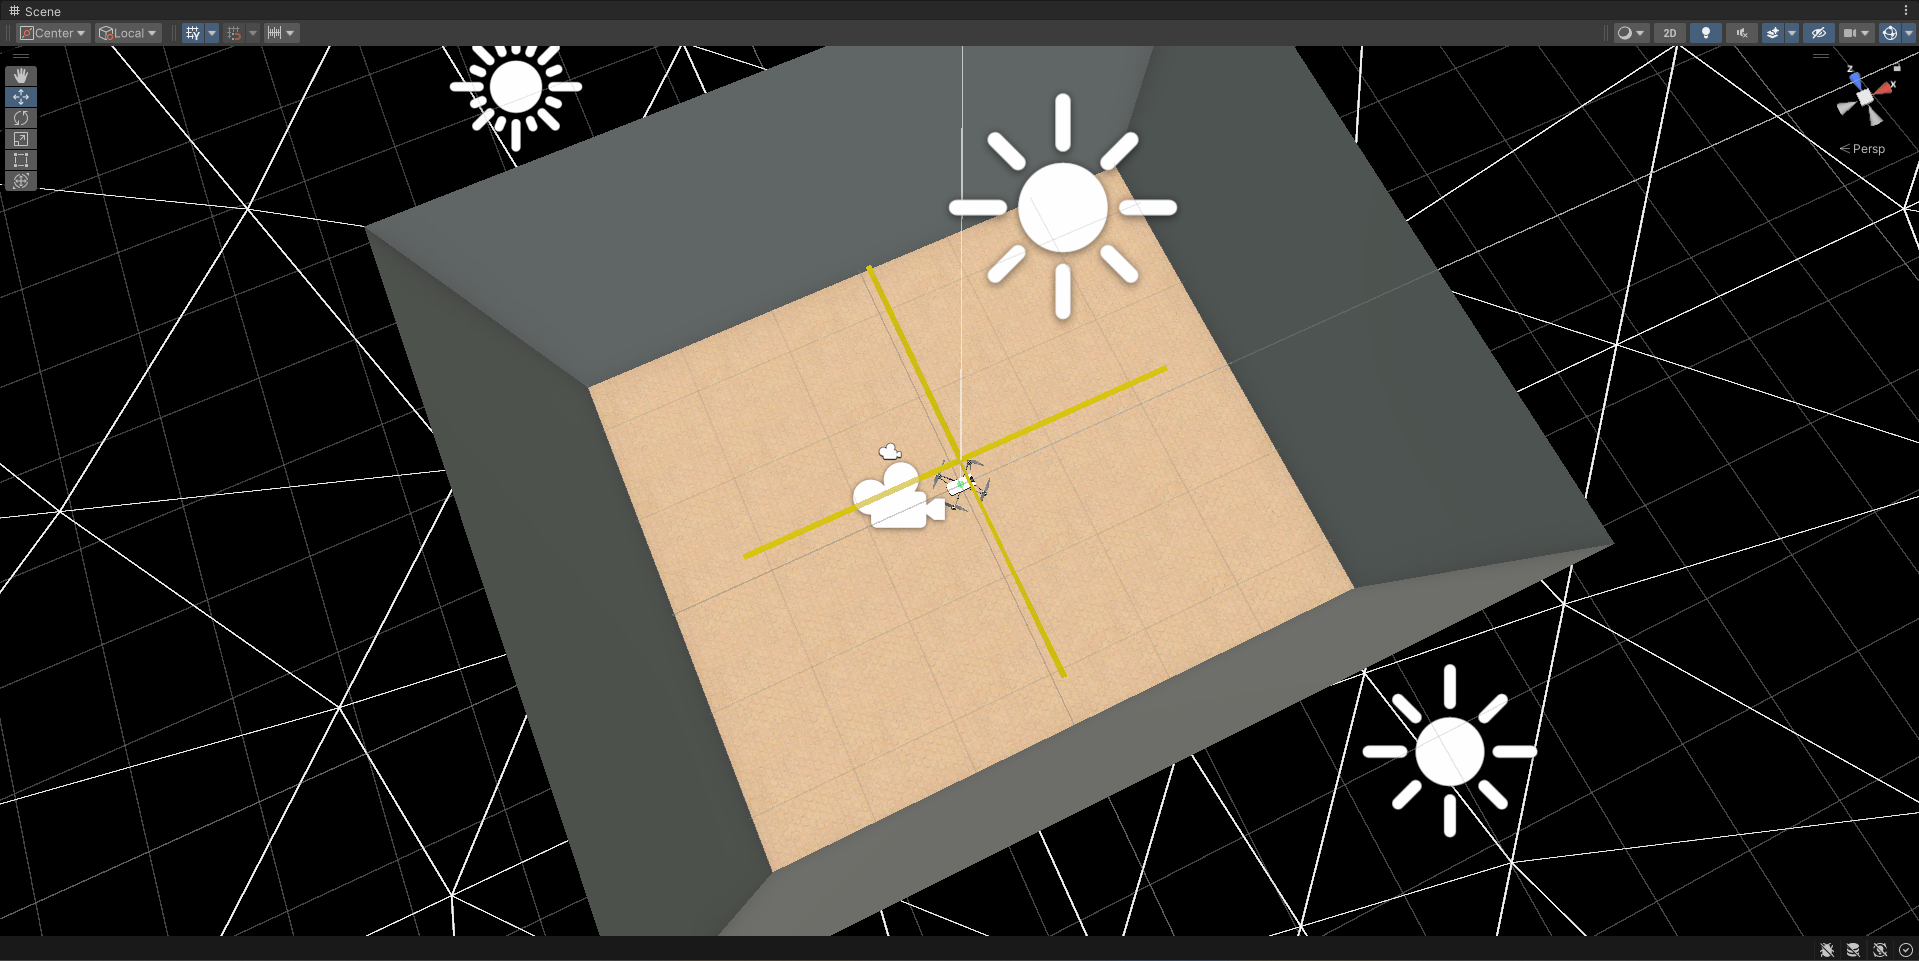
- You may recreate the current room, where the drone is flying for a better visual replication. I choose to simply measure the tracking area
from the origin and place a modified cube for every wall, so that it is easier to follow the virtual Drone within the space.
The Tello Drone requires a control input containing a total of four float values:
- Lateral movement (left/right)
- Vertical movement (up/down)
- Longitudinal movement (forward/backward)
- Rotation (left/right)
I created a custom "Flight-System", which takes the current position of the drone and the location of the target as the input. There is also the possibility of providing the target angle, but for simple tracking this field is not required.
using System.Collections;
using System.Collections.Generic;
using TelloLib;
using UnityEngine;

public class DroneMover : MonoBehaviour
{
    public (float, float, float, float) CalculateFlightMotion(Transform drone, Vector3 target, float targetAngle)
    {
        float distanceToTarget = Vector3.Distance(drone.position, target);
        Vector3 deltaPosToTarget = target - drone.position;

        deltaPosToTarget = new Vector3(deltaPosToTarget.x, 0.0f, deltaPosToTarget.z);

        float angleToTarget = Vector3.Angle(drone.transform.right, deltaPosToTarget);
        Vector3 crossAngle = Vector3.Cross(drone.transform.right, deltaPosToTarget);
        if (crossAngle.y < 0)
        {
            angleToTarget *= -1;
        }

        Debug.Log("Target | Distance: " + distanceToTarget.ToString("0.000") + "m - Angle: " + angleToTarget.ToString("000.000") + "°");

        float droneLateral = 0.0f;
        droneLateral = AllignAngleWithTarget(angleToTarget);
        float droneVertical = 0.0f;
        droneVertical = AllignHeightWithTarget(target.y, drone.position.y);

        float droneForward = 0.0f;
        float droneHorizontal = 0.0f;

        (droneForward, droneHorizontal) = MoveHorizontal(angleToTarget, distanceToTarget);

        return (droneLateral, droneVertical, droneForward, droneHorizontal);
    }

    private float AllignAngleWithTarget(float angleToTarget)
    {
        float lx = 0f;

        if (Mathf.Abs(angleToTarget) > 45.0f)
        {
            lx = angleToTarget / Mathf.Abs(angleToTarget);
        }
        else
        {
            lx = angleToTarget / 45.0f;
        }

        return lx;
    }

    private float AllignHeightWithTarget(float targetHeight, float droneHeight)
    {
        float ly = 0f;

        if (Mathf.Abs(targetHeight - droneHeight) > 1.0f) //0.1f)
        {
            ly = (targetHeight - droneHeight) / Mathf.Abs(targetHeight - droneHeight);
        }
        else
        {
            ly = targetHeight - droneHeight; //* 10.0f;
        }

        return ly;
    }

    private (float, float) MoveHorizontal(float targetAngle, float targetDistance)
    {
        float rx = 0.0f;
        float ry = 0.0f;

        rx = Mathf.Sin(targetAngle * Mathf.Deg2Rad) * targetDistance;
        ry = Mathf.Cos(targetAngle * Mathf.Deg2Rad) * targetDistance;

        if (targetAngle <= -90.0f && targetAngle >= 90.0f)
        {
            ry *= -1;
        }

        rx = Mathf.Clamp(rx, -1.0f, 1.0f);
        ry = Mathf.Clamp(ry, -1.0f, 1.0f);

        return (rx, ry);
    }
}
- Copy the code above into a new Script and name it DroneMover.cs
- Create a new empty GameObject and attach the Script to it.
The advantage of this approach is the splitting of components into the essential controls and the commands. With my (simple) implementation, the Script calculates the direct Path to the destination and sends the corresponding flight input to the drone. There are many other ways of implementing such a flight-system, which are more precise and better adapted to the Tello-Drone, but this code is more like a proof of concept and does its job anyways.
- (Optional) Copy the dji_tello.glb Drone Model from the Project Repo (provided at the end of this Wiki page) and import it to your project
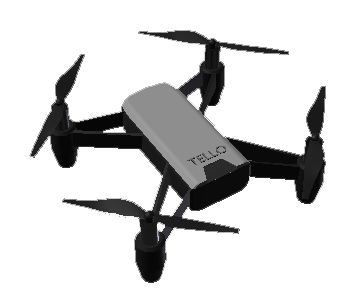
- Alternatively you may create any empty GameObject and proceed with this one - the only disadvantage is, that there won't be any visualization of the Drones position.
- Attach the OptiTrack Rigid Body Component to the Drone/GameObject
- Streaming Client: Drag the Origin(OptiTrack)-GameObject from the Hierarchy onto this field
- Rigid Body ID: 100 (recommended) -> You can choose any number, but remember is for later usage!
- (Optional) Attach the Render-Camera as a child Object so that it follows the Drone
- Launch Motive
- Do the usual calibration including the Wanding
This has to be done every time the camera position changes
- Enter the Calibration-Mode within Motive
- Ensure, that no markers are visible for any camera. You can mask any visible markers, which cannot be removed. This can also be reflections from flat surfaces, like screens and mirrors.
- Follow the Calibration-Setup
- Do the Wanding with the Wand-Tool
- Use the "Triangle" (precisely called CS-200 Calibration Square) and place it at the center of the tracking space to calibrate also the ground plane
**At this point, you may create a new DataEntry within Motive or remove the other already available Rigidbodies. This is not a requirement, but may help keeping the Scene clean and minimize the Bandwidth usage. This tutorial will assume an empty DataEntry in Motive for the next steps.
Open the Preferences within Motive and switch to the Streaming Tab
- Enable: Of course 😉
- Local Interface: Select the IP, that is in the same Subnet as your own PC (typically this will be an IP starting with
10.X.X.Xor192.168.X.X). If only one PC is used, select127.0.0.1or loopback! - Transmission Type: Unicast
- Up-Axis: Y-Axis
- Remote Trigger: Enable
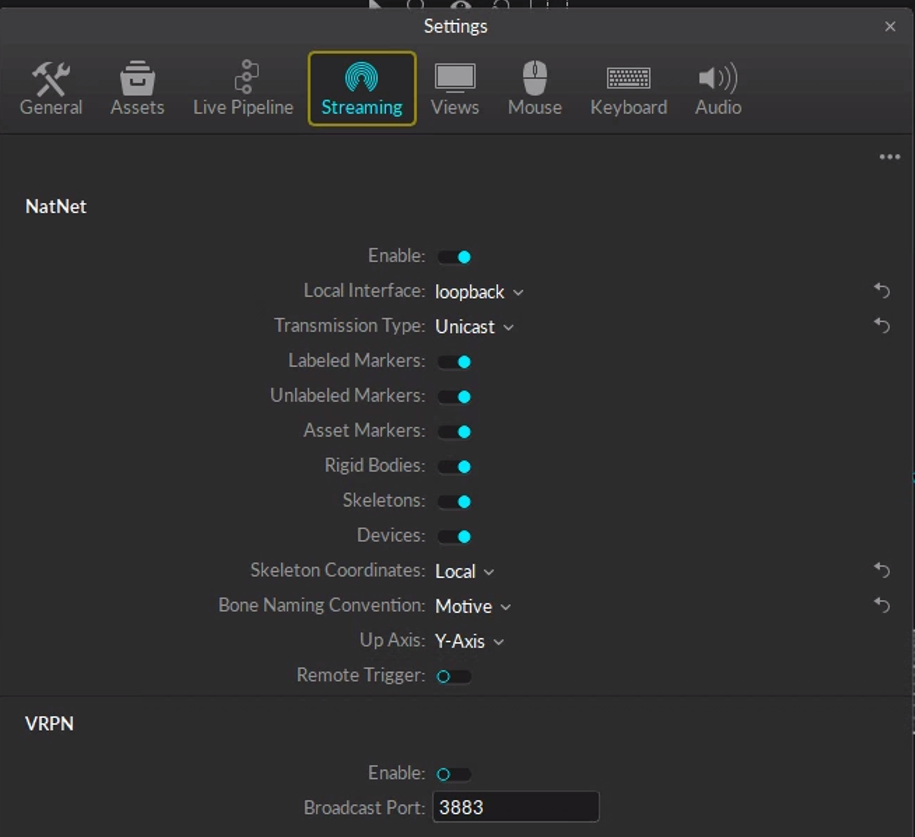 Write down the IP-Address and enter it in Unity within the Origin(OptiTrack)-GameObject (Server Address).
- Equip the Drone with some reflective tracking markers (how many, is your choice -> but ensure, that the drone can be tracked correctly at any
height below the cameras view)
Hint: As the Drone is a symmetrical object, the lateral orientation may not be captured correctly. To counteract this behavior, place another marker at the front or at the back of the Drone. The positioning of that marker is not important - simply remember it, OptiTrack will do the rest.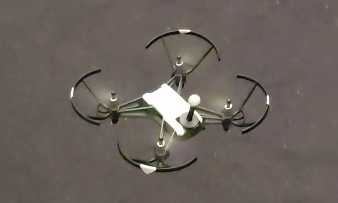
- Place the Drone at the center of the tracking space
-
Rotate the Drone so that it faces precisely in the -X direction
This step is crucial and by far the hardest for the whole Recipe as the orientation of the virtual drone has to match the physical one.
If the orientation mismatch is great enough, the Drone will always fly with a this rotation offset, multiplying with the distance flown! - Select all visible Drone-Markers (including the asymmetrical one) within Motive
- Right click -> Create Rigidbody
- In the bottom right corner, enter 100 as the StreamingID (or the previously chosen number for the Drone)
Enter the PlayMode within Unity and move the drone manually. You should see the virtual Model moving corresponding the real Drone - if any kind
of rotation offset is clearly visible, do not proceed and redo the last 5 Steps!
Do not try to fly the drone at this point, as it is not connected with the PC!
- Enable WiFi within the Windows-Settings
- Remove or disable the automatic connection to any known network
- Windows will recognize, that the Drones WiFi does not provide any connection to the Internet any may change to another WiFi.
To prevent this, keep only the Tello-WiFi in the Connection-List.
- Boot up the Drone by pressing the side button and wait for the indicator light to begin blinking.
- Connect to the Tello-WiFi
- Check with ipconfig, that you now have two active IP-Addresses, one from the LAN-Controller and one from the Drones WiFi.
If not, go to the Troubleshooting section. You only have to do this step once. - Place the Drone on any safe spot within the tracking area
- Hit Play within Unity
- Step away from the Drone
- Press and hold T for at least one Second -> the Drone will now initialize the TakeOff sequence
- Move the Drone with W,A,S,D for first testing
- Land the Drone by pressing and holding L
-
Wait until all propellers have stopped rotating while holding the land-key
Do not reach for the Drone (especially from above) until it has stopped moving! If the landing is aborted in any way, the Drone will fly back straight up to the TakeOff position again!
Now that the Drone is up and flying and even tracked by OptiTrack, it's time to give it some commands.
Simply having a trackable Drone in Unity is quite boring, so let's add some other components. Every tracked object by OptiTrack can be moved into Unity by following a few simple steps:
- Create a new empty GameObject and give it a meaningful name
- Attach a Mesh Renderer to the Object for visual output
- Attach a Mesh to the Mesh Filter
- Attach the OptiTrackRigidBody-Script to the GameObject
- Drag the StreamingClient (in our case, the Origin(OptiTrack)) onto the corresponding field
- Enter any ID and remember it
- Prepare the tracked object with some reflective markers
- Within Motive, select the tracked markers and create a new Rigidbody
- Enter the previously assigned ID as the StreamingID
 With the Attack-Mode enabled, the Drone will try to reach the target destination, which is constantly moving. This control-setup is more aggressive
than the normal DroneMover, providing about 10 Minutes of action by fleeing from the Drone (until the Battery dies)! 😆
With the Attack-Mode enabled, the Drone will try to reach the target destination, which is constantly moving. This control-setup is more aggressive
than the normal DroneMover, providing about 10 Minutes of action by fleeing from the Drone (until the Battery dies)! 😆
using System;
using System.Collections;
using System.Collections.Generic;
using TelloLib;
using UnityEngine;

public class DroneAttack : MonoBehaviour
{
    [SerializeField] private GameObject drone;
    private bool attackModeEnabled = false;

    void FixedUpdate()
    {
        if (Input.GetKeyDown(KeyCode.Space))
        {
            attackModeEnabled = !attackModeEnabled;
        }
        if (!attackModeEnabled)
        {
            return;
        }

        float distanceToTarget = Vector3.Distance(drone.transform.position, this.transform.position);
        Vector3 deltaPosToTarget = this.transform.position - drone.transform.position;

        deltaPosToTarget = new Vector3(deltaPosToTarget.x, 0.0f, deltaPosToTarget.z);

        float angleToTarget = Vector3.Angle(drone.transform.right, deltaPosToTarget);
        Vector3 crossAngle = Vector3.Cross(drone.transform.right, deltaPosToTarget);
        if (crossAngle.y < 0)
        {
            angleToTarget *= -1;
        }

        Debug.Log("Target | Distance: " + distanceToTarget.ToString("0.000") + "m - Angle: " + angleToTarget.ToString("000.000") + "°");

        float droneLateral = 0.0f;
        droneLateral = AllignAngleWithTarget(angleToTarget);
        float droneVertical = 0.0f;
        droneVertical = AllignHeightWithTarget(this.transform.position.y, drone.transform.position.y);

        float droneForward = 0.0f;
        float droneHorizontal = 0.0f;
        //droneForward = MoveForwardTowardsTarget(angleToTarget, distanceToTarget);

        (droneForward, droneHorizontal) = MoveForAttack(angleToTarget, distanceToTarget);

        ControlDrone(droneLateral, droneVertical, droneForward, droneHorizontal);
    }

    private float AllignAngleWithTarget(float angleToTarget)
    {
        float lx = 0f;

        if (Mathf.Abs(angleToTarget) > 20.0f)
        {
            lx = angleToTarget / Mathf.Abs(angleToTarget);
        }
        else
        {
            lx = angleToTarget / 20.0f;
        }

        return lx;
    }

    private float AllignHeightWithTarget(float targetHeight, float droneHeight)
    {
        float ly = 0f;
        targetHeight += 0.2f;

        if (Mathf.Abs(targetHeight - droneHeight) > 0.5f)
        {
            ly = (targetHeight - droneHeight) / Mathf.Abs(targetHeight - droneHeight);
        }
        else
        {
            ly = targetHeight - droneHeight * 2.0f;
        }

        return ly;
    }

    private float MoveForwardTowardsTarget(float angleToTarget, float distanceToTarget)
    {
        float ry = 0f;

        if (Mathf.Abs(angleToTarget) <= 20.0)
        {
            if (distanceToTarget >= 0.2f)
            {
                ry = 1.0f;
            }
            else
            {
                ry = distanceToTarget * 5.0f;
            }
        }

        return ry;
    }

    private (float, float) MoveForAttack(float targetAngle, float targetDistance)
    {
        float rx = 0.0f;
        float ry = 0.0f;

        rx = Mathf.Sin(targetAngle * Mathf.Deg2Rad);
        ry = Mathf.Cos(targetAngle * Mathf.Deg2Rad);

        if (targetAngle < 0.0f)
        {
            //rx *= -1;
        }
        if (targetAngle <= -90.0f && targetAngle >= 90.0f)
        {
            ry *= -1;
        }

        //rx *= targetDistance;
        //ry *= targetDistance;

        rx = Mathf.Clamp(rx, -1.0f, 1.0f);
        ry = Mathf.Clamp(ry, -1.0f, 1.0f);

        return (rx, ry);
    }

    private void ControlDrone(float droneLateral, float droneVertical, float droneHorizontal, float droneForward)
    {
        Debug.Log("RX: " + droneHorizontal + " | RY: " + droneForward);

        Tello.controllerState.setAxis(droneLateral, droneVertical, droneHorizontal, droneForward);

        if (Tello.controllerState.speed != 1)
        {
            Tello.controllerState.setSpeedMode(1);
        }
    }
}
- Copy the Code listed above and create a new Script
- Attach the Script to the tracked target as a component
- Start the PlayMode
- Press T for TakeOff
- Get yourself ready and hit the Spacebar!
To stop the Drone:
- Hit Space again or
- ... press and hold L
- ... wait until the Battery runs out of charge 😉
 In this mode, you can draw any flight route within the tracking area by moving the tracked GameObject. The Drone will fly according to that path
in a loop until the mode is exited.
In this mode, you can draw any flight route within the tracking area by moving the tracked GameObject. The Drone will fly according to that path
in a loop until the mode is exited.
using System.Collections;
using System.Collections.Generic;
using TelloLib;
using UnityEngine;

public class DroneFlightPath : MonoBehaviour
{
    private bool drawPath;
    private bool flyPath;
    private Vector3 nextWaypoint;
    private LineRenderer flightPath;

    private List<Vector3> flightPathAngles;

    [SerializeField] private Transform drone;

    private DroneMover droneMover;
    [SerializeField] private GameObject target;

    IEnumerator drawCoroutine;
    IEnumerator flyCoroutine;

    void Start()
    {
        flightPath = GameObject.Find("FlightPath").GetComponent<LineRenderer>();
        flightPathAngles = new List<Vector3>();

        droneMover = GameObject.Find("DroneMover").GetComponent<DroneMover>();

        drawCoroutine = DrawFlightPath();
        flyCoroutine = FollowFlightPath();
    }

    void Update()
    {
        if (Input.GetKeyDown(KeyCode.O))
        {
            StartCoroutine(flyCoroutine);
        }

        if (Input.GetKeyDown(KeyCode.P) && !drawPath && !flyPath)
        {
            drawPath = true;
            flyPath = false;
            StartCoroutine(drawCoroutine);
        }
        else if ((Input.GetKeyDown(KeyCode.P) && drawPath && !flyPath))
        {
            target.SetActive(true);
            drawPath = false;
            flyPath = true;
            StopCoroutine(drawCoroutine);
            StartCoroutine(flyCoroutine);
        }
        else if ((Input.GetKeyDown(KeyCode.P) && !drawPath && flyPath))
        {
            target.SetActive(false);
            drawPath = false;
            flyPath = false;
            StopCoroutine(flyCoroutine);
            drawCoroutine = DrawFlightPath();
            flyCoroutine = FollowFlightPath();
        }
    }

    private IEnumerator DrawFlightPath()
    {
        flightPath.positionCount = 0;
        flightPathAngles = new List<Vector3>();

        while (true)
        {
            flightPath.positionCount += 1;
            flightPath.SetPosition(flightPath.positionCount - 1, this.transform.position);
            flightPathAngles.Add(this.transform.right);
            yield return new WaitForSecondsRealtime(0.5f);
        }
    }

    private IEnumerator FollowFlightPath()
    {
        nextWaypoint = flightPath.GetPosition(0);
        int currentWaypoint = 0;
        Tello.takeOff();

        while (true)
        {
            target.transform.SetPositionAndRotation(nextWaypoint, Quaternion.identity);

            while (Vector3.Distance(drone.position, nextWaypoint) > 0.33f)
            {
                float lx, ly, rx, ry;
                (lx, ly, rx, ry) = droneMover.CalculateFlightMotion(drone, nextWaypoint, 0.0f);
                //rx = AllignAngleToTarget(drone, flightPathAngles[currentWaypoint]);
                if (Vector3.Distance(drone.position, nextWaypoint) < 0.5f)
                {
                    lx = 0.0f;
                }

                Tello.controllerState.setAxis(lx, ly, rx, ry);
                //Tello.controllerState.setSpeedMode(2);
                yield return new WaitForSecondsRealtime(0.1f);
            }

            if (currentWaypoint < flightPath.positionCount - 1)
            {
                currentWaypoint++;
            }
            else
            {
                currentWaypoint = 0;
            }
            nextWaypoint = flightPath.GetPosition(currentWaypoint);
        }
    }

    private float AllignAngleToTarget(Transform drone, Vector3 targetAngle)
    {
        float angleToTarget = Vector3.Angle(drone.transform.right, targetAngle);
        float lx = 0.0f;

        Vector3 crossAngle = Vector3.Cross(drone.transform.right, targetAngle);
        if (crossAngle.y < 0)
        {
            angleToTarget *= -1;
        }

        if (Mathf.Abs(angleToTarget) > 20.0f)
        {
            lx = angleToTarget / Mathf.Abs(angleToTarget);
        }
        else
        {
            lx = angleToTarget / 20.0f;
        }

        return lx;
    }
}
- A tracked GameObject for creating the flight path (follow the General Setup for instructions)
- A GameObject called FlightPath with a attached LineRenderer
- Copy the code above and create a script
- Attach the Script to the flight path creation tool
- Create another empty GameObject (e.g. a small sphere) and attach it on the Target-Field (as the name suggests, this will be the visual indication of the next waypoint)
- Again, boot up the Drone and connect to the Tello-WiFi
Do not press T for TakeOff this time! - Press P to begin with the flight path tracking

- Move the tracked object to create the path
- Step away from the Drone and hit P again
- Observe the Drone replicating the flight path
To stop the Drone:
- Press P again
- Press and hold L
If the Drone is stopped you may...
- ... create a new Path by pressing P again
- ... resume on the old path by pressing O
Extending this Project is quite simple as it only requires two steps:
- Adding a new tracked object into Unity
- Writing custom code for the flight controls
Some possible extensions would be a KeepDistance-Mode, a Flee-Mode or a combination of all already existing Modes together. Feel free to try out the available Project and experiment a bit with the combination of Drone-Flying and OptiTrack!
 There is also the possibility to track a skeleton instead of a simple Rigidbody. There is no additional Work to do within Unity, you simply have
to attach the OptitrackSkeletonAnimator-Script to the GameObject.
There is also the possibility to track a skeleton instead of a simple Rigidbody. There is no additional Work to do within Unity, you simply have
to attach the OptitrackSkeletonAnimator-Script to the GameObject.
For simplicity, it is recommended to simply use the skeleton Prefab available within .\Assets\optitrack-unity\OptiTrack\Prefabs\
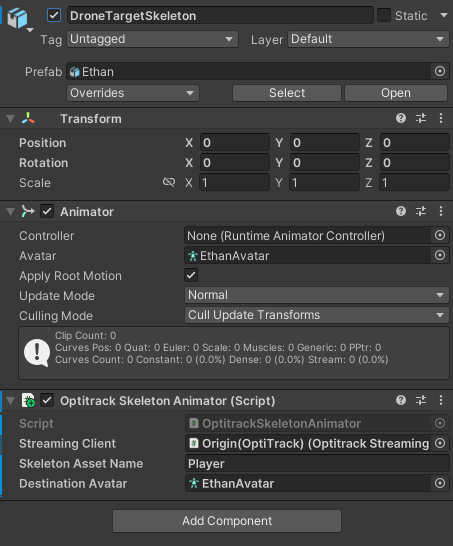
In Motive it is necessary to create a new trackable skeleton, so put on the Motion-Suit! 😃
After that, follow the steps for Skeleton-Creation within Motive or simply select all of the tracked Markers and put them into a Skeleton. The
first way might be easier, as you will get visual information from Motive which markers are at the correct place and which ones are not trackable.
When the Skeleton has been created, name it, so you can get the data in Unity. That's now, where the only difference comes in - you don't have to
assign an ID, but a name.
At the end, simply assign the wanted Script to any body part and maybe do not connect the Attack-Script with the head of the Skeleton! 😉
 You may have noticed, that the Drone is not able to stay near the ground by itself and landing can be a quite tedious process. This is
because of a built-in mechanism preventing the Drone from hitting any stationary (thin) object, placed on the floor. This can be used as a
safety-mechanism, especially, when tracking a Skeleton with the Attack-Mode. Simply lay on the ground with the chest down and wait until the Drone
begins circling above the target - then move away in one quick motion as the drone will need some time, to begin attacking again.
You may have noticed, that the Drone is not able to stay near the ground by itself and landing can be a quite tedious process. This is
because of a built-in mechanism preventing the Drone from hitting any stationary (thin) object, placed on the floor. This can be used as a
safety-mechanism, especially, when tracking a Skeleton with the Attack-Mode. Simply lay on the ground with the chest down and wait until the Drone
begins circling above the target - then move away in one quick motion as the drone will need some time, to begin attacking again.
... or simply hit the Drone with the leg/hand -> not really the way to go, but better than being injured by the propellers.
Any problems? This section is here to help!
Very important: Check if Motive is frozen! (Look at the Timer at the bottom of the Window)
-
Motive works flawlessly:
... then it's a simple Bug in Unity. Restart the Editor and try it again. -
Motive is also not responding:
... DO NOT EXIT UNITY AT THIS POINT OR DISCONNECT THE PC FROM THE LAN-NETWORK! If you do so, you will have to recalibrate the whole OptiTrack System, including Wanding, etc. - and if you didn't reset the network interface at the PC running Motive, you can do that again,
as the connection to Unity never has been closed by Windows!
... try to close Motive! Use the whole Windows-Arsenal, including the Task-Manager andtaskkillif necessary!
There is a critical Bug somewhere located in the Code of the Motive-Service, which is running in the Background and manages the connection to the cameras. Unity might seem not responding, but it is awaiting data from Motive. If now Motive is able to continue within its Code (e.g. by closing Unity), it will throw an Exception and delete the calibration data a a safety-mechanism, but without restarting the OptiTrack-Service. If the process gets interrupted by stopping Motive first, nothing critical will happen and Unity will receive the Data right after restarting Motive again.
It might be necessary to bridge the two connections together. But at first, ensure, that the PC is connecting only to the Tello-WiFi and not to
any other one providing an internet connection! If the bridging is done too early ... congratulations! You've now created a big "Infinity"-Loop
in any Domain-Network including alerting every IT-Admin responsible for the infrastructure.
Check also, if you have any virtual Network-Card installed, like Hyper-V or Wireguard.
No and no? Then, let's bridge the connections together!
-
Open the old control panel in Windows
-
Network and Internet -> Network and Sharing Center
-
Change adapter settings
-
Both select the WiFi and the LAN-Interface (or both WiFi-Networks
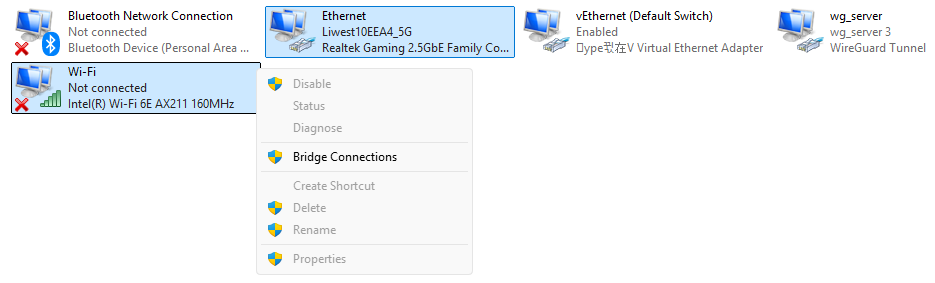
-
Right click -> Bridge Connections
-
You will now see a new Network Interface -> Remember removing the Bridge before changing the WiFi or you won't have any Internet-Connection
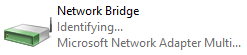
-
Try connecting to the WiFi again -> Windows will show the LAN-Interface as disconnected, but it is available via the Bridge
That's a safety-mechanism -> simply reboot the Drone, connect to the WiFi and hit T to trigger TakeOff!
Sadly, that's a limitation of the Drones capabilities in small spaces if the FlyMode is set to fast. There is a latency from tracking the Drone via OptiTrack, sending the Data to Unity, proceeding them and sending the flight commands to the Tello-Drone. This, combined with the unstable motion within small areas, makes the Drone to always "overshoot" the target.
Recalibrate the Drone within Motive by placing it in the center of the tracking space, facing the X-Axis as precise as possible!
Is the WiFi disconnected? If yes, the Drone continues with the last received command and will therefore crash at any point. If no, check if the Unity Window is in "focus" for the Keyboard-Input.
This can be the result of two conditions. Either, a motor has overheated and needs to cool down or the Drone is not able to spin up the propellers at a constant rate. In both cases, you may hold down the L key and the Drone should spin down slowly. Then, check the Drone and the propellers for any damage.
The Battery is almost empty. Either land the Drone or brace for impact after a few minutes!
Recalibrate the cameras! The position of some cameras has been changed since the last calibration.
Get the current state of the Project from here
Videos created with kind help from Luca Geiger 😄