Dexter Setup
When removing a Dexter from it's shipping / storage case, please be very careful to rotate each joint in the correct direction to unfold the arm. This direction should be obvious for the base (joint1) and joints 2 and 3, but joints 4 and 5 can be rotated in the wrong direction and end up 360 degrees from the correct place. Pictures placed in the case when a new Dexter is sent out will indicate the correct directions, but you can also figure them out by looking at what the tool interface will run into as it's rotated. Just make sure the wires don't get wrapped up.
The standard Dexter base is NOT intended to be perfectly stable. It must be mounted to a stable surface by gluing, screwing, or clamping the legs down.
- If the surface has a lip, you can clamp 2 or 3 of the feet down.

- For wooden, metal, or other surfaces which can have holes, screw or bolt the feet down.

- For a flat, inviolate surface like steel, marble, cement, etc... use large amounts of hot glue injected up into the "foot"

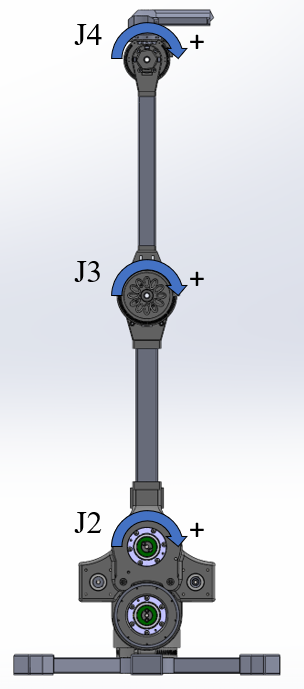
Before powering on Dexter, position each joint at a known position. The default position is with all the joints vertical, and the tool interface (the last segment) pointed to the right when facing the joints, as shown here:
Plug in the power cord to fire up your Dexter robot. Wait for the "boot dance" to complete (if it's enabled). Continue to connect to Dexter.