Tutorial Data Import 101
As a developer of an application, you may need to send data to the Intelligence Suite in batches from external data stores like IBM Cloud Object Store (COS). In this exercise, you will learn how to write a rule to programmatically import events from a Cloud Object Store bucket into your Intelligence Suite organization, and then query those events in the Intelligence Suite as you did in Tutorial-Query-102.
At the end of this tutorial, you will have learned:
- How to create an Import rule that looks for object upsert events in COS files and imports the data to the Intelligence Suite as
BusinessObjectEvents. - Verify the data was imported from COS by running an Intelligence Suite GraphQL query.
(Some of these APIs will likely have public APIs at a later date)
- Before you start, you should make sure you get and Upload your COS credentials. Make note of your the
secretNameyou used when uploading theapikeyto your Intelligence Suite tenant configuration, as you will need it below in your import rule. Also make note of your COSinstanceid, as you will need this value below as well. - Before you start, retrieve the private endpoint and region for your COS bucket. Also make note of your bucket's name.
- Tutorial-Query-102 for verifying the data imported.
- Tutorial-Query-106 for learning how to query for error events.
- Read through how to add JWT-Authentication to your HTTP requests to Intelligence Suite REST and Graph APIs, and be sure to pass this auth header in each API in this tutorial. NOTE: If you fail to pass this auth header you will get a 401 from the Intelligence Suite APIs.
- Using an HTTP tool such as Postman set the url to
https://api.ibm.com/infohub/run/metadata/api/v1/na/data/import/rules - Set the method to POST
Content-Type: application/json- Set the request's Body to the following content:
NOTE: Fill in the secretName below that you uploaded to the Intelligence Suite during the 'upload your COS credentials' prerequisite step. Also fill in an appropriate endpoint, bucketName, instanceId and bucketRegion for your COS bucket. You should have made note of this information during this prerequisite step. Make sure to use the private endpoint for your COS bucket. You can optionally include a prefixName.
{
  "name": "My first COS bulk import rule",
  "tenantId": "{{YOUR TENANT ID HERE}}",
  "instructions": {
    "source": {
      "sourceType": "COS",
      "COS": {
        "bucketName": "{{YOUR BUCKET NAME HERE}}",
        "prefixName": "{{YOUR PREFIX NAME HERE}}",
        "endpoint": "{{YOUR COS PRIVATE END POINT HERE}}",
        "instanceId": "{{YOUR COS INSTANCE ID HERE!}}",
        "bucketRegion": "{{YOUR COS BUCKET LOCATION HERE}}",
        "secretName": "{{YOUR SECRET NAME HERE}}"
      }
    },
    "routeTo": {
      "destinationType": "streamingIngest",
      "streamingIngest": {
        "priority": "1"
      }
    }
  }
}
_Note: If a private endpoint is not used you will get the following rule loading error. Should you see this error message, edit your import rule and update the endpoint to use a private endpoint:
"status": {
    "code": "loading_error",
    "details": "Version 1.0 of this rule was not able to be loaded due to the following error: Failed to get list of unprocessed objects due to Client execution did not complete before the specified timeout configuration."
  }
- Using an HTTP tool such as Postman set the URL to
https://api.ibm.com/infohub/run/metadata/api/v1/na/data/import/rules/{{YOUR RULE ID HERE}}/status - Set the method to GET
- The new rule's status will be returned to you as follows:
{
    "code": "loading",
    "details": "Version 1.0 of this rule is in the process of being loaded. It will not start processing until it is finished loading"
}
- After roughly 30 seconds issue the GET call again until the new rule's status returns the following:
{
    "code": "live",
    "details": "Version 1.0 of this rule is live and processing"
}
- The file must contain individual events in JSON format, with each event on a new line.
- The name of the file may not contain any of these characters:
/\":'?<>&*| - The file can be in a compressed format (only gzip is supported), the file name should end with
.gzor.gzip - All the events in each uploaded file is assigned an unique batchId, which can be used to query the events or objects through the
batchTraceIdattribute in simple filter as shown in the query. - Below are some sample events. Place these in a file and edit the tenantIds appropriately. Alternatively you can remove the tenantIds from each event and specify a tag for the tenantId. (Do not format/prettify the JSON body). If you specified a prefixName in your rule (eg 'importdemo' in the sample above), be sure to upload it with that prefix:
{"eventCode":"objectUpsertEvent", "tenantId":"087c8b15-c0df-48e1-ae0b-b991aa8d1bf3", "timestampEventOccurred":"2021-03-22T03:49:11.024Z", "eventDetails":{ "businessObject":{ "type":"Product", "globalIdentifiers":[ { "name":"import_test_product_id", "value":"testProductIdABC123" } ], "name": "testProductABC1231", "partNumber": "testPartNumberABC1231", "value": 100000, "valueCurrency": "USD", "category": { "globalIdentifiers":[ { "name":"import_test_category_id", "value":"testCategoryIDABC123" } ] } } }}
{"eventCode":"objectUpsertEvent", "tenantId":"087c8b15-c0df-48e1-ae0b-b991aa8d1bf3", "timestampEventOccurred":"2021-03-22T03:49:11.024Z", "eventDetails":{ "businessObject":{ "type":"Catalog", "globalIdentifiers":[ { "name":"import_test_category_id", "value":"testCategoryIdABC123" } ], "name": "testCategoryABC123", "code": "testCodeABC123", "value": 100000 } }}
NOTE: The following is the min requirements for an event:
{
   "eventCode":"objectUpsertEvent",
   "tenantId":"xxxxxx-xxxx-xxxx-xxxxxxxxxx",
   "eventDetails":{
      "businessObject":{
         "type":"Xxxxxxxxx", //valid Intelligence Suite Object type; eg DemandPlan
         "globalIdentifiers":[
            {
               "name":"xxxxxxx",
               "value":"yyyyyy"
            }
         ]
      }
   }
}
- NOTE: If you planned to use a
prefixNamedo not add the prefix name to the name of the file that you will upload. The COS UI will escape the backslash and your import will not proceed as expected. Instead, there is a text box entry in which you can specify the prefix in the 'Upload' COS UI.
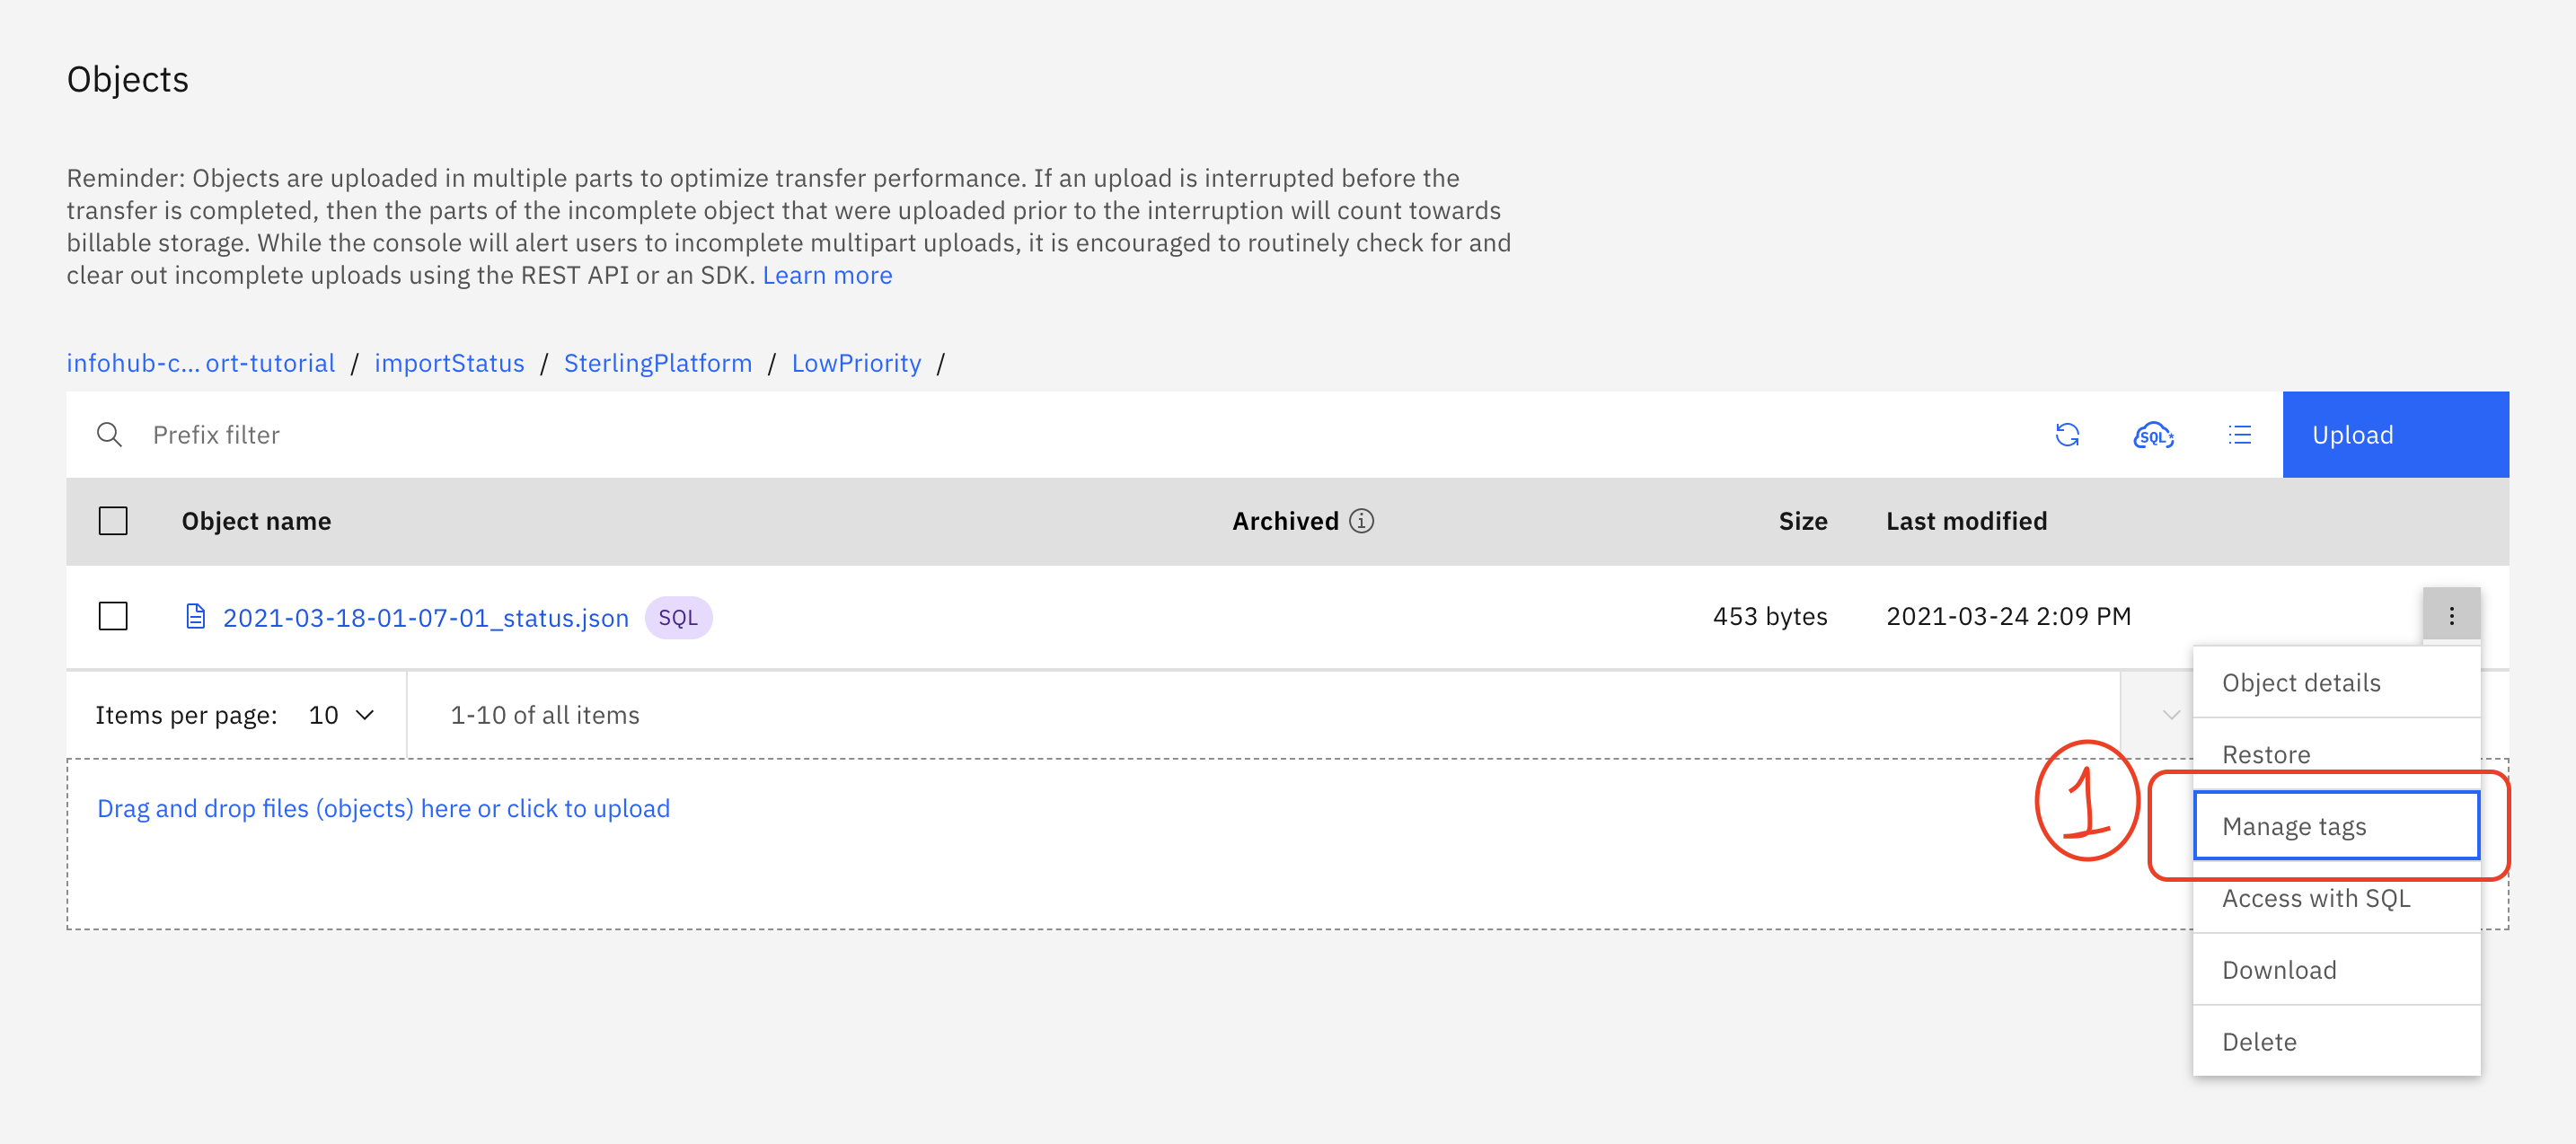
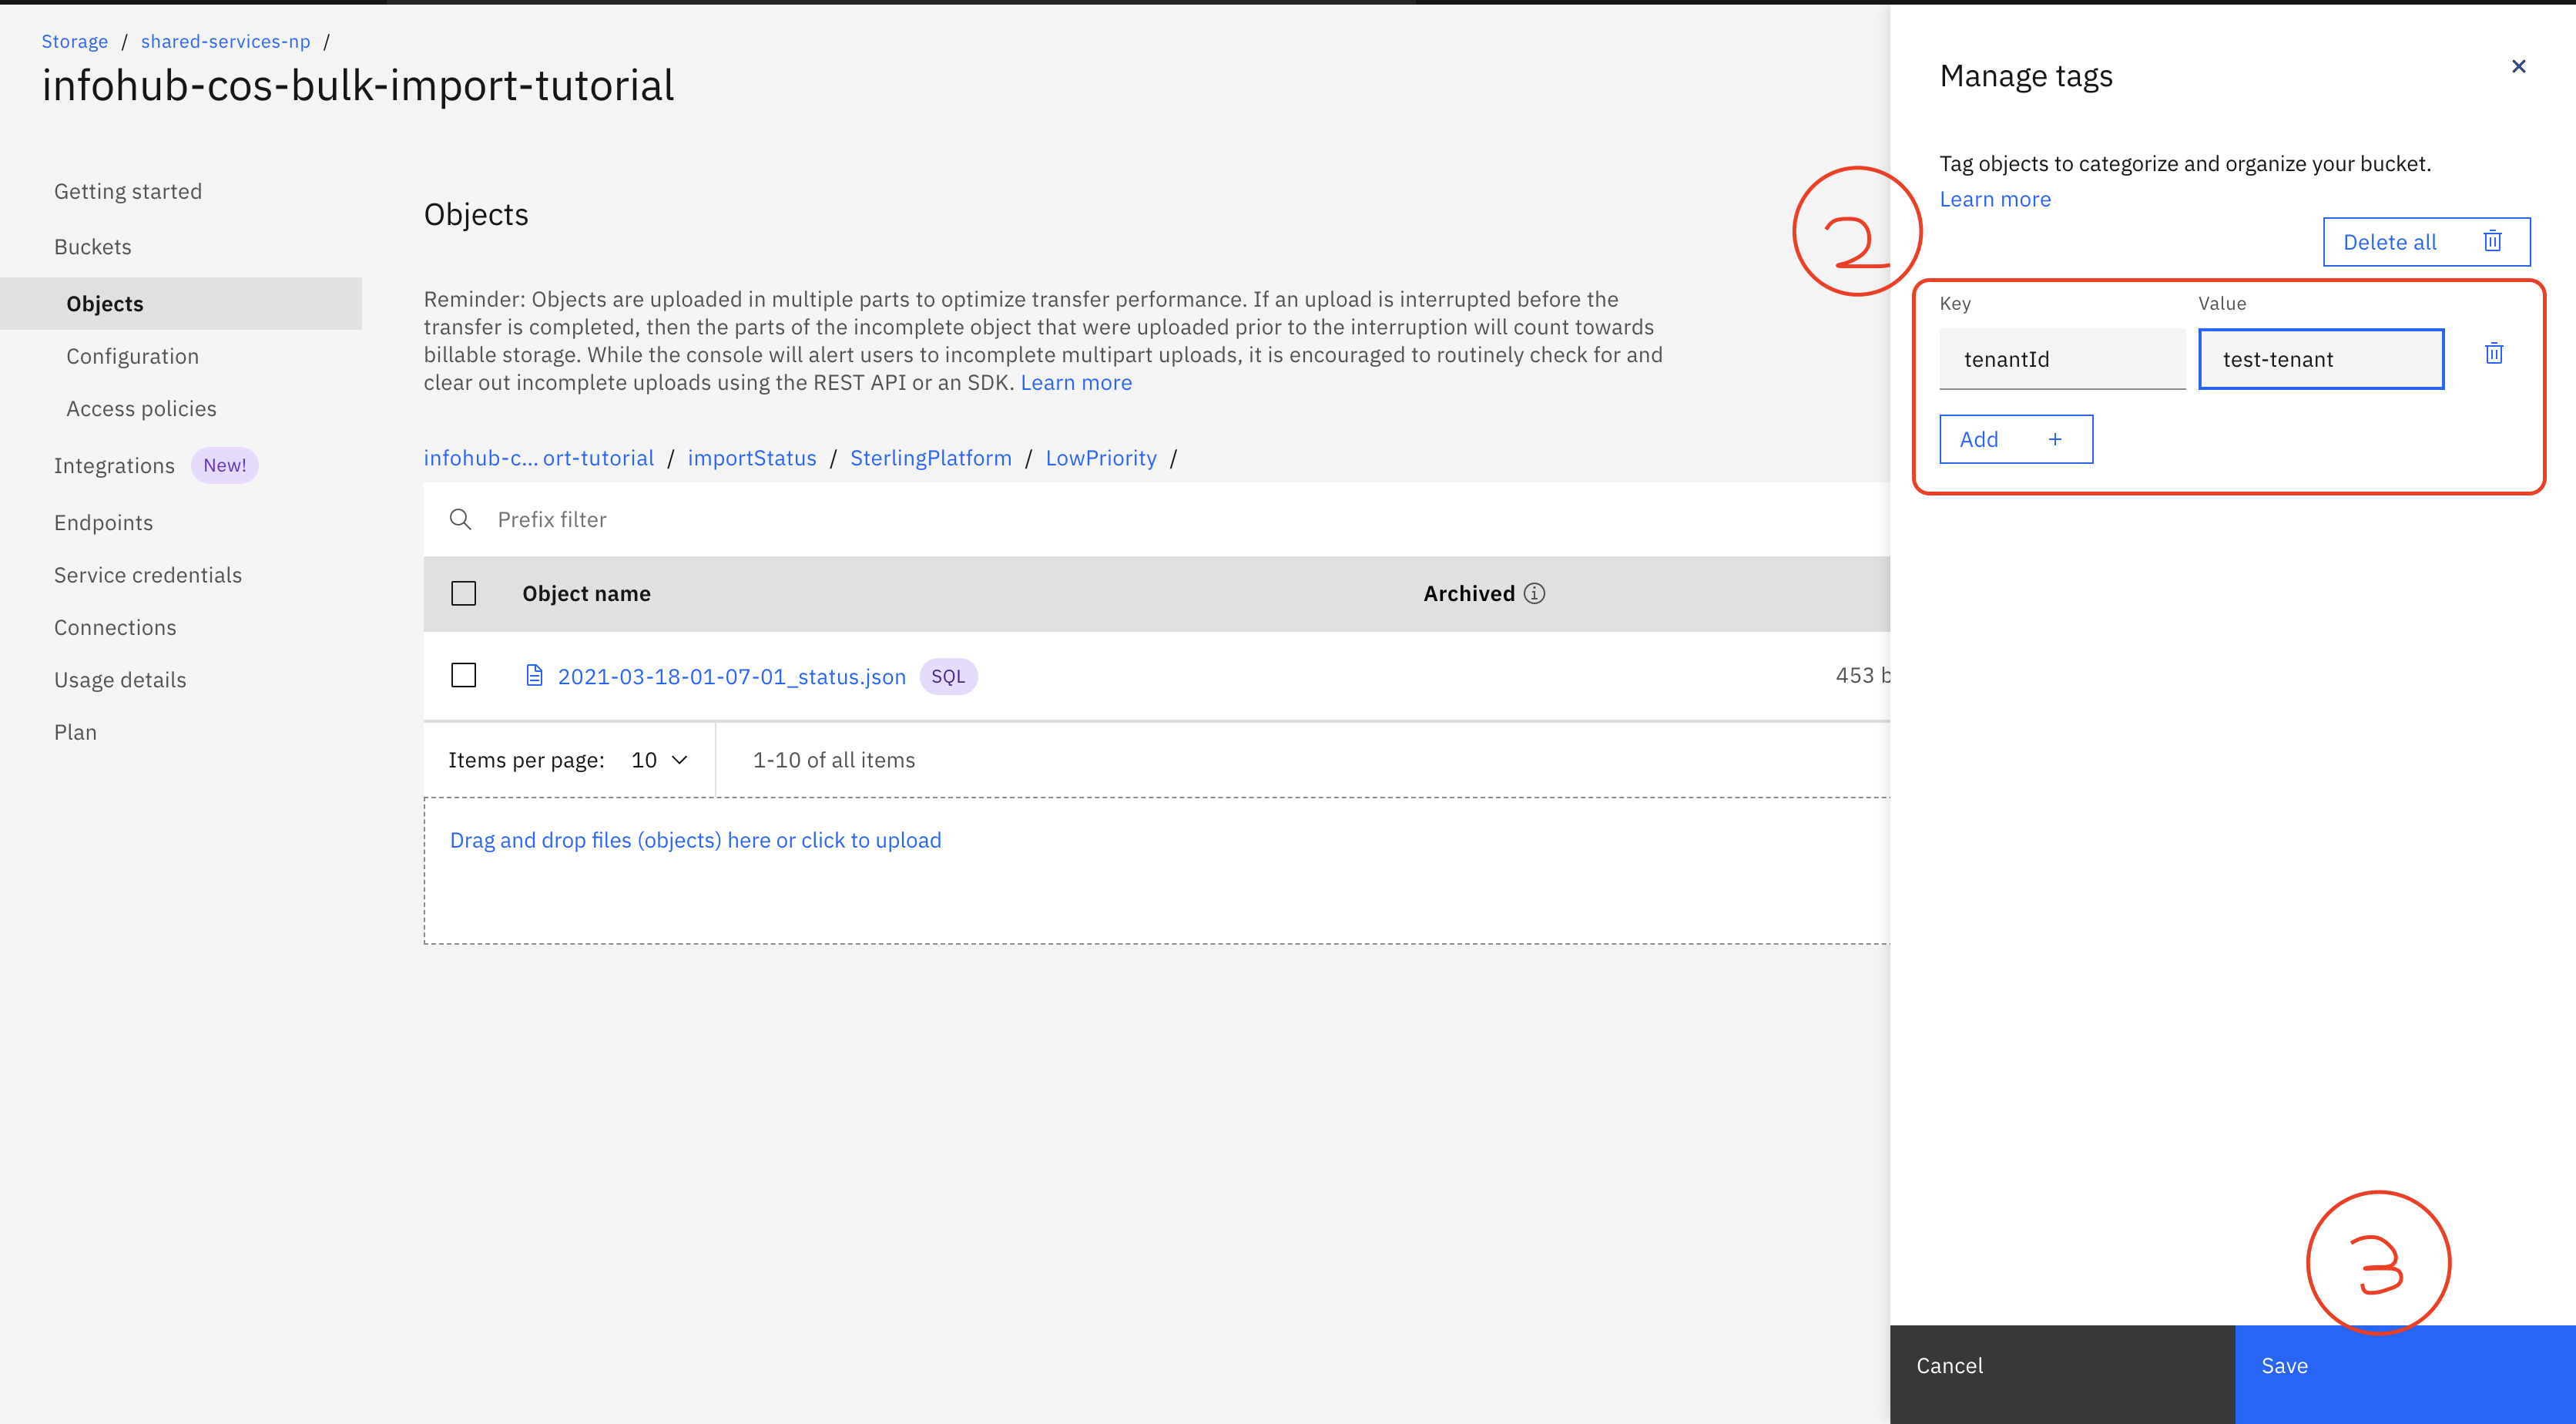
- Optionally, instead of specifying a tenantId in each event within the file, you can instead add your tenantId into a tag called
tenantIdwhen you upload the file. If the tenantId is not specified in the event then the tenantId from the tag will be picked up and added to the event. Note that if you do specify tenantId in any events they must match the value in the tag. Steps to add tenantId in the tag are as follows:
4. Upload the file to the COS bucket and prefixName you specified in your import rule in Step 1 above:
- Login your IBM Cloud account.
- Open up the
Resource list - Expand the
Storagesection and select your desired COS resource group. - Choose in
StorageinResource list. - Choose
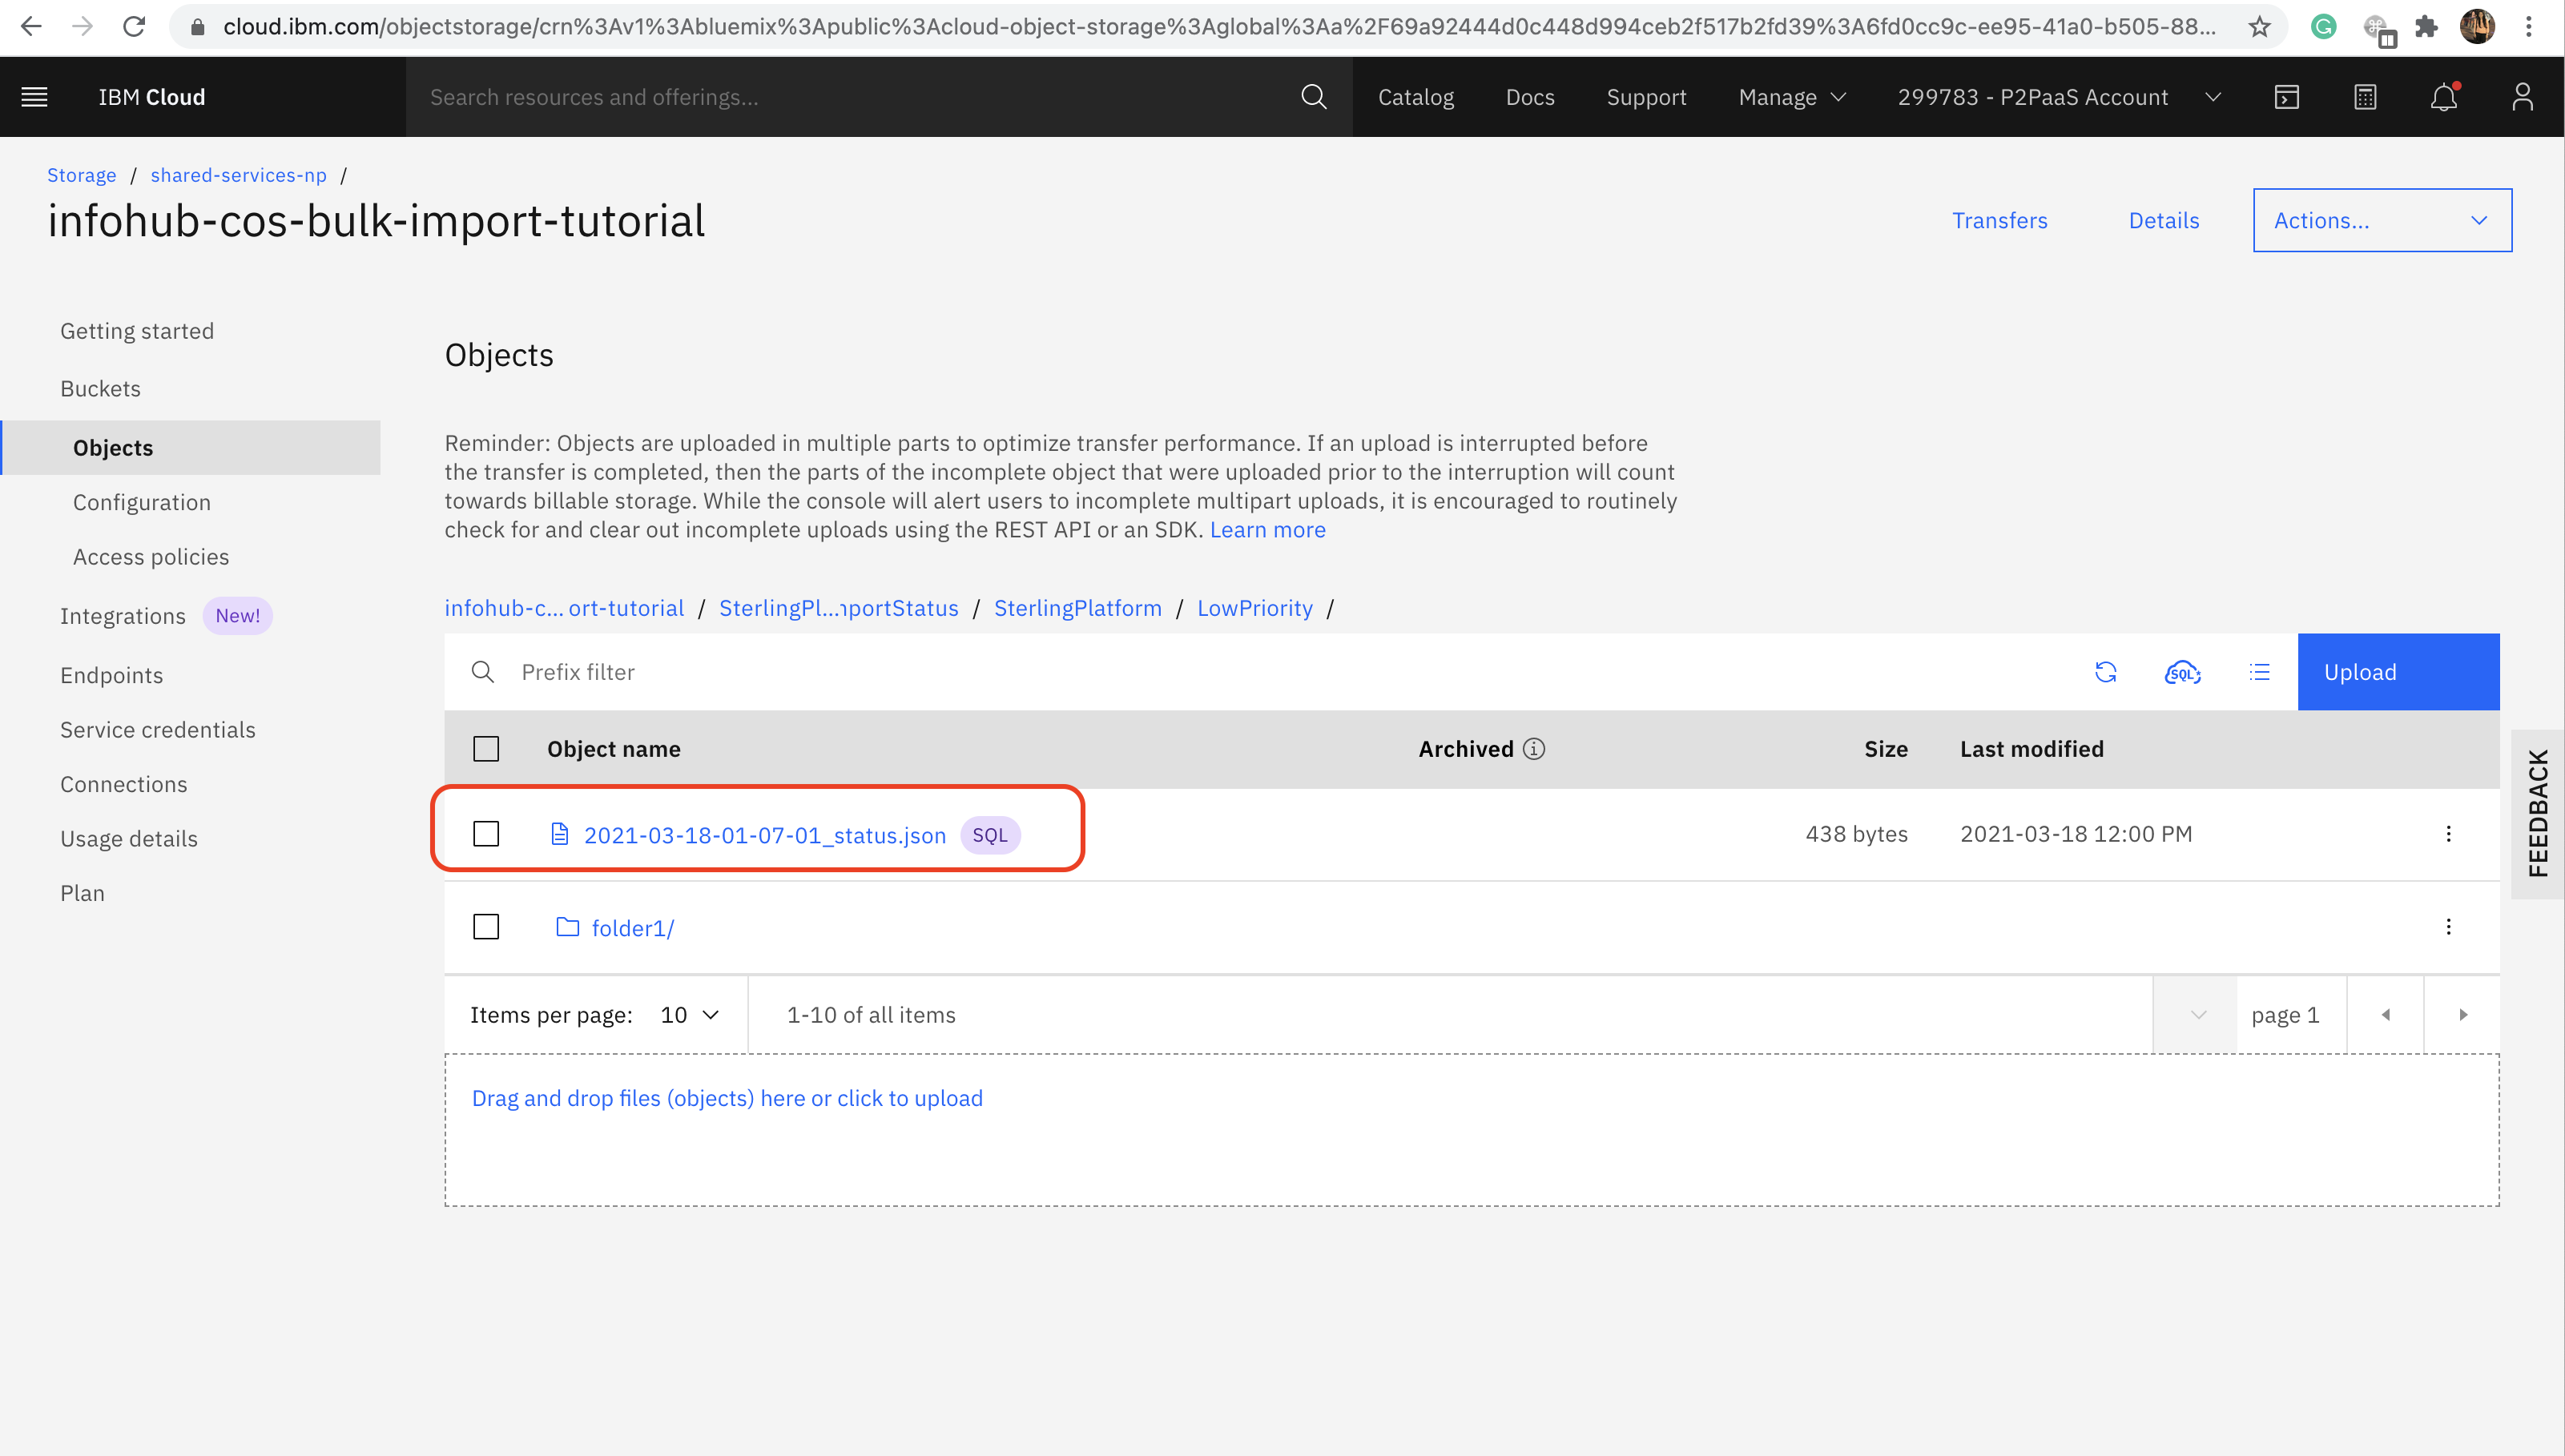
Bucketsin the left menu, and find yourBucketName, which in this example was set to 'infohub-cos-bulk-import-tutorial'. - Click the
Uploadbutton. - Upload the file to your bucket. If you specified a prefixName (eg 'importdemo' in the sample above), be sure to specify that prefix. There is a special text box labeled
Prefix for objects (optional)in the COSUploadUI where you can enter your prefix. Be sure to end the prefix with a/at the end. Do not add the prefix name to name of the file that your will upload or the COS UI will escape the backslash and your import will not proceed as expected. - Optionally you can add tenantId as tag as described here
The status will be uploaded into a file in your COS bucket by the Intelligence Suite for every batch of records uploaded. The progress file will be in the following format/location:
importStatus/streamingIngest/<yourPrefixName>/<yourUploadedObjectFileName>_<fileUploadTimestampHere>_status.json in the same bucket used to get the data to import.
The file can be downloaded from COS.
{
  "numberOfEventsImported":3,
  "totalNumberOfRecords":4,
  "bucketName":"infohub-cos-bulk-import-tutorial",
  "importStartTimestamp":"2021-03-20T08:10:28.731Z",
  "importCompletedTimestamp":"2021-03-20T08:10:30.732Z",
  "consumedBytes":6388,
  "numberOfEventsRejected":1,
  "tenantId":"c60fe724-6224-4078-bcb3-a166118fa8a1",
  "objectName":"importdemo/sampleImportTest1.json",
  "batchId":"<batchId>",
  "status":"COMPLETED",
  "totalSizeBytes":6388
}
NOTE: It may take up to 2 minutes for the import service to see your new file on COS.
- Follow the Tutorial-Query-102 to query the object events uploaded to the Intelligence Suite. You can also grab the batch id from the status file and run a simple filter query where
batchTraceIdmatches the batch id assigned to your import. - Example: Query number of object events with a particular 'batchTraceId'
{
  businessObjectEvents(
    simpleFilter: {
      batchTraceId: "BATCH ID FROM STATUS FILE",
      tenantId: "YOUR TENANT ID"
    }
  ) {
    totalCount
  }
}
- If you see any errors posted in your status file, or your query doesn't return all your expected data, try querying for error events of type
IngestionErrorEventDetailsand look for possible format issues with your imported data.
- Using an HTTP tool such as Postman set the url to
https://api.ibm.com/infohub/run/metadata/api/v1/na/data/import/rules/{{YOUR RULE ID HERE}} - Set the method to PUT
- Set the Body with the new rule
- You can optionally verify the rule was updated by changing the method to GET, and verifying that the return value shows the updated version of your rule.
- Using an HTTP tool such as Postman set the URL to
https://api.ibm.com/infohub/run/metadata/api/v1/na/data/import/rules/{{YOUR RULE ID HERE}} - Set the method to DELETE
- You can optionally verify that the rule was deleted by changing the http method to GET, which should return the following error message:
{"message":"rule {{YOUR RULE ID HERE}} does not exist"}
- Onboarding your data Load and manage your IBM Intelligence Suite data by understanding the data model and how to upload your own data into the system.