Automation
In certain cases an action or a series of actions might be required whenever a condition or a certain command occurs, which would result in a lot of micromanagement if handled by the server. In those cases the firmware allows for a limited amount of automation in one of two forms:
-
Macro: define a state consisting of several commands. All commands get executed whenever the state is activated. -
Events: wait for a predefined condition to occur and execute a single command whenever it does.
Using this basic principles, most simple and common automation usecases are covered. Below are 3 examples showing how to approach using either events, macros or a combination of both.
Whenever several actuators work together to achieve a certain state of the experiment, macros are the way to go.
Imagine the following situation:
graph LR
    subgraph source[light source]
        direction LR
        rLED[red LED]
        bLED[blue LED]
        broadband[broadband lightsource]
    end

    subgraph filter
        direction LR
        on[on]
        off[off]
    end

    experiment

    source --> filter --> experiment
- An experiment can be used with 3 different light sources that need to be placed into the beam path
- 2 of these are simple LEDs
- the third is a broad band light source
- a filter can be placed in the beam path but should not be used for the LEDs
- light sources are placed by a single servo rotating into the corresponding angle
- filter is placed by a second servo
- servos should not move simultaneously to avoid blocking each other
This results in 6 states the experiment can be in, of which only 4 are useful:
| state name | light source | filter |
|---|---|---|
| unfiltered | broad band | No |
| filtered | broad band | Yes |
| red led | LED1 | No |
| blue led | LED2 | No |
Additionally, the servo position of the light sources (servo1) and the filter (servo2) were measured to the following:
| state name | servo1 position | servo2 position |
|---|---|---|
| unfiltered | 0 | 0 |
| filtered | 0 | 90 |
| red led | 30 | 0 |
| blue led | 60 | 0 |
Now that all necessary information is gathered, we can define a macro module named lightSource containing 4 states, one for each experimental state. For each state 4 commands are needed to achieve the positions defined above.
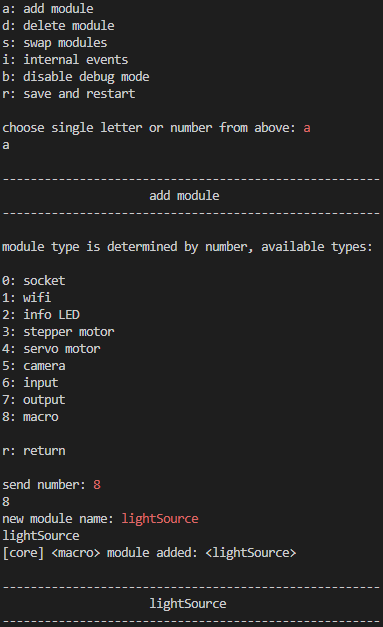
All states only differ by the servo position, here by the example of the first state unfiltered:
| controlId | control key | control value | purpose |
|---|---|---|---|
| servo1 | moveTo | 0 | bring broad band light source in position |
| lightSource | complete | 15000 | wait for servo, 15 s timeout |
| servo2 | moveTo | 0 | remove filter |
| lightSource | complete | 5000 | wait for servo, 5 s timeout |
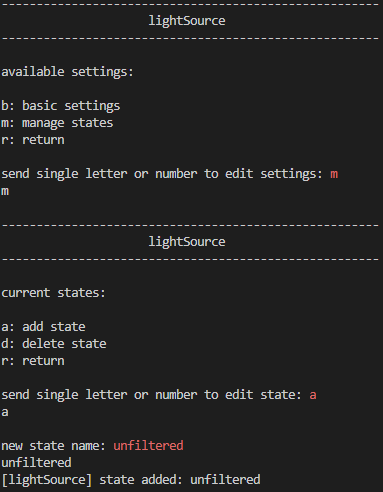
Start by creating the state
Add all commands one by one
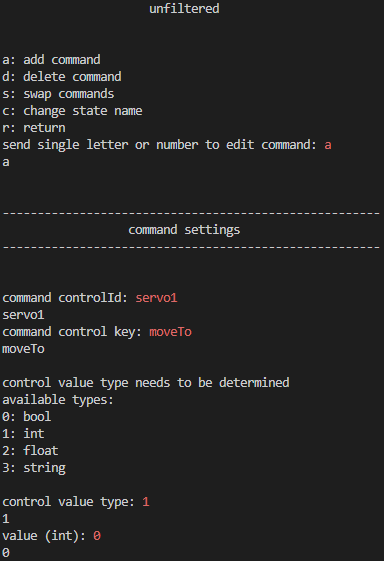
Note that after each movement command the macro module instructs itself to wait for the completion of the last command, i.e. it will wait for the last controlId to give a ready signal either by internal events or by emitting a status (the servos are not necessarily located on the same ESP32). This effectively avoids moving both servos simultaneously. It also means the macro module will only report back to the server with its final state once all motors finished moving or timed out.
To activate one of the 4 states it suffices to send a single command to the module:
[
    "command",
    {
        "controlId":"lightSource",
        "state":"red led"
    }
]
The macro module will send the commands to the motors and wait for them to finish movement, after which it will update its status to the server:
[
    "status",
    {
        "controlId":"lightSource",
        "status":
        {
            "busy":"false",
            "state":"red led"
        }
    }
]Whenever an action like actuator movements or even just status updates are required on a specific condition like connection state or input state of the ESP32, events should be used. Here, we will use a simple button to demonstrate the principle:
   3.3 V  o
  button  x
          ├----o input pin
resistor  █
     GND  ⏚
- the voltage on a button is monitored by a module
input - once the button is pushed, the voltage rises considerably
- current state of the button should be relayed to the server robustly
- state of the button should either be
loworhigh
First, input needs to be configured with suitable thresholds. The lower voltage threshold should be low enough to reliably detect the button push, while high enough to avoid noise triggering it. The same applies to the upper threshold with the added condition that there should be enough distance between lower and upper threshold to avoid jumping from low to high frequently (robust against noise). The following configuration was tested and determined to work:
| setting | value | comment |
|---|---|---|
| averageTime | 100 | avoid noise while within typical human reaction time |
| rangeChecking | true | enable thresholds |
| deadMicroSeconds | 10000 | 10 ms, avoiding noise |
| loBound | 500 | 0.5 V |
| hiBound | 1500 | 1.5 V |
| isBinary | true | set threshold policy to binary |
With these settings, the module will only issue an internal event if the voltage changes from low to high or vice versa, suitable events we can now react on. We define 2 event hooks, one for each state of the button:
| listeningId | event type | controlId | control key | control value |
|---|---|---|---|---|
| input | 8 | input | getStatus | true |
| input | 9 | input | getStatus | true |
Access the internal events:

Add a new event hook:

Define the command connected to the event:

Do not forget to restart to save the changes you just made!

Now the input module will be instructed to report its status to the server whenever the state changes, for example when the button is pressed:
[
    "status",
    {
        "controlId":"input",
        "status":
        {
            "averageTime":500,
            "updateTime":2000,
            "stream":false,
            "inputState":true
        }
    }
]
This effectively synchronizes the button state with the socket server.
In some situations it is advisable to mix events and macros to reach a goal. This is for example advantageous if a condition requires more than a single command (although this can also be achieved by multiple event hooks) and mandatory if a waiting period is required.
One usecase is if several actuators should move into a neutral position whenever the hardware connects to the server, and remain in a safety position whenever the hardware is disconnected. This can be done by placing all necessary actions in a macro with two states, neutral and safe. These states can then be activated by placing event hooks for both socket authenticated and socket disconnected events. This will ensure that all components are only in a potentially unsafe position if a stable connection to the server is established.
Another example is a combination of the previously described macros and events by moving the light source into the unfiltered position whenever the button is pressed. This only requires one event hook:
| listeningId | event type | controlId | control key | control value |
|---|---|---|---|---|
| input | 9 | lightSource | state | unfiltered |


