Home
Version: 1.4.1
Platform: Windows 10/11, Windows Server 2016+ (Linux support in early development)
Developer: Sparks Skywere
Repository: https://raw.githubusercontent.com/SparksSkywere/servermanager
-
Server Manager — Technical Wiki
- Table of Contents
- 1. Introduction
- 2. System Requirements
- 3. Installation
- 4. Architecture and Project Structure
- 5. Starting and Stopping the Application
- 6. The Launcher and Process Management
- 7. Desktop Dashboard (Tkinter GUI)
- 8. Web Interface
- 9. Web Server and REST API
- 10. Server Management
- 11. Minecraft Server Management
- 12. Database Layer
- 13. User Management and Authentication
- 14. Security
- 15. Clustering and Multi-Node Management
- 16. Services and Inter-Process Communication
- 17. Logging System
- 18. Monitoring and Analytics
- 19. Email Notifications (SMTP)
- 20. Diagnostics and Debugging
- 21. Network Management
- 22. Firewall Configuration
- 23. Uninstallation
- 24. Troubleshooting
- 25. Configuration Reference
Server Manager is a server management platform developed by Sparks Skywere for managing dedicated. It provides both a desktop GUI and a web-based platform for administering servers from a local machine or across various networks (All self hosted too!).
The application is designed to run on Windows with administrator privileges and offers the following core capabilities:
- Server Management — Install, start, stop, restart, and update game servers through a unified interface.
- Real-Time Server Console — Interactive console that connects to running server processes, allowing operators to view output and send commands in real time through multiple input methods including named pipes and file-based command queues.
- Automated Operations — Schedule server restarts with pre-restart warning broadcasts, MOTD (Message of the Day) announcements at configurable intervals, and automatic update checking with seamless update-and-restart workflows.
- Multi-Node Clustering — A Host/Subhost topology that allows a central Host node to manage multiple Subhost nodes across a network. Nodes join via a secure request-and-approval workflow, and the Host can remotely control servers on any connected Subhost.
- Web-Based Dashboard — A web interface served from a Flask web server (via Waitress WSGI) that provides server management, user administration, analytics charts, and cluster management from any browser on the network.
- User Management with 2FA — Multi-user support with role-based access control (admin/user), bcrypt password hashing, and optional TOTP-based two-factor authentication.
- Monitoring and Metrics — Real-time analytics collection with health scoring, Prometheus-format metrics endpoint, SNMP monitoring support, and Grafana integration with pre-built dashboard configurations.
- Email Notifications — SMTP-based email notifications using templates for events such as server alerts, account lockouts, password resets, maintenance windows, and welcome messages. Supports Gmail, Outlook, Office365, Yahoo, custom SMTP, and OAuth 2.0 for Microsoft Exchange.
- Security — Rate limiting, CSRF protection, input validation (SQL injection and XSS prevention), account lockout, path traversal prevention, SSL/TLS certificate management, and network-level access control.
| Requirement | Minimum | Recommended |
|---|---|---|
| Operating System | Windows 10 / Windows Server 2016 | Windows 11 / Windows Server 2022 |
| Python | 3.8+ | 3.11+ |
| RAM | 4 GB | 8 GB+ |
| Disk Space | 500 MB (application only) | 10 GB+ (with game servers) |
| Privileges | Administrator | Administrator |
| Network | Local access | LAN/WAN for web and cluster |
Linux support is in early development. Debian-based distributions (Ubuntu, Debian) are recommended for ease of use. Other distributions may work but are not actively tested. The Linux installer handles package installation via apt, yum, dnf, or pacman.
All Python dependencies are listed in requirements.txt and are installed automatically by the installer:
| Package | Purpose |
|---|---|
| flask | Web server framework |
| flask-cors | Cross-Origin Resource Sharing support |
| flask-limiter | API rate limiting |
| psutil | Process and system monitoring |
| requests | HTTP client for API calls |
| pywin32 | Windows service support and security APIs |
| pycryptodome | Cryptographic operations |
| gitpython | Git repository management |
| paramiko | SSH connectivity for remote operations |
| schedule | Task scheduling |
| pystray | System tray icon |
| pillow | Image processing for tray icon |
| sqlalchemy | Database ORM and connection management |
| cryptography | SSL certificate generation and Fernet encryption |
| pyodbc | ODBC database connectivity (MSSQL) |
| pyotp | TOTP-based two-factor authentication |
| vdf | Valve Data Format parsing (Steam configs) |
| waitress | Production WSGI server for Flask |
| bcrypt | Password hashing |
| secure-smtplib | Secure SMTP connections |
| msal | Microsoft Authentication Library for OAuth 2.0 |
| requests-oauthlib | OAuth library for SMTP |
| GPUtil | GPU monitoring |
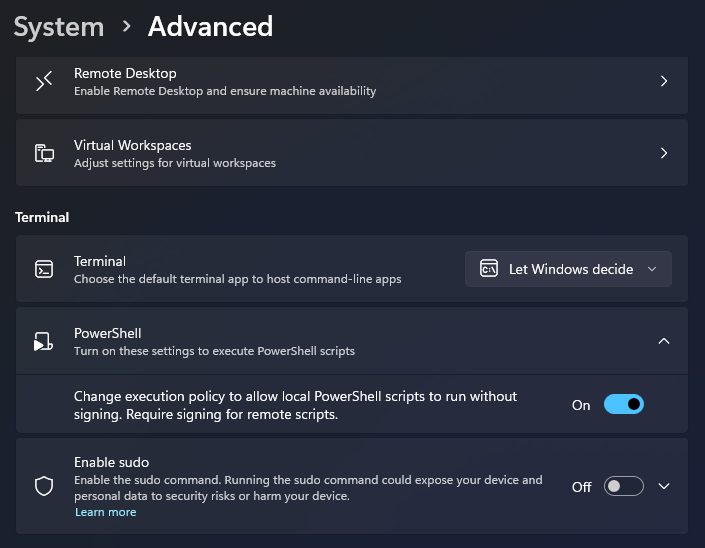
Enabling powershell scripts
- Go to Settings
- Go to System -> Advanced
- Enable powershell scripts
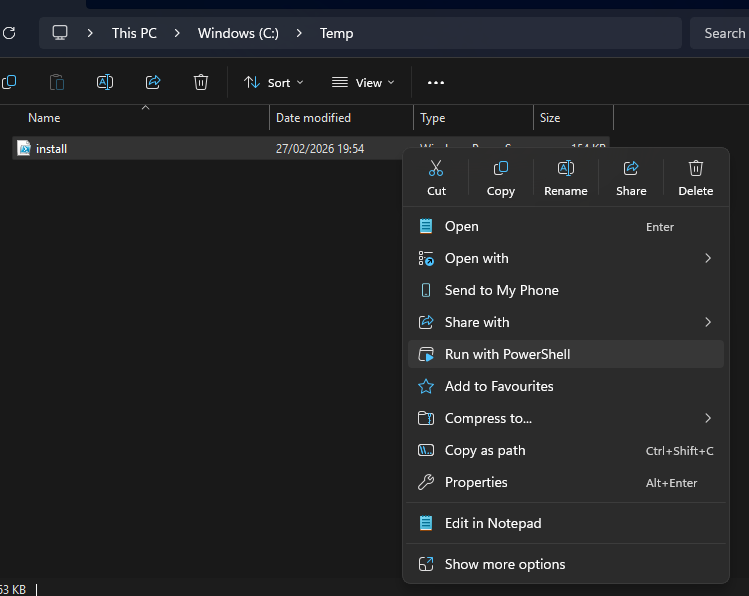
The Windows installer is a PowerShell script (install.ps1) that provides a WinForms-based GUI wizard. It must be run with Administrator privileges.
(Owners note: I do plan to make this an EXE in the future, I have Ps2Exe but need to check signing)
Steps to install:
- Open PowerShell as Administrator.
- Navigate to the directory containing the installer or clone the repository first:
git clone https://raw.githubusercontent.com/SparksSkywere/servermanager.git
cd servermanager
- Run the installer:
.\install.ps1
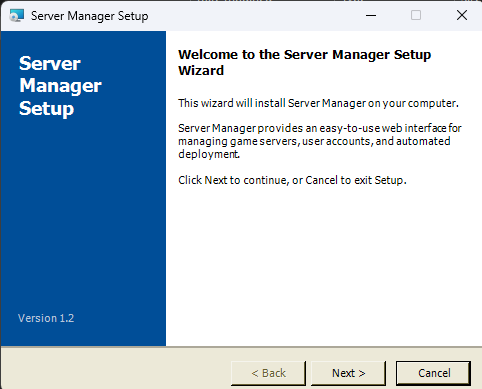
- The GUI wizard will guide you through the following steps:
-
First page — The intial installer page, important page to read the general synopsis of this program and check the current version downloaded.
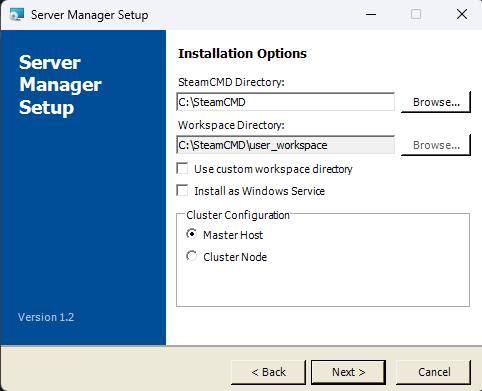
-
Second Page — Second page where you can select the installer directory with workspace directory (if you want users to access a different secure storage away from the SteamCMD storage) you can also select the clusters configuration at this stage.
-
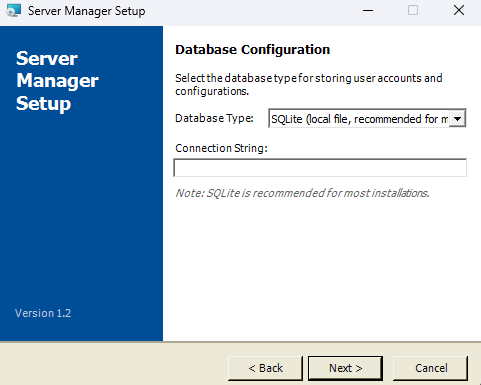
Third Page — Database Configuration, you can choose what type of database will be used by servermanager, default is SQLite.
-
Cluster Configuration — You are asked to select the node role:
- Host — This machine will act as the central management server.
- Subhost — This machine will connect to an existing Host. You will need to provide the Host's IP address.
-
Repository Clone — The Server Manager source code is cloned from the GitHub repository. If direct Git access fails, the installer falls back to downloading a ZIP archive from GitHub.
-
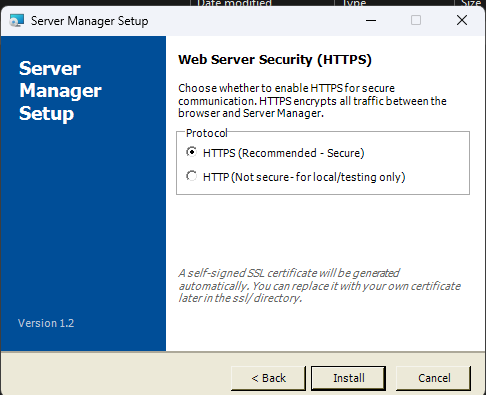
Web Security — The page to choose if you want to use HTTPS or HTTP for running the webserver, for outside communication HTTPS is recommended.
-
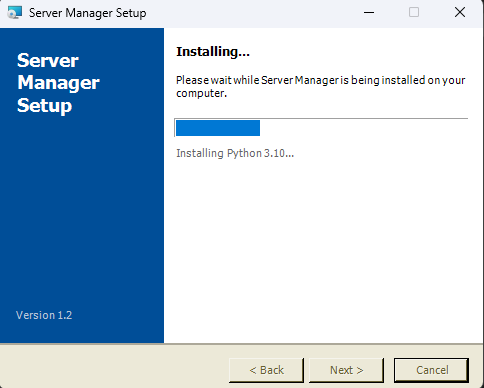
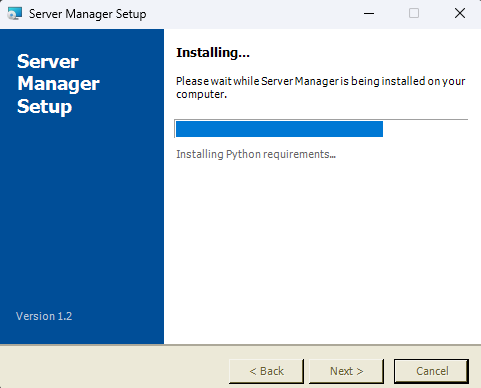
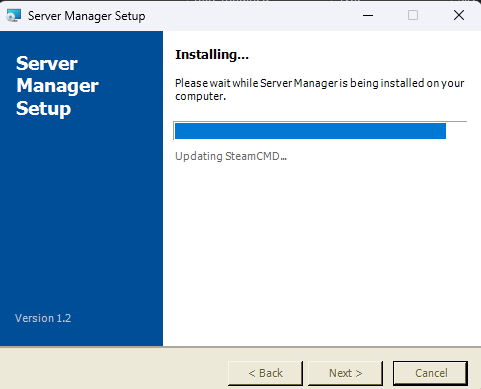
Installation - The progress bars!
-
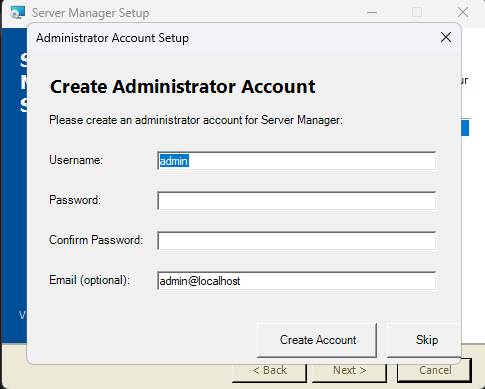
Admin Account Creation — A root administrator account is created with customisable credentials (default:
admin/admin).
-
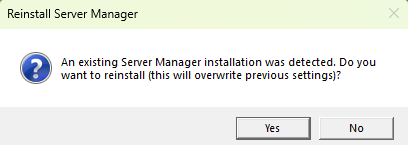
Reinstallation: If an existing installation is detected in the registry, the installer will prompt you to confirm whether you want to reinstall. Reinstalling will overwrite previous settings.
Service Management via Installer: The installer also supports service management mode via the -ServiceAction parameter:
.\install.ps1 -ServiceAction Install    # Install and start as Windows service
.\install.ps1 -ServiceAction Uninstall  # Remove the Windows service
.\install.ps1 -ServiceAction Start      # Start the service
.\install.ps1 -ServiceAction Stop       # Stop the service
.\install.ps1 -ServiceAction Restart    # Restart the service
.\install.ps1 -ServiceAction Status # Check service statusThe Linux installer is a Bash script (install.sh). Run it with sudo privileges:
sudo sh install.shThe Linux installer:
- Detects the package manager (apt, yum, dnf, or pacman).
- Installs Python 3.8+ and pip if not present.
- Installs Git if not present.
- Clones the repository from GitHub.
- Installs Python dependencies from
requirements.txt. - Creates the directory structure under
$HOME/SteamCMD(includingssl/for certificates). - Initialises SQLite databases (users, steam apps, cluster including
pending_requestsandhost_statustables). - Configures cluster role (Host or Subhost) with secure token generation.
- Generates SSL/TLS certificates if HTTPS is selected (using Python
cryptographyoropensslfallback). - Configures firewall rules using UFW or firewalld (ports 8080, 443, 8081, 5001, 27015-27050).
- Creates a
.desktopfile for desktop shortcut integration. - Sets up a systemd user service with SSL environment variables.
If you prefer a manual setup:
git clone https://raw.githubusercontent.com/SparksSkywere/servermanager.git
cd servermanager
pip install -r requirements.txt
After manual installation, you will need to:
- Create the registry keys manually (Windows) or ensure fallback directory detection works.
- Run the
Update-ServerManager.pywtool to initialise the database schema. - Create an admin user using the database tools.
After installation is complete:
-
Start the application. Run
Start-ServerManager.pywto launch Server Manager in desktop mode. The application requires Administrator privileges and will prompt for elevation if not already running as admin. - Access the system tray icon. A tray icon will appear in the Windows taskbar notification area. Right-click it to access the menu.
- Open the desktop dashboard. Right-click the tray icon and select "Open Server Dashboard" to open the Tkinter-based local management GUI.
-
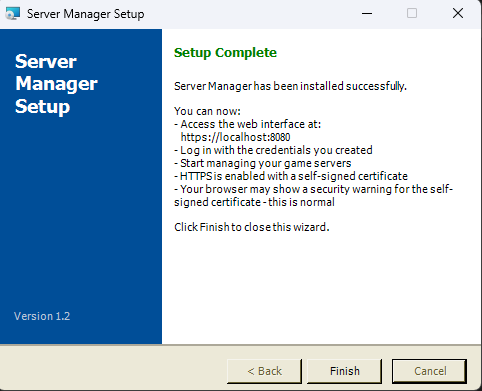
Access the web interface. Open a browser and navigate to
https://localhost:443(if HTTPS was enabled during installation) orhttp://localhost:8080(HTTP). From another machine, replacelocalhostwith your server's IP address. Log in with the admin credentials configured during installation (default:admin/admin). If using a self-signed certificate, your browser will show a security warning — this is expected and safe to proceed through. -
Populate the Steam database. The Steam and Minecraft application ID databases can be populated using the scanners in
Modules/Database/scanners/. RunModules/Database/scanners/AppIDScanner.pyto download the Steam dedicated server catalogue, andModules/Database/scanners/MinecraftIDScanner.pyto download Minecraft version information. This provides the searchable server lists when creating new servers.
The following describes the complete project directory structure and the purpose of each component:
Servermanager/                      # Project root
├── Start-ServerManager.pyw         # Entry point — starts the application
├── Stop-ServerManager.pyw          # Entry point — stops all components
├── Update-ServerManager.pyw        # GUI tool for database schema updates
├── install.ps1                     # Windows PowerShell installer (3100+ lines)
├── install.sh                      # Linux Bash installer
├── uninstaller.ps1                 # Windows uninstaller
├── uninstaller.sh                  # Linux uninstaller
├── requirements.txt                # Python package dependencies
├── README.md                       # Quick-start readme
│
├── Modules/                        # Core application modules (split by domain)
│   ├── core/                       # Core framework and startup components
│   │   ├── common.py               # Shared utilities, registry access, base classes
│   │   ├── server_logging.py       # Centralised logging management
│   │   ├── launcher.py             # Process launcher and child process manager
│   │   └── timer.py                # Dashboard periodic update timers
│   │
│   ├── server/                     # Server runtime and console components
│   │   ├── server_manager.py       # Core server lifecycle (start/stop/install/update)
│   │   ├── server_console.py       # Real-time interactive server console
│   │   ├── server_operations.py    # Simplified server operations facade
│   │   └── minecraft.py            # Minecraft server management utilities
│   │
│   ├── services/                   # Background service and process-control components
│   │   ├── webserver.py            # Flask web server with REST API
│   │   ├── trayicon.py             # System tray icon (pystray)
│   │   ├── server_automation.py    # MOTD broadcasting and restart warnings
│   │   ├── scheduler.py            # Task scheduling and timer management
│   │   ├── service_wrapper.py      # Windows service wrapper (pywin32)
│   │   └── stop_servermanager.py   # Shutdown utility
│   │
│   ├── updates/                    # Update and Java tooling
│   │   ├── server_updates.py       # Scheduled update checking and execution
│   │   ├── java_configurator.py    # CLI tool for Java version management
│   │   └── auto_app_update.py      # Application self-update helper
│   │
│   ├── ui/                         # UI helpers and dialogs
│   │   ├── automation_ui.py        # Tkinter GUI for automation settings
│   │   ├── documentation.py        # Help and About dialog boxes
│   │   ├── analytics.py            # Real-time analytics and metrics collection
│   │   └── agents.py               # Cluster agent management with GUI
│   │
│   ├── security/                   # Security and identity modules
│   │   ├── security.py             # Core cryptographic security primitives
│   │   ├── web_security.py         # Web application security (rate limit, CSRF, etc.)
│   │   ├── network_security.py     # Network-level access control decorators
│   │   ├── cluster_security.py     # Cluster membership management
│   │   ├── ssl_utils.py            # SSL/TLS certificate generation and management
│   │   └── user_management.py      # User CRUD with 2FA support
│   │
│   ├── network/                    # Network operations
│   │   └── network.py              # Ping, port scan, and firewall helpers
│   │
│   ├── Database/                   # Database modules
│   │   ├── database_utils.py       # Shared DB connection utilities
│   │   ├── SQL_Connection.py       # Unified SQL connection interface
│   │   ├── server_configs_database.py  # Server configurations ORM and manager
│   │   ├── user_database.py        # User database initialisation
│   │   ├── authentication.py       # Authentication backend (SQL + Windows)
│   │   ├── steam_database.py       # Steam apps database setup
│   │   ├── minecraft_database.py   # Minecraft database setup
│   │   ├── cluster_database.py     # Cluster database with 10+ tables
│   │   ├── console_database.py     # Console state persistence
│   │   └── scanners/               # Database population scanners
│   │       ├── AppIDScanner.py     # Steam AppID scanner and DB builder
│   │       └── MinecraftIDScanner.py # Minecraft version scanner
│   │
│   ├── SMNP/                       # Monitoring integrations
│   │   ├── snmp_manager.py         # SNMP monitoring module
│   │   └── graphana.py             # Grafana/Prometheus metrics
│   │
│   └── SMTP/                       # Email subsystem
│       ├── mailserver.py           # SMTP mail server with OAuth 2.0
│       ├── notifications.py        # Email notification templates
│       └── Mail-Templates/         # HTML/text email templates
│           ├── welcome_html.html
│           ├── password_reset_html.html
│           ├── account_locked_html.html
│           ├── server_alert_html.html
│           ├── maintenance_html.html
│           ├── custom_html.html
│           ├── mail-template.css
│           └── (corresponding _subject.txt and _text.txt files)
│
├── Host/                           # Desktop dashboard modules
│   ├── dashboard.py                # Main Tkinter dashboard (~1000 lines)
│   ├── dashboard_functions.py      # Dashboard utility functions (~3700 lines)
│   ├── dashboard_dialogs.py        # Server configuration dialogs
│   ├── dashboard_server_config.py  # Server configuration UI
│   ├── dashboard_server_ops.py     # Server operations UI
│   ├── dashboard_settings.py       # Dashboard settings UI
│   ├── dashboard_ui.py             # UI component builders
│   └── admin_dashboard.py          # Admin dashboard for user/email management
│
├── api/                            # REST API modules
│   └── cluster.py                  # Cluster API Flask Blueprint
│
├── services/                       # Background service modules
│   ├── command_queue.py            # File-based command queue for server stdin
│   ├── stdin_relay.py              # Named pipe stdin relay
│   ├── persistent_stdin.py         # Persistent stdin pipe for subprocesses
│   ├── dashboard_tracker.py        # Dashboard and server process tracker
│   └── service_helper.py           # Windows service management CLI helper
│
├── debug/                          # Diagnostics and debugging
│   ├── debug.py                    # System diagnostics engine
│   └── debug_manager.py            # Debug center GUI
│
├── www/                            # Web interface static files
│   ├── index.html                  # Redirect to login
│   ├── login.html                  # Login page
│   ├── dashboard.html              # Main web dashboard
│   ├── create-server.html          # Server creation wizard
│   ├── admin.html                  # Admin panel
│   ├── cluster.html                # Cluster management page
│   ├── diagnostics.html            # Authentication diagnostics
│   ├── css/                        # Stylesheets
│   │   ├── common.css              # Shared layout styles (header, nav, user menu, themes)
│   │   ├── dashboard.css
│   │   ├── login.css
│   │   ├── normalize.css
│   │   ├── notifications.css
│   │   ├── shared.css
│   │   ├── style.css
│   │   └── theme.css
│   └── js/                         # JavaScript modules
│       ├── api.js                  # API client class
│       ├── auth.js                 # Authentication module
│       ├── dashboard.js            # Dashboard page logic with Chart.js
│       ├── serverControls.js       # Server control functions
│       ├── charts.js               # Chart configuration
│       ├── config.js               # Client configuration
│       ├── theme.js                # Dark/light theme toggle
│       ├── timerange.js            # Time range selector
│       └── utils.js                # Utility functions
│
├── db/                             # Database files (created at install)
├── ssl/                            # SSL certificates
├── icons/                          # Application icons
├── logs/                           # Log file directories
│   ├── components/                 # Per-component log files
│   ├── debug/                      # Debug log files
│   └── services/                   # Service log files
├── temp/                           # Temporary/runtime files
│   ├── launcher.pid                # Launcher process ID file
│   ├── webserver.pid               # Web server process ID file
│   ├── trayicon.pid                # Tray icon process ID file
│   ├── dashboard.pid               # Dashboard process ID file
│   ├── server_automation.pid       # Automation process ID file
│   └── command_queues/             # File-based command queues per server
├── tools/                          # Standalone utility scripts
│   ├── reset_admin_password.py     # Admin password reset utility
│   ├── reset_admin_2FA.py          # Admin 2FA reset utility
│   ├── verify_database.py          # Database verification tool
│   └── verify_dedicated_servers.py # Post-scan server verification
├── docs/                           # Documentation and screenshots
└── WIKI.md                         # This file
The application follows a layered architecture where modules depend on shared utilities and communicate through well-defined interfaces:
Foundation Layer:
-
Modules/core/server_logging.py— All logging flows through the centralisedLogManagersingleton. Every module callsget_component_logger()orsetup_module_logging()to get a properly configured logger with rotating file handlers. -
Modules/core/common.py— ProvidesServerManagerModule(base class for all major modules),RegistryModule(lightweight base class for registry-backed modules such asSecurityManagerandServerOperations),ServerManagerPaths(registry-based path resolution),ProcessManager(PID file management),ConfigManager(application configuration via database), and numerous utility functions includingmake_2fa_callbacks()(shared 2FA dialog logic),send_command_to_server()(unified command delivery), andmake_canvas_width_updater()(shared UI factory).
Core Layer:
-
Modules/server/server_manager.py— The engine of the application. Handles SteamCMD-based and Minecraft server installations, server start/stop with multiple fallback strategies, and process monitoring. -
Modules/core/launcher.py— Orchestrates the application startup by launching child processes (tray icon, web server, automation) based on the cluster role. -
Modules/services/webserver.py— The Flask web server that serves the web interface and exposes the REST API.
Database Layer:
-
Modules/Database/— All database operations are isolated here.database_utils.pyprovides shared connection factory functions. Each domain has its own module (server configs, users, steam apps, minecraft, cluster, console states).
UI Layer:
-
Host/dashboard.py+Host/dashboard_functions.py+Host/dashboard_ui.py+Host/dashboard_dialogs.py+Host/dashboard_server_config.py+Host/dashboard_server_ops.py+Host/dashboard_settings.py— The Tkinter desktop dashboard. -
www/— The web interface static files served by the Flask web server.
Services Layer:
-
services/— Background processes and IPC mechanisms for command delivery to server processes.
All installation and runtime configuration is stored in the Windows Registry under:
HKEY_LOCAL_MACHINE\Software\SkywereIndustries\Servermanager
The following values are stored:
| Value Name | Type | Description |
|---|---|---|
Servermanagerdir |
REG_SZ | Absolute path to the Server Manager installation directory |
CurrentVersion |
REG_SZ | Installed version number (e.g., "1.2") |
UserWorkspace |
REG_SZ | Path to the user workspace directory |
InstallDate |
REG_SZ | Date and time of installation |
LastUpdate |
REG_SZ | Date and time of last update |
ModulePath |
REG_SZ | Path to the Modules directory |
LogPath |
REG_SZ | Path to the logs directory |
SteamCmdPath |
REG_SZ | Path to the SteamCMD installation |
WebPort |
REG_SZ | Web server port number (default: 8080) |
HostType |
REG_SZ | Cluster role — either "Host" or "Subhost" |
HostAddress |
REG_SZ | (Subhost only) IP address of the Host node |
ClusterCreated |
REG_SZ | Whether cluster configuration exists |
If the registry keys are not available (e.g., due to permissions or running on Linux), the application falls back to using the script directory as the root path. This fallback is implemented in ServerManagerPaths.initialise_fallback().
To start Server Manager in desktop mode, run the Start-ServerManager.pyw script. This script performs the following startup sequence:
- Privilege Check — Verifies the process is running with Administrator privileges. If not, it prompts for UAC elevation.
-
Singleton Check — Reads PID files from the
temp/directory. If another instance of Server Manager is already running (launcher, tray icon, or web server PID exists and the process is alive), it prompts the user about whether to restart. - Orphaned PID Cleanup — Scans all PID files and removes any that reference processes which are no longer running. This handles cases where the application did not shut down cleanly.
-
Directory Verification — Ensures required directories exist (
logs/,temp/,logs/components/,logs/debug/,logs/services/). -
Launcher Start — Launches
Modules/core/launcher.pyusingpythonw.exe(windowless Python) withCREATE_NO_WINDOWandDETACHED_PROCESSflags so it runs in the background.
The launcher (Modules/core/launcher.py) then takes over and starts the appropriate child processes based on the cluster role:
- Host Role: Starts the system tray icon, web server, and server automation process.
- Subhost Role: Starts the system tray icon and a subhost dashboard process (on port 5002).
- Unknown Role: Starts the system tray icon and web server.
Server Manager can run as a Windows service for unattended operation. The service is managed through Modules/services/service_wrapper.py which implements win32serviceutil.ServiceFramework.
Service Details:
-
Service Name:
ServerManagerService - Display Name: Server Manager Service
- Startup Type: Automatic (configured during installation)
- Health Monitoring: The service performs health checks every 30 seconds and will automatically restart failed components.
Installing the Service:
.\install.ps1 -ServiceAction InstallManaging the Service:
.\install.ps1 -ServiceAction Start
.\install.ps1 -ServiceAction Stop
.\install.ps1 -ServiceAction Restart
.\install.ps1 -ServiceAction Status
.\install.ps1 -ServiceAction Uninstall
Alternatively, you can use the services/service_helper.py CLI:
python services/service_helper.py install
python services/service_helper.py start
python services/service_helper.py stop
python services/service_helper.py status
python services/service_helper.py uninstall
Or manage it through standard Windows service management tools (services.msc, sc command, or the PowerShell *-Service cmdlets).
To stop Server Manager, run Stop-ServerManager.pyw or use the "Exit" option from the system tray icon menu. The Stop-ServerManager.pyw script launches Modules/services/stop_servermanager.py.
The shutdown utility (ServerManagerStopper) executes a carefully ordered shutdown sequence to prevent data loss and orphaned processes:
- Stop All Game Servers — Attempts to gracefully stop all managed game servers using their configured stop commands.
-
Stop Processes from PID Files — Reads PID files for launcher, web server, tray icon, dashboard, automation, and debug-center processes (including
debug.pid). For each: sendsterminate(), waits up to 10 seconds, then usestaskkill /F /T(force kill with child processes). - Stop Processes by Name/Path — Scans running processes for Server Manager targets using command line plus executable-path validation to catch missed processes while avoiding false-positive system processes.
- Wait and Re-Scan — Waits briefly, then re-scans to ensure all processes have exited.
-
Final Cleanup Kill — As a last resort, uses
taskkillwithCOMMANDLINEfilters to forcefully kill any remainingpython.exeorpythonw.exeprocesses associated with Server Manager. -
PID File Removal — Removes all PID files from the
temp/directory.
CLI Arguments:
-
--debug— Enable verbose debug logging during shutdown. -
--force— Force kill all processes without graceful shutdown attempts.
The launcher (Modules/core/launcher.py) is the central process orchestrator. It extends ServerManagerModule (inheriting path resolution, config management, and PID file handling) and manages the lifecycle of all child processes.
Key Behaviours:
-
Cluster Role Detection — On startup, the launcher reads the
HostTyperegistry value to determine whether this node is a Host, Subhost, or Unknown. For Subhost nodes, it also reads theHostAddressvalue to know which Host to connect to. -
Process Launching — Each child process (tray icon, web server, automation) is launched as a separate Python process using
subprocess.PopenwithCREATE_NO_WINDOWandDETACHED_PROCESSflags. The tray icon usespythonw.exe(windowless), while other processes use the regularpythonexecutable. -
Port Verification — After launching the web server, the launcher verifies it is actually listening on the configured port. It performs up to 15 retry cycles, checking socket connectivity, before reporting a startup failure.
-
Process Monitoring — A 5-second monitoring loop runs continuously, checking that all child processes are still alive. If a child process dies unexpectedly, the launcher will attempt to restart it up to 3 times. The restart counter resets after a successful restart.
-
PID File Management — PID files are stored as JSON in the
temp/directory with the following structure:{ "ProcessId": 12345, "StartTime": "2026-01-15T10:30:00.000000", "ProcessType": "launcher" } -
Cleanup — On shutdown (signal handler or explicit call), the launcher terminates all child processes using psutil's process tree walking (
children(recursive=True)) to ensure no orphaned grandchild processes remain. It falls back totaskkill /F /Tif psutil fails.
CLI Arguments:
-
--service— Run as a Windows service (affects startup behaviour). -
--debug— Enable DEBUG-level logging. -
--force— Force start even if another instance is detected.
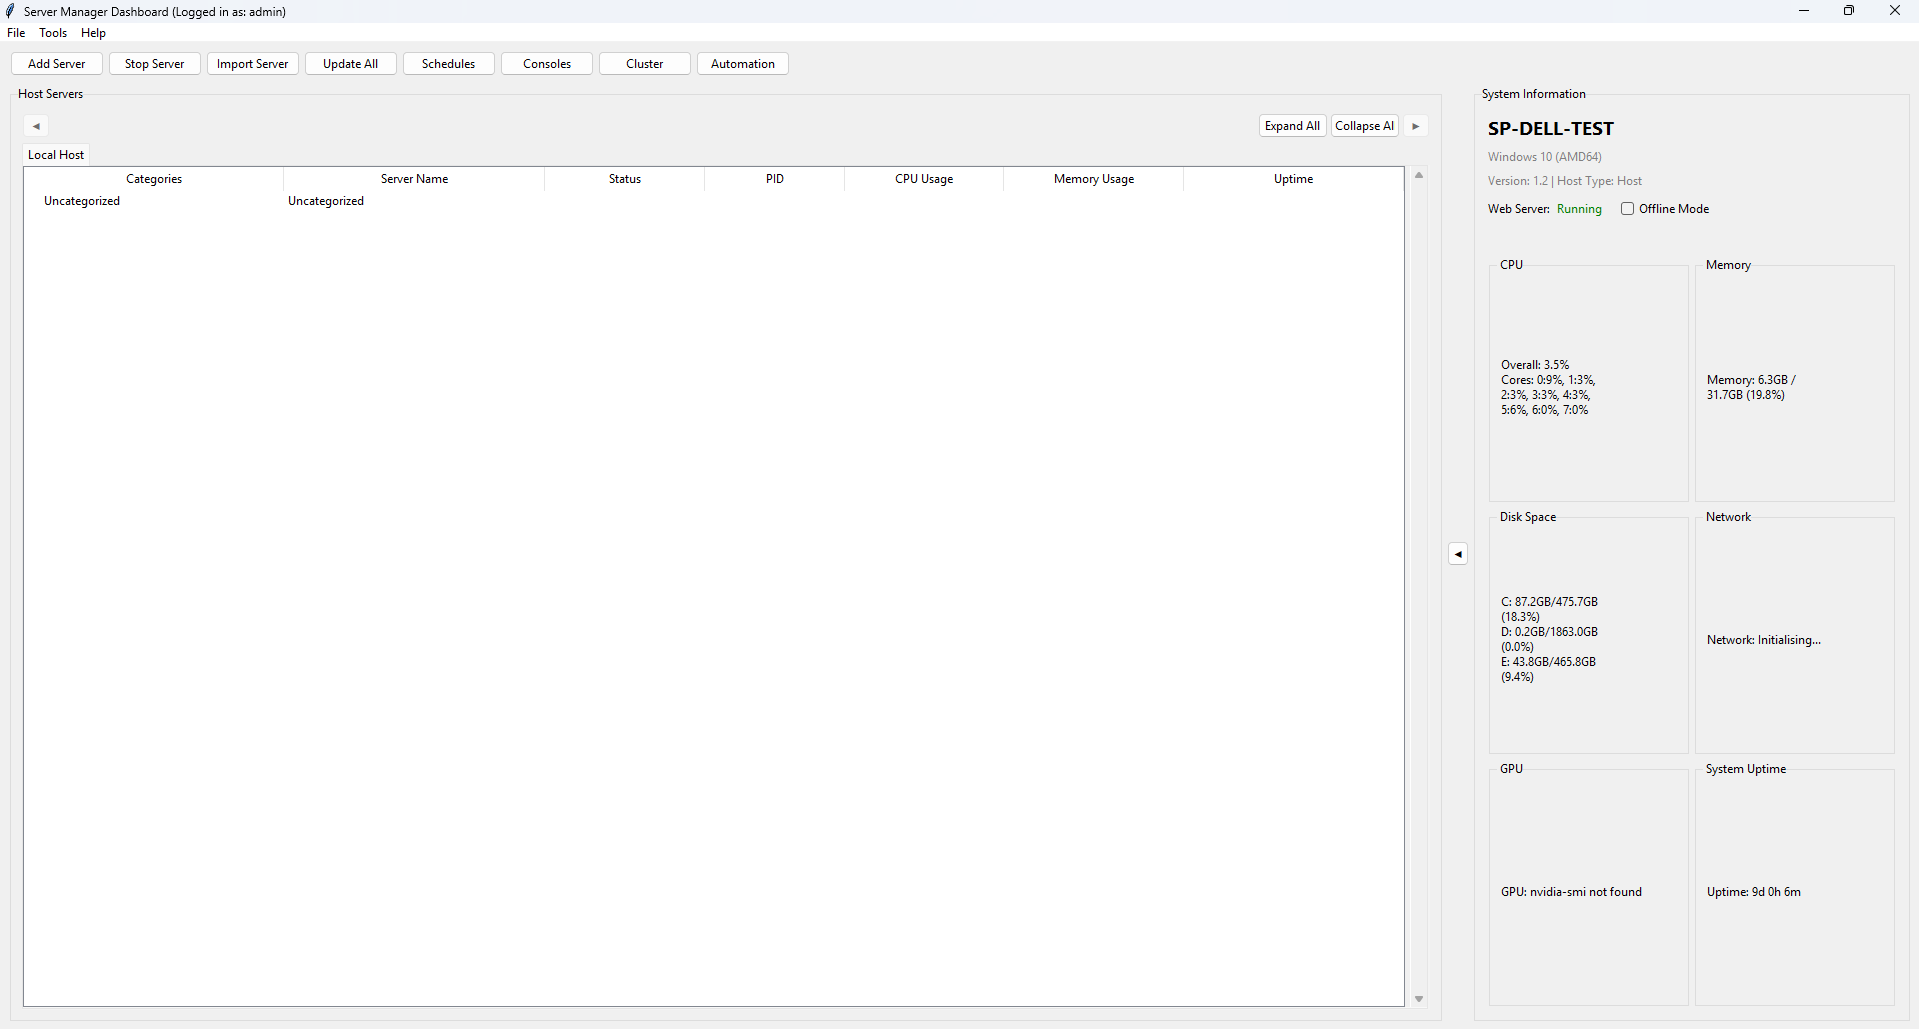
The main desktop dashboard (Host/dashboard.py) is a Tkinter-based GUI that provides full server management capabilities. It is approximately 1,000 lines of code (with UI logic split across dashboard_functions.py, dashboard_dialogs.py, dashboard_server_config.py, dashboard_server_ops.py, and dashboard_settings.py) and is the primary local management interface.
Launch: Right-click the system tray icon and select "Open Server Dashboard", or run Host/dashboard.py directly.
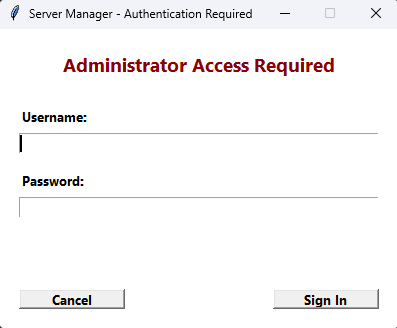
Authentication: On launch, the dashboard presents a login dialog. Users must authenticate with their username, password, and optionally a 2FA code if two-factor authentication is enabled on their account. Authentication is performed against the user database using bcrypt password hashing.
Initialisation Sequence: After successful login, the dashboard performs a 6-step asynchronous initialisation:
- Registry configuration loading
- Database connection verification
- UI construction
- Server list population from database
- System information collection
- Timer and monitoring initialisation
Main Interface Components:
-
Server List Panel — Displays all managed servers in a tree view, organised by category. Each server shows its name, type (Steam/Minecraft/Custom), status (Running/Stopped/Error), and CPU/memory usage. Memory is reported differently based on the server type: Java/Minecraft servers display JVM heap allocation (VMS) with a "(JVM)" suffix, while Steam and other native processes display RSS (Resident Set Size). Servers can be drag-and-drop reordered with a floating visual indicator. Right-clicking a server opens a context menu with 20+ options including Start, Stop, Restart, Console, Edit Config, View Process Details, Check for Updates, and more.
-
System Metrics Panel — Shows real-time system information with visual progress bars for CPU usage, RAM usage, and disk usage. Information is refreshed periodically by background timers.
-
Action Buttons Bar — Quick access buttons for common operations: Start All Servers, Stop All Servers, Restart All Servers, Add Server, Import/Export Configurations, Refresh.
-
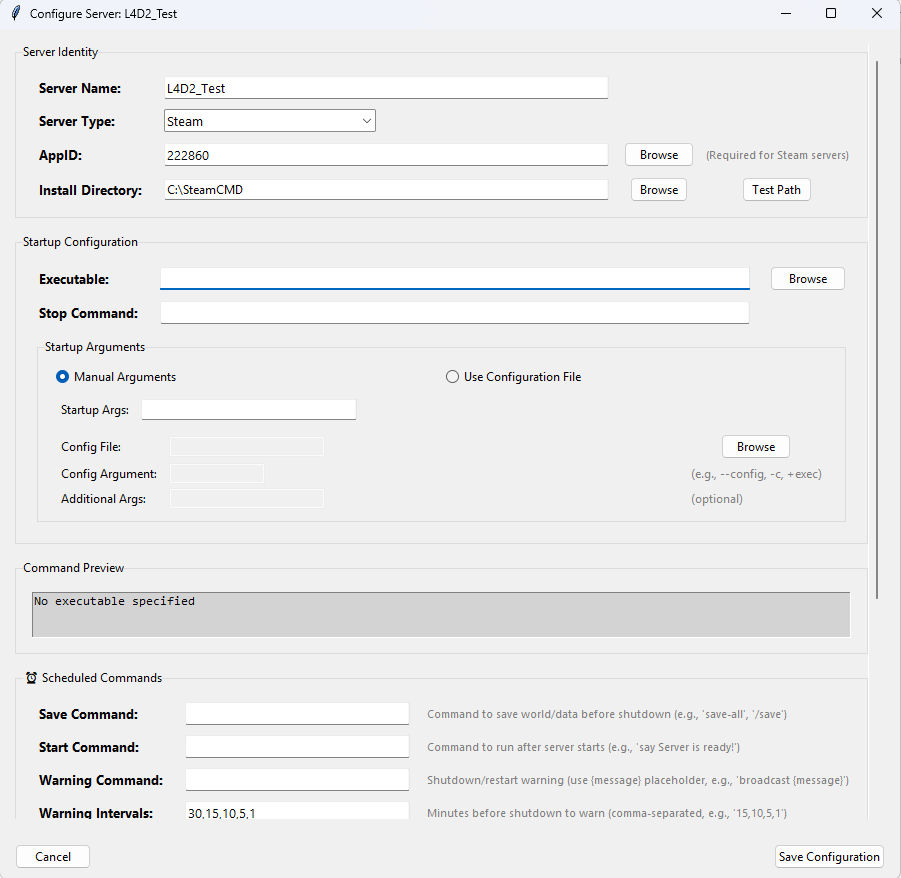
Server Configuration Dialog — A editor for each server's settings. Fields include server name, App ID, installation directory, executable path, launch arguments, stop command, MOTD configuration, update schedule, and automation settings.
-
Process Details View — For a running server, shows detailed process information including PID, CPU usage percentage, memory consumption, uptime, number of child processes, open file handles, and network connections. Memory is displayed according to process type: Java/Minecraft servers show JVM heap (VMS) with a "(JVM)" label, while Steam and other servers show RSS. The Resources tab shows both RSS and VMS values along with the detected process type.
-
Settings Dialog — Application-wide settings organised into 5 tabs:
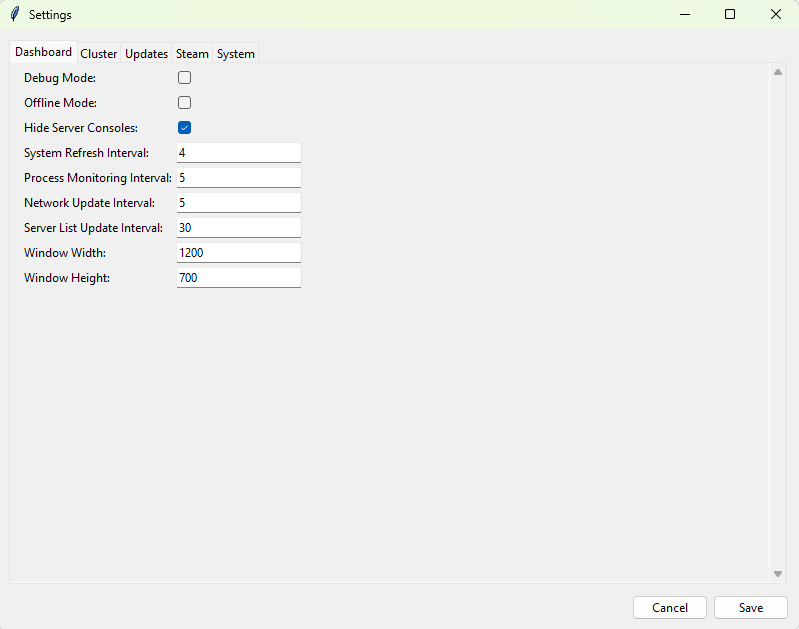
-
General — Application theme, log level, auto-start preferences.
-
Web Server — Port configuration, SSL toggle.
-
Database — Database backend selection and connection parameters.
-
Cluster — Cluster role configuration, node management.
-
Advanced — Debug mode, process creation flags, console visibility.
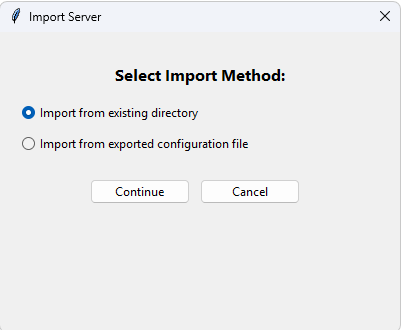
-
Import/Export — Server configurations can be exported to JSON files and imported on other installations for migration or backup purposes.
DPI Awareness: The dashboard is DPI-aware and adjusts its scaling for high-resolution displays on Windows 10/11. It uses ctypes.windll.shcore.SetProcessDpiAwareness(1) to enable per-monitor DPI awareness.
Singleton Enforcement: Only one instance of the dashboard can run at a time, enforced through a PID file lock in the temp/ directory.
The Admin Dashboard (Host/admin_dashboard.py) provides user account management and email configuration. It is accessible from the system tray icon menu (Admin Dashboard option) or from within the main dashboard.
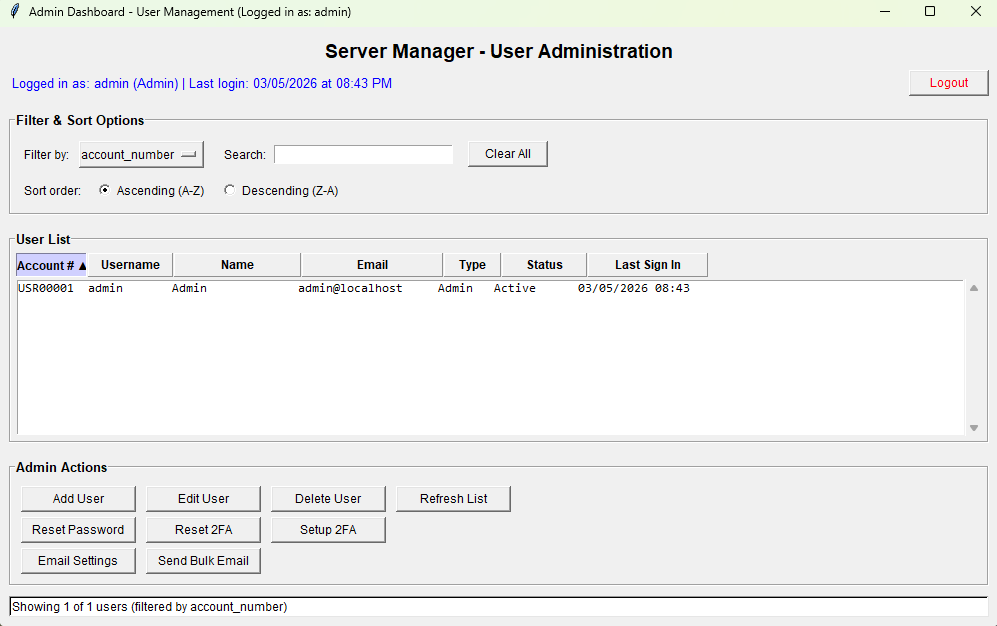
User Management Features:
- View all user accounts in a sortable, filterable table showing username, email, role (Admin/User), active status, last login date, and 2FA status.
- Add User — Create new user accounts with username, password, email, first name, last name, and role selection.
- Edit User — Modify user properties including role and active/inactive status.
- Delete User — Remove user accounts with confirmation dialog.
- Reset Password — Reset a user's password to a new value.
- Setup 2FA — Generate a TOTP secret for a user and display a QR code that can be scanned with an authenticator app (Google Authenticator, Microsoft Authenticator, etc.).
Email Management Features:
- SMTP Configuration — Configure SMTP settings with provider presets for Gmail, Outlook, Office365, Yahoo, and custom servers. Settings include server address, port, TLS/SSL mode, username, and password.
- Notification Toggles — Enable or disable specific notification types: welcome emails, password reset emails, account lockout notifications, server alerts, maintenance notifications, and admin-only alerts.
- Send Email — Send a test or custom email directly from the admin panel.
- Bulk Email — Send an email to all registered users simultaneously.
The Automation Settings Window (Modules/ui/automation_ui.py) provides a per-server configuration interface for automated operations. It can be opened from the tray icon menu or from the dashboard.
Configuration Fields:
- Server Selection — Dropdown to select which server to configure. Changing the server loads its current settings.
-
MOTD (Message of the Day):
-
MOTD Command — The command syntax to use for broadcasting messages (e.g.,
say,broadcast,/say). Must include{message}as a placeholder for the actual message text. - MOTD Message — The message text to broadcast.
- MOTD Interval — How often to broadcast the MOTD, in minutes. Set to 0 to disable.
-
MOTD Command — The command syntax to use for broadcasting messages (e.g.,
-
Server Commands:
- Start Command — Command to execute after the server process starts (e.g., initial setup commands).
-
Stop Command — The command to send to the server to initiate a graceful shutdown (e.g.,
stop,exit,quit). -
Save Command — Command to trigger a world/data save (e.g.,
save-all,/save).
-
Restart Warnings:
-
Warning Command — The command used to broadcast warning messages before a restart. Uses
{message}placeholder. -
Warning Intervals — Comma-separated list of minutes before restart at which to send warnings (default:
30,15,10,5,1). For example, "30,15,10,5,1" means warnings are sent at 30 minutes, 15 minutes, 10 minutes, 5 minutes, and 1 minute before the restart. -
Warning Message Template — The message template for warnings. Uses
{message}placeholder which is replaced with the countdown text (e.g., "Server restarting in {message}").
-
Warning Command — The command used to broadcast warning messages before a restart. Uses
Test Buttons:
- Test MOTD — Sends the configured MOTD message to the running server immediately.
- Test Warning — Sends a test warning message with a configurable countdown value.
- Test Save Command — Executes the save command on the running server.
Settings are persisted to the database via ServerConfigManager.
The Server Console (Modules/server/server_console.py) provides a real-time interactive terminal for communicating with running server processes. It is approximately 3,100 lines of code.
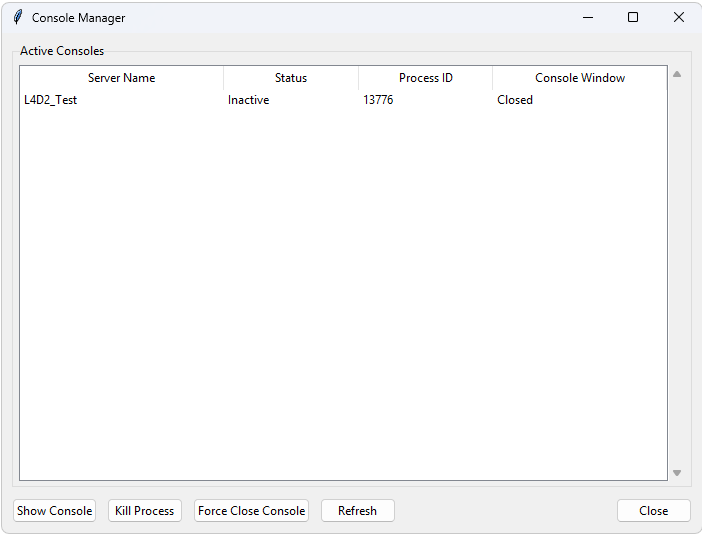
Two Main Classes:
-
RealTimeConsole— The backend that manages the connection to a server's subprocess. It creates monitoring threads for stdout and stderr, buffers output, writes to log files, and handles command input through multiple delivery methods. -
ConsoleManager— The Tkinter GUI window that provides the user interface. Features include:- Dark-themed terminal-style output display with colour-coded text.
- Command input field with history (up/down arrow to cycle through previous commands).
- Auto-scrolling with the option to scroll back and read previous output.
- Text search functionality within the console output.
- Adjustable font size.
- Console state persistence — the console output and input history can be saved to and loaded from the database, allowing you to close and reopen the console without losing context.
Five Command Input Methods: Server Manager implements five different methods for delivering commands to server process stdin. It tries them in order of reliability:
-
Console API (Direct) — Writes directly to the subprocess stdin pipe. This is the most reliable method but may not work if the subprocess has redirected or closed its stdin.
-
Named Pipes (stdin_relay.py) — Uses Windows Named Pipes (
\\.\pipe\ServerManager_stdin_{server_name}) to deliver commands. A background relay thread listens on the pipe and forwards received data to the subprocess stdin. This method works across process boundaries and provides JSON acknowledgment of command delivery. -
Persistent Stdin Pipes (persistent_stdin.py) — Creates a persistent duplex named pipe that is passed as the stdin handle when spawning the subprocess. This ensures stdin is always writable.
-
Command Queue Files (command_queue.py) — A file-based fallback. Commands are written to a text file (
temp/command_queues/{server_name}_commands.txt) with the formattimestamp:command. A polling thread reads the file every 100 milliseconds and delivers commands to stdin. The file is auto-cleaned after 100 processed commands. -
Stdin Relay with Acknowledgment — Similar to method 2 but with a full request-response cycle including delivery confirmation.
These methods are tried in sequence. If one fails, the next is attempted, ensuring maximum reliability for command delivery.
The system tray icon (Modules/services/trayicon.py) provides persistent background presence and quick access to all application features. It uses the pystray library with pillow for icon rendering.
Menu Items:
- Open Server Dashboard — Launches the main Tkinter dashboard as a detached process.
- Open Admin Dashboard — Launches the admin dashboard.
- Open Web Interface — Opens the default web browser to the web interface URL.
- Automation Settings — Opens the automation configuration window.
- Open Console — Opens the server console selector.
- Debug Center — Opens the diagnostics and debugging GUI.
- About — Shows version and system information.
- Exit — Calls the centralized shutdown utility and then exits, ensuring tray/launcher/debug/web processes are all closed consistently.
Tooltip: The tray icon tooltip dynamically displays the number of currently running servers.
Status Updates: A background timer updates the tray icon status every 10 seconds, checking process health and server counts.
Singleton Enforcement: Only one tray icon instance can run at a time, enforced via PID file.
The web interface is served by the Flask web server (via Waitress WSGI) on the port configured during installation (default: 8080). Access it from any browser:
-
Local machine:
http://localhost:8080 -
Remote machine:
http://<server-IP>:8080 -
With SSL enabled:
https://localhost:8080orhttps://<server-IP>:8080
All web pages support both light and dark themes, togglable from the user menu. Theme preference is saved in the browser's local storage.
The login page (www/login.html) presents a clean authentication form with:
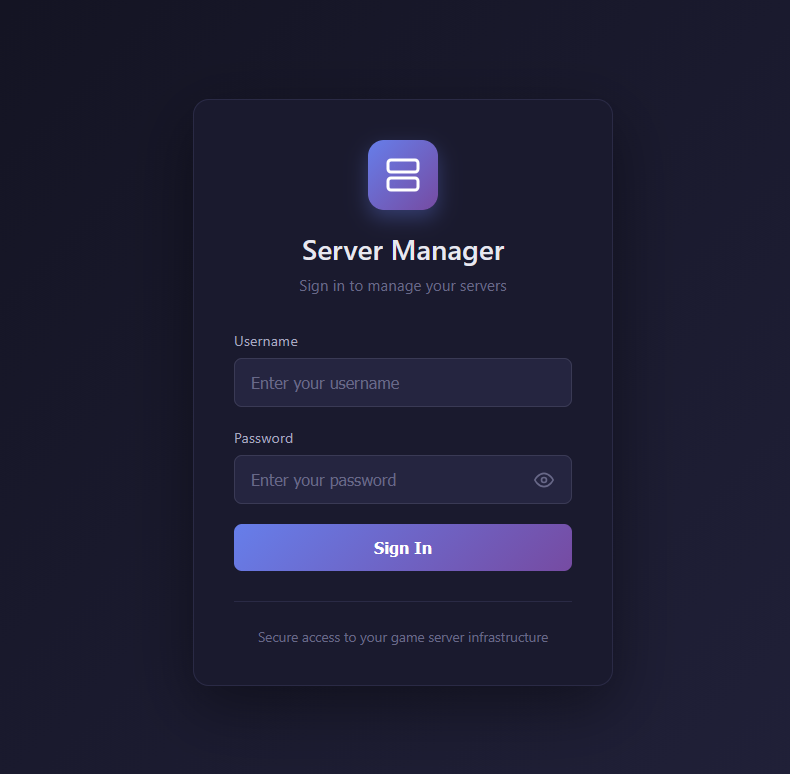
- Username field
- Password field with visibility toggle (eye icon)
- Login button with loading spinner during authentication
- Error and success alert messages
Upon successful login, the session token, username, and admin status are stored in the browser's sessionStorage. The user is then redirected to the dashboard. If the token is invalid or expired, subsequent API calls will return 401 and the user will be redirected back to the login page.
The web dashboard (www/dashboard.html) is the main management interface for the web UI, featuring:
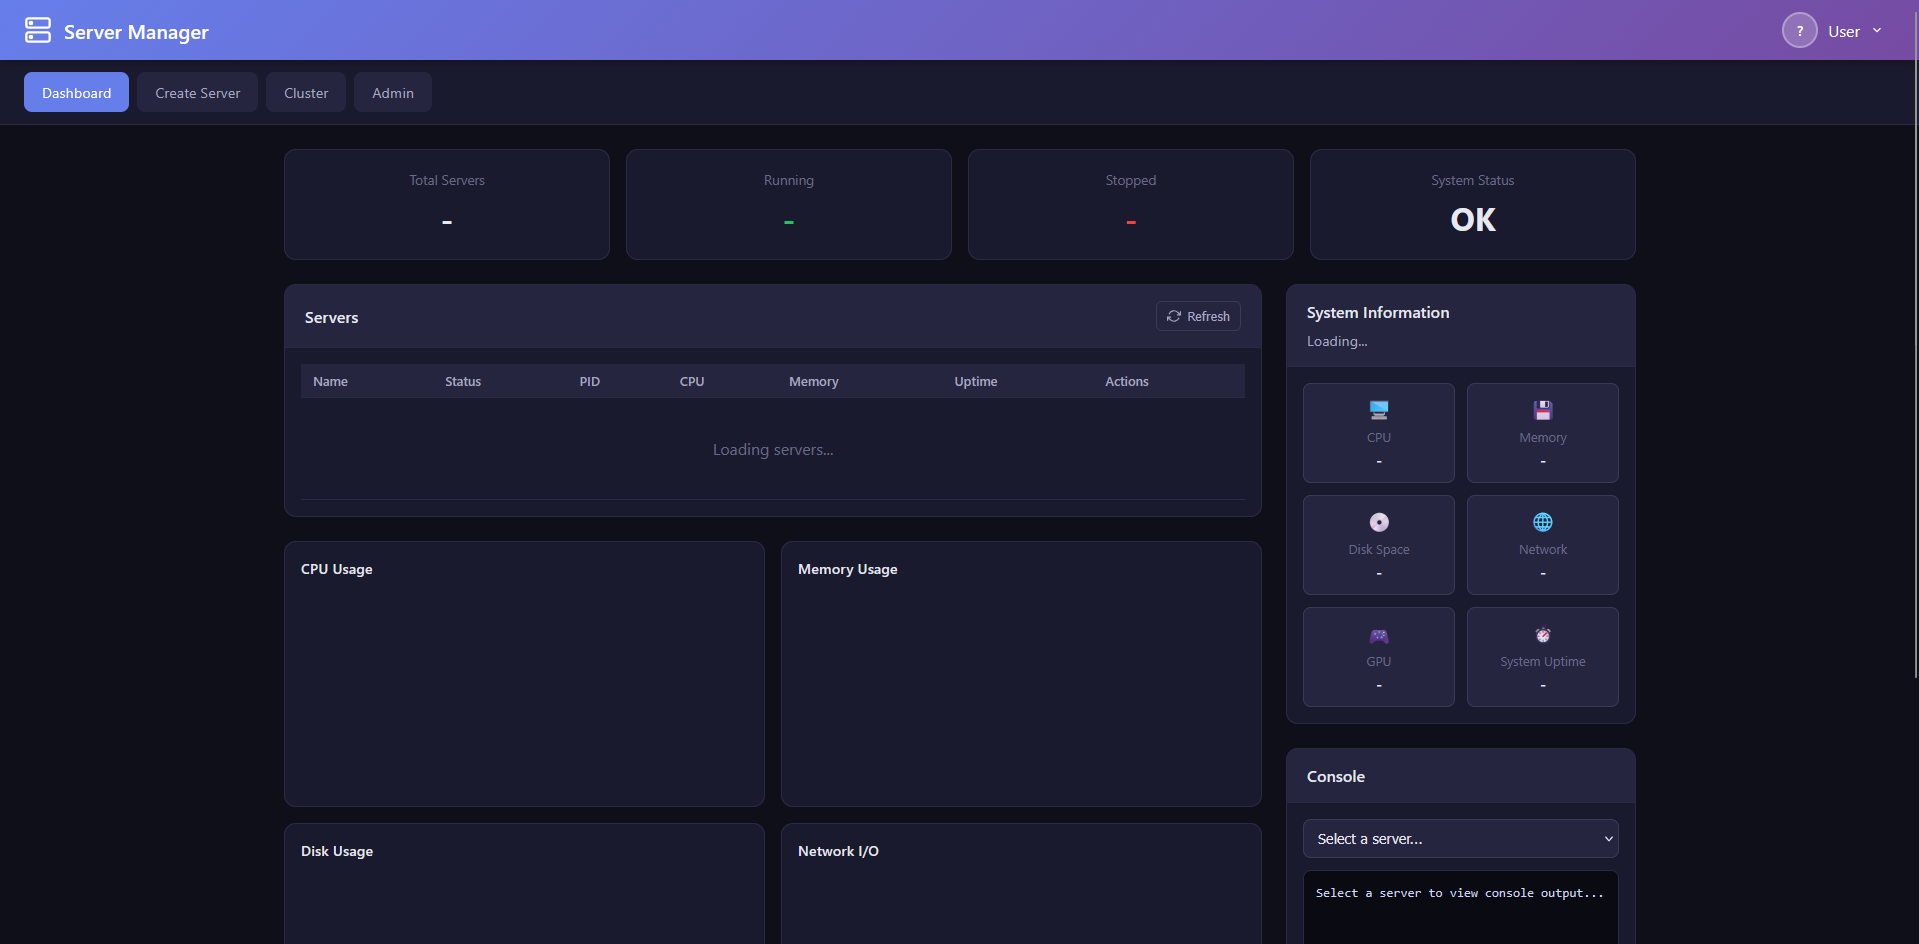
Header:
- Application title and branding
- User menu dropdown with avatar display, profile link, theme toggle (dark/light), and logout button
Navigation Bar:
- Dashboard (home)
- Create Server
- Cluster (visible only to admin users)
- Admin (visible only to admin users)
Stats Grid: Four cards showing at-a-glance metrics:
- Total Servers (count)
- Running Servers (count)
- CPU Usage (percentage)
- Memory Usage (percentage)
Server List: Each managed server is displayed as a card with:
- Server name and type badge (Steam/Minecraft/Custom)
- Status indicator (Running with green badge, Stopped with red badge, Error with orange badge)
- CPU usage and memory usage from real-time process monitoring. Java/Minecraft servers display JVM heap allocation with a "(JVM)" suffix, while Steam and other servers display RSS.
- Action buttons: Start, Stop, Restart, Remove (with confirmation dialog)
- Console viewer modal — Click to view live server output and send commands
System Information Panel: Displays the server host's system details:
- Hostname and operating system
- CPU model, core count, and current usage
- Total and available memory
- Disk space usage
Charts: Powered by Chart.js, the dashboard includes five interactive charts:
- CPU Usage (bar chart)
- Memory Usage (bar chart)
- Server Status Distribution (pie chart)
- Network Activity (line chart)
- Disk Usage (doughnut chart)
Auto-Refresh: Data is automatically refreshed at a configurable interval (default: 10 seconds). The refresh cycle updates the server list, stats grid, charts, and system information.
The Create Server page (www/create-server.html) provides a wizard for setting up new game servers:
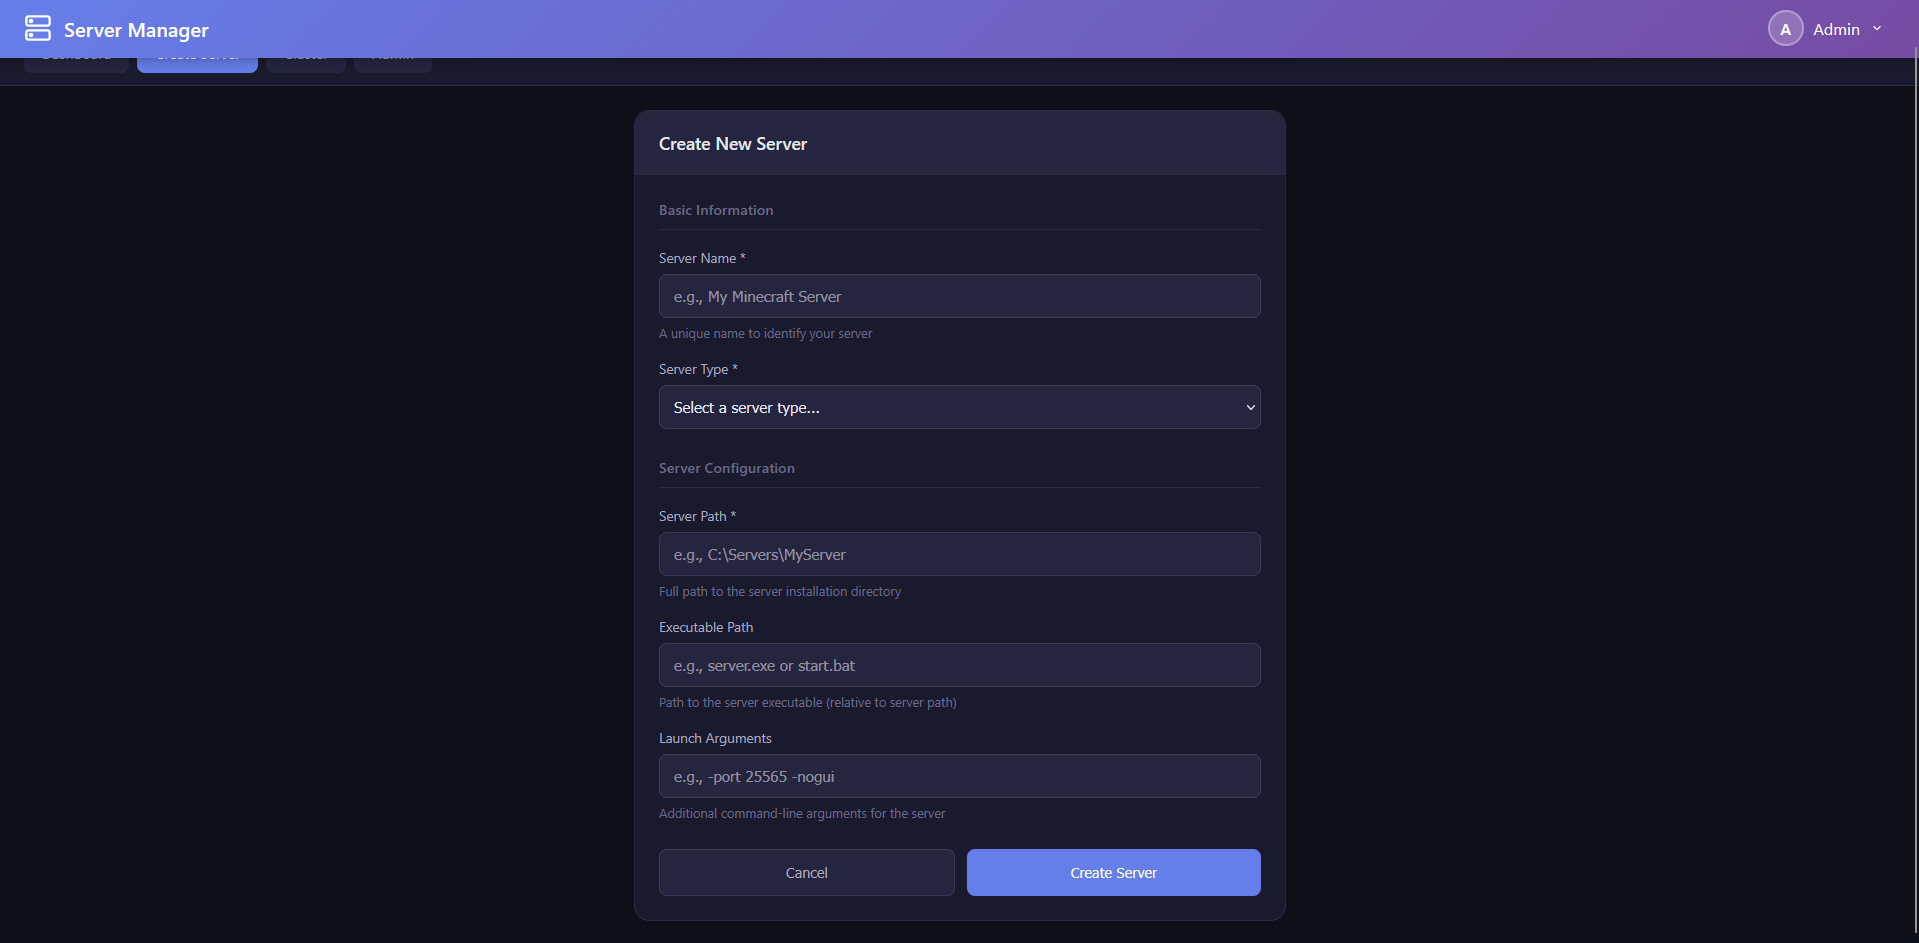
Server Type Selection:
- Steam — For SteamCMD-based dedicated servers
- Minecraft — For Minecraft Java Edition servers
Steam Server Configuration:
- Server Name — A unique friendly name for the server
- App ID — The Steam Application ID for the dedicated server. Includes a searchable dropdown populated from the Steam apps database, allowing you to search by game name. Common examples: Counter-Strike 2 (730), Team Fortress 2 (232250), Garry's Mod (4020), Valheim (896660)
- Install Directory — Where the server files will be installed
- Custom Executable — Optional override for the server executable path
- Anonymous Login — Toggle whether SteamCMD should use anonymous login (most free dedicated servers support this) or require Steam credentials
Minecraft Server Configuration:
- Server Version — Select from available Minecraft versions
- Modloader — Choose between Vanilla, Fabric, Forge, or NeoForge
- Java Path — Path to the Java executable (auto-detected if possible)
Validation: Form fields are validated before submission. On success, a notification toast is displayed and the server appears in the dashboard server list. On error, detailed error messages are shown.
The Admin Panel (www/admin.html) provides web-based user management for administrators:

User Management Table:
- Displays all users with: username, email, role badge (Admin highlighted), status (Active/Inactive)
- Edit button per user
- Delete button with confirmation
- Reset Password button
Create User Form:
- Username, email, password fields
- Role selection (admin/user)
- Active/inactive toggle
- Submit creates the user immediately
System Settings Section:
- Application-wide configuration options accessible from the web interface
The Cluster Management page (www/cluster.html) provides cluster administration for multi-node setups:
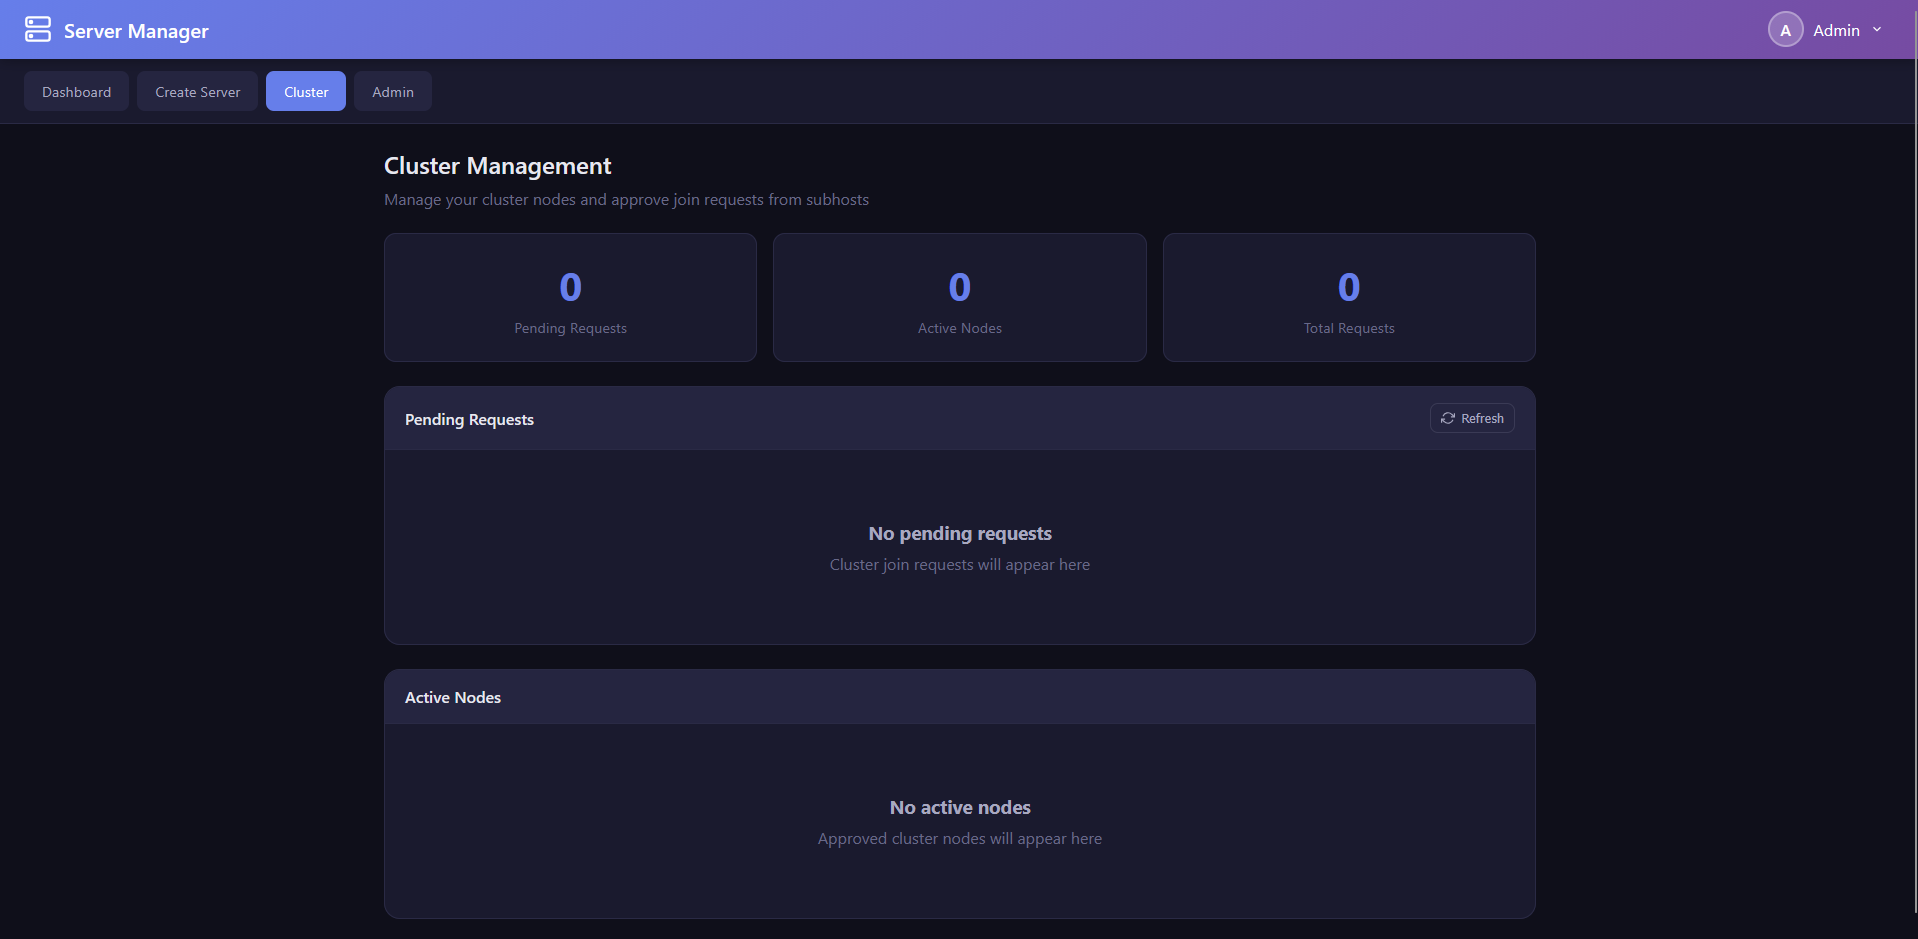
Stats Grid:
- Total Nodes count
- Online Nodes count
- Pending Requests count
Pending Requests: Lists all pending cluster join requests with:
- Requesting node name and IP address
- Request timestamp
- Approve and Reject buttons per request
Registered Nodes: Lists all cluster nodes with:
- Node name and IP address
- Status indicator (Online with green dot, Offline with red dot, Pending with yellow dot)
- Node details (port, last heartbeat time)
- Revoke button to remove a node from the cluster
Auto-Refresh: Cluster data refreshes every 30 seconds to reflect heartbeat updates and new join requests.
The web server (Modules/services/webserver.py) is a Flask application served through the Waitress WSGI server (a production-grade server, unlike Flask's built-in development server). It is approximately 2,800 lines of code.
Key Configuration:
-
Port: Configurable via registry
WebPortvalue (default: 8080) -
CORS: Enabled via
flask-corsfor cross-origin requests from the web interface -
SSL: Optional SSL/TLS support. When SSL is enabled, certificates are loaded from the
ssl/directory -
Static Files: The
www/directory is served for all web interface assets - Session Management: Token-based authentication using Bearer tokens in the Authorization header
Startup Sequence:
- Import and initialise database modules (user database, server config manager)
- Create Flask application and configure CORS
- Register the cluster API Blueprint
- Set up static file serving from
www/ - Initialise the
DashboardTrackerfor process monitoring - Create default admin user if none exists
- Start Waitress WSGI server on the configured port
All API endpoints are prefixed with /api/ and require authentication unless otherwise noted.
Authentication Endpoints:
| Method | Endpoint | Description | Auth Required |
|---|---|---|---|
| POST | /api/auth/login |
Authenticate and receive a session token | No |
| GET | /api/auth/verify |
Verify the current session token is valid | Yes |
Server Management Endpoints:
| Method | Endpoint | Description |
|---|---|---|
| GET | /api/servers |
List all servers with current status, real-time CPU and memory usage |
| POST | /api/servers |
Create a new server (name, appid, type, install_dir) |
| GET | /api/servers/<name>/status |
Get status of a specific server |
| POST | /api/servers/<name>/start |
Start a server |
| POST | /api/servers/<name>/stop |
Stop a server |
| POST | /api/servers/<name>/restart |
Restart a server |
| DELETE | /api/servers/<name> |
Remove a server configuration |
Console Endpoints:
| Method | Endpoint | Description |
|---|---|---|
| GET | /api/servers/<name>/console |
Get recent console output for a server |
| POST | /api/servers/<name>/console |
Send a command to a server's console |
User Management Endpoints (Admin Only):
| Method | Endpoint | Description |
|---|---|---|
| GET | /api/users |
List all user accounts |
| POST | /api/users |
Create a new user account |
| DELETE | /api/users/<username> |
Delete a user account |
| PUT | /api/users/<username>/password |
Reset a user's password |
User Profile Endpoints:
| Method | Endpoint | Description |
|---|---|---|
| GET | /api/profile |
Get the current user's profile |
| PUT | /api/profile |
Update profile fields (display name, email, bio, timezone, theme) |
| PUT | /api/profile/password |
Change the current user's password |
| POST | /api/profile/avatar |
Upload a profile avatar image |
Analytics Endpoints:
| Method | Endpoint | Description |
|---|---|---|
| GET | /api/analytics/summary |
Get analytics summary data |
| GET | /api/analytics/time-series |
Get time-series metrics data |
System Endpoints:
| Method | Endpoint | Description |
|---|---|---|
| GET | /api/settings |
Get system settings |
| GET | /api/status |
Get application status (used by cluster nodes) |
| GET | /metrics |
Prometheus-format metrics endpoint |
Cluster Endpoints (via Blueprint): See Section 15.3: Cluster API Endpoints.
-
Login Request: The client sends a POST to
/api/auth/loginwith{ "username": "...", "password": "..." }. - Credential Verification: The server authenticates against the user database using bcrypt. If the stored hash uses the legacy SHA256 format, it is automatically upgraded to bcrypt on successful login.
- Token Generation: On success, a session token is generated and returned along with the username, admin status, and user ID.
-
Token Storage: The client stores the token in
sessionStorage(browser) and includes it in all subsequent requests as a Bearer token in the Authorization header:Authorization: Bearer <token>. - Token Verification: Each API request checks the Authorization header. If the token is missing, invalid, or expired, a 401 response is returned, and the web interface redirects to the login page.
Server Manager supports three types of server installations:
Steam Dedicated Servers: Installation is performed through SteamCMD, Valve's command-line tool for downloading and updating Steam game servers. The process:
- The user provides the Steam App ID, server name, and installation directory.
- Server Manager invokes SteamCMD with the appropriate parameters:
steamcmd +login <username> +force_install_dir <dir> +app_update <appid> validate +quit. - SteamCMD handles downloading the server files. Server Manager monitors the process and handles 40+ error codes.
- Login can be anonymous (for free dedicated servers) or authenticated (for servers requiring a Steam account). Steam Guard TOTP codes are supported.
- After installation, the server configuration is saved to the database with all metadata.
Minecraft Servers: Minecraft server installation supports four modloaders:
- Vanilla — Downloads the official server JAR from Mojang's version manifest.
- Fabric — Downloads from the Fabric meta API.
- Forge — Downloads from the Forge promotions/downloads CDN.
- NeoForge — Downloads from the NeoForge API.
The installer also handles EULA auto-acceptance, launch script creation (with appropriate Java arguments), and server detection.
Custom Servers: You can add any executable as a managed server by providing the executable path and working directory.
Starting a server (ServerManager.start_server_advanced()) involves:
- Corruption Detection — Checks the installation directory for signs of corrupted or incomplete installations.
-
Executable Resolution — Handles multiple executable types: batch scripts (
.bat,.cmd), executables (.exe), and Java JARs (.jar). For batch scripts, the command is wrapped withcmd.exe /c. For JAR files, the Java executable is used. -
Process Creation — The server process is started with
subprocess.Popen. Console window visibility is controlled by thehideServerConsolesconfiguration option. Stdin, stdout, and stderr are captured for console interaction. - Retry Logic — If the first start attempt fails, up to 3 retries are attempted with different strategies (e.g., adjusting working directory, retrying with different executable detection).
- Process Registration — The PID, process creation time, and status are recorded in the database.
- Stdin Relay Setup — The command input infrastructure (named pipes, command queue) is initialised for the new server process.
- Post-Start Commands — If a start command is configured in the automation settings, it is executed on the server after a brief startup delay.
Stopping a server (ServerManager.stop_server_advanced()) uses a multi-strategy graceful shutdown approach:
-
Stop Command via Stdin — If a stop command is configured (e.g.,
stop,exit,quit), it is sent to the server via the stdin relay infrastructure. - SIGTERM — A terminate signal is sent to the process.
- Window Close — On Windows, attempts to close the process's main window.
- Ctrl+C Event — Sends a CTRL_C_EVENT to the process group.
-
Force Kill — If none of the graceful methods succeed within the timeout period, the process is forcefully terminated using
taskkill /F /T(with child processes).
After the process exits, the PID and status are updated in the database, and stdin relay resources are cleaned up.
Restarting a server (ServerManager.restart_server_advanced()) combines the stop and start sequences:
- Initiate stop with the graceful shutdown sequence.
- Wait for the process to fully exit.
- Initiate start with the standard startup sequence.
- A callback function can be provided for progress reporting.
If pre-restart warnings are configured, the restart operation first sends countdown warnings at the configured intervals before initiating the stop.
The update system (Modules/updates/server_updates.py, ServerUpdateManager) provides both on-demand and scheduled update checking:
Manual Update Check:
For Steam servers, the update checker queries SteamCMD's app_info_print command with a 2-minute timeout to compare the installed build ID against the latest available build ID. If a newer version is available, the server can be updated.
Automatic Update Process:
- Stop the server (if running).
- Run SteamCMD to update the server files (
+app_update <appid> validate). - Restart the server.
- The
in_progressflag prevents concurrent update operations on the same server.
Scheduled Updates:
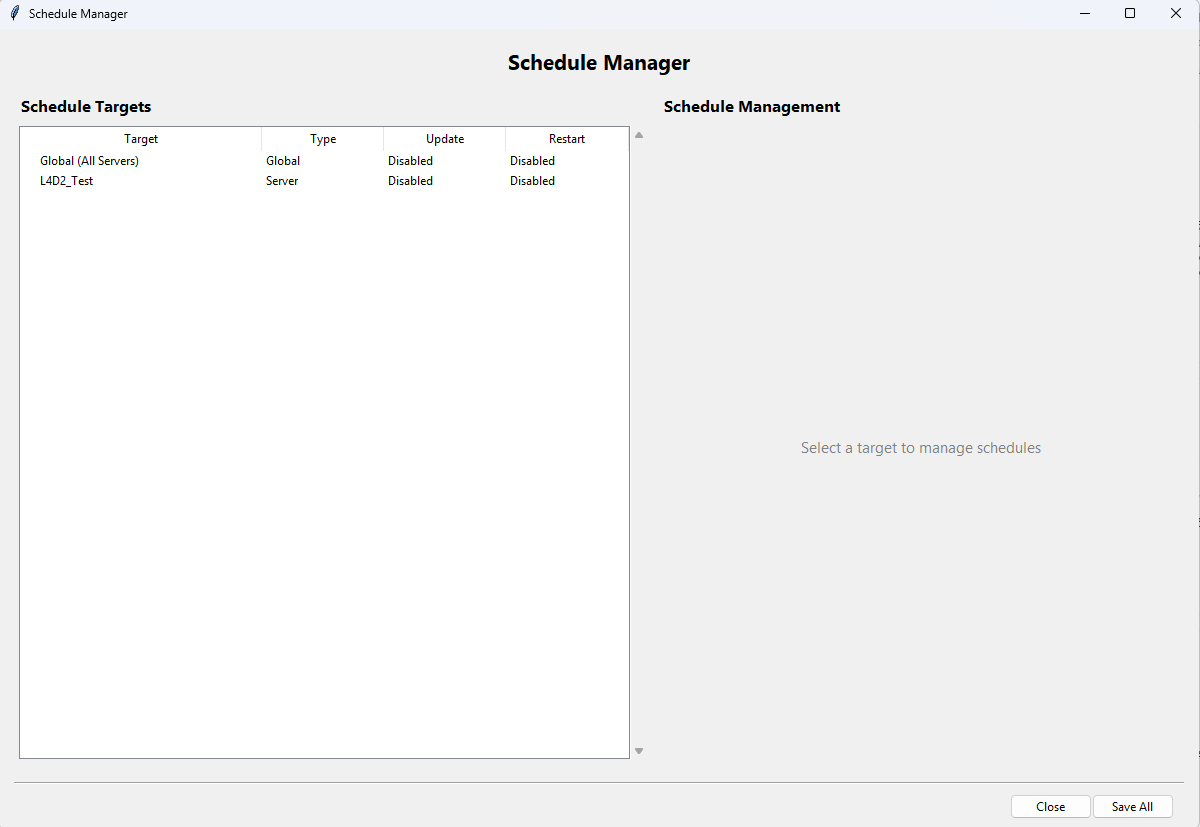
- Global Schedule — A global update schedule can be configured to check all servers at a specific time window. The system supports daily and weekly schedules with a 30-minute time window for flexibility.
- Per-Server Schedule — Individual servers can have their own update schedules that override the global schedule.
- Scattered Restarts — To avoid restarting all servers simultaneously, a hash of the server name is used to compute a consistent time offset, scattering restarts across the schedule window.
Pre-Restart Warnings:
Before restarting a server for updates, warning messages are broadcast to connected players at configurable intervals. The default intervals are 30, 15, 10, 5, and 1 minutes before the restart. The warning message template supports a {message} placeholder that is replaced with the remaining time. Warning delivery uses the shared send_command_to_server() utility from common.py, which tries the persistent stdin pipe first and falls back to the file-based command queue.
Batch Updates:
The update_all_steam_servers() method checks and updates all Steam servers sequentially with a 2-second delay between servers to avoid overwhelming the system or SteamCMD.
See Section 7.4: Server Console for the full description of the console system and its five command delivery methods.
The Server Automation system (Modules/services/server_automation.py, ServerAutomationManager) runs as a background process and handles:
MOTD Broadcasting:
- A background thread checks all server configurations every 60 seconds.
- For each server with MOTD enabled (interval > 0 and message non-empty), it checks if enough time has elapsed since the last broadcast.
- If the server is running and it is time, the MOTD command is sent to the server with
{message}replaced by the configured message text. - Broadcast timestamps are tracked per-server to maintain accurate intervals.
Restart Warnings:
- When a scheduled restart is approaching, warning messages are sent at the configured intervals (e.g., "Server restarting in 30 minutes", "Server restarting in 15 minutes", etc.).
- The warning command and message template are per-server settings.
- Warning delivery uses the shared
send_command_to_server()utility fromcommon.py.
Start Commands:
- After a server starts, configured start commands are automatically executed.
- This is useful for servers that need initialisation commands after boot.
Server Manager supports four Minecraft modloaders:
-
Vanilla — The official Mojang server JAR. Downloaded directly from Mojang's version manifest API (
https://launchermeta.mojang.com/mc/game/version_manifest_v2.json). Supports all release and snapshot versions. -
Fabric — A lightweight, modular modloader. Downloaded from the Fabric meta API (
https://meta.fabricmc.net/). Popular for performance-focused mod packs. -
Forge — The most established modloader for Minecraft. Downloaded from the Forge promotions API (
https://files.minecraftforge.net/). Supports a vast ecosystem of mods. -
NeoForge — A community fork of Forge with modern API improvements. Downloaded from the NeoForge API (
https://maven.neoforged.net/).
Different Minecraft versions require different Java versions. Server Manager includes automatic Java detection and version matching:
| Minecraft Version | Required Java Version |
|---|---|
| 1.16 and earlier | Java 8 |
| 1.17 | Java 16 |
| 1.18 – 1.20 | Java 17 |
| 1.21 and later | Java 21 |
Java Detection: The detect_java_installations() function scans common Windows installation paths:
-
JAVA_HOMEenvironment variable C:\Program Files\Java\*C:\Program Files (x86)\Java\*C:\Program Files\Eclipse Adoptium\*C:\Program Files\Amazon Corretto\*C:\Program Files\Microsoft\*- System PATH directories
For each detected installation, the function extracts the version string and validates the Java binary.
Compatibility Checking: check_java_compatibility() compares a detected Java installation against the requirements for a specific Minecraft version and reports whether it is compatible, along with recommendations if not.
The Java Configurator (Modules/updates/java_configurator.py) is a command-line tool for managing Java installations:
# List all detected Java installations
python Modules/updates/java_configurator.py list-java

# List all Minecraft servers from the database
python Modules/updates/java_configurator.py list-servers

# Check Java compatibility for a server
python Modules/updates/java_configurator.py check --server "My Minecraft Server"

# Configure Java for a server (auto-selects if not specified)
python Modules/updates/java_configurator.py configure --server "My Minecraft Server" --java "C:\Program Files\Java\jdk-21\bin\java.exe"Server Manager supports multiple database backends through SQLAlchemy:
| Backend | Connection | Use Case |
|---|---|---|
| SQLite (default) | File-based, no server needed | Single-machine installations, development |
| Microsoft SQL Server | Via pyodbc + ODBC driver | Enterprise deployments with existing MSSQL infrastructure |
| MySQL / MariaDB | Via mysqlconnector | Multi-user environments |
| PostgreSQL | Via psycopg2 | High-performance enterprise deployments |
The database backend is selected during installation and stored in the registry. Database connection parameters (server address, database name, authentication) are read from the registry at runtime by database_utils.py.
When using SQLite (default), three database files are created in the db/ directory:
| File | Purpose |
|---|---|
servermanager_users.db |
User accounts, permissions |
steam_ID.db |
Steam application catalogue, console states |
servermanager.db |
Cluster config, nodes, tokens, app config, server categories, update schedules, Steam credentials |
The Minecraft database uses the same SQLAlchemy engine as the Steam database, storing Minecraft server version information.
The ServerConfig model (Modules/Database/server_configs_database.py) stores all server configuration data with 30+ columns:
| Column | Type | Description |
|---|---|---|
id |
Integer (PK) | Auto-incrementing primary key |
Name |
String | Unique server name |
Type |
String | Server type ("Steam", "Minecraft", "Custom") |
AppID |
String | Steam App ID or Minecraft version |
InstallDir |
String | Installation directory path |
ExecutablePath |
String | Path to the server executable |
Arguments |
String | Launch arguments |
ProcessId |
Integer | PID of the running process (0 if stopped) |
Status |
String | Current status (Running/Stopped/Error) |
CPUUsage |
Float | Last recorded CPU usage |
MemoryUsage |
Float | Last recorded memory usage |
MotdCommand |
String | MOTD broadcast command template |
MotdMessage |
String | MOTD message text |
MotdInterval |
Integer | MOTD broadcast interval (minutes) |
StartCommand |
String | Post-start command |
StopCommand |
String | Graceful stop command |
SaveCommand |
String | World/data save command |
WarningCommand |
String | Restart warning command template |
WarningIntervals |
String | Comma-separated warning intervals |
WarningMessageTemplate |
String | Warning message template |
ScheduledRestartEnabled |
Boolean | Whether scheduled restarts are active |
The ServerConfigManager class provides full CRUD operations, server copying, user-filtered access based on permissions, and JSON import/export for migration between installations.
The users table stores user account information:
| Column | Type | Description |
|---|---|---|
id |
Integer (PK) | Auto-incrementing primary key |
username |
String (unique) | Login username |
password |
String | bcrypt-hashed password |
email |
String | Email address |
first_name |
String | First name |
last_name |
String | Last name |
display_name |
String | Display name shown in UI |
account_number |
String (unique) | Generated account identifier |
is_admin |
Integer | Admin flag (0 or 1) |
is_active |
Integer | Active status (0 or 1) |
created_at |
DateTime | Account creation timestamp |
last_login |
DateTime | Last successful login |
two_factor_enabled |
Integer | 2FA enabled flag |
two_factor_secret |
String | TOTP secret key |
avatar |
String | Avatar image path or URL |
bio |
Text | User biography |
timezone |
String | Preferred timezone |
theme |
String | Preferred UI theme |
The ensure_root_admin() function creates a default admin account (username: admin, password: admin) if no admin user exists.
The steam_apps table catalogues Steam dedicated servers:
| Column | Type | Description |
|---|---|---|
appid |
Integer (PK) | Steam Application ID |
name |
String | Application name |
type |
String | Application type |
is_server |
Integer | Is a server application |
is_dedicated_server |
Integer | Is a dedicated server |
requires_subscription |
Integer | Requires paid subscription |
anonymous_install |
Integer | Supports anonymous SteamCMD login |
publisher |
String | Publisher name |
release_date |
String | Release date |
description |
Text | Application description |
tags |
String | Associated tags |
price |
String | Price information |
platforms |
String | Supported platforms |
last_updated |
DateTime | Last update timestamp |
source |
String | Data source identifier |
This database is populated by the AppIDScanner (Modules/Database/scanners/AppIDScanner.py) which:
- Fetches the complete Steam app list from the
ISteamApps/GetAppList/v2/API endpoint. - Queries the Steam Store API for detailed information on each application, with rate limiting (2-second general delay, 3-second API delay).
- Uses enhanced server detection with keyword matching, regex patterns, and DLC exclusion to identify dedicated server applications.
- Maintains a curated list of well-known free dedicated servers (CS2, TF2, L4D2, GMod, Rust, ARK, Valheim, etc.) with pre-set subscription and anonymous install flags.
The minecraft_servers table catalogues Minecraft server versions:
| Column | Type | Description |
|---|---|---|
id |
Integer (PK) | Auto-incrementing primary key |
version |
String | Minecraft version number |
type |
String | Version type (release, snapshot, etc.) |
modloader |
String | Modloader (vanilla, fabric, forge, neoforge) |
java_version |
String | Required Java version |
download_url |
String | Server JAR download URL |
release_date |
String | Release date |
last_updated |
DateTime | Last database update |
The MinecraftIDScanner (Modules/Database/scanners/MinecraftIDScanner.py) populates this table by fetching version information from four sources: Mojang (vanilla), Fabric meta API, Forge promotions, and NeoForge API.
The cluster database (Modules/Database/cluster_database.py) uses direct SQLite and contains 10+ tables managed by the ClusterDatabase singleton:
Tables:
| Table | Purpose |
|---|---|
cluster_config |
Cluster role, name, secret, master IP |
cluster_nodes |
Registered cluster nodes with status and heartbeat |
cluster_tokens |
Authentication tokens for inter-node communication |
cluster_communication_log |
Audit log of all cluster operations |
pending_requests |
Node join requests awaiting approval |
host_status |
Host node health status |
server_categories |
Server group categories with display order |
dashboard_config |
Dashboard layout and display preferences |
update_config |
Global and per-server update schedules |
main_config |
Application configuration key-value store |
steam_credentials |
Encrypted Steam login credentials |
Key Features:
-
JSON Migration — If legacy JSON configuration files exist, they are automatically migrated to the database using
_flatten_config()to recursively flatten nested config dicts into typed key-value pairs. -
Heartbeat System — Nodes periodically send heartbeats to update their
last_pingtimestamp, allowing the system to detect offline nodes. - Token Management — Cluster authentication tokens have expiration dates and can be revoked.
- Category Management — Server categories support custom display ordering with drag-and-drop reordering capability.
- Steam Credentials Encryption — Steam login credentials are encrypted using hostname-based XOR encryption before storage.
The console state database (Modules/Database/console_database.py) persists console sessions:
| Column | Type | Description |
|---|---|---|
server_name |
String (PK) | Server identifier |
state_data |
Text (JSON) | Serialized console state (output buffer, command history) |
updated_at |
DateTime | Last update timestamp |
Console states older than 1 hour are treated as stale and ignored on load. This prevents loading outdated console output when reconnecting to a server.
Update-ServerManager.pyw — A GUI tool for database schema updates that provides:
- Detection of the database backend type (SQLite/MySQL/MariaDB/MSSQL).
- Creating the
userstable if it does not exist, with all 14 required columns. - Adding missing columns to existing tables using ALTER TABLE statements.
- Generating account numbers for users that do not have one.
- Creating the default admin user if no admin exists.
- Backend-specific SQL type mapping (e.g.,
TEXTin SQLite vsNVARCHAR(MAX)in MSSQL).
The Modules/Database/scanners/ directory contains scripts for populating the application ID databases:
AppIDScanner.py — Populates the Steam dedicated server catalogue:
- Fetches the complete Steam app list from the
ISteamApps/GetAppList/v2/API endpoint. - Queries the Steam Store API for detailed application metadata with rate limiting.
- Uses keyword matching, regex patterns, and DLC exclusion to identify dedicated servers.
- Maintains a curated list of well-known free dedicated servers with pre-set flags.
MinecraftIDScanner.py — Populates the Minecraft version catalogue:
- Fetches version information from four sources: Mojang (vanilla), Fabric meta API, Forge promotions, and NeoForge API.
- Pre-compiles regex patterns for efficient version string parsing.
- Stores version, modloader, Java requirement, and download URL per entry.
Each user account is represented by the User SQLAlchemy model with the fields described in Section 12.4. Users have two roles:
- Admin — Full access to all features including user management, cluster management, and system settings.
- User — Access to assigned servers only, based on per-server permission entries.
Server Manager uses bcrypt for password hashing (via the bcrypt Python package). The UserManager.hash_password() method generates a bcrypt hash with automatic salting.
Legacy Support: Older installations may have passwords hashed with SHA256. The authentication system detects the hash format on login. If a SHA256-hashed password is successfully verified, it is automatically upgraded to bcrypt in-place, providing seamless migration without user intervention.
Authentication resilience: The authenticate method includes up to 3 retries with brief delays to handle SQLite "database locked" errors that can occur under concurrent access.
Server Manager supports TOTP-based two-factor authentication using the pyotp library:
Setup Process:
- An admin generates a 2FA secret for a user account via the Admin Dashboard.
- The secret is used to generate a QR code that the user scans with an authenticator app (Google Authenticator, Microsoft Authenticator, Authy, etc.).
- The 2FA secret is stored in the
two_factor_secretcolumn of the user record andtwo_factor_enabledis set to 1.
Login with 2FA:
When 2FA is enabled, after entering the correct username and password, the user is prompted for a 6-digit TOTP code from their authenticator app. The code is verified server-side using pyotp.TOTP.verify(). The 2FA dialog logic is shared between the desktop dashboard (Host/admin_dashboard.py) and the user database module (Modules/Database/user_database.py) through the make_2fa_callbacks() factory function in Modules/core/common.py, which returns reusable on_verify, on_cancel, and on_key_press callbacks.
ADD SCREENSHOT
Resetting 2FA:
If a user loses access to their authenticator app, an admin can reset their 2FA using the reset_admin_2FA.py utility script:
python Modules/Database/reset_admin_2FA.pyThis clears the two_factor_secret and sets two_factor_enabled to 0. The user can then set up 2FA again.
The authentication module (Modules/Database/authentication.py) supports two authentication methods:
-
SQL Authentication (default) — Authenticates against the user database using bcrypt password comparison. This is the primary method for all web and desktop login flows.
-
Windows Authentication — Uses
win32security.LogonUser()to authenticate against Windows Active Directory or local accounts. This is useful in enterprise environments where users should log in with their Windows domain credentials.
The authentication mode can be configured as auto (try SQL first, fall back to Windows), sql (SQL only), or windows (Windows only).
If the admin password is lost, use the password reset utility:
python Modules/Database/reset_admin_password.pyThis script:
- Connects to the user database.
- Finds the admin user account.
- Resets the password to the default value (
admin). - Reports success or failure.
Important: After resetting, log in immediately and change the password to a secure value.
The WebSecurityManager (Modules/security/web_security.py) provides web application security through multiple integrated components:
Rate Limiting:
- The
RateLimiterclass implements sliding window rate limiting. - Tracks request counts per IP address within configurable time windows.
- Configurable limits per endpoint or globally.
Account Lockout:
- The
AccountLockoutclass protects against brute-force attacks. - After 5 failed login attempts within 5 minutes, the account is locked for 15 minutes.
- Lockout status and remaining attempts are communicated in API responses.
CSRF Protection:
- The
CSRFProtectionclass generates and validates CSRF tokens for form submissions. - Tokens are tied to user sessions and have configurable expiration.
Input Validation:
- The
InputValidatorclass detects and blocks common attack patterns:- SQL Injection — Detects common SQL injection patterns (UNION SELECT, OR 1=1, DROP TABLE, etc.).
-
XSS (Cross-Site Scripting) — Detects script injection attempts (
<script>,javascript:,onerror=, etc.). -
Path Traversal — Detects directory traversal patterns (
../,..\\,%2e%2e).
Client-Side XSS Prevention:
- The
escapeHtml()utility function in the web interface sanitises API response data before rendering into the DOM. - All dynamic content rendered via
innerHTMLis escaped to prevent stored/reflected XSS from server data.
Path Security:
- The
PathSecurityclass provides safe path joining that prevents directory traversal. - All file paths are validated to ensure they remain within allowed directories.
IP Security:
- The
IPSecurityclass manages IP allowlisting for sensitive operations.
Security Headers: The web server applies standard security headers to all responses:
-
Content-Security-Policy(CSP) — Restricts resource loading origins. -
Strict-Transport-Security(HSTS) — Enforces HTTPS when SSL is enabled. -
X-Frame-Options— Prevents clickjacking (set to DENY). -
X-Content-Type-Options— Prevents MIME-type sniffing (set to nosniff). -
X-XSS-Protection— Enables browser XSS filters. -
Referrer-Policy— Controls referrer information leakage.
The network security module (Modules/security/network_security.py) provides Flask decorators for network-level access control:
@require_allowed_network() — Restricts access to requests from allowed network ranges. Default allowed networks include:
-
127.0.0.0/8— Localhost (always allowed) -
10.0.0.0/8— Private network (Class A) -
172.16.0.0/12— Private network (Class B) -
192.168.0.0/16— Private network (Class C)
@require_cluster_network_security() — Additional restrictions for cluster API endpoints, ensuring only authorised cluster nodes can communicate.
The SSL utilities module (Modules/security/ssl_utils.py) manages SSL/TLS certificates for secure HTTPS communication:
Self-Signed Certificate Generation:
- Generates RSA 2048-bit key pairs.
- Creates X.509 certificates with Subject Alternative Names (SANs) that include all local IP addresses, the hostname, and localhost.
- Certificate validity is set to 1 year by default.
- Certificates and keys are stored in the
ssl/directory asserver.crtandserver.key.
Certificate Verification:
- Validates existing certificates for expiration, key matching, and SAN coverage.
- Reports certificate details including issuer, subject, validity period, and SANs.
Auto-Provisioning:
- If SSL is enabled but no certificate exists, one is automatically generated.
- If an existing certificate is expired or invalid, it is regenerated.
CLI Interface:
python Modules/security/ssl_utils.py generate   # Generate a new self-signed certificate
python Modules/security/ssl_utils.py verify     # Verify the existing certificate
python Modules/security/ssl_utils.py info # Display certificate detailsThe cluster security module (Modules/security/cluster_security.py, SimpleClusterManager) manages cluster membership:
- Master/Node Topology — A single Host acts as the cluster master, with Subhost nodes joining as members.
- Join Request Workflow — Nodes must request to join, and the Host admin must approve each request. This prevents unauthorized nodes from joining the cluster.
- Dual Storage — Cluster role configuration is stored in both the Windows Registry and the cluster database for redundancy.
- Token-Based Authentication — Cluster communication uses token-based authentication with expiration and revocation support.
Server Manager supports a basic clustering model with two roles:
Host:
- Acts as the central management server.
- Runs the full web interface, API, and dashboard.
- Processes join requests from Subhost nodes.
- Can remotely manage servers on connected Subhosts by proxying API calls.
- Maintains the cluster database with all node information.
Subhost:
- Connects to an existing Host node.
- Runs a local dashboard on port 5002.
- Sends periodic heartbeats to the Host to report status.
- Responds to remote management commands forwarded by the Host.
- Sets the
CLUSTER_HOST_URLenvironment variable for Host discovery.
Communication Protocol: All cluster communication uses HTTP/HTTPS REST API calls between nodes. The Host proxies requests to Subhosts by forwarding them to the Subhost's API endpoint and returning the response.
The cluster join workflow follows a request-and-approval pattern:
-
Request: A Subhost sends a join request to the Host:
POST /api/cluster/request-joinwith node name and IP address. The request is stored in thepending_requeststable. -
Review: The Host administrator views pending requests in the dashboard or cluster management web page. Each request shows the requesting node's name, IP address, and request timestamp.
-
Approve or Reject: The administrator can:
-
Approve (
POST /api/cluster/requests/<id>/approve) — The node is added to thecluster_nodestable with "approved" status, and an authentication token is generated. -
Reject (
POST /api/cluster/requests/<id>/reject) — The request is removed from the pending queue.
-
Approve (
-
Polling: The Subhost periodically checks
GET /api/cluster/check-approval/<id>to see if its request has been approved. Once approved, it receives its authentication token and begins sending heartbeats. -
Heartbeat: Approved Subhosts send periodic heartbeats (
POST /api/cluster/heartbeat) to update theirlast_pingtimestamp. The heartbeat includes node name, IP, port, and server count. Nodes that stop sending heartbeats are eventually marked as offline. -
Revocation: The Host administrator can revoke a node at any time (
DELETE /api/cluster/nodes/<id>), which removes it from the cluster.
The cluster API is implemented as a Flask Blueprint (api/cluster.py) and registered under /api/cluster/:
Join Workflow:
| Method | Endpoint | Description |
|---|---|---|
| POST | /api/cluster/request-join |
Submit a join request |
| GET | /api/cluster/requests |
List pending join requests |
| POST | /api/cluster/requests/<id>/approve |
Approve a join request |
| POST | /api/cluster/requests/<id>/reject |
Reject a join request |
| GET | /api/cluster/check-approval/<id> |
Check approval status |
Node Management:
| Method | Endpoint | Description |
|---|---|---|
| GET | /api/cluster/nodes |
List all cluster nodes |
| DELETE | /api/cluster/nodes/<id> |
Revoke (remove) a node |
Subhost Management:
| Method | Endpoint | Description |
|---|---|---|
| GET | /api/cluster/subhosts |
List subhosts with status |
| POST | /api/cluster/heartbeat |
Send node heartbeat |
Status:
| Method | Endpoint | Description |
|---|---|---|
| GET | /api/cluster/status |
Get cluster status summary |
| GET | /api/cluster/host-status |
Get host status details |
| GET | /api/cluster/role |
Get this node's cluster role |
Remote Server Operations (Host Only):
| Method | Endpoint | Description |
|---|---|---|
| GET | /api/cluster/subhost/<id>/servers |
List servers on a subhost |
| POST | /api/cluster/subhost/<id>/servers |
Create a server on a subhost |
| DELETE | /api/cluster/subhost/<id>/servers/<name> |
Remove a server from a subhost |
| POST | /api/cluster/subhost/<id>/servers/<name>/start |
Start a server on a subhost |
| POST | /api/cluster/subhost/<id>/servers/<name>/stop |
Stop a server on a subhost |
| POST | /api/cluster/subhost/<id>/servers/<name>/restart |
Restart a server on a subhost |
All remote server operations are forwarded to the target Subhost's API via _forward_request_to_subhost().
The Agent Manager (Modules/ui/agents.py) provides a Tkinter GUI for cluster administration:
The GUI includes:
- Cluster Status Panel — Shows the current cluster role, number of registered nodes, and overall cluster health.
- Pending Requests Section — A tree view of pending join requests with Approve and Reject buttons. Each request shows the node name, IP address, and request time.
- Registered Nodes Section — A tree view of all cluster nodes with status indicators (online/offline). An "Add Node" form allows manually registering nodes. A right-click context menu provides: Ping Node, View Servers, Remove Node.
- Background Polling — The GUI polls the cluster database every 5 seconds to update node statuses and detect new join requests.
Node Pinging: The ping_node() method sends an HTTP request to GET /api/status on the target node to verify connectivity and retrieve basic status information.
The command queue (services/command_queue.py, CommandQueueRelay) provides file-based command delivery as a reliable fallback mechanism.
How It Works:
- Commands are written to a text file at
temp/command_queues/{server_name}_commands.txt. - Each line has the format:
timestamp:command_text. - A dedicated polling thread reads the file every 100 milliseconds.
- When new commands are detected, they are delivered to the server process via a registered callback function.
- Processed commands are tracked by unique ID to prevent double-delivery.
- The command file is automatically truncated after 100 processed commands to prevent unbounded growth.
Thread Safety: The command queue maintains a global registry of active relays, ensuring one relay per server. All file operations are wrapped in appropriate error handling for concurrent access.
The stdin relay (services/stdin_relay.py) uses Windows Named Pipes for efficient cross-process command delivery.
Pipe Creation:
- A named pipe is created at
\\.\pipe\ServerManager_stdin_{server_name}. - The pipe uses a null DACL security descriptor for broad access across different user contexts.
- A non-daemon listener thread waits for connections on the pipe.
Command Flow:
- A client (dashboard, web API, automation system) connects to the named pipe.
- The client writes the command string to the pipe.
- The relay thread reads the command and writes it to the server process's stdin.
- A JSON acknowledgment is sent back through the pipe confirming delivery.
Client Function: send_command_via_relay(server_name, command) handles the client side: connecting to the pipe, writing the command, and reading the response.
The persistent stdin pipe (services/persistent_stdin.py, PersistentStdinPipe) creates a named pipe that is used as the subprocess stdin handle at creation time.
How It Differs from stdin_relay:
- The persistent stdin pipe is created before the server process is spawned and passed as the
stdinparameter tosubprocess.Popen(). - This ensures the server process always has a writable stdin, even if it does not normally accept input.
- The pipe handle is created as inheritable using
win32securityand converted to a C file descriptor viamsvcrt.open_osfhandle()for compatibility with Python's subprocess module.
The dashboard tracker (services/dashboard_tracker.py, DashboardTracker) monitors the state of dashboards and servers.
Functions:
-
scan_dashboards()— Reads PID files from thetemp/directory and verifies each process is still running usingpsutil.pid_exists(). Returns a list of active dashboard/component processes. -
scan_servers()— Loads server configurations from the database and checks whether each server's recorded PID is still running. -
start_auto_refresh()— Starts a background daemon thread that refreshes the dashboard and server status every 10 seconds.
The dashboard tracker is used by the web server to provide real-time status information to the web interface.
Command Delivery Wrapper:
The send_command_to_server() function in Modules/core/common.py provides a unified high-level interface for sending commands to server processes. It is used by ServerAutomationManager (MOTD, warnings) and ServerUpdateManager (pre-restart warnings). The function:
- Attempts delivery via the persistent stdin pipe first.
- Falls back to the file-based command queue if the pipe is not available.
- Returns a boolean indicating success or failure.
The logging system is centralised in Modules/core/server_logging.py through the LogManager singleton class. All application modules use this system rather than configuring their own logging handlers.
Three Log Formatters:
-
Default:
%(asctime)s - %(name)s - %(levelname)s - %(message)s -
Detailed:
%(asctime)s - %(name)s - %(levelname)s - %(filename)s:%(lineno)d - %(funcName)s() - %(message)s— Includes source file, line number, and function name. -
JSON:
{"timestamp": "%(asctime)s", "logger": "%(name)s", "level": "%(levelname)s", "message": "%(message)s", "module": "%(filename)s", "line": %(lineno)d}— Machine-readable JSON format for log aggregation tools.
File Handler Configuration:
-
Handler Type:
RotatingFileHandlerfrom Python'slogging.handlersmodule. - Max File Size: 10 MB per log file (configurable).
- Backup Count: 3 rotated files kept (configurable).
-
Date Format:
%Y-%m-%d %H:%M:%S
Log Consolidation: To reduce the number of log files, 30+ component loggers are mapped to approximately 15 shared log files. For example:
- Dashboard, DashboardFunctions, DashboardUI →
Dashboard.log - ServerManager, ServerOperations, ServerUpdates →
ServerManager.log - SteamDatabase, MinecraftDatabase, DatabaseUtils →
Database.log - NetworkManager, ClusterManager, AgentManager →
Network.log - WebServer, WebSecurity →
WebServer.log
Early Crash Logging: The early_crash_log() function provides emergency logging before the LogManager is fully initialised. It writes directly to the component log file using basic file I/O during the earliest stages of module loading.
All log files are stored under the logs/ directory:
| Directory | Contents |
|---|---|
logs/components/ |
Per-component log files (Dashboard.log, ServerManager.log, etc.) |
logs/debug/ |
Debug and diagnostic log files |
logs/services/ |
Service-layer log files (CommandQueue, StdinRelay, etc.) |
The LogManager includes automated log maintenance:
Log Compression:
- A background daemon thread periodically scans for log files older than 7 days.
- Old log files are compressed using gzip (
.gzextension) to save disk space.
Log Deletion:
- Log files (both compressed and uncompressed) older than 30 days are automatically deleted.
- This prevents unbounded disk usage from log accumulation.
Log Statistics: The LogManager tracks error and warning counts since the last reset. These statistics are accessible through the analytics system and can be included in diagnostic reports.
The analytics module (Modules/ui/analytics.py, AnalyticsCollector) collects real-time metrics and provides health scoring:
Data Collection:
- Metrics are stored in memory using
collections.dequewith a maximum of 1440 entries (representing 24 hours of data at 1-minute intervals). - Thread-safe data structures using
collections.defaultdictof deques. - Collects CPU usage, memory usage, disk usage, server counts, and per-server metrics.
Health Scoring:
- The analytics system calculates a health score on a 0-100 scale.
- Factors include CPU usage, memory availability, disk space, number of error-state servers, and logging error rates.
- Health scores are categorised: 90-100 = Healthy, 70-89 = Warning, Below 70 = Critical.
Data Export:
-
get_analytics_summary()— Returns current values and 24-hour trends. -
get_time_series_data()— Returns historical time-series data for charts. -
export_to_json()— Exports all analytics data as JSON for external processing.
The SNMP manager (Modules/SMNP/snmp_manager.py, SNMPManager) provides SNMP monitoring data:
Enterprise OID Base: 1.3.6.1.4.1.12345
OID Mappings:
| OID Suffix | Metric | Description |
|---|---|---|
.1.1 |
health_score | Overall system health (0-100) |
.1.2 |
cpu_percent | Current CPU usage |
.1.3 |
memory_percent | Current memory usage |
.1.4 |
disk_percent | Current disk usage |
.1.5 |
uptime | System uptime in seconds |
.2.1 |
servers_total | Total managed servers |
.2.2 |
servers_running | Currently running servers |
.2.3 |
servers_offline | Offline/stopped servers |
.2.4 |
servers_error | Servers in error state |
.3.1 |
webserver_cpu | Web server CPU usage |
.3.2 |
webserver_memory | Web server memory usage |
.3.3 |
webserver_connections | Active web connections |
.3.4 |
dashboards_count | Active dashboards |
Methods:
-
get_snmp_metrics()— Returns all SNMP metrics as a dictionary. -
get_snmp_walk_data()— Returns data formatted for SNMP walk operations. -
get_metric_by_oid(oid)— Returns a single metric by its OID.
The Grafana manager (Modules/SMNP/graphana.py, GrafanaManager) provides monitoring system integration:
Prometheus Metrics Endpoint:
The web server exposes a /metrics endpoint that returns metrics in Prometheus text exposition format:
# HELP server_manager_health_score Overall system health score
# TYPE server_manager_health_score gauge
server_manager_health_score 95.0

# HELP server_manager_cpu_usage Current CPU usage percentage
# TYPE server_manager_cpu_usage gauge
server_manager_cpu_usage 23.5

# HELP server_manager_servers_total Total managed servers
# TYPE server_manager_servers_total gauge
server_manager_servers_total 5
...
Grafana JSON Metrics: A JSON format endpoint provides structured metrics data with three sections: system metrics, server metrics, and application metrics.
Time-Series Data:
The get_time_series_data() method provides time-stamped metric data suitable for Grafana graph panels.
Pre-Built Dashboard:
The get_dashboard_config() method returns a complete Grafana dashboard JSON definition with three panels:
- Health Score — A stat panel showing the current health score.
- Server Status — A pie chart showing the distribution of server states (running, stopped, error).
- System Resources — A time-series graph showing CPU, memory, and disk usage over time.
This JSON can be imported directly into Grafana to create a monitoring dashboard without manual configuration.
The mail server module (Modules/SMTP/mailserver.py, MailServer) supports multiple email providers and protocols:
Provider Presets:
| Provider | SMTP Server | Port | Security |
|---|---|---|---|
| Gmail | smtp.gmail.com | 587 | STARTTLS |
| Outlook | smtp-mail.outlook.com | 587 | STARTTLS |
| Office365 | smtp.office365.com | 587 | STARTTLS |
| Yahoo | smtp.mail.yahoo.com | 587 | STARTTLS |
| Custom | User-defined | User-defined | TLS/SSL/None |
Configuration Storage: SMTP settings are stored in the Windows Registry under:
HKEY_LOCAL_MACHINE\Software\SkywereIndustries\Servermanager\MailServer
Capabilities:
- Send plain text and HTML emails.
- Attach files (MIME multipart with Base64 encoding).
- Send to multiple recipients.
- Connection testing (
test_connection()) to verify SMTP settings. - Automatic provider detection from email domain.
For organisations using Microsoft 365 with modern authentication, Server Manager supports OAuth 2.0 via MSAL (Microsoft Authentication Library):
Setup Process:
- Register an application in Azure Active Directory.
- Configure the required API permissions (Mail.Send for Microsoft Graph).
- Enter the Application (client) ID and Tenant ID in Server Manager.
- On first use, an interactive browser window opens for user consent.
- After consent, the refresh token is stored securely for silent authentication.
Token Management:
- Tokens are refreshed silently (without user interaction) using the stored refresh token.
- Tokens are refreshed 5 minutes before expiration to prevent authentication failures.
- If silent refresh fails, the interactive browser flow is triggered again.
Email Sending:
- OAuth-authenticated emails are sent via the Microsoft Graph API (
/me/sendMail) rather than traditional SMTP. - This bypasses the need for app passwords or enabling "less secure apps".
The notification system (Modules/SMTP/notifications.py, NotificationManager) provides templated email notifications:
Available Templates:
| Template | Trigger | Description |
|---|---|---|
welcome |
User account creation | Welcome message with login instructions |
password_reset |
Password reset request | Password reset instructions with temporary credentials |
account_locked |
Account lockout | Notification that the account has been locked due to failed login attempts |
server_alert |
Server issues | Alert about server problems (crash, high resource usage, errors) |
maintenance |
Scheduled maintenance | Advance notice of planned maintenance windows |
custom |
Manual send | Custom message from the admin panel |
Template Structure:
Each template consists of three files in the Modules/SMTP/Mail-Templates/ directory:
-
{template_name}_html.html— HTML version of the email body -
{template_name}_text.txt— Plain text fallback -
{template_name}_subject.txt— Email subject line
Templates use placeholder replacement (e.g., {username}, {server_name}, {timestamp}) to personalise each notification.
Template Variables:
-
{username}— Recipient's username -
{display_name}— Recipient's display name -
{server_name}— Name of the affected server -
{timestamp}— Current date and time -
{base_url}— Application base URL -
{message}— Custom message content
CSS Styling: All HTML templates reference mail-template.css for consistent styling. The CSS is embedded inline in the HTML before sending for maximum email client compatibility.
Notification Toggles:
Each notification type can be individually enabled or disabled through the admin dashboard. There is also an admin_only_alerts option that restricts server alerts and maintenance notifications to admin users only.
The debug module (debug/debug.py, DebugManager) provides system diagnostics:
System Information Collection:
- Platform details (OS, version, architecture)
- CPU information (model, core count, current usage)
- Memory statistics (total, available, percentage used)
- Disk information (total, free, percentage used per partition)
- Network interfaces and IP addresses
- Server Manager-specific info (version, installation directory, component status)
Process Information:
- Detailed process stats for any PID (CPU, memory, status, creation time)
- Child process enumeration
- Open file handles
- Network connections per process
Server Diagnostics:
- Per-server process details with uptime calculation
- Port status checking (is a port open/listening)
- Network connectivity testing
The create_diagnostic_report() method generates a JSON report containing:
- System Information — Full hardware and OS details.
- Registry Check — All Server Manager registry values and their current state.
- File System Check — Verification that all required directories and files exist.
- Top 10 Processes — The 10 most resource-intensive processes on the system.
- Port Status — Whether the web server port (8080) and common game server ports are open.
- Server Status — Current state of all managed servers.
Diagnostic reports are saved as JSON files and can be shared with support for troubleshooting.
The Debug Center (debug/debug_manager.py, DebugManagerGUI) provides a Tkinter window for running diagnostics:
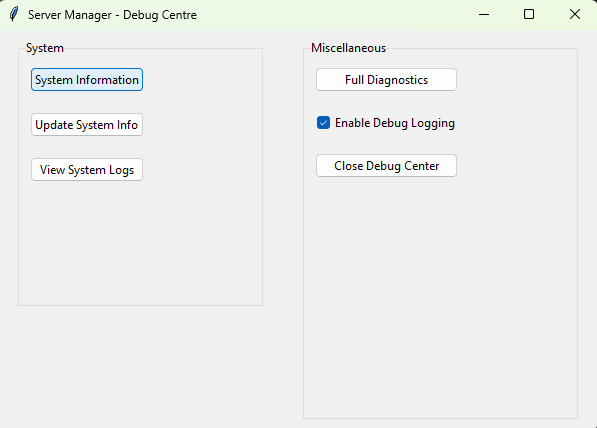
Available Actions:
| Button | Function | Description |
|---|---|---|
| System Info | Collects and displays system information | Shows CPU, memory, disk, network, and SM-specific details |
| Update Info | Shows update status | Displays version information and available updates |
| View Logs | Opens log directory | Opens the logs/ directory in Windows Explorer |
| Full Diagnostics | Runs diagnostics | 4-step process with progress bar: system info → installation verification → server check → diagnostic report |
| Debug Mode | Toggles debug logging | Enables or disables DEBUG-level logging across all modules |
| Close | Closes the Debug Center | Exits the diagnostic GUI |
Colour-Coded Results: Diagnostic results are colour-coded in the output display:
- Green — Success, everything is working correctly.
- Yellow — Warning, potential issue detected but not critical.
- Red — Error, a problem has been detected that needs attention.
The network module (Modules/network/network.py, NetworkManager) provides network operations and diagnostics:
IP Discovery:
- Detects all local IP addresses across all network interfaces.
- Identifies the primary IP address used for external communication.
Port Scanning:
- Scans specified ports to check if they are open or closed.
- Used by the diagnostics system to verify server port availability.
Connectivity Testing:
- Ping testing to verify network reachability.
- DNS resolution verification.
- Traceroute functionality for diagnosing network path issues.
Firewall Management:
- Interface with Windows Firewall via
netshcommands. - Create, modify, and remove firewall rules programmatically.
- Used by the installer for automatic firewall configuration.
Network Interfaces:
- Enumerate all network interfaces with their IP addresses, subnet masks, and gateway information.
The installer automatically creates the following Windows Firewall rules:
Web Interface (Port 8080):
| Rule Name | Direction | Protocol | Port | Description |
|---|---|---|---|---|
ServerManager_WebInterface_In |
Inbound | TCP | 8080 | Allow access to the web interface |
ServerManager_WebInterface_Out |
Outbound | TCP | 8080 | Allow outbound from web interface |
HTTPS (Port 443, when SSL enabled):
| Rule Name | Direction | Protocol | Port | Description |
|---|---|---|---|---|
ServerManager_HTTPS_In |
Inbound | TCP | 443 | Allow HTTPS web interface access |
ServerManager_HTTPS_Out |
Outbound | TCP | 443 | Allow HTTPS outbound |
HTTP to HTTPS Redirect (Port 8081, when SSL enabled):
| Rule Name | Direction | Protocol | Port | Description |
|---|---|---|---|---|
ServerManager_HTTPRedirect_In |
Inbound | TCP | 8081 | Allow HTTP redirect to HTTPS |
Cluster API (Port 5001):
| Rule Name | Direction | Protocol | Port | Description |
|---|---|---|---|---|
ServerManager_ClusterAPI_In |
Inbound | TCP | 5001 | Allow cluster API communication |
ServerManager_ClusterAPI_Out |
Outbound | TCP | 5001 | Allow outbound cluster communication |
Game Server Ports (TCP, 7777-7800):
| Rule Name | Direction | Protocol | Port | Description |
|---|---|---|---|---|
ServerManager_GameServers_In |
Inbound | TCP | 7777-7800 | Allow game server TCP connections |
ServerManager_GameServers_Out |
Outbound | TCP | 7777-7800 | Allow game server TCP outbound |
Game Server Ports (UDP, 7777-7800):
| Rule Name | Direction | Protocol | Port | Description |
|---|---|---|---|---|
ServerManager_GameServers_UDP_In |
Inbound | UDP | 7777-7800 | Allow game server UDP connections |
ServerManager_GameServers_UDP_Out |
Outbound | UDP | 7777-7800 | Allow game server UDP outbound |
Steam Query Protocol (UDP, 27015-27030):
| Rule Name | Direction | Protocol | Port | Description |
|---|---|---|---|---|
ServerManager_SteamQuery_In |
Inbound | UDP | 27015-27030 | Allow Steam server browser queries |
ServerManager_SteamQuery_Out |
Outbound | UDP | 27015-27030 | Allow Steam query outbound |
Note: HTTPS and HTTP redirect rules are only created if SSL/HTTPS is enabled during installation. Cluster API rules are created for both Host and Subhost nodes. If your game servers use ports outside the 7777-7800 range, you will need to add additional firewall rules manually.
Removing Firewall Rules: The uninstaller removes all Server Manager firewall rules. You can also remove them manually:
Get-NetFirewallRule -DisplayName "ServerManager_*" | Remove-NetFirewallRuleRun the uninstaller script as Administrator:
.\uninstaller.ps1The uninstaller performs the following steps in order:
-
Stop All Processes — Runs
stop_servermanager.pyto gracefully shut down all Server Manager components and managed game servers. - Remove Windows Service — If the service is installed, it is stopped and uninstalled.
-
Remove Firewall Rules — All
ServerManager_*firewall rules are removed. - Remove Scheduled Tasks — Any Windows Task Scheduler tasks created by Server Manager are removed.
-
Remove Program Data — The installation directory and its contents are deleted. The uninstaller uses three deletion methods in sequence to handle locked files:
- PowerShell
Remove-Item cmd.exe /c rd /s /q- robocopy purge (mirrors an empty directory over the target)
- PowerShell
-
Remove Registry Keys — The
HKLM\Software\SkywereIndustries\Servermanagerregistry key and all its values are deleted. - Optional: Remove SteamCMD — Offers to remove the SteamCMD installation directory.
Run the uninstaller script:
sudo sh uninstaller.shProblem: Start-ServerManager.pyw does not launch or immediately exits.
Solutions:
- Ensure you are running as Administrator. Right-click the script and select "Run as administrator".
- Check for orphaned PID files in the
temp/directory. Delete any.pidfiles and try again. - Verify Python is installed and in your PATH:
python --version. - Check the console debug log at
console_debug.login the project root for startup errors. - Check
logs/components/Launcher.logfor detailed error messages.
Problem: Cannot access http://localhost:8080 in a browser.
Solutions:
- Verify the web server is running: Check for
webserver.pidin thetemp/directory and confirm the process exists. - Check if the port is in use by another application:
netstat -an | findstr :8080. - Verify the Windows Firewall allows port 8080 (see Section 22).
- Check
logs/components/WebServer.logfor error messages. - Try accessing with the IP address instead of localhost:
http://127.0.0.1:8080.
Problem: "Failed to connect to database" errors in logs.
Solutions:
- For SQLite: Ensure the
db/directory exists and is writable. - For SQL Server/MySQL/PostgreSQL: Verify the database server is running and accessible.
- Run
Update-ServerManager.pywto check and repair the database schema. - Check
logs/components/Database.logfor detailed error information.
Problem: A managed server fails to start.
Solutions:
- Check the server's installation directory exists and contains the expected files.
- Verify the executable path in the server configuration is correct.
- For Steam servers: Re-validate the installation by running an update.
- For Minecraft servers: Ensure the correct Java version is installed (see Section 11.2).
- Check the server's console log file in
logs/for error output. - Verify no other instance of the server is already running on the same ports.
Problem: Commands sent through the console are not being executed by the server.
Solutions:
- Check that the stdin relay is running: Look for named pipe
\\.\pipe\ServerManager_stdin_{server_name}. - Check the command queue file:
temp/command_queues/{server_name}_commands.txt. - Verify the server process accepts stdin input (some servers do not read from stdin).
- Try the different command input methods described in Section 7.4.
- Check
logs/services/CommandQueue.logandlogs/services/StdinRelay.logfor errors.
Problem: 2FA codes are not being accepted.
Solutions:
- Ensure the system clock is accurate. TOTP codes are time-based, and a clock difference of more than 30 seconds will cause failures.
- If the authenticator app was reinstalled, the 2FA secret may have been lost. Reset 2FA by running:
python Modules/Database/reset_admin_2FA.py
- Verify the correct user account is selected when scanning the QR code.
Problem: Subhost nodes cannot connect to the Host.
Solutions:
- Verify the Host's IP address and port are correct in the Subhost configuration.
- Ensure the Host's firewall allows inbound connections on port 8080 from the Subhost's IP.
- Test network connectivity:
ping <host-ip>from the Subhost. - Check that the Host is actually running and the web server is accessible.
- Verify the Subhost's join request has been approved on the Host.
- Check
logs/components/Network.logon both Host and Subhost for error details.
Base Path: HKEY_LOCAL_MACHINE\Software\SkywereIndustries\Servermanager
| Key | Type | Default | Description |
|---|---|---|---|
Servermanagerdir |
REG_SZ | (install path) | Root installation directory |
CurrentVersion |
REG_SZ | "1.3" | Installed version |
UserWorkspace |
REG_SZ | (auto) | User workspace directory |
InstallDate |
REG_SZ | (auto) | Installation timestamp |
LastUpdate |
REG_SZ | (auto) | Last update timestamp |
ModulePath |
REG_SZ | (auto) | Modules directory path |
LogPath |
REG_SZ | (auto) | Logs directory path |
SteamCmdPath |
REG_SZ | (auto) | SteamCMD executable path |
WebPort |
REG_SZ | "8080" | Web server port |
HostType |
REG_SZ | "Host" | Cluster role (Host/Subhost) |
HostAddress |
REG_SZ | (none) | Host IP for Subhost nodes |
ClusterCreated |
REG_SZ | (none) | Cluster initialisation flag |
Mail Server Sub-Key: HKLM\Software\SkywereIndustries\Servermanager\MailServer
Stores SMTP configuration values (server, port, username, provider, etc.).
| Variable | Purpose | Values |
|---|---|---|
PYTHONDONTWRITEBYTECODE |
Prevents __pycache__ creation |
"1" |
SERVERMANAGER_DEBUG |
Enables debug logging globally | "1", "true", "True" |
SSL_ENABLED |
Enables HTTPS protocol | "true" |
CLUSTER_HOST_URL |
Host URL for Subhost nodes | Full URL (e.g., "http://192.168.1.10:8080") |
| Port | Protocol | Service |
|---|---|---|
| 8080 | TCP | Web interface and REST API |
| 5001 | TCP | Cluster proxy (internal) |
| 5002 | TCP | Subhost dashboard (internal) |
| 7777-7800 | TCP/UDP | Game server ports (configurable) |
| 27015-27030 | UDP | Steam query protocol |
Each server can have the following automation settings configured:
| Field | Database Column | Default | Description |
|---|---|---|---|
motd_command |
MotdCommand |
(empty) | Command to broadcast MOTD. Must include {message} placeholder |
motd_message |
MotdMessage |
(empty) | The MOTD text to broadcast |
motd_interval |
MotdInterval |
0 | MOTD broadcast interval in minutes (0 = disabled) |
start_command |
StartCommand |
(empty) | Command to execute after server starts |
stop_command |
StopCommand |
(empty) | Graceful shutdown command |
save_command |
SaveCommand |
(empty) | World/data save command |
scheduled_restart_enabled |
ScheduledRestartEnabled |
false | Toggle for scheduled restarts |
warning_command |
WarningCommand |
(empty) | Restart warning broadcast command. Must include {message} placeholder |
warning_intervals |
WarningIntervals |
"30,15,10,5,1" | Comma-separated minutes before restart to send warnings |
warning_message_template |
WarningMessageTemplate |
"Server restarting in {message}" | Warning message template |
Example Configuration for a Minecraft Server:
MOTD Command: say {message}
MOTD Message: Welcome to our server! Type /help for commands.
MOTD Interval: 30
Start Command: say Server is now online!
Stop Command: stop
Save Command: save-all
Warning Command: say {message}
Warning Intervals: 30,15,10,5,1
Warning Message Template: Server restarting in {message} minutes. Please save your progress!
Example Configuration for a Source Engine Server (CS2, Garry's Mod, etc.):
MOTD Command: say {message}
MOTD Message: Welcome! Visit our website at example.com
MOTD Interval: 15
Start Command:
Stop Command: quit
Save Command:
Warning Command: say {message}
Warning Intervals: 15,10,5,1
Warning Message Template: Server restart in {message} minutes
This documentation covers Server Manager version 1.3 For the latest updates, check the GitHub repository.