Web Interface and API
This page documents the browser UI, Flask/Waitress web server, API surface, and authentication flow.
The web interface is served by the Flask web server (via Waitress WSGI) on the port configured during installation (default: 8080). Access it from any browser:
-
Local machine:
http://localhost:8080 -
Remote machine:
http://<server-IP>:8080 -
With SSL enabled:
https://localhost:8080orhttps://<server-IP>:8080
All web pages support both light and dark themes, togglable from the user menu. Theme preference is saved in the browser's local storage.
The login page (www/login.html) presents a clean authentication form with:
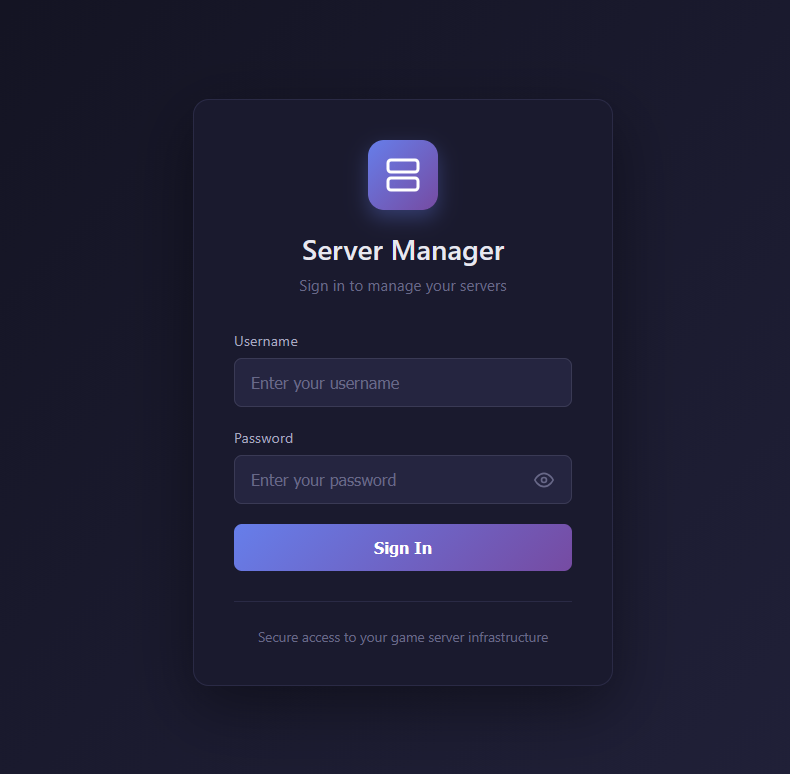
- Username field
- Password field with visibility toggle (eye icon)
- Login button with loading spinner during authentication
- Error and success alert messages
Upon successful login, the session token, username, and admin status are stored in the browser's sessionStorage. The user is then redirected to the dashboard. If the token is invalid or expired, subsequent API calls will return 401 and the user will be redirected back to the login page.
The web dashboard (www/dashboard.html) is the main management interface for the web UI, featuring:
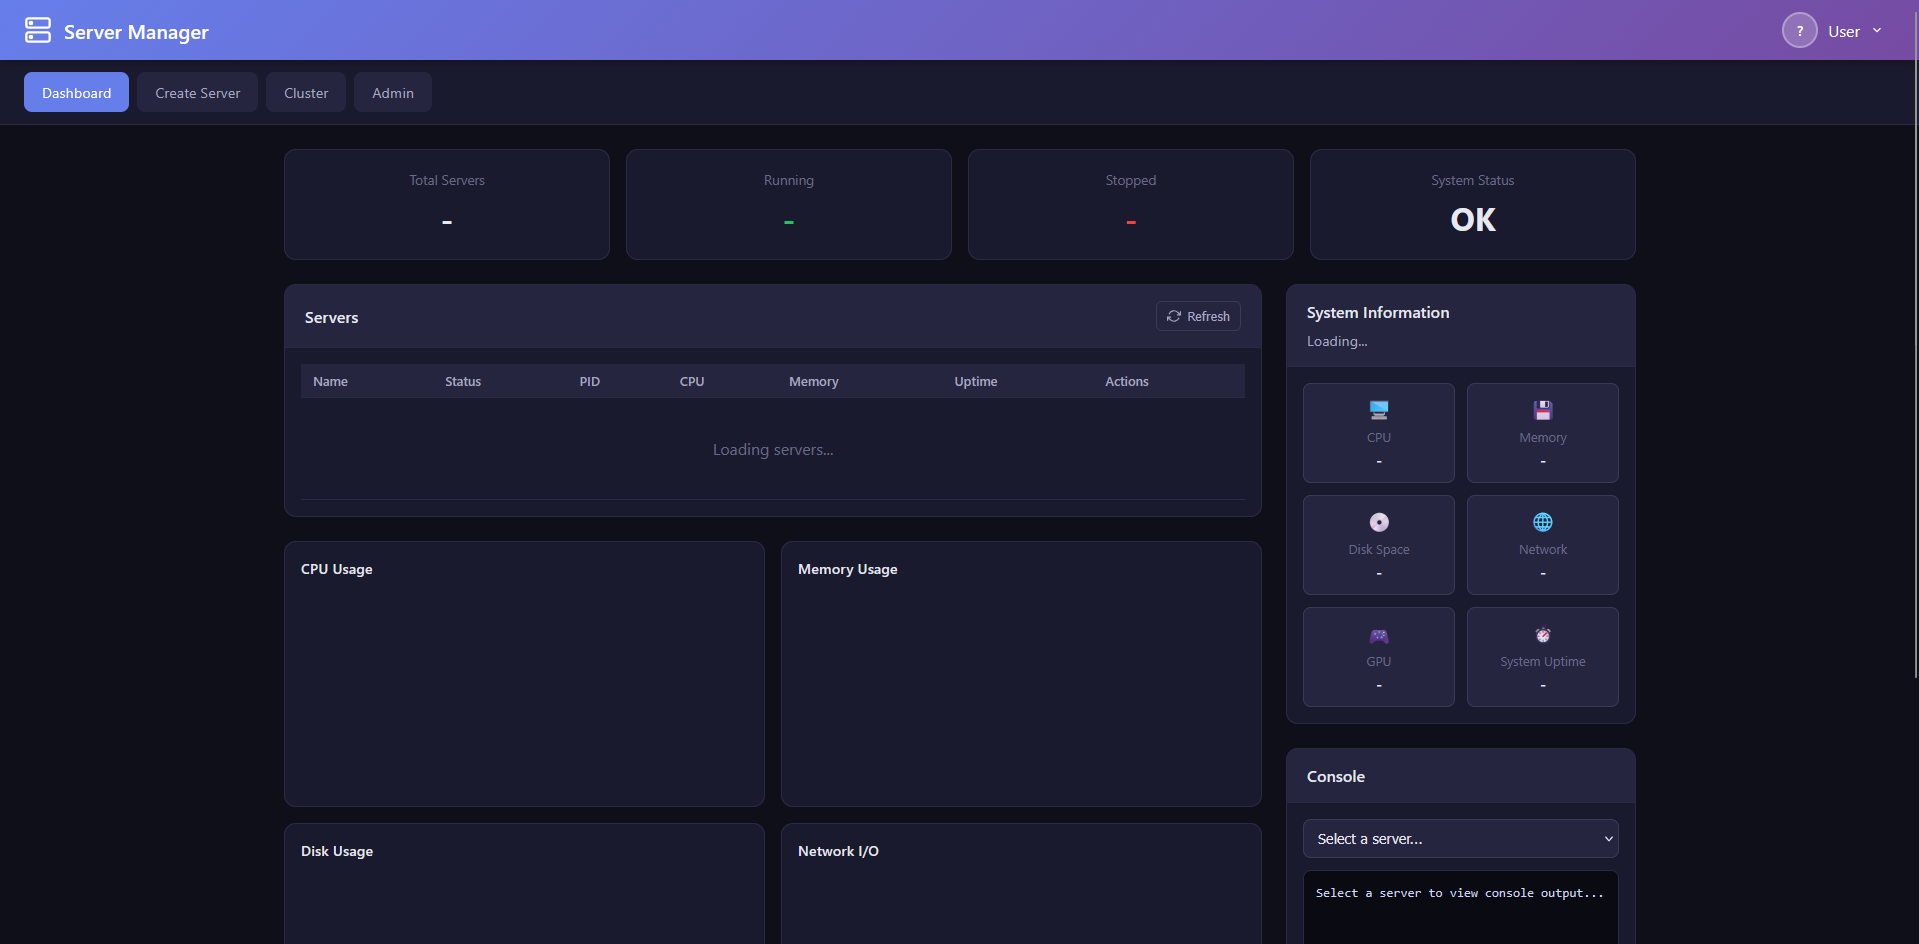
Header:
- Application title and branding
- User menu dropdown with avatar display, profile link, theme toggle (dark/light), and logout button
Navigation Bar:
- Dashboard (home)
- Create Server
- Cluster (visible only to admin users)
- Admin (visible only to admin users)
Stats Grid: Four cards showing at-a-glance metrics:
- Total Servers (count)
- Running Servers (count)
- CPU Usage (percentage)
- Memory Usage (percentage)
Server List: Each managed server is displayed as a card with:
- Server name and type badge (Steam/Minecraft/Custom)
- Status indicator (Running with green badge, Stopped with red badge, Error with orange badge)
- CPU usage and memory usage from real-time process monitoring. Java/Minecraft servers display JVM heap allocation with a "(JVM)" suffix, while Steam and other servers display RSS.
- Action buttons: Start, Stop, Restart, Remove (with confirmation dialog)
- Console viewer modal — Click to view live server output and send commands
System Information Panel: Displays the server host's system details:
- Hostname and operating system
- CPU model, core count, and current usage
- Total and available memory
- Disk space usage
Charts: Powered by Chart.js, the dashboard includes five interactive charts:
- CPU Usage (bar chart)
- Memory Usage (bar chart)
- Server Status Distribution (pie chart)
- Network Activity (line chart)
- Disk Usage (doughnut chart)
Auto-Refresh: Data is automatically refreshed at a configurable interval (default: 10 seconds). The refresh cycle updates the server list, stats grid, charts, and system information.
The Create Server page (www/create-server.html) provides a wizard for setting up new game servers:
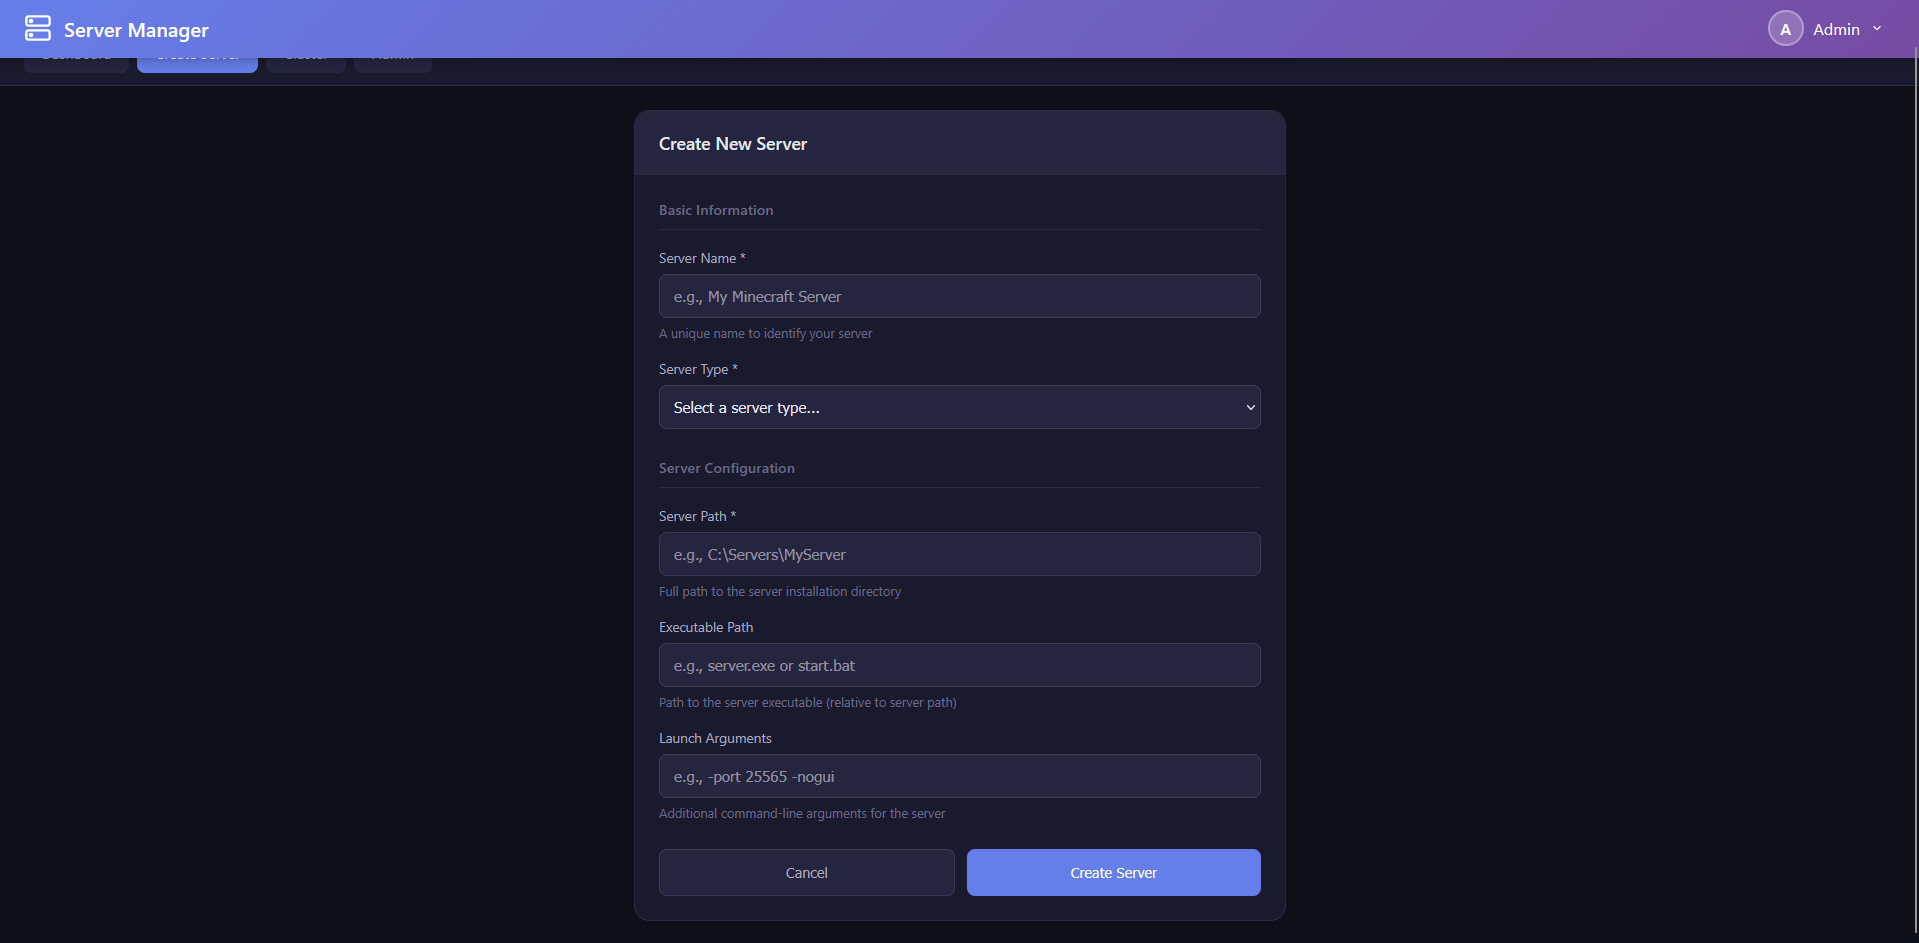
Server Type Selection:
- Steam — For SteamCMD-based dedicated servers
- Minecraft — For Minecraft Java Edition servers
Steam Server Configuration:
- Server Name — A unique friendly name for the server
- App ID — The Steam Application ID for the dedicated server. Includes a searchable dropdown populated from the Steam apps database, allowing you to search by game name. Common examples: Counter-Strike 2 (730), Team Fortress 2 (232250), Garry's Mod (4020), Valheim (896660)
- Install Directory — Where the server files will be installed
- Custom Executable — Optional override for the server executable path
- Anonymous Login — Toggle whether SteamCMD should use anonymous login (most free dedicated servers support this) or require Steam credentials
Minecraft Server Configuration:
- Server Version — Select from available Minecraft versions
- Modloader — Choose between Vanilla, Fabric, Forge, or NeoForge
- Java Path — Path to the Java executable (auto-detected if possible)
Validation: Form fields are validated before submission. On success, a notification toast is displayed and the server appears in the dashboard server list. On error, detailed error messages are shown.
The Admin Panel (www/admin.html) provides web-based user management for administrators:

User Management Table:
- Displays all users with: username, email, role badge (Admin highlighted), status (Active/Inactive)
- Edit button per user
- Delete button with confirmation
- Reset Password button
Create User Form:
- Username, email, password fields
- Role selection (admin/user)
- Active/inactive toggle
- Submit creates the user immediately
System Settings Section:
- Application-wide configuration options accessible from the web interface
The Cluster Management page (www/cluster.html) provides cluster administration for multi-node setups:
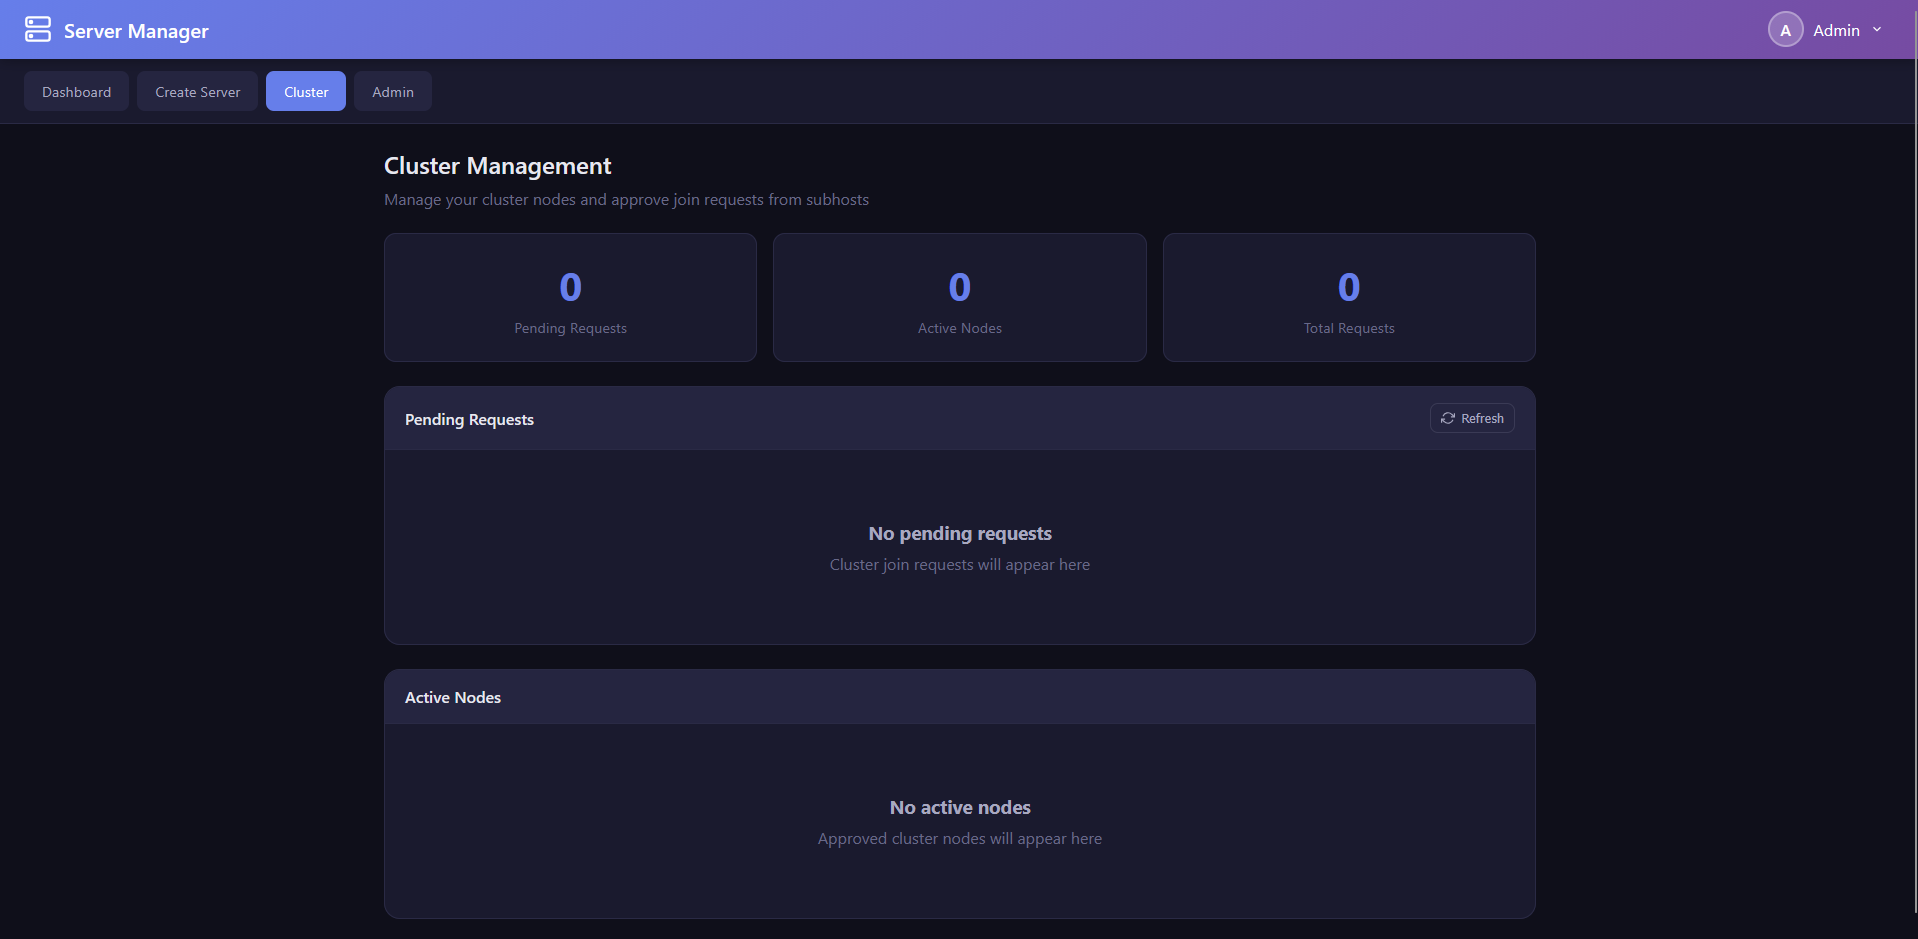
Stats Grid:
- Total Nodes count
- Online Nodes count
- Pending Requests count
Pending Requests: Lists all pending cluster join requests with:
- Requesting node name and IP address
- Request timestamp
- Approve and Reject buttons per request
Registered Nodes: Lists all cluster nodes with:
- Node name and IP address
- Status indicator (Online with green dot, Offline with red dot, Pending with yellow dot)
- Node details (port, last heartbeat time)
- Revoke button to remove a node from the cluster
Auto-Refresh: Cluster data refreshes every 30 seconds to reflect heartbeat updates and new join requests.
The web server (Modules/services/webserver.py) is a Flask application served through the Waitress WSGI server (a production-grade server, unlike Flask's built-in development server). It is approximately 2,800 lines of code.
Key Configuration:
-
Port: Configurable via registry
WebPortvalue (default: 8080) -
CORS: Enabled via
flask-corsfor cross-origin requests from the web interface -
SSL: Optional SSL/TLS support. When SSL is enabled, certificates are loaded from the
ssl/directory -
Static Files: The
www/directory is served for all web interface assets - Session Management: Token-based authentication using Bearer tokens in the Authorization header
Startup Sequence:
- Import and initialise database modules (user database, server config manager)
- Create Flask application and configure CORS
- Register the cluster API Blueprint
- Set up static file serving from
www/ - Initialise the
DashboardTrackerfor process monitoring - Create default admin user if none exists
- Start Waitress WSGI server on the configured port
All API endpoints are prefixed with /api/ and require authentication unless otherwise noted.
Authentication Endpoints:
| Method | Endpoint | Description | Auth Required |
|---|---|---|---|
| POST | /api/auth/login |
Authenticate and receive a session token | No |
| GET | /api/auth/verify |
Verify the current session token is valid | Yes |
Server Management Endpoints:
| Method | Endpoint | Description |
|---|---|---|
| GET | /api/servers |
List all servers with current status, real-time CPU and memory usage |
| POST | /api/servers |
Create a new server (name, appid, type, install_dir) |
| GET | /api/servers/<name>/status |
Get status of a specific server |
| POST | /api/servers/<name>/start |
Start a server |
| POST | /api/servers/<name>/stop |
Stop a server |
| POST | /api/servers/<name>/restart |
Restart a server |
| DELETE | /api/servers/<name> |
Remove a server configuration |
Console Endpoints:
| Method | Endpoint | Description |
|---|---|---|
| GET | /api/servers/<name>/console |
Get recent console output for a server |
| POST | /api/servers/<name>/console |
Send a command to a server's console |
User Management Endpoints (Admin Only):
| Method | Endpoint | Description |
|---|---|---|
| GET | /api/users |
List all user accounts |
| POST | /api/users |
Create a new user account |
| DELETE | /api/users/<username> |
Delete a user account |
| PUT | /api/users/<username>/password |
Reset a user's password |
User Profile Endpoints:
| Method | Endpoint | Description |
|---|---|---|
| GET | /api/profile |
Get the current user's profile |
| PUT | /api/profile |
Update profile fields (display name, email, bio, timezone, theme) |
| PUT | /api/profile/password |
Change the current user's password |
| POST | /api/profile/avatar |
Upload a profile avatar image |
Analytics Endpoints:
| Method | Endpoint | Description |
|---|---|---|
| GET | /api/analytics/summary |
Get analytics summary data |
| GET | /api/analytics/time-series |
Get time-series metrics data |
System Endpoints:
| Method | Endpoint | Description |
|---|---|---|
| GET | /api/settings |
Get system settings |
| GET | /api/status |
Get application status (used by cluster nodes) |
| GET | /metrics |
Prometheus-format metrics endpoint |
Cluster Endpoints (via Blueprint): See Section 15.3: Cluster API Endpoints.
-
Login Request: The client sends a POST to
/api/auth/loginwith{ "username": "...", "password": "..." }. - Credential Verification: The server authenticates against the user database using bcrypt. If the stored hash uses the legacy SHA256 format, it is automatically upgraded to bcrypt on successful login.
- Token Generation: On success, a session token is generated and returned along with the username, admin status, and user ID.
-
Token Storage: The client stores the token in
sessionStorage(browser) and includes it in all subsequent requests as a Bearer token in the Authorization header:Authorization: Bearer <token>. - Token Verification: Each API request checks the Authorization header. If the token is missing, invalid, or expired, a 401 response is returned, and the web interface redirects to the login page.