Troubleshooting and Reference
This page contains diagnostics, networking, firewall notes, uninstall steps, troubleshooting guidance, and configuration reference tables.
The debug module (debug/debug.py, DebugManager) provides system diagnostics:
System Information Collection:
- Platform details (OS, version, architecture)
- CPU information (model, core count, current usage)
- Memory statistics (total, available, percentage used)
- Disk information (total, free, percentage used per partition)
- Network interfaces and IP addresses
- Server Manager-specific info (version, installation directory, component status)
Process Information:
- Detailed process stats for any PID (CPU, memory, status, creation time)
- Child process enumeration
- Open file handles
- Network connections per process
Server Diagnostics:
- Per-server process details with uptime calculation
- Port status checking (is a port open/listening)
- Network connectivity testing
The create_diagnostic_report() method generates a JSON report containing:
- System Information — Full hardware and OS details.
- Registry Check — All Server Manager registry values and their current state.
- File System Check — Verification that all required directories and files exist.
- Top 10 Processes — The 10 most resource-intensive processes on the system.
- Port Status — Whether the web server port (8080) and common game server ports are open.
- Server Status — Current state of all managed servers.
Diagnostic reports are saved as JSON files and can be shared with support for troubleshooting.
The Debug Center (debug/debug_manager.py, DebugManagerGUI) provides a Tkinter window for running diagnostics:
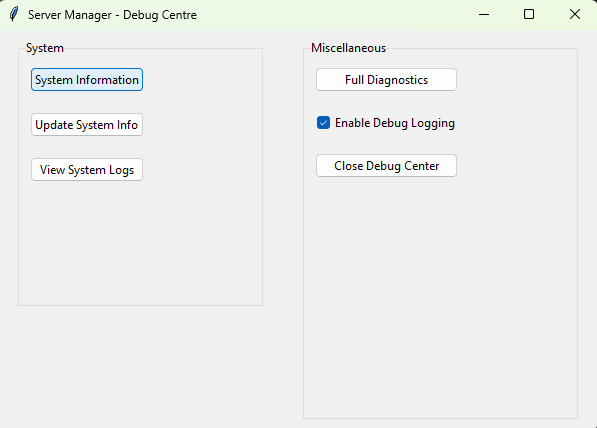
Available Actions:
| Button | Function | Description |
|---|---|---|
| System Info | Collects and displays system information | Shows CPU, memory, disk, network, and SM-specific details |
| Update Info | Shows update status | Displays version information and available updates |
| View Logs | Opens log directory | Opens the logs/ directory in Windows Explorer |
| Full Diagnostics | Runs diagnostics | 4-step process with progress bar: system info → installation verification → server check → diagnostic report |
| Debug Mode | Toggles debug logging | Enables or disables DEBUG-level logging across all modules |
| Close | Closes the Debug Center | Exits the diagnostic GUI |
Colour-Coded Results: Diagnostic results are colour-coded in the output display:
- Green — Success, everything is working correctly.
- Yellow — Warning, potential issue detected but not critical.
- Red — Error, a problem has been detected that needs attention.
The network module (Modules/network/network.py, NetworkManager) provides network operations and diagnostics:
IP Discovery:
- Detects all local IP addresses across all network interfaces.
- Identifies the primary IP address used for external communication.
Port Scanning:
- Scans specified ports to check if they are open or closed.
- Used by the diagnostics system to verify server port availability.
Connectivity Testing:
- Ping testing to verify network reachability.
- DNS resolution verification.
- Traceroute functionality for diagnosing network path issues.
Firewall Management:
- Interface with Windows Firewall via
netshcommands. - Create, modify, and remove firewall rules programmatically.
- Used by the installer for automatic firewall configuration.
Network Interfaces:
- Enumerate all network interfaces with their IP addresses, subnet masks, and gateway information.
The installer automatically creates the following Windows Firewall rules:
Web Interface (Port 8080):
| Rule Name | Direction | Protocol | Port | Description |
|---|---|---|---|---|
ServerManager_WebInterface_In |
Inbound | TCP | 8080 | Allow access to the web interface |
ServerManager_WebInterface_Out |
Outbound | TCP | 8080 | Allow outbound from web interface |
HTTPS (Port 443, when SSL enabled):
| Rule Name | Direction | Protocol | Port | Description |
|---|---|---|---|---|
ServerManager_HTTPS_In |
Inbound | TCP | 443 | Allow HTTPS web interface access |
ServerManager_HTTPS_Out |
Outbound | TCP | 443 | Allow HTTPS outbound |
HTTP to HTTPS Redirect (Port 8081, when SSL enabled):
| Rule Name | Direction | Protocol | Port | Description |
|---|---|---|---|---|
ServerManager_HTTPRedirect_In |
Inbound | TCP | 8081 | Allow HTTP redirect to HTTPS |
Cluster API (Port 5001):
| Rule Name | Direction | Protocol | Port | Description |
|---|---|---|---|---|
ServerManager_ClusterAPI_In |
Inbound | TCP | 5001 | Allow cluster API communication |
ServerManager_ClusterAPI_Out |
Outbound | TCP | 5001 | Allow outbound cluster communication |
Game Server Ports (TCP, 7777-7800):
| Rule Name | Direction | Protocol | Port | Description |
|---|---|---|---|---|
ServerManager_GameServers_In |
Inbound | TCP | 7777-7800 | Allow game server TCP connections |
ServerManager_GameServers_Out |
Outbound | TCP | 7777-7800 | Allow game server TCP outbound |
Game Server Ports (UDP, 7777-7800):
| Rule Name | Direction | Protocol | Port | Description |
|---|---|---|---|---|
ServerManager_GameServers_UDP_In |
Inbound | UDP | 7777-7800 | Allow game server UDP connections |
ServerManager_GameServers_UDP_Out |
Outbound | UDP | 7777-7800 | Allow game server UDP outbound |
Steam Query Protocol (UDP, 27015-27030):
| Rule Name | Direction | Protocol | Port | Description |
|---|---|---|---|---|
ServerManager_SteamQuery_In |
Inbound | UDP | 27015-27030 | Allow Steam server browser queries |
ServerManager_SteamQuery_Out |
Outbound | UDP | 27015-27030 | Allow Steam query outbound |
Note: HTTPS and HTTP redirect rules are only created if SSL/HTTPS is enabled during installation. Cluster API rules are created for both Host and Subhost nodes. If your game servers use ports outside the 7777-7800 range, you will need to add additional firewall rules manually.
Removing Firewall Rules: The uninstaller removes all Server Manager firewall rules. You can also remove them manually:
Get-NetFirewallRule -DisplayName "ServerManager_*" | Remove-NetFirewallRuleRun the uninstaller script as Administrator:
.\uninstaller.ps1The uninstaller performs the following steps in order:
-
Stop All Processes — Runs
stop_servermanager.pyto gracefully shut down all Server Manager components and managed game servers. - Remove Windows Service — If the service is installed, it is stopped and uninstalled.
-
Remove Firewall Rules — All
ServerManager_*firewall rules are removed. - Remove Scheduled Tasks — Any Windows Task Scheduler tasks created by Server Manager are removed.
-
Remove Program Data — The installation directory and its contents are deleted. The uninstaller uses three deletion methods in sequence to handle locked files:
- PowerShell
Remove-Item cmd.exe /c rd /s /q- robocopy purge (mirrors an empty directory over the target)
- PowerShell
-
Remove Registry Keys — The
HKLM\Software\SkywereIndustries\Servermanagerregistry key and all its values are deleted. - Optional: Remove SteamCMD — Offers to remove the SteamCMD installation directory.
Run the uninstaller script:
sudo sh uninstaller.shProblem: Start-ServerManager.pyw does not launch or immediately exits.
Solutions:
- Ensure you are running as Administrator. Right-click the script and select "Run as administrator".
- Check for orphaned PID files in the
temp/directory. Delete any.pidfiles and try again. - Verify Python is installed and in your PATH:
python --version. - Check the console debug log at
console_debug.login the project root for startup errors. - Check
logs/components/Launcher.logfor detailed error messages.
Problem: Cannot access http://localhost:8080 in a browser.
Solutions:
- Verify the web server is running: Check for
webserver.pidin thetemp/directory and confirm the process exists. - Check if the port is in use by another application:
netstat -an | findstr :8080. - Verify the Windows Firewall allows port 8080 (see Section 22).
- Check
logs/components/WebServer.logfor error messages. - Try accessing with the IP address instead of localhost:
http://127.0.0.1:8080.
Problem: "Failed to connect to database" errors in logs.
Solutions:
- For SQLite: Ensure the
db/directory exists and is writable. - For SQL Server/MySQL/PostgreSQL: Verify the database server is running and accessible.
- Run
Update-ServerManager.pywto check and repair the database schema. - Check
logs/components/Database.logfor detailed error information.
Problem: A managed server fails to start.
Solutions:
- Check the server's installation directory exists and contains the expected files.
- Verify the executable path in the server configuration is correct.
- For Steam servers: Re-validate the installation by running an update.
- For Minecraft servers: Ensure the correct Java version is installed (see Section 11.2).
- Check the server's console log file in
logs/for error output. - Verify no other instance of the server is already running on the same ports.
Problem: Commands sent through the console are not being executed by the server.
Solutions:
- Check that the stdin relay is running: Look for named pipe
\\.\pipe\ServerManager_stdin_{server_name}. - Check the command queue file:
temp/command_queues/{server_name}_commands.txt. - Verify the server process accepts stdin input (some servers do not read from stdin).
- Try the different command input methods described in Section 7.4.
- Check
logs/services/CommandQueue.logandlogs/services/StdinRelay.logfor errors.
Problem: 2FA codes are not being accepted.
Solutions:
- Ensure the system clock is accurate. TOTP codes are time-based, and a clock difference of more than 30 seconds will cause failures.
- If the authenticator app was reinstalled, the 2FA secret may have been lost. Reset 2FA by running:
python Modules/Database/reset_admin_2FA.py
- Verify the correct user account is selected when scanning the QR code.
Problem: Subhost nodes cannot connect to the Host.
Solutions:
- Verify the Host's IP address and port are correct in the Subhost configuration.
- Ensure the Host's firewall allows inbound connections on port 8080 from the Subhost's IP.
- Test network connectivity:
ping <host-ip>from the Subhost. - Check that the Host is actually running and the web server is accessible.
- Verify the Subhost's join request has been approved on the Host.
- Check
logs/components/Network.logon both Host and Subhost for error details.
Base Path: HKEY_LOCAL_MACHINE\Software\SkywereIndustries\Servermanager
| Key | Type | Default | Description |
|---|---|---|---|
Servermanagerdir |
REG_SZ | (install path) | Root installation directory |
CurrentVersion |
REG_SZ | "1.3" | Installed version |
UserWorkspace |
REG_SZ | (auto) | User workspace directory |
InstallDate |
REG_SZ | (auto) | Installation timestamp |
LastUpdate |
REG_SZ | (auto) | Last update timestamp |
ModulePath |
REG_SZ | (auto) | Modules directory path |
LogPath |
REG_SZ | (auto) | Logs directory path |
SteamCmdPath |
REG_SZ | (auto) | SteamCMD executable path |
WebPort |
REG_SZ | "8080" | Web server port |
HostType |
REG_SZ | "Host" | Cluster role (Host/Subhost) |
HostAddress |
REG_SZ | (none) | Host IP for Subhost nodes |
ClusterCreated |
REG_SZ | (none) | Cluster initialisation flag |
Mail Server Sub-Key: HKLM\Software\SkywereIndustries\Servermanager\MailServer
Stores SMTP configuration values (server, port, username, provider, etc.).
| Variable | Purpose | Values |
|---|---|---|
PYTHONDONTWRITEBYTECODE |
Prevents __pycache__ creation |
"1" |
SERVERMANAGER_DEBUG |
Enables debug logging globally | "1", "true", "True" |
SSL_ENABLED |
Enables HTTPS protocol | "true" |
CLUSTER_HOST_URL |
Host URL for Subhost nodes | Full URL (e.g., "http://192.168.1.10:8080") |
| Port | Protocol | Service |
|---|---|---|
| 8080 | TCP | Web interface and REST API |
| 5001 | TCP | Cluster proxy (internal) |
| 5002 | TCP | Subhost dashboard (internal) |
| 7777-7800 | TCP/UDP | Game server ports (configurable) |
| 27015-27030 | UDP | Steam query protocol |
Each server can have the following automation settings configured:
| Field | Database Column | Default | Description |
|---|---|---|---|
motd_command |
MotdCommand |
(empty) | Command to broadcast MOTD. Must include {message} placeholder |
motd_message |
MotdMessage |
(empty) | The MOTD text to broadcast |
motd_interval |
MotdInterval |
0 | MOTD broadcast interval in minutes (0 = disabled) |
start_command |
StartCommand |
(empty) | Command to execute after server starts |
stop_command |
StopCommand |
(empty) | Graceful shutdown command |
save_command |
SaveCommand |
(empty) | World/data save command |
scheduled_restart_enabled |
ScheduledRestartEnabled |
false | Toggle for scheduled restarts |
warning_command |
WarningCommand |
(empty) | Restart warning broadcast command. Must include {message} placeholder |
warning_intervals |
WarningIntervals |
"30,15,10,5,1" | Comma-separated minutes before restart to send warnings |
warning_message_template |
WarningMessageTemplate |
"Server restarting in {message}" | Warning message template |
Example Configuration for a Minecraft Server:
MOTD Command: say {message}
MOTD Message: Welcome to our server! Type /help for commands.
MOTD Interval: 30
Start Command: say Server is now online!
Stop Command: stop
Save Command: save-all
Warning Command: say {message}
Warning Intervals: 30,15,10,5,1
Warning Message Template: Server restarting in {message} minutes. Please save your progress!
Example Configuration for a Source Engine Server (CS2, Garry's Mod, etc.):
MOTD Command: say {message}
MOTD Message: Welcome! Visit our website at example.com
MOTD Interval: 15
Start Command:
Stop Command: quit
Save Command:
Warning Command: say {message}
Warning Intervals: 15,10,5,1
Warning Message Template: Server restart in {message} minutes
This documentation covers Server Manager version 1.3 For the latest updates, check the GitHub repository.