Repository navigation
Installation
You need three things: the app (Python), flashprog or flashrom, and a Raspberry Pi Pico running the HydraFlasher firmware.
The easiest way: download the newest App release from Releases. Python isn't needed.
| System | File | How |
|---|---|---|
| Windows | HydraFlasher-Setup-<version>.exe |
Installer: Start-menu entry, optional desktop icon, uninstall via Windows settings. Installing a newer version updates the old one. |
| Windows | HydraFlasher-<version>-portable.exe |
Runs without installing, from anywhere (a USB stick too). It unpacks itself at every start, which takes a few seconds. |
| Linux | HydraFlasher-<version>-x86_64.AppImage |
chmod +x HydraFlasher-*.AppImage, then run it. Needs a distribution from 2022 or newer, and FUSE: if it doesn't start, install fuse3 (sudo apt install fuse3), or start it with --appimage-extract-and-run. |
Windows may show "Windows protected your PC" (the app isn't signed with a paid certificate): More info → Run anyway. Some antivirus programs are wary of the portable .exe; the installer is less likely to be flagged.
You still need flashprog or flashrom (see below), and on Linux serial port access.
Requirements: Python 3.8 or newer with Tk, and flashprog or flashrom.
git clone https://github.com/Waffelo/HydraFlasher.git
cd HydraFlasher
pip install -r requirements.txt     # customtkinter, pyserial, plus the optional plyer and tkinterdnd2
python3 HydraFlasher.py
Two packages are optional: plyer shows desktop notifications when a job ends on Windows (Linux uses notify-send instead), and tkinterdnd2 lets you drag and drop images onto the window. Without them those features are simply off.
On first launch HydraFlasher looks for flashprog, then flashrom, on your PATH and in the usual install folders. If it finds neither, it asks you to locate the binary once and remembers the choice.
Only one HydraFlasher window can run at a time. Starting a second one shows "Hydra Flasher is already running", because two windows would talk to the same Pico and garble each other's commands.
Your user needs read/write access to the Pico's serial port (usually /dev/ttyACM0). Add yourself to the right group, then log out and back in:
sudo usermod -aG dialout $USER     # Debian, Ubuntu, Fedora
sudo usermod -aG uucp $USER        # Arch
Without access, HydraFlasher asks for your sudo password and runs flashprog through sudo. That works, but the features that talk to the Pico directly are then turned off: the live socket scan (so chips only show up after a probe), verify on Pico and used blocks only. Fixing the group is strongly recommended.
The Pico runs a modified pico-serprog with ten chip-select lines, status LEDs and an on-device CRC32. Building needs the Pico SDK: either set PICO_SDK_PATH, or put a pico-sdk checkout in or next to firmware/.
cd firmware
./build.sh          # builds build/pico_serprog.uf2
./build.sh flash    # builds, then copies it to a Pico in BOOTSEL mode
./build.sh flash reboots a Pico that already runs HydraFlasher firmware into its bootloader by itself. For a new Pico, hold the BOOTSEL button while plugging it in, so it shows up as the RPI-RP2 drive. Every push to GitHub that touches firmware/ also builds the .uf2 in GitHub Actions.
Without building: once the Pico runs HydraFlasher firmware, the app updates it for you: settings → latest installs the newest release from GitHub. A blank Pico shows up as the RPI-RP2 drive by itself; a Pico with other or older firmware does when you hold its BOOTSEL button while plugging it in. HydraFlasher notices the drive (A Pico in bootloader mode (RPI-RP2) is plugged in), and settings → latest or from file… installs the firmware on it. Copying the .uf2 onto the drive yourself works too.
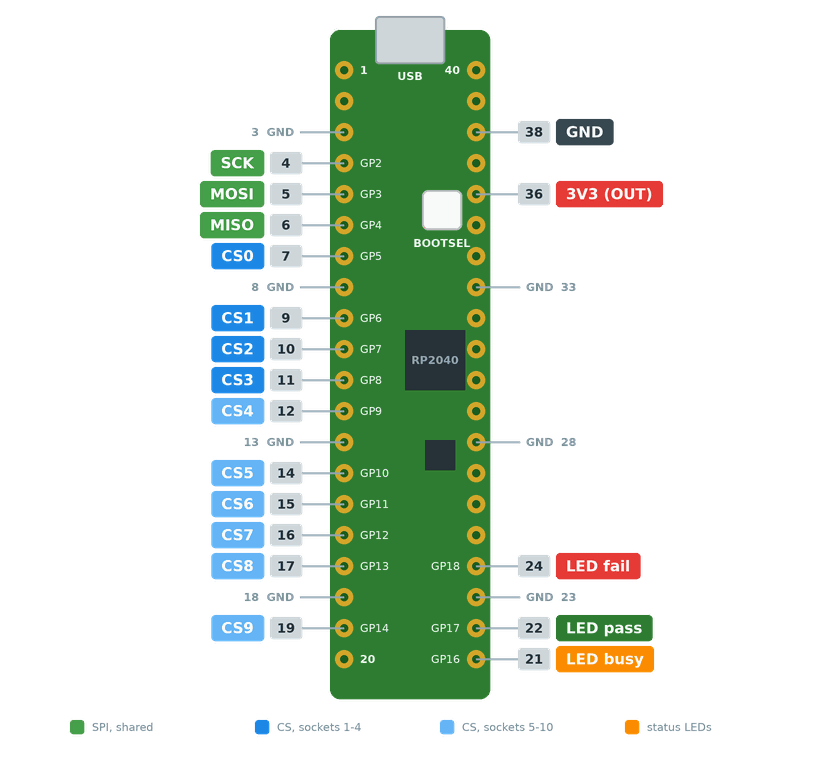
| Signal | Pico GPIO |
|---|---|
| SCK | GP2 |
| MOSI | GP3 |
| MISO | GP4 (pull-up) |
| CS0 to CS9 | GP5 to GP14 |
| LED busy / pass / fail | GP16 / GP17 / GP18 (pins 21 / 22 / 24, the other side of the board) |
All sockets share SCK, MOSI and MISO; each socket has its own CS line. The app uses sockets CS0 to CS3 by default; boards with 1 to 10 sockets are supported. With a 10 kΩ pull-up from each socket's /CS to 3V3, the app detects how many sockets your board has by itself (firmware 1.2 or newer, see Socket count). A broadcast selects every socket at once (see Operations).
Older HydraFlasher firmware had six chip selects (CS0 to CS5) and the LEDs on GP11 / GP12 / GP13. Those pins are now CS6 to CS8, and the LEDs moved to GP16 / GP17 / GP18. After flashing the new firmware onto an existing board:
- Move the three LEDs to GP16 / GP17 / GP18 (Pico pins 21 / 22 / 24). LEDs left on GP11 to GP13 sit on chip-select lines, which idle high, so all three just stay lit.
- Sockets CS0 to CS5 stay on the same pins, so the sockets need no rewiring.
The app works with both: it asks the Pico how many chip selects it has and uses the right broadcast. With the old firmware, sockets beyond CS5 show no CS line in firmware.
The firmware names itself "HydraFlasher" over USB, so HydraFlasher finds and selects the right serial port automatically. Since firmware 1.3 it uses Raspberry Pi's USB ID for Pico serial devices (2E8A:000A) with a serial number unique to each Pico; older firmware used CAFE:4001 and the same serial number on every board. After updating to 1.3, Windows gives the Pico a new COM port number once.