Home
ZicBox is a versatile C++ framework designed to simplify the development of music applications, with a primary focus on creating grooveboxes and drum machines for custom hardware running on Raspberry Pi. However, it is not limited to embedded devices, it also runs on Linux desktops, making it a basic foundation for building full-fledged music production software.
ZicBox is built around a highly modular system that ensures flexibility and extensibility:
- UI Components as Modules – Every UI element is encapsulated as a module, allowing for easy customization and expansion.
- Audio Processing as Modules – Synth engines (such as drum synthesizers, sample players, ...) and effect processors (like filters, distortion, etc.) are also modular, enabling seamless integration of new sound-processing capabilities.
- Hardware Interfaces as Modules – The system abstracts hardware interactions into modules, making it simple to add support for new devices without modifying the core application.
This modular design allows developers to extend ZicBox effortlessly by adding new modules without altering the framework’s core logic.
ZicBox efficiently manages system resources to ensure low-latency audio performance. It achieves this by:
- Running the UI in a dedicated thread to ensure smooth rendering and interaction.
- Routing all control data between the UI and the audio engine efficiently.
- Running each audio track in a separate thread, ensuring optimal real-time processing.
- Handling audio thread synchronization to maintain precise timing and tempo accuracy.
For configuring the framework, ZicBox provides a Lua scripting interface. However, instead of writing pure Lua, developers can use TypeScript, thanks to the TypeScript-to-Lua transpiler. This allows for a strongly typed configuration system while still benefiting from Lua's lightweight runtime.
Additionally, ZicBox leverages JSX (React-style syntax) for UI configuration, making it intuitive to define interface components. Unlike traditional React, there is no component state management involved, JSX is used purely for declarative UI structure.
- 🖥️ Designed for Custom Hardware – Optimized for Raspberry Pi but also runs on Linux desktop.
- 🧩 Extensible & Modular – Easily add new UI components, synth engines, effects, and hardware integrations.
- ⚡ High-Performance Audio – Multi-threaded design ensures real-time audio processing with precise synchronization.
- 💡 Type-Safe Configuration – Use TypeScript instead of Lua for a structured, maintainable setup.
- 🎨 JSX-Based UI – Define interfaces declaratively with React-style syntax.
ZicBox is an ideal solution for developers looking to build custom music applications, whether for standalone hardware or full desktop music production environments.
Clone the repo and start building with ZicBox! 🎵
git clone --recurse-submodules https://github.com/apiel/zicBox.git
cd zicBox
Note: If the repository has already been cloned but submodules are missing, run the following command to pull them:
git submodule update --initFor SSH submodules, use:
git submodule update --init .gitmodules_ssh
Update package lists and install required dependencies:
apt-get update
apt-get install build-essential librtmidi-dev libsndfile1-dev pulseaudio alsa-utils liblua5.4-dev -yIf you are setting up on a desktop, install SDL2 development libraries:
sudo apt-get install libsdl2-devFor Raspberry Pi, a setup script is available. Run the following commands:
cd hardware/rpi
sudo ./setup.shOnce everything is set up, you can run the demo project using:
make pixelNow you should get something like:
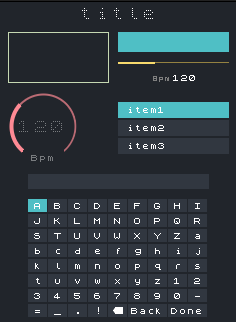
Yes, I know, it sounds boring! But before we complicate things, let's take a moment to understand how everything works. First, let's take a look at the code:
import * as React from '@/libs/react';

import { plugin, pluginAlias } from '@/libs/audio';
import { pixelController } from '@/libs/controllers/pixelController';
import { applyZic } from '@/libs/core';
import { Keyboard } from '@/libs/nativeComponents/Keyboard';
import { KnobValue } from '@/libs/nativeComponents/KnobValue';
import { List } from '@/libs/nativeComponents/List';
import { Rect } from '@/libs/nativeComponents/Rect';
import { Text } from '@/libs/nativeComponents/Text';
import { Value } from '@/libs/nativeComponents/Value';
import { View } from '@/libs/nativeComponents/View';
import { setScreenSize, setWindowPosition } from '@/libs/ui';

// Initialized our first audio plugin, just the tempo plugin.
pluginAlias('Tempo', 'libzic_Tempo.so');
plugin('Tempo');

const ScreenWidth = 240;
const ScreenHeight = 320;

// Initialized our hardware controller ('rpi3A_4enc_11btn' is to define the hardware version)
pixelController('rpi3A_4enc_11btn');

// For conveniency, on dekstop, set the window to a specifc location
setWindowPosition(400, 500);
// Define the screen size
setScreenSize(ScreenWidth, ScreenHeight);

// Finally define the UI
applyZic(
    <View name="Demo"> { /* UI components must be contain in a view, there can be as many view as you want */ }
        <Text fontSize={16} text="title" bounds={[0, 0, ScreenWidth, 16]} centered />

        <Rect color="tertiary" filled={false} bounds={[10, 30, 100, 50]} />
        <Rect color="primary" bounds={[120, 30, 110, 20]} />

        <Value
            audioPlugin="Tempo" // Here we define which audio plugin to control
            param="BPM" // Here we define which parameter of the audio plugin to control
            bounds={[120, 60, 110, 20]}
            encoderId={0} // Specify which hardware encoder will change the value of this parameter
            barColor="quaternary"
        />

        <KnobValue
            audioPlugin="Tempo"
            param="BPM"
            bounds={[10, 90, 70, 70]}
            encoderId={1}
            color="secondary"
        />

        <List items={['item1', 'item2', 'item3']} bounds={[120, 100, 110, 60]} />

        <Keyboard bounds={[0, 175, ScreenWidth, 120]} />
    </View>
);
If you prefer not to use TypeScript for the configuration file, you have alternatives, you can use Lua, or even define everything directly in C++. However, I personally find TypeScript/JSX to be the most convenient option due to its strong typing, ease of use, and developer-friendly tooling.
Now, you might be wondering about performance, don’t worry! The configuration process is purely declarative, meaning TypeScript is only used to define settings and structure. Once the configurations are initialized, the actual execution happens entirely in C++, ensuring optimal performance. TypeScript is only invoked at runtime to process the configuration, but after that, everything runs natively in C++ without any overhead from TypeScript itself.
In short, you get the best of both worlds, TypeScript for a clean and manageable configuration setup, and C++ for high-performance execution.
More documentation here.
🎧 Built for musicians & developers
 |
 |
 |
 |
 |
 |