Repository navigation
Input System
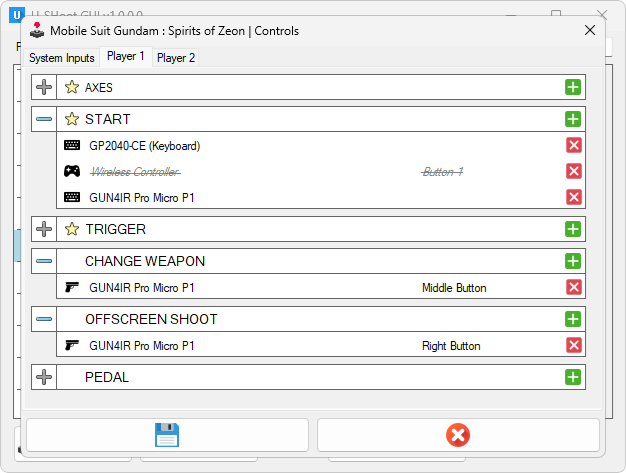
This Window can be displayed both from a specific game Inputs settings or from the main window Default Inputs button.
| Item | Description |
|---|---|
| Category |  |
| Input |  |
| Entry |  |
| Save |  |
| Cancel |  |
For each game, inputs are stored into 2 catégories:
- SYSTEM INPUTS for cabinet unique buttons (
TEST,SERVICE,COIN) - PLAYER INPUTS for player dependent-inputs (
START,TRIGGER)
Global input will also contain a custom virtual EXIT button to close/quit the game.
Each Input element represents a button or an axis in the game.
All buttons can have multiple entries registered, whereas AXES Input element can only have one and unique.
| Item | Description |
|---|---|
| Expand/Collapse button |
 No entry has been added for that input.  At least one entry has been added for that input, but the group is collapsed. Click it to expand.  At least one entry has been added for that input. Click it to collapse the group. |
 Default Value icon |
If displayed, this means that input already has at least one Default Value set in the program. Whether the Default Input contains plugged/unplugged/available devices is unknown. |
| Input Name | All registered input entries will be displayed below |
 Add entry button |
Click to add an entry for that Input. |
| Item | Description |
|---|---|
| Device Type |
 Regular mouse (relative positionning, will use window cursor position)  Keyboard device  Mouse-based lightgun (Absolute positionning)  Joypad/Gamepad based device |
| Entry description | Device name (when available) and selected button name |
 Remove entry button |
Click to remove the selected entry from the list for that Input |
Grayed-out entries will be displayed when the corresponding hardware device is not found/unplugged from the system :

They are designed to act as a cabinet/panel/game controller switch, and each button Input can have multiple entries.
- Click the "Add Entry" button
- Press the desired button on the device
Repeat to add as many required Entry for each Input.
They are designed to control the player aim/reticle and can only have one entry assigned (adding a new one will only result in overwriting the previous one.)
Also, AXES is a unique Input element for both X and Y axes, meaning the same hardware device must be used to control X and Y positionning.
AXES Input can only have one and unique Entry.
Adding a new one will only result in overwriting the previous one.
- Click the "Add Entry" button
- Move the desired source device. U-Shoot will add it to the
AXESentry if the device has compatible hardware interface. - Device name will simply be displayed and windows cursor position will be used.
- Click the "Add Entry" button
- Move the desired source device. U-Shoot will add it to the
AXESentry if the device has compatible hardware interface. - Device name will simply be displayed and Raw Input absolute positionning data will be read from the device.
- Click the "Add Entry" button
- Move the desired source device. U-Shoot will add it to the
AXESentry if the device has compatible hardware interface. - Device name will be displayed along with a
 Settings icon.
- Click this icon to configure analog options
When selecting an Analog device as AXES controller, a Settings icon becomes available in the Input entry.
Clicking it will show this window :
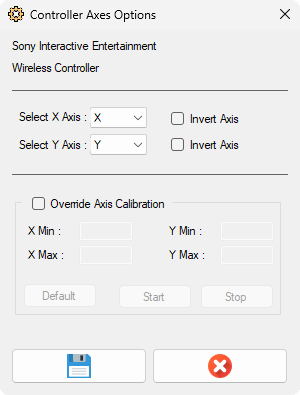
When an analog device has many different available axes (multiple stick or potentiometers), use it to choose the corresponding one.
Also, based on the hardware/software, it's possible to invert each axis (ex: mounted analog guns)
Some analog devices (like arcade analog guns) have old potentiometer and do not allow to use the max range that should be available for X/Y axis.
Checking the option will allow a manual calibration so that the real axis range will be used instead of the theorical one :
- Check the option
- Press the
Startbutton - Move the controller as far as possible in each direction, MIN/MAX values should change accordingly
- Once done, click the
Stopbutton and save.
Clicking the Default button will remove the manual calibration and use theorical MIN/MAX values