Khe Sanh Campaign Briefing
The 414th's working reference for Caucasus - Khe Sanh: Operation Niagara (Caucasus map, 21 January 1968). This is the brief-builder: accurate friendly order of battle, the win geometry, a fill-in mission-brief template, package recipes, a comms/FAC card, the AAA threat-defeat reference, and a phased campaign plan. Print it, fork it, scribble on it.
 The lifeline under fire — a C-130 on the Khe Sanh strip, 1968. USAF photo (public domain), via Wikimedia Commons; full image credits.
🟢🟡 Provenance & confidence — read this. This handbook is read straight from the campaign files —
resources/campaigns/khe_sanh_niagara.yaml,resources/factions/USA 1970 Vietnam War.json, andresources/factions/nva_1970.json. Trust the ORBAT, factions, economy, settings, supply routes, and the enemy AAA/armor/SAM lists. Two things are designed but still being tuned / not yet flown and are flagged 🟡 where they appear: the exact SAM/IADS placement in the NVA rear (the build inherited Yankee Station's SAM laydown and is being thinned to a firebase feel — see §4/§10), and Combat SAR (a 414th feature still in in-game testing). The campaign is headless-validated, pending its first in-game flight pass.
⚠️ Mods/modules required. This campaign won't load or spawn correctly without the period content it's built on. From the campaign + faction files: Vietnam War Vessels (v2.3.0), OV-10A Bronco mod, Russian Military Assets Pack ([CH]T-54/ASU-85), WW2 Asset Pack (NVA), and the era modules it slots — A-4E, A-1 Skyraider, F-8E, A-6, F-100, OV-10, OH-6, plus the F-4/F-111C/B-52 it lists. Make sure your squadron's install matches before op night.
- Campaign at a glance
- Win conditions & how the siege breaks
- Friendly order of battle (real, from the campaign)
- The enemy in one screen
- Campaign CONOPS — the phase plan
- Weekly op-night runbook
- The mission brief template (fill-in)
- Package recipes
- Comms, FAC & code-word card
- Threat-defeat quick reference (it's an AAA fight)
- Combat SAR — downed over the hills
- Loadout & role pairing notes (1968)
- Appendix A — blank one-page brief sheet
- Appendix B — mission log / debrief sheet
| Item | Value |
|---|---|
| Campaign | Caucasus - Khe Sanh: Operation Niagara (fork of NoGoodNews' 1968 Yankee Station) |
| Theater | Caucasus (NW-Vietnam highlands mapped onto the foot of the Caucasus range) |
| Date / setting | 21 January 1968 — the siege of Khe Sanh; Operation Niagara air umbrella |
| Our side | USA 1970 Vietnam War — Marine/Navy/USAF/Army air, the carriers on Yankee Station |
| Enemy | NVA 1970 — ground-heavy (armor + artillery + AAA), air-light (token guns-only MiG-17s) |
| Posture | Asymmetric. Blue owns the air; red owns the ground and the initiative. Keep the base alive, then break the ring. |
| Economy skew | Blue favoured — start $3000 / income ×1.5 vs red $1500 / ×1.2 (red's money feeds the ground) |
| Front reinforcements |
automate_front_line_reinforcements: true — the ring keeps pressing on its own |
| Threat profile | Wall-to-wall AAA (12.7–57 mm + radar Shilka), armor at Lang Vei, SA-2/SA-3 in depth. No MANPADS (none existed in 1968). |
| Difficulty cushions |
invulnerable_player_pilots: true, player_skill: Excellent, enemy Average, day-only missions |
| Module note | Many airframes are modern stand-ins for the period type (AH-1W for AH-1G, A-6E for A-6A, F-4E for F-4B/C, CH-53E for CH-53) |
The one-sentence situation: two NVA divisions have ringed the Marine base at Khe Sanh; the only way in is by air — hold the perimeter with round-the-clock tac air, Arc Light, and airlift, then break the siege with the Pegasus relief.
This is a dynamic campaign built around a siege topology. There's no scripted ending — you win by relieving Khe Sanh and rolling the NVA off the perimeter.
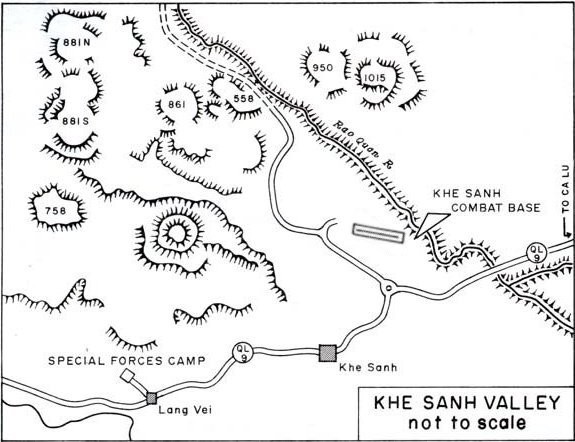 The real ground the layout abstracts: the base + airstrip, the hill outposts, Route 9 east, and Lang Vei to the SW. Public domain; see the visual briefing for the aerial + Jan-1968 disposition map and full credits.
The map (Caucasus → Vietnam):
| Vietnam | Caucasus CP | Side | Role |
|---|---|---|---|
| Khe Sanh Combat Base | Kutaisi | BLUE | the besieged base — encircled, air-only resupply (starts at 0.25 strength) |
| Hill 881S (forward outpost) | Hill 881S FOB | BLUE | blue forward FOB, airlift-supplied with Kutaisi |
| The hills (881/861/558) + NVA artillery | Sukhumi | RED | the siege ring NW — artillery + AAA on the high ground |
| Route 9 / Pegasus axis | Senaki | RED | the NW approach the relief must reopen (token MiG-17s here) |
| Lang Vei SF camp | Kobuleti | RED | SW — the armor threat (PT-76 / [CH] T-54), Route 9 |
| Da Nang (tac-air rear + relief) | Batumi | BLUE | main blue tac-air base + the Pegasus ground-relief pocket |
| Yankee Station | Naval-1 / Naval-2 | BLUE | the carriers offshore (A-4/A-6/F-8/RA-5/E-2) |
| Deep-east rear | Tbilisi-Lochini | BLUE | the heavy rear: fast jets, B-52 Arc Light, EC-121, tanker, airlift |
The siege geometry: Kutaisi (blue) is encircled — every land-adjacent CP (Senaki, Sukhumi, Kobuleti) is red, so the front rings the base and its only lifeline is air. Blue's other holding (Batumi + the carriers) is a separate pocket, not land-adjacent to Kutaisi. Kutaisi's 0.25 strength pulls the siege fronts in tight (~7/13/28 km on the Senaki/Kobuleti/Sukhumi axes).
The win arc = Operation Pegasus: push from Batumi through Kobuleti / Senaki to link up with Kutaisi — that breaks the siege. Get there by:
- Keeping the base alive — CAS on the perimeter, airlift/resupply into Kutaisi + Hill 881S.
-
Killing NVA ground — BAI/CAS on the hill artillery and the Lang Vei armor; Arc Light on the
massed infantry. Red's economy feeds ground reinforcements (
×1.2, automated), so attriting the ring is how the line moves your way. - The ground relief — as the front advances up the Pegasus axis, the encircling CPs flip and the ring opens.
Tempo: unlike a SAM-belt air war, the limiting factor here is how fast you can grind the ring while the airlift keeps the garrison fed. Air superiority is essentially free — spend your sorties on the ground fight, not on chasing MiGs.
Exact, from khe_sanh_niagara.yaml. All airframes are player-flyable era types (some modern
stand-ins). Sizes are starting squadron strength.
| Squadron airframe | Role | Size |
|---|---|---|
| AH-1W SuperCobra | CAS | 4 |
| OV-10A Bronco | CAS / FAC(A) | 4 |
| A-1H Skyraider | CAS (forward "Sandy") | 4 |
| UH-1H Iroquois | Air Assault (medevac/resupply) | 4 |
| Squadron airframe | Role | Size |
|---|---|---|
| A-1H Skyraider | CAS | 8 |
| F-8E Crusader | BARCAP | 8 |
| CH-53E | Air Assault (heavy lift) | 2 |
| UH-1H Iroquois | Air Assault | 4 |
| Squadron airframe | Role | Size |
|---|---|---|
| F-100D Super Sabre | CAS | 12 |
| F-4E-45MC Phantom II | Strike | 12 |
| RF-101B Voodoo | Armed Recon | 4 |
| B-52H Stratofortress | Strike (Arc Light) | 4 |
| EC-121D Warning Star | AEW&C | 2 |
| KC-135 Stratotanker | Refueling (boom) | 2 |
| C-130J-30 | Transport (Khe Sanh airlift) | 4 |
| Squadron airframe | Role | Size |
|---|---|---|
| E-2C Hawkeye | AEW&C | 2 |
| F-8E Crusader | BARCAP | 12 |
| A-4E Skyhawk | Strike | 12 |
| A-4E Skyhawk | Strike | 12 |
| RA-5C Vigilante | Armed Recon | 4 |
| Squadron airframe | Role | Size |
|---|---|---|
| A-6E Intruder | Strike (all-weather) | 12 |
| A-4E Skyhawk | CAS | 12 |
Reading the roster for tasking:
- CAS / FAC — the main effort. A-1H Skyraider (the iconic "Sandy", Kutaisi + Da Nang), A-4E Skyhawk (carriers), F-100D (Tbilisi), AH-1W gunships, and the OV-10A Bronco as your FAC(A) (the faction's JTAC airframe). This is where most sorties go.
- Strike / interdiction. A-6E (all-weather, big bomb load), F-4E (Tbilisi), A-4E. Hit the hill artillery, the Lang Vei armor, and the supply road/bridges.
- Arc Light. B-52H out of Tbilisi — area saturation on massed NVA.
- Air superiority (cheap). F-8E Crusader (Da Nang + carrier) and the F-4E cover the token MiG-17 presence at Senaki. Carries AIM-9 + guns — and that's plenty here.
- Recon. RF-101B Voodoo + RA-5C Vigilante — find the guns, the armor, and the bomb damage.
- Lift / lifeline. C-130J (the Khe Sanh airlift), UH-1H (medevac/resupply), CH-53E (heavy lift).
- Enablers. EC-121D + E-2C for the air picture, KC-135 boom tanker.
⚠️ Tanker gotcha (plan around it): only the boom KC-135 is fragged (at Tbilisi). It feeds the USAF jets — F-100D, F-4E, RF-101B, B-52H. The Navy/Marine probe jets (A-4E, A-6E, F-8E, A-1H) have no drogue tanker in the laydown — they rely on short legs from the carrier / Da Nang and hot-pit turns. Keep their fragged ranges honest, or add a KC-130/S-3B drogue tanker squadron if you want carrier-jet AAR.
The NVA are ground-heavy and air-light — historically right. The campaign is not an air-superiority or SEAD fight; it's about surviving the guns and killing the ground force.
Air — token, and guns-only.
- MiG-17F Fresco (×8, BARCAP) at Senaki — the only fielded fighters near the front. The faction date-gates their missiles out (R-3R/R-60 pushed to 1980), so they're guns-only knife-fighters. Don't get slow and low with one; keep energy, use F-8/F-4 to swat them. The faction can field MiG-19/MiG-21 but the campaign doesn't place them.
- Mi-8 Hip at Sukhumi (CAS) and Senaki (transport) — the NVA's own lift/light-attack.
Ground — the real fight (BAI/CAS targets).
-
Armor at Lang Vei (Kobuleti): PT-76 amphibious tanks and
[CH]T-54 MBT (plus[CH]ASU-85, T-55A, half-tracks) — the campaign's signature armor threat. Historically the PT-76 overran Lang Vei on 7 Feb '68 — the first NVA armor in the South. - Artillery on the hills (Sukhumi): BM-21 Grad and towed guns ringing the base.
- Infantry massing on the perimeter — the Arc Light / TIC targets.
Air defense — AAA is the threat, not SAMs. From nva_1970.json:
| System | Type | Note |
|---|---|---|
| ZSU-23-4 Shilka | Radar-directed 23 mm SPAAG | The dangerous one — accurate, tracks. Respect it. |
| ZSU-57-2 | 57 mm SPAAG (optical) | Heavy hitter up to medium altitude. |
| S-60 57 mm | Towed radar/optical 57 mm | Reaches ~medium altitude; the classic NVA flak. |
| ZU-23 (towed + on Ural) | 23 mm autocannon | Everywhere; deadly low. |
| SA-2 / SA-3 + KS-19 | Strategic SAM + 100 mm guns | 🟡 In depth only (intended). See below. |
🟡 On the SAMs / IADS.
advanced_iads: trueis set and the faction carries SA-2/SA-3 + the "Flat Face" search radar, but the exact SAM placement is still being tuned — the build inherited Yankee Station's SAM laydown and the design intent is to thin it to a firebase feel: AAA at the perimeter, SA-2 only in the deep rear. Also, the NVA field no AWACS and no dedicated EWR, so under the MANTIS engine the SA-2 net is likely detection-light. Net effect for you: plan against the AAA belt as the dominant, ever-present threat; treat any SA-2 as a deep-rear verify-in-game item, not a perimeter problem.
Naval — minimal. Small patrol boats (armed speedboats / S130) only. No real surface threat; blue owns the water (and brings the New Jersey / Oklahoma City gun line — see §8).
The historical arc (Niagara → Pegasus) becomes a phased plan. Phases overlap; the automated ring keeps pressing, so the early phases are about not losing the base while you build toward the relief.
- Objective: don't lose Khe Sanh. Blunt the closest assaults; keep Kutaisi + Hill 881S supplied.
- Fly: CAS on the perimeter (A-1H, AH-1W, A-4E) under FAC(A) control (OV-10); airlift (C-130) and medevac (UH-1H) into Kutaisi; light BARCAP (F-8E) for the token MiGs.
- Win when: the perimeter is stable and the airlift is flowing.
- Objective: beat down the AAA on the hills so strikers can work, and locate the Lang Vei armor.
- Fly: recon (RF-101B/RA-5C) to map the guns + armor; BAI on the hill artillery; FAC-directed CAS; first Arc Light boxes on massed infantry. Keep CAS feeding the perimeter.
- Win when: the worst of the perimeter AAA is suppressed and the armor/artillery is mapped.
- Objective: destroy the Lang Vei (Kobuleti) armor and the hill (Sukhumi) artillery — the things that can crack the wire.
- Fly: dedicated anti-armor strikes (A-6E/A-4E/F-100 with Rockeye/snake/napalm), sustained Arc Light, naval gunfire if you want it. Push the Batumi front toward Kobuleti.
- Win when: the armor threat is gone and the ground front starts moving up the Pegasus axis.
- Objective: advance from Batumi through Kobuleti / Senaki to link up with Kutaisi.
- Fly: CAS/BAI ahead of the advancing front, interdiction of the supply road (cut the bridges — see §8), Arc Light on the NVA divisional rear, continued airlift until the road opens.
- Win when: the front reaches Kutaisi — siege broken.
Carry one idea through every phase: the air keeps the base alive; the ground fight wins it. Don't let the airlift lapse while you chase the offensive.
A repeatable Saturday flow. The mission commander (MC) owns the plan; everyone else fills it.
Before op night (MC, in the Retribution tool):
- Sync the save; read last turn's SITREP (losses, base captures, front movement) and the current siege geometry.
- Pick this turn's objective off the phase plan (§5): one main effort (perimeter CAS / anti-armor / Pegasus push) + the standing airlift.
- Lay the packages (§8): main-effort CAS or anti-armor under a FAC, an Arc Light if there's a massed target, the C-130 airlift, light BARCAP, and a Combat SAR alert if helos are free.
- Assign player slots to the sorties that matter; let the AI fill BARCAP/lift.
- Generate the mission. Confirm the FAC/JTAC is set, day-only is on, and kneeboards generated.
At the brief (MC, ~10 min): run the §7 template. Emphasise the gun threat and run-in discipline (this campaign kills you with flak, not missiles).
Flight leads: brief your flight's game plan, FAC contract, and comms off the package brief.
After the flight (MC): run the §Appendix B debrief, fly the turn, capture the SITREP.
Role slate (assign each op night):
| Role | Typical airframe | Job |
|---|---|---|
| Mission Commander | any | Owns the plan & timeline |
| FAC(A) | OV-10A Bronco | Finds targets, marks, controls the CAS stack |
| CAS lead | A-1H / A-4E / F-100D / AH-1W | Puts ordnance on the perimeter under the FAC |
| Anti-armor lead | A-6E / A-4E | Kills the Lang Vei armor |
| Arc Light | B-52H | Area saturation on massed NVA |
| BARCAP | F-8E | Swats the token MiG-17s (cheap insurance) |
| Airlift | C-130J / UH-1H | Keeps Khe Sanh + Hill 881S fed |
| Recon | RF-101B / RA-5C | Maps guns, armor, BDA |
| Sandy / CSAR | A-1H + UH-1H/CH-53E | Rescues downed aircrew over the hills |
Copy this for each mission. Fill the brackets. A stripped one-pager is in Appendix A.
======================  KHE SANH — MISSION BRIEF  ======================
OP / TURN / DATE: Niagara · Turn [N] · 21 JAN 1968 (+[turns])
MISSION #: [____]      MC: [callsign]

1. SITUATION
   Last turn (SITREP): [losses / front movement / base status]
   Siege now: [where the ring is; is the airlift flowing?]
   Enemy: [AAA known on this axis / armor or arty located / token MiG note]
   Friendly: [adjacent packages, the ground push, airlift status]
   Weather / light: DAY. [ceiling / vis / wind]

2. MISSION (who-what-where-when-why)
   "[Package] will [task] [target] vic [hill/Lang Vei/Route 9] at [TOT]
    under [FAC callsign], in order to [phase objective]."

3. EXECUTION
   a. Commander's intent / main effort: [the one thing that must happen]
   b. Scheme of maneuver:
        - Push: [time]   IP / Contact pt: [point]   TOT: [time]
        - [Flight] — [role] — [run-in plan, FAC check-in, deliveries, egress]
   c. Game plan vs. the GUNS (this is an AAA fight — §10):
        - Hard deck / roll-in altitude: [stay above the auto-AAA floor]
        - Run-in: vary axis every pass; NO repeat passes on the same heading
        - Shilka (radar 23mm) called: [terrain-mask / re-attack from a new axis]
        - Egress: jink, don't dive low to admire the target
   d. Weapons / loadout per flight: [§12 — period iron, snake/napalm/rockets/gun]
   e. FAC contract: [marks (Willie Pete), talk-on, line-up, cleared hot / abort]
   f. Success / abort criteria: [what "done" is; when to knock it off]

4. COORDINATION & COMMS (§9)
   FAC(A): [callsign / freq]   AWACS: [EC-121/E-2 callsign / freq]
   Tanker: [KC-135 / freq — USAF jets only]   Airlift window: [if deconflicting Kutaisi]
   Package freq: [____]   Guard: 243.0
   Code — PUSH [____]  CLEARED HOT [____]  ABORT [____]  TROOPS-IN-CONTACT [____]

5. ADMIN & SAR (§11)
   Bingo / Joker: [____]   Divert: [Da Nang/Khe Sanh/carrier]
   Combat SAR: Sandy [A-1H flight], Dustoff [UH-1H], freq [____]
   If you go down: [over hostile hills — get off the LZ-side slope, guard, Sandy runs it]

6. CONTINGENCIES
   - Weather below mins over the target: [divert / re-task]
   - FAC off-station: [hold / abort the CAS — no uncontrolled drops near the wire]
   - Airlift threatened: [escort / suppress the gun that's ranging the strip]
   - Heavy AAA on the briefed axis: [shift IP, attack from a new bearing]
========================================================================
Fast templates for the tool. Scale to what's available and to the threat. Note how different this is from a modern war — no SEAD/DEAD packages (AAA isn't killed by HARM), and air superiority is an afterthought.
| Package | Core | Support | Notes |
|---|---|---|---|
| FAC + CAS (the bread and butter) | OV-10 FAC(A) + 2–4× A-1H / A-4E / F-100D | AH-1W gunships | The FAC finds/marks; CAS works the perimeter. Most sorties. |
| Anti-armor (Lang Vei) | 2–4× A-6E or A-4E (Rockeye/snake/napalm) | OV-10 FAC | Kill the PT-76/T-54 at Kobuleti. The signature BAI mission. |
| Arc Light | 1–3× B-52H | (recon to fix the box) | Area saturation on massed infantry/arty. Deconflict the box hard. |
| Hill interdiction | 2–4× A-4E / F-100D / A-6E | OV-10 FAC + recon | Beat down the Sukhumi artillery + AAA. |
| Road/bridge interdiction | 2× A-6E / A-4E | recon | Cut the destructible bridges on the NVA supply axis (Route 9). |
| BARCAP (cheap) | 2× F-8E | EC-121 / E-2 picture | Token MiG-17 insurance. Guns + AIM-9 is plenty. |
| Airlift / resupply | C-130J + UH-1H | (CAS on call) | Keep Kutaisi + Hill 881S fed. Protect the strip from ranging guns. |
| Naval gunfire (optional) | New Jersey / Oklahoma City gun line | — | The faction carries the BB/CLG; shore bombardment of the coastal ring. |
| Combat SAR (§11) | A-1H "Sandy" ×2 + UH-1H/CH-53E | AH-1W | Stand up when aircrew goes down over the hills. |
Put a FAC (OV-10) over any CAS push — talk-ons and Willie-Pete marks are how you put iron on a gun or a bunker line you can't see from altitude, and how you keep drops off the friendly wire.
Fill the blanks per mission; the structure stays constant. The FAC(A) is central here — more like a JTAC brief than a strike-package brief.
NETS
  Package (primary) ....... [____]      Guard ................... 243.0 / 121.5
  FAC(A) "[callsign]" ..... [____]      AWACS (EC-121/E-2) ..... [____]
  Tanker (KC-135, USAF) ... [____]      Airlift / Khe Sanh tower [____]
  Combat SAR (Sandy) ...... [____]      Ground / TIC net ....... [____]

THE 9-LINE (FAC to attack) — copy it down
  1 IP/BP   2 Heading   3 Distance   4 Target elev   5 Target desc
  6 Target location   7 Mark (WP/laser/talk-on)   8 Friendlies   9 Egress
  Readback: lines 4, 6, and restrictions. Wait for "CLEARED HOT".

CODE WORDS (set fresh each mission)
  PUSH ......... [____]   (commit / run-in)
  CLEARED HOT . [____]    (FAC clears the drop)
  ABORT ........ [____]   (knock it off — go around, no drop)
  TIC ......... [____]    (troops in contact — danger-close discipline)

KEY BREVITY
  CONTACT ............ I see the mark/target you called
  TALLY / NO JOY ..... I see the target / I don't
  IN (heading) ....... rolling in on the attack
  OFF (direction) .... off target, egressing
  WINCHESTER / BINGO . out of ordnance / fuel to RTB
  DANGER CLOSE ....... friendlies within risk distance — FAC must clear, read back
  GUNS / TRIPLE-A .... taking AAA (give type + clock + where)
No "MAGNUM/MUD" SAM chatter here — the threat call that matters is "GUNS, [clock], [type]" so the flight can shift its run-in. And danger-close discipline near the wire is the whole ballgame.
This campaign kills you with flak, not missiles. Carry this on the kneeboard.
| Threat | Defeat |
|---|---|
| ZSU-23-4 Shilka | Radar-directed 23 mm — the accurate one. If it's up, terrain-mask and re-attack from a new axis; don't fly a predictable pattern in its arc. Kill it first if it's near your target. |
| ZSU-57-2 / S-60 (57 mm) | Reach up to medium altitude. Roll in from above their effective ceiling, dive, deliver, egress jinking. Don't loiter or make repeat passes on one heading. |
| ZU-23 (23 mm) + 12.7/14.5 mm | Lethal low. Stay above the auto-AAA floor near the target; if you must go low, go fast and unpredictable, one pass. |
The golden rules (1968 tac-air):
- There are no MANPADS. Medium altitude is comparatively safe — use it. The historical loss driver was diving into the auto-AAA envelope and making repeat passes.
- Vary everything — IP, run-in heading, roll-in altitude. The gunners learn a pattern fast.
- One pass, haul ass when the guns are hot. Let the FAC re-mark for the next jet, don't re-attack the same line.
- Let the FAC find the gun. A Willie-Pete mark on a flak pit is a target; an un-spotted gun is what gets you.
- MiG-17F — guns-only (missiles date-gated out). Keep energy, don't slow-fight; F-8/F-4 with AIM-9 + guns handle it. AWACS (EC-121/E-2) gives the picture.
- 🟡 SA-2 / SA-3 — deep-rear only and likely detection-light (no NVA AWACS/EWR). Not a perimeter problem; verify placement in-game before planning any deep strike around it.
A downed airman over the NVA-held hills is the COIN mood of this campaign, and the faction carries the classic rescue package: the A-1H "Sandy" escort + UH-1H "Dustoff" / CH-53E pickup.
- Sandy — A-1H Skyraider (Kutaisi + Da Nang): finds and protects the survivor, suppresses the guns around them, walks the helo in.
- Dustoff / pickup — UH-1H (medevac) or CH-53E (heavy lift).
- Gunship — AH-1W for suppression.
Two campaign-specific notes:
- 🟡 Combat SAR is a 414th feature still in in-game testing (open items on the checklist) — fly it, but brief it as a capability we're shaking out, not a guaranteed safety net.
-
invulnerable_player_pilots: trueis set for this campaign — your own pilot won't be killed in the cockpit, which softens the stakes of going down. CSAR is still the right play for immersion and for AI aircrew, but it's a cushioned ride here by design.
Downed-airman contract (put it in §5): get off the LZ-side slope to defensible cover, comms on the SAR/guard freq, let Sandy run the on-scene picture, authenticate per the day's plan.
Period 1968 — dumb iron, napalm, rockets, and guns. There are essentially no PGMs in this fight; accuracy comes from the FAC, the dive, and the gun.
| Role | Airframe(s) | Typical period load | Notes |
|---|---|---|---|
| CAS (prop) | A-1H Skyraider | Mk-82/snakeye, napalm, LAU rockets, 20 mm | The loiter king. Sandy + perimeter CAS. |
| CAS (jet) | A-4E, F-100D | Mk-82/snake, napalm, Zuni, Mk-20 Rockeye, gun | Fast CAS under the FAC. |
| Anti-armor | A-6E, A-4E | Mk-20 Rockeye, snake, napalm | Rockeye is your armor-killer at Lang Vei. |
| Strike / interdiction | A-6E, F-4E | Mk-82/83/84, snake | A-6E = all-weather, big load; bridges + arty. |
| Area saturation | B-52H | Full conventional bomb bay | Arc Light boxes — deconflict hard. |
| Gunship | AH-1W | rockets + cannon (+ TOW where fitted) | Perimeter CAS, escort. |
| FAC(A) | OV-10A Bronco | Willie Pete marking rockets + LAU rockets + gun | Finds, marks, controls. The keystone. |
| BARCAP | F-8E Crusader | AIM-9 + 20 mm | "Last of the gunfighters" — perfect vs the MiG-17. |
| Recon | RF-101B, RA-5C | cameras | Map the guns, the armor, the BDA. |
| Lift | C-130J, UH-1H, CH-53E | — | The lifeline. C-130 = Khe Sanh airlift. |
Tanker pairing (don't strand a striker):
- Boom (KC-135, the only one fragged): F-100D, F-4E, RF-101B, B-52H.
- Probe (no drogue tanker fragged): A-4E, A-6E, F-8E — fly off the carrier / Da Nang ranges, or add a KC-130/S-3B drogue squadron.
Note:
restrict_weapons_by_dateis off by default for this campaign, so the loadout editor may offer later stores — fly the period iron above for the right feel (and to keep it honest to '68).
Print one per flight lead.
KHE SANH  ·  TURN [__]  ·  MSN #[____]            MC: [______]

CALLSIGN: [______]  AIRFRAME: [______]  #SHIP: [__]  ROLE: [__________]

MISSION: ________________________________________________________________
TARGET / AREA: ________________________  TOT: [______]  PUSH: [______]
FAC(A): [__________]  FAC FREQ: [______]

RUN-IN PLAN:  IP [______]  ROLL-IN ALT [______]  AXIS (vary!) [__________]
HARD DECK: [______]   BINGO: [______]   JOKER: [______]   DIVERT: [______]

GUNS EXPECTED: _________________________________________________________
GAME PLAN: _____________________________________________________________

COMMS:  PKG [______]  FAC [______]  AWACS [______]  GUARD 243.0
CODE:   PUSH [____]  CLEARED HOT [____]  ABORT [____]  TIC [____]

LOADOUT: _______________________________________________________________
SAR: Sandy [______]  Dustoff [______]   If down: ______________________
NOTES: _________________________________________________________________
One per mission; feeds next turn's SITREP.
KHE SANH DEBRIEF  ·  TURN [__]  ·  MSN #[____]  ·  [date]

OBJECTIVE THIS TURN: ____________________________________________________
RESULT:  [ ] MET   [ ] PARTIAL   [ ] NOT MET

PERIMETER: [ ] held  [ ] pressed  [ ] lost ground at ___________________
AIRLIFT INTO KHE SANH:  [ ] flowing  [ ] threatened by ________________
RED GROUND KILLED:  armor ____  arty ____  vehicles ____  troops (est) ____
BLUE LOSSES:  a/c ____  aircrew ____ (recovered __ / down __)
FRONT MOVEMENT (Pegasus axis): _________________________________________

WHAT WORKED: ___________________________________________________________
WHAT DIDN'T: ___________________________________________________________
NEXT TURN MAIN EFFORT (per §5): ________________________________________
Grounded in resources/campaigns/khe_sanh_niagara.yaml, resources/factions/USA 1970 Vietnam War.json,
and resources/factions/nva_1970.json. Build/design notes:
docs/dev/design/414th-khe-sanh-campaign-notes.md.
Items marked 🟡 (SAM/IADS placement, Combat SAR) are designed-but-pending and should be verified
in-game. Callsigns, frequencies, and code words are illustrative and freely editable.
This page is the online copy of docs/campaigns/khe-sanh-campaign-handbook.md in the repo. Edit that file; the wiki is mirrored from docs/wiki/ on merge to main.