Repository navigation
Creating a project
*Please note, this page is constantly updated, so information and pictures will change regularly, as we fix bugs, enhance existing features, and build new ones, that will enhance the getting started process.....*
**Creating a project.**
We hope you've had a look at our quick start pages, and familiarised yourself with the components in OOM. Creating a project in OOM is simple, and this guide to walk you through the stages involved.
Midi


Midi in OOM is, like any track based component, comprised of inputs and outputs. In a midi track, the input is usually provided by a hardware device, like a midi keyboard, or controller surface of some kind. The output from a midi track goes to any software or hardware device that is capable of receiving midi data, like a software or hardware sampler. In the examples to follow, our midi input device is a midi keyboard, and the output is the excellent OpenSource sampler, LinuxSampler
An OOM midi track needs the following additional component, which is a midi instrument set (*.idf). By default, a midi track in OOM opens with a default GM bank and patch instrument set. Those familiar with the GM standard will quickly recognize the patches.
There is a separate section on creating a midi instrument set, and we recommend you read that first, then come back here. Instrument Sets
When you've created one or more instrument sets of your choice, if you don't wish to use the standard GM set, go to the menu Global Settings, and select the option Connections manager.
This will open a popup window, and you'll see a tabbed selection of options, being Audio Routing Manager, Midi Port Manager, Midi Sync/Presets, and Midi Assign.
Select the tab, Midi Port Manager .

Starting from the top left of the Midi connections window, the functions are:
Port This is the number of the port you've created.
GUI For those instruments like softsynths, which have a user interface.
I and O These columns show an icon which represents the capability of the instrument or instrument set to display Ins and/or Outs. Some instruments will only show 1 icon here, and some 2.
Instrument This is the column for your instrument set, and you'll see in empty ports the default instrument is GM. By clicking on the down arrow, a list appears of the instrument sets you have on your system, including the default sets within the app, and those you created yourself.
Device name In this column is the device you create for the port. You can either create a new jack device, or choose from the Alsa devices on your system. OOM is capable of managing both.
In routes Out routes These columns are the ins and outs for the port device you're creating. If you have created a jack device for the port, then you can set aliases in the Ins port. for the out port, press the arrow and a list of jack clients capable of receiving jackmidi will appear, and you choose which one you want.
in ch, out ch partially out of view When these are set to none, the port/device will transmit on all channels for the device. You can change this to the channel of your choice.
State out of view This describes the state of the port. when you've done it right, it will say OK!
It's a good idea to sort out all your midi porting first, as these port/devices will appear in a list to select from when creating midi tracks. Whatever you initially set in the track for the port, and channel number, these can be changed at anytime in the advanced section of the Patch Sequencer tab.
New Midi Track
Once you've created your ports, it's time to create a midi track, and set the in and out parameters for it. On the midi track header is a button marked P. This is your ports out button, and you can choose which port you want associated with that track from the list you created. Select a port, and then go to the Patch Sequencer tab in the Resources Centre, and check the box marked Advanced.
Once you've opened the advanced section, you'll see a set of midi controls and parameters for your track.
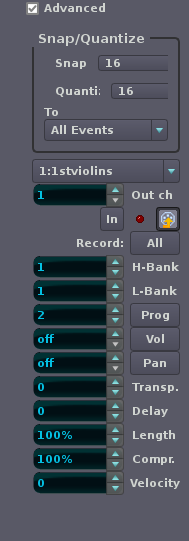
These controls are as follows:
Snap and Quantize panel This is the values for snap and quantize you set for your grid size. It also determines the jump size the playback cursor takes, when you move it forwards and backwards with shortcut keys.
ports This drop down list is your output ports.
CH the value box below that is the output midi channel for the track. You can set this to the channel you wish to send midi data on.
in This is your input for the track, and in here you select which input device or port you want to supply midi data to the track. Press the button, and a list will come up.
Next to the in button is a small red light, which will glow when you input midi. (Play your keyboard, for example) To the right of that is the icon for turning midi input on and off.
Next is the button called Record This button by default records all midi input to the track.
H-Bank This is the high bank (MSB) value for the currently loaded bank and patch.
L-bank This is the low bank (LSB) value for the currently loaded bank and patch.
Prog this is the parameter for the Program Changes.
Vol this is the parameter for the midi track volume.
Pan this is the parameter for the midi track pan.
transpos this is the parameter for midi track transposition.
delay this is the parameter for midi track delay.
length this parameter sets the default length of an inputted midi note. Be aware that the note will still appear as full length in the Performer Canvas, if you have input the note by Step Input, for example. It will "sound" relative to the percentage you've set.
compr. this parameter sets the default midi compr of the midi track.
Velocity this paramater sets the default velocity for the midi track.
Select the in button, and choose your input device. Play a little on your keyboard and check the input is working. The light next to the button should glow while you play. Your midi track is ready.
For any midi or audio track to be heard in OOM, it must be record-armed.
Let's assume you're using an external synth or sampler, like Linuxsampler. You've set it up correctly and you're going to connect it to OOM. It's a good idea to start LS or any external sound generator first, before starting OOM2, as a normal procedure. Go to the Midiports/softsynth window, and for the track/port you've selected, go to the outs button, and press it. You'll see LinuxSampler midi inputs in the list. Pick one to use as the chosen port output.
Close that window.
Now the midi is set, we'll need to connect Linuxsampler's audio outputs into OOM2, so you can hear what you're playing.
You now have an audio signal chain going from Linuxsampler, to the input buss, to the buss, to the master and out to your jack audio inputs. By default, the input buss is muted, so after making sure you have your input buss mixer slider turned down, unmute the input buss. Raise the slider a little.
We're now ready to test your project setup. Go to the Arranger window, and highlight your midi track, and make sure the midi track is record armed.
Start playing your midi keyboard, and you should hear the sound.
Repeat this process for additional midi tracks, and audio inputs, to your requirements. You can route multiple input busses into busses, as you want, or route input busses straight to Master for a particular use case.
Recording Midi

To record Midi in OOM, ensure the track is record armed, then press the Global Record button in the Transport Icons set. Start playback with the Space bar, and play your notes. When you have finished recording, press Space again, and playback stops, disabling the Global recording state. You will see a new rectangle in your track, called a part. This part contains your recorded midi data.
Audio Tracks
As previously explained we use OOM for orchestral and fim scoring. Like most Daws, OOM can be used for many type of recording and creating, and in OOM, the audio structure is linear, from input busses, to the Master output, as it is for Midi, from input port to output port.
The first step is creating input buss/tracks to accept audio into OOM.
We go to the Views tab in the Orchestra Pit dock, and in the top window, called Views, click on the entry called Inputs view. The track view will now change, and you'll have an empty track column. right click in the column and select Input track from the list. (shortcut is Shift + I) An input track will appear, and it will do so in a muted state. Name the track, save the project, then open the Connections Manager again (F2), and click on the Audio Connections tab.

Your input will be listed in the centre panel. Any audio output channels from currently running external apps, like LinuxSampler, will appear in the left hand panel. Select your input port in the middle, then select the port you wish to capture coming into OOM, in the left hand panel. If the connection is valid, then you'll see the button marked connect, highlight Green. Click on it, and a new port connection will appear in the bottom panel, showing you have made a successful connection. (The ESC key closes the connections manager)
An input connection into OOM is now created, and can be routed to audio track, audio busses, the master track, or a combination of these.
Now we have an input, we click OFF the input view in the Orchestra Pit tab, and in the track column, we add an audio track, using right click. (Shortcut for an audio track is Shift + W) Name the track as you want, and save the project.
Open the Connection Manager again ( F2 ). In the audio connections tab, a new entry has appeared in the middle panel which is your newly created Audio track. Highlight it, and then look in the left hand panel for your input track. Select that, and press the Green connect button. You'll see a new connection appear in the bottom panel.
Recording Audio

Ensure the track is record armed, then press the global record button. Start playback with the Space bar, record your work, then hit Space again, and playback will stop, disabling the global recording state. You'll see a new part with a wave displayed in the part.
Recording and editing midi and audio will be covered in detail as this manual is developed further.
Restoring connections automatically
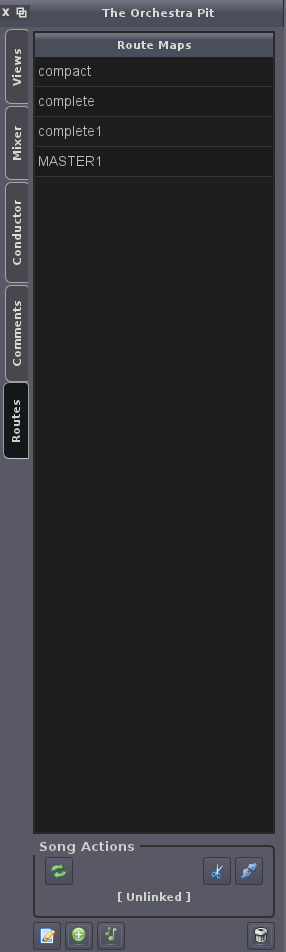
The 4th panel in the Orchestra Pit is a brand new feature just added to OOM. Called the Port Connector, this feature performs an important function in managing ports into and out of OOM, as templates.
Here's a possible scenario:
You've got 500 ports, both midi and audio. You've also got multiple clients plugged into OOM, and you've spent hours, days, weeks, and possibly months, manually creating and connecting your working template, ports, and connections. Finally, after a LOT of work (based on personal experience), you've got your big orchestral template set up, at least before the fine tuning starts. You take a deep breath, and start all your clients, with OOM last. You've got the creative rush, and start recording. Without noticing, because you've got most of your clients in another desktop, and possibly multiple terminals, you fail to notice a client has zombified because it's in the middle of a complex part of your project with lots going on, you didn't quite hear it, and now you've lost those port connections.
Then you save.
Now you have a project saved with ports missing. You finally notice they're gone, and set about restarting the mischievous client, and manually re-connecting the ports. However, if the client is a big sampler, into which you're routing 100 or 200 or more ports, then you've got all those ports to connect again, and, well, there's another sizable period of time gone, not creating music, but administering your system. Get it all running again, and a little while later.......
Add the time up, and you've quite probably spent more time administering, than creating.
This is a real and frustrating scenario that is just as valid in the commercial world, and we decided to do something about it.
The port connector is your safe haven for restoring your port session. It's this window that not only gives you an automated escape from dying clients, and consequent manual port connecting, by simply restoring a port map, but much more than that, it's a place where you can create multiple port maps for many purposes. You can create as many port maps as you require, and from our experience, if you have more than one .oom file that you use as templates, to "save as" from, then it's a good idea to create a port map for each of these.
All port maps are global, and can be applied to any project.
So, how does it work?
You create a desired setup, with your OOM project, and all connected external clients. Make sure everything is up and running properly.
Then you go to the port connector window in the Resource centre, and click the green plus button at the bottom. A popup window appears, and you name your portmap to anything you want, and add comments if you wish. Click save, and your portmap is created and appears as a new entry in the window.
You begin to write music, and that naughty zombified client does it's thing. Restart the client, highlight the port map that you want to invoke, and click the rotating arrow button at the bottom left of the window. It will stay darker until the port connection restoration is complete. Your portmap has now restored the "good" set of connections you saved.
NOTE. Stop playback before running any map changes.
Association
If you have a project with a defined portmap, that is you're not going to change it, then you can associate the map with the project. At the bottom of the route connector window is a set of icons. In the upper row to the right, there are two icons, represented by a pair of scissors, and a set of plugs. These are your association icons, to assign a portmap to a project, and un-assign.
When your project is up and running, and you've created a portmap for the project, press the assign icon, and the portmap is assigned.
You now have a specific portmap/project association, and when you use the rotating arrow icon on the left, to run a map, it will use the project associated portmap to rebuild your connections automatically. You can un-assign a portmap from a project using the scissors icon.
Bounce to file or track
OOM is equipped with 2 options for you the user, to finalise your masterpiece, and produce a wav of selected, or all, recorded audio.
The Bounce function is capable of two requirements, bounce a Master to file or track, and bounce an audio part or parts to a new audio track, quite possibly as part of a mixdown for like instruments, i.e. all 1st violins to one stereo track, or orchestra percussion to the same. Bounce is simple to use. For a Master bounce, simply press the record button in the master out track, and a dialog will appear, asking you to set the range of bounce with the left/right indicators, if you have not already done so. Once you've done this, a new dialog will appear when you press the Master record button, with options to record the file to your desired location, and the format of the wav file you want, being Stereo, Mono, or 5.1, and Wav 16bit, 24bit, or 32bit float. Once you've selected your options, and click ok in the dialog, the bounce process will begin.
To bounce to an audio track is even simpler.
Go to the Audio Menu, and select "bounce to track". You will be asked to set a source audio track or tracks, and a destination track, be it an existing audio track, or one that the bounce to track function will create for you. Hit ok, and the bounce process will begin.
Work in progress.....