Using GuppyKE
Plain-English reference for every screen in OpenKE. If you're looking at something and wondering "what does this do?" — find it here.
🔒 You can't break a running print by exploring the screen. Anything that would interrupt a job is blocked or asks you to confirm first. Tap around freely.
A column of icon buttons runs down the left edge of the screen. Tap one to switch. Tapping the already-active tab resets it (Macros jumps back to favourites, Console clears the input).
| Tab | What's here |
|---|---|
| 🏠 Home | Temperatures, graph, and the buttons you use every day |
| Macros | Your Klipper gcode macros |
| Console | Type gcode directly or browse commands |
| Tune | Grid of calibration tool launchers |
| Settings | Grid of system panel launchers |
Both Tune and Settings work the same way: each is a grid of large icon buttons. Tapping one opens a full-screen sub-panel. Nothing is adjusted or configured inline on these tabs themselves.
Your everyday screen. Inline content — no launcher grid.
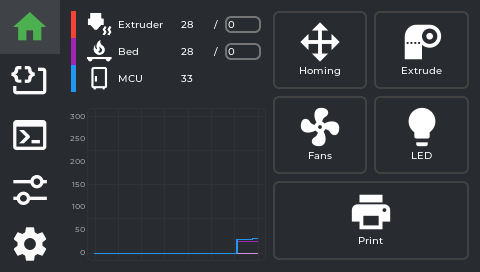
Shows live read-outs with target values for whichever sensors are configured in guppyconfig.json
(monitored_sensors) — by default nozzle, bed, and MCU. A chamber sensor also appears here,
but only if one is set up in your printer's config with the display name "Chamber" — it is not shown
by default on a stock KE.
-
Tap any temperature to set a target (preheat). A numpad opens. The reading shows current/target
— e.g.
45 / 210means currently 45 °C, heating toward 210 °C. - There are no material presets (no PLA/PETG/ABS quick-select buttons) — type the exact temperature you want on the numpad.
- Tap the target to clear it (set to 0 — cool down / off).
- Chamber and MCU are display-only (no heater to control).
A rolling line chart of all monitored temperatures, colour-coded. Useful for watching whether a heater is stable at target or still swinging.
Five icon buttons below the temperatures. Each opens a floating panel over the current screen:
| Button | Opens |
|---|---|
| Homing | Movement panel (jog + home axes) |
| Extrude | Filament panel (load/unload + manual extrude) |
| Fans | Fan speed controls |
| LED | Case light controls |
| File browser |
Opens from the Home tab Homing button.
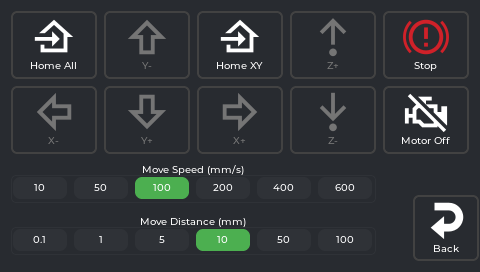
- Move Distance selector: 0.1 mm / 1 mm / 5 mm / 10 mm / 50 mm / 100 mm — how far each direction tap moves.
- Move Speed selector: 10 / 50 / 100 / 200 / 400 / 600 mm/s — how fast that move happens.
- X−/X+, Y−/Y+, Z−/Z+ — move the toolhead by the selected distance, at the selected speed. On the KE (bed-slinger), Y moves the bed.
- There is no live position readout on this panel — the app tracks position internally (to stop you jogging past the axis limits) but doesn't display X/Y/Z coordinates anywhere on screen.
⚠️ The printer doesn't know where it is until it homes. Moving before homing can crash the toolhead. Use the Home buttons below first.
| Button | What it does |
|---|---|
| Home All | G28 — homes X, Y, and Z |
| Home XY | Homes X and Y only, leaving Z where it is |
| Stop | Emergency stop — asks "Do you want to emergency stop?" first, then cuts power to motors/heaters immediately if confirmed. Same underlying action as the print-status screen's Emergency Stop. |
There is no button to home a single axis (X, Y, or Z) by itself — only the two combined options above.
Disables stepper motors so you can move the toolhead and bed by hand. They re-engage on the next move command or home.
Flips which direction Y+ and Y− move the bed. Some users find the default unintuitive on a bed-slinger. Toggle to match your mental model. (Also settable permanently in Settings → System → Invert Y Direction.)
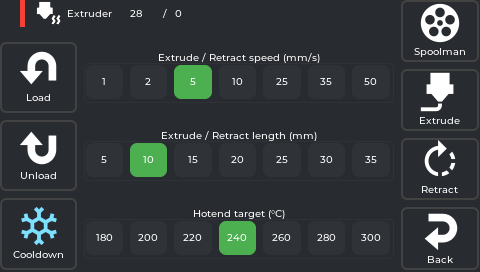
Opens from the Home tab Extrude button. Six buttons in total — Load, Unload, Cooldown on the left; Spoolman, Extrude, Retract, Back on the right — plus three preset selectors in the middle: Hotend target (°C), Extrude/Retract length (mm), and Extrude/Retract speed (mm/s).
Note: the hotend target here is a fixed list (180 / 200 / 220 / 240 / 260 / 280 / 300 °C), not the free-entry numpad you get by tapping the temperature on the Home tab. If you want an exact value like 215 °C, set it from the Home tab instead — this selector only offers those 7 presets.
Heats the nozzle to the selected target, feeds filament forward. If Spoolman is active, a "Use this filament?" confirmation appears first. While it's running, there's no separate Stop button — the on-screen message tells you to "Tap Cooldown to stop", and Cooldown stays active for exactly that while every other button is disabled. After loading finishes, the nozzle auto-cools.
Start Load when your filament is already inserted into the extruder throat. Tap Cooldown once plastic coming out the nozzle runs clean and consistent.
Heats the nozzle, retracts filament fully out of the bowden/throat, then auto-cools. Remove the filament from the top of the extruder manually after.
Immediately sets the hotend target to 0. Also doubles as the way to interrupt an in-progress Load (see above) and stays tappable while the hotend is heating toward a pending Extrude/Retract, so you can cancel that too.
Shortcut straight to the Spoolman panel — same one reachable from Settings.
For precise manual movement once the nozzle is already hot:
- Extrude/Retract length (mm) — how far each press moves: 5 / 10 / 15 / 20 / 25 / 30 / 35
- Extrude/Retract speed (mm/s) — how fast: 1 / 2 / 5 / 10 / 25 / 35 / 50
- Extrude / Retract buttons — each press moves that amount once, at that speed
The nozzle must be at temperature (Klipper enforces this) — tapping Extrude/Retract while cold heats it first, then runs the move once it's up to temperature. Also auto-cools after each operation.
Opens from the Home tab Fans button.
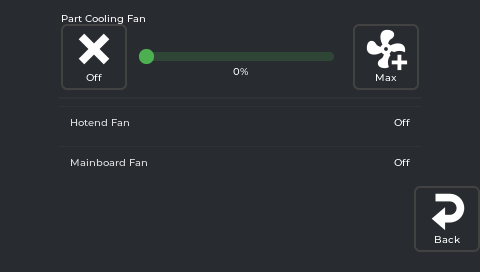
There are two very different kinds of row here, and which one you get depends on whether the fan is
listed in guppyconfig.json's fans setting:
-
Fans listed in
fans(by default, just the Part Cooling Fan) get a full editable control: an Off button, a 0–100% slider, and a Max button. Changes apply immediately and override whatever gcode was sending. 0% for the first layer of ABS/ASA; 100% for PLA/PETG bridges. -
Everything else Klipper reports as a fan (typically the Hotend Fan and Mainboard Fan —
Klipper's
heater_fan/controller_fantypes) shows as a plain read-only row: just the name and its current "On"/"Off" state, with no slider or toggle at all. These are auto-managed by Klipper based on temperature — you cannot control them manually from this screen.
If you want a fan that currently shows as read-only to become adjustable, add it to fans in
guppyconfig.json — see Configuration.
Opens from the Home tab LED button.

Each LED/light Klipper reports appears as a row with Off, a brightness slider, and Max — unless
it's a simple on/off light (no PWM dimming), in which case the slider is hidden and you get Off/On
only. If your printer.cfg has no [led]/[neopixel]/output-pin light section at all, this screen is
completely empty except the Back button — there's no "nothing configured" message, it's just blank.
This is common: not every KE has a case light wired into Klipper, so don't be surprised if yours is empty.
Opens from the Home tab Print button.
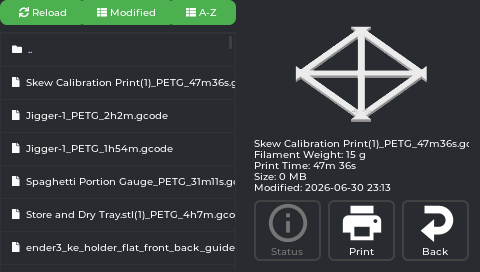
- Lists
.gcodefiles from internal storage and any plugged-in USB stick. A..row at the top lets you go up a folder. - Three buttons above the list: Reload (re-fetches the file list from the printer — also resets the sort, see below), Modified, and A-Z (the two sort options).
- Tap a file to preview it on the right: thumbnail (if the slicer generated one), file name, Filament Weight, Print Time, Size, and Modified (date/time).
- Three buttons below the preview: Status (jumps straight to the full print-status screen — only enabled while a print is actually running or paused), Print (starts this file), and Back.
- Files sort by date (newest first) by default. Tapping a sort button changes it for that visit, but it resets back to date/newest-first every time you re-open the file browser — it is not remembered between opens.
- USB files load full metadata (print time, filament weight) via a metascan on first access.
Appears automatically (pops to the front) the moment a print starts, no matter which tab you're on. If you navigate away from it back to the Home tab while printing, a compact progress widget appears there in place of the usual action buttons — tap it to bring the full print status screen back. This shortcut only appears on the Home tab, not on Macros/Console/Tune/Settings.
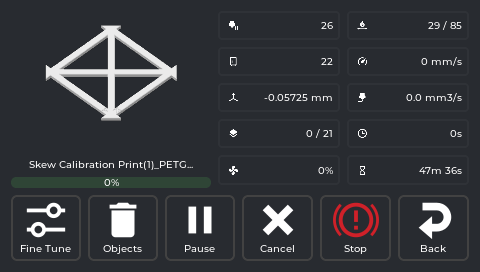
Thumbnail, file name, and a progress bar sit on the left. On the right is a fixed 5-row × 2-column grid, in this exact order:
| Row | Left column | Right column |
|---|---|---|
| 1 |
Extruder temp — current, or current / target while a target is set |
Bed temp — same current/target format |
| 2 | Chamber temp — same format. Always shown here, even if you don't have a "Chamber" sensor configured (unlike the Home tab, which hides it in that case) | Speed — current print speed in mm/s |
| 3 | Z-offset — tap this one specifically to open the baby-stepping panel right here | Flow — volumetric flow rate in mm³/s (not the same thing as the Fine Tune panel's flow percentage) |
| 4 |
Layers — always current / total
|
Elapsed time |
| 5 | Fan speed(s) — if more than one fan is relevant, shown comma-separated | Time left (estimate) |
Pressure Advance and total filament used are not shown on this screen. Pressure Advance can be adjusted live from the Tune tab → Fine Tune panel while a print is running; filament used is tracked internally to estimate the time remaining, but there's no on-screen readout for it.
Tap the Z-offset readout to get step buttons (±0.001, ±0.005, ±0.01, ±0.025, ±0.05 mm). Nudge while watching the first layer:
- Lines not fusing / gaps: too high — lower (−)
- Lines translucent or completely flat: too low — raise (+)
- Squished together and fused, no gaps: correct
Saves automatically.
Six buttons in total: Fine Tune, Objects, Pause (becomes Resume once paused), Cancel, Stop, Back.
| Button | What it does |
|---|---|
| Fine Tune | Shortcut straight to the Fine Tune panel — same one reachable from the Tune tab. |
| Objects | Opens the Exclude Object screen below. |
| Pause / Resume | Parks the toolhead, holds temperatures. Resume brings it back and continues. |
| Cancel | Cancels the print. Shows a red Confirm dialog. For the very last remaining object (Exclude Object), shows a "Cancel print?" confirmation. |
| Stop | The button's actual label is just "Stop", not "Emergency Stop" — but it is the same emergency-stop action as everywhere else in the app. Cuts all movement and heaters immediately. Use only if something is going wrong physically. Requires a power-cycle or FIRMWARE_RESTART to recover. |
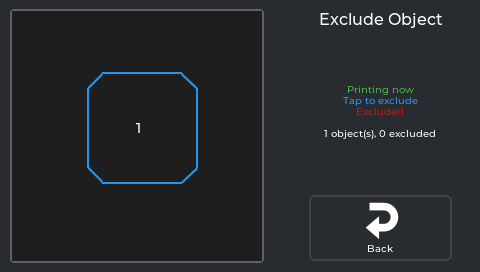
Opens from the print status screen's Objects button — only useful for gcode files sliced with object labels (the same "Label Objects" slicer setting adaptive meshing relies on). Shows each object as a shape you can tap: green means "Printing now", plain means "Tap to exclude", red means "Excluded". Skipping an object stops printing it partway through without cancelling the whole job — useful if one part of a multi-part print has failed but the rest is still going well. A counter below the legend reads exactly "N object(s), N excluded".
All your Klipper gcode macros, accessible from the screen. Inline content — no launcher grid.
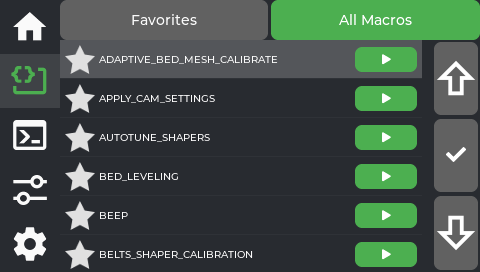
- Favorites / All Macros — a segmented toggle at the top switches between the two views. Favorites (the default) shows only macros you've pinned; if you have none yet, it says "No favorites yet. Open All Macros and tap the star to add." Tapping the Macros tab again while already on it jumps back to Favorites.
- All Macros is a flat, alphabetical list — not grouped by category. Each row has a ☆ star (tap to pin/unpin as a favorite) and a green ▶ button that runs that macro immediately.
- Up / ✓ / Down column on the right — this is a separate navigation aid, not a scrollbar: Up/ Down move a highlight cursor through the list one row at a time, and ✓ expands (or collapses) the currently highlighted macro's parameter inputs, scrolling it into view. You can also just tap a macro's row directly with your finger to expand it — the ✓ column is an alternative for precise selection, not the only way in.
- Parameters — once expanded (by tapping the row or via ✓), fill in the parameter inputs before running, or leave defaults as-is.
Direct gcode access. Inline content — no launcher grid. Opens on the terminal view by default — tapping the Console tab again while already on it resets back to this terminal view too.
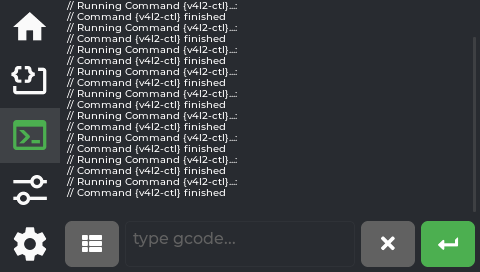
Type any gcode command directly, same as the Mainsail terminal.
-
History — last 100 entries. Temperature-spam lines (
T:210 B:60 …) are filtered so they don't flood the history. Tap a history entry to re-run it. - The small list icon to the left of the text field (not a separate tab) is how you get to the Command Browser described below.
Reached by tapping the list icon next to the text field on the terminal view — it isn't a separate tab of its own.
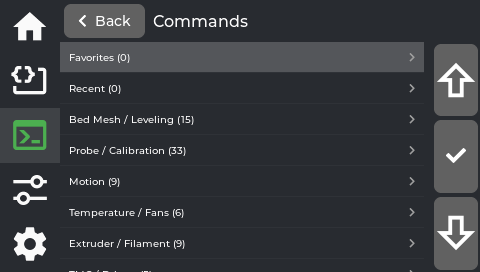
The category list always starts with Favorites and Recent, followed by keyword-based groups (Bed Mesh/Leveling, Probe/Calibration, Motion, Temperature/Fans, Extruder/Filament, and more), each showing a command count. Two things worth knowing about the first two:
- Favorites here are separate from the Macros tab's favorites — this is its own star list, specific to gcode commands in this browser, with its own empty-state message ("No favorites yet. Star commands in any list.").
- Recent is shared history with Fluidd — it's not tracking only what you've run from this screen; it reflects command history from other interfaces too, if you use them.
The same Up / ✓ / Down navigation column from the Macros tab appears here too (see Macros tab for what it does).
Drill-down interface: tap a category → see commands in it. There is no third "detail" level with a description and its own Run button — tapping a command inserts its name straight into the terminal's input field and switches you back to the terminal view, keyboard already open, cursor at the end so you can type any parameters yourself:
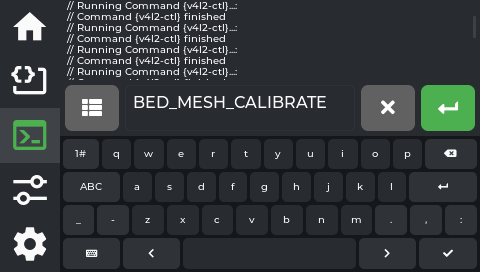
Press the green ↵ button on the terminal to actually run it. This is really a fast way to look up and insert a command name without typing it from memory, not a guided form. If tapping a command doesn't seem to do anything, try again with a firm, clean tap — the resistive touchscreen occasionally misses a light tap.
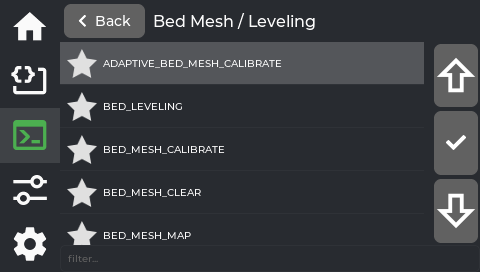
Inside a category, a filter box appears at the bottom (only at this level, not on the category list itself) — type to narrow the list live. Each command here also has its own ☆ star, same favoriting behavior as the category list.
An 8-tile grid of icon buttons (4 columns × 2 rows). Tapping a button opens its sub-panel full-screen. Nothing is adjusted inline on this tab itself.
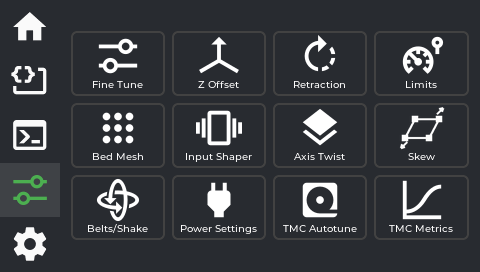
| Row | Col 1 | Col 2 | Col 3 | Col 4 |
|---|---|---|---|---|
| 1 | Fine Tune | Z Offset | Retraction | Limits |
| 2 | Bed Mesh | Power Settings | TMC Metrics | Calibration |
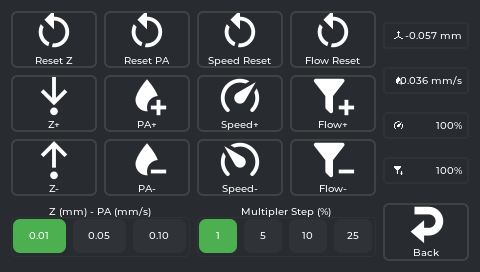
Not sliders — this panel is entirely + / − buttons, each with a matching Reset button, usable during a print or any time. There are two step-size selectors that control how much each button tap changes: one shared between Z-offset and Pressure Advance (0.01 / 0.05 / 0.10), and one for Speed and Flow together (the "Multiplier Step" — 1 / 5 / 10 / 25%).
| Control | Buttons | What it does |
|---|---|---|
| Speed | Speed+ / Speed− / Speed Reset | Global speed multiplier. 100% = follow slicer speeds exactly. |
| Flow | Flow+ / Flow− / Flow Reset | Extrusion multiplier. Under-extruding → raise. Over-extruding → lower. |
| Pressure Advance (PA) | PA+ / PA− / Reset PA | Compensates for nozzle pressure lag at speed. Fixes corner bulges and blobs. |
| Z-offset | Z+ / Z− / Reset Z | A third place to baby-step Z-offset, alongside the print-status readout and the separate Z Offset panel below — all three adjust the same underlying value. |
Firmware Retraction is not part of this panel — it's the separate Retraction tile on the Tune tab grid, described below.
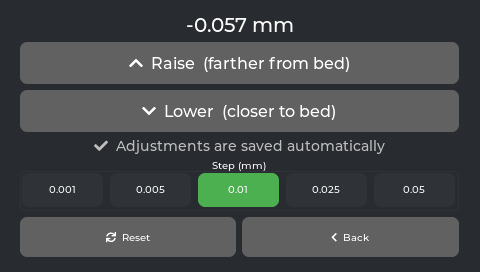
First-layer baby-stepping. Same as tapping Z on the print-status screen, but also usable outside a print.
- Raise (farther from bed) / Lower (closer to bed) buttons, plus a Reset button that sets the offset to exactly 0.
- Step size buttons: 0.001 / 0.005 / 0.01 / 0.025 / 0.05 mm
- Current value shown at top
- There is no separate Save button — every tap (including Reset) adjusts the offset and saves it automatically (via the Save Z-Offset macros the installer sets up). You'll see "Adjustments are saved automatically" on the panel as a reminder.
- The printer must be homed first. If it isn't, you'll get a homing prompt instead of the adjustment going through. This isn't just a safety check — an unhomed adjustment would actually change the live offset (so the on-screen number would move) but silently fail to move the toolhead or save, which would leave the displayed value out of sync with what's actually stored. Homing first avoids that.
There are two separate requirements here, and both have to be true for this to actually do anything to your prints:
-
Your Klipper config needs a
[firmware_retraction]section. This is what decides whether this panel shows controls at all — if it's missing, the panel shows an empty state instead, and there's nothing to accidentally break. -
The gcode file you're printing needs to have been sliced with Firmware Retraction turned on (in
OrcaSlicer/PrusaSlicer etc., the retraction type setting —
G10/G11commands, not the slicer's default direct-E-axis retraction). This is a per-file slicer setting, completely separate from #1. Even with[firmware_retraction]configured and this panel showing live values, if the specific file you're printing wasn't sliced with Firmware Retraction selected, none of these values are used — the print just uses whatever retraction the slicer itself wrote into the gcode instead.
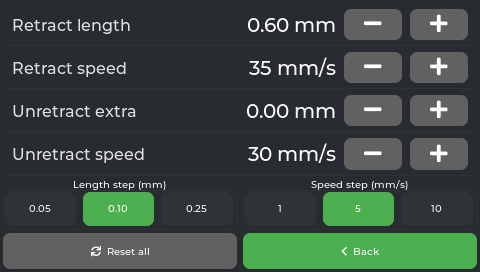
If both are true, you get 4 rows — Retract length (mm), Retract speed (mm/s), Unretract
extra (mm), Unretract speed (mm/s) — each with −/+ buttons, plus a Length step (mm) selector
(0.05/0.10/0.25) and a Speed step (mm/s) selector (1/5/10), and a single Reset all button.
Changes apply immediately (live, via SET_RETRACTION) and are runtime-only — like the Limits
panel, nothing here is saved to printer.cfg, so a Klipper restart reverts everything to your config
file's values.
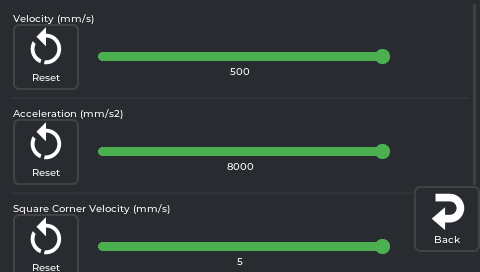
Hard caps on machine speed and acceleration, each shown as a slider with its own Reset button
(resets that one value back to what's set in printer.cfg, not a fixed factory number):
| Setting (exact on-screen label) | What it is |
|---|---|
| Velocity (mm/s) | Hard cap on axis speed |
| Acceleration (mm/s2) | Hard cap on acceleration |
| Acceleration to Deceleration (mm/s2) | A separate Klipper acceleration cap used specifically when the toolhead needs to slow down; distinct from the general Acceleration above |
| Square Corner Velocity (mm/s) | How fast the toolhead turns a sharp corner without fully decelerating |
Dragging any slider (or tapping its Reset) sends the change to Klipper immediately — there's no
separate "apply" step. These are runtime-only: nothing here is written to printer.cfg, so a
Klipper restart puts every value back to whatever printer.cfg says, undoing anything you changed here.
Raising these doesn't automatically make prints faster — the slicer's own speeds must also be raised. Going beyond what the machine can handle causes ringing artifacts.
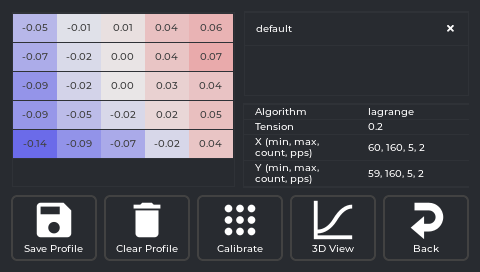
Opens showing a table of raw Z values at each probe point by default (colour-shaded — blue is low, red is high) plus an info panel (Algorithm, Tension, and the X/Y probe range — min, max, count, points per segment). There's no on/off toggle for mesh compensation; see Clear Profile below for how that actually works.
- 3D View button — switches to a colour surface you can rotate/zoom instead of the table. Tap again to switch back.
-
Calibrate — runs
BED_MESH_CALIBRATE(auto-homing first if the printer isn't already homed), maps the whole bed fresh (~2–3 min). - Save Profile — saves the current mesh permanently under a name you choose, so you can switch between multiple saved meshes later.
-
Clear Profile — runs
BED_MESH_CLEAR, which turns mesh compensation off (this is the closest thing to an "off switch" — there's no separate toggle). Calibrating again, or loading a saved profile, turns it back on. - Saved profiles list — each saved profile is a row with its name; tap the row to load it as active, or tap the ✕ on that row to delete it permanently.
-
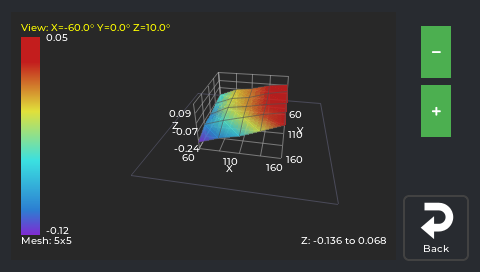
Drag anywhere on the mesh to rotate it — the angle readout in the top-left (
View: X=... Y=... Z=...) updates live as you drag. - The colour scale on the left maps colour to height (red = high, blue = low); the exact range and the mesh size (e.g. "Mesh: 5x5") are shown with it.
-
The +/− buttons on the right have two different jobs depending on how you press them — this is
the only place in the app where that's true:
- Short tap zooms the whole view in/out (like moving the camera closer/further).
- Press and hold instead exaggerates or flattens the height of the surface — makes bumps look taller (hold +) or flatter (hold −) — without changing how sensitive the colours are. It keeps changing for as long as you hold it.
- Back here returns you to the Table view, not out of Bed Mesh entirely — tap it again from the table to actually leave the panel.
| Section | What it does |
|---|---|
| Power devices | On/off buttons for any smart plugs or relays configured in Moonraker. If none are configured, this section doesn't appear at all — no placeholder text, it's just not there. |
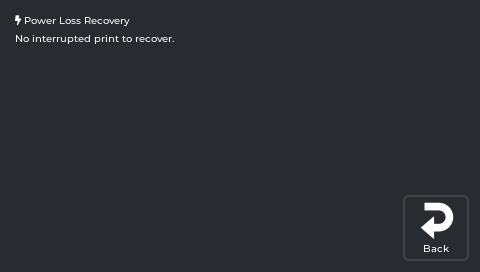
| Power Loss Recovery | Resume a print that was interrupted by a power cut. Not automatic — after power comes back, you have to open this screen yourself. It reads Creality's own saved print-state file to find something to resume, so it isn't a GuppyKE-invented feature; if that file is missing or stale, there's nothing to offer. Three things you might see here: (1) if a print is currently running, "A print is running. If power is lost, reopen this screen to resume." — that's the reminder of what to do; (2) if nothing is recoverable, "No interrupted print to recover."; (3) if something is recoverable, a Resume button (reheats and returns to the saved position — a real resume, not a restart) and a Dismiss button (clears the prompt without printing). If the saved position turns out invalid, it safely restarts the file from the beginning instead of crashing. |
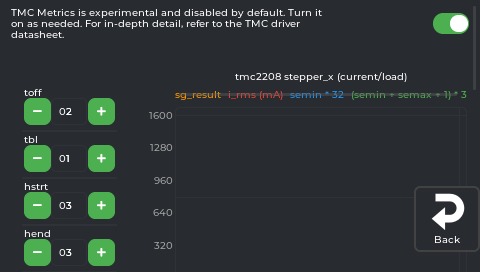
The panel itself says it best: "TMC Metrics is experimental and disabled by default." There's a toggle at the top — it's off unless you turn it on (turning it on/off loads or unloads a separate Klipper diagnostics module, so there's a real reason it isn't always running).
sg_result, i_rms in mA, and two other computed values — the panel doesn't explain what these mean
beyond their names; the app's own advice is "refer to the TMC driver datasheet") plus four adjustable
values: toff (0–15), tbl (0–3), hstrt (0–7), hend (0–15) — these are raw TMC chopper-timing
register names. Tapping +/- on any of them sends the change to the driver immediately, live — it is
not a preview you confirm afterward. There's no indication these persist across a restart on their own.
Given the app's own "experimental" label and that these are low-level hardware timing values, don't adjust them unless you specifically know what you're doing (per the driver datasheet) — this isn't needed for normal printing or normal troubleshooting. If you suspect a driver issue, TMC Autotune (inside the Calibration hub below) is the supported way to tune your drivers.

A single hub for every calibration routine, reached from the Calibration tile. Replaces what used to be four separate Tune-tab tiles (Input Shaper, Axis Twist, Skew, TMC Autotune) plus a since-retired Belts/Shake screen (mechanically dead-ended and no longer reachable from anywhere in the app). Opens as a numbered, scrollable list matching the order the Calibration Explained guide recommends doing these in, followed by an unordered Other section for routine (non-calibration) tools:
| # | Step | Opens |
|---|---|---|
| 1 | Axis Twist | Axis Twist Compensation wizard |
| 2 | Z-Offset & Bed Mesh | The guided Recalibration Wizard |
| 3 | Input Shaper | Input Shaper calibration |
| 4 | E-Steps Calibration | The guided E-Steps wizard |
| 5 | Skew Correction | Skew Correction |
| 6 | TMC Autotune (optional) | TMC Autotune |
| — | Bed Mesh (Other) | The same Bed Mesh panel as the Tune-tab tile above — view or re-mesh standalone without redoing the whole wizard |
Tapping Axis Twist or Skew Correction when their Klipper config section isn't present shows a toast instead of opening the panel, same as before when they were their own tiles. Tapping any row while a print is running shows the usual "locked during print" notice instead of opening it.
The guided, combined replacement for doing Z-offset and bed-mesh calibration as two separate manual steps: paper-test (or BLTouch) Z-offset → automatic bed mesh → review/save, with an optional load-cell-assisted refine step along the way. Full walkthrough: Calibration Explained.
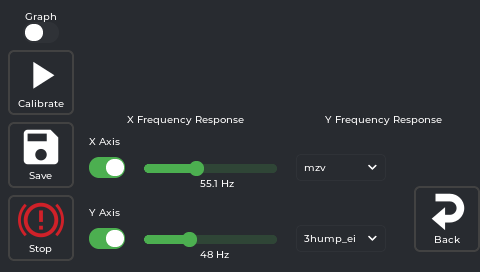
Reduces ghosting/ringing (echoes trailing sharp corners at speed). The panel has 3 buttons on the left
(Calibrate, Save, Stop) and, per axis, a toggle switch, a frequency value, and a shaper-type
dropdown (populated with whatever shaper types Klipper supports — e.g. mzv, ei, 3hump_ei, zv).
- X switch / Y switch — turn an axis on or off for the next Calibrate run, not "enable/disable shaping" on that axis. Turn one off if you only want to re-test the other. Both are on by default.
- Graph switch (top) — off by default. Turn it on before tapping Calibrate if you want an actual plotted frequency-response curve rendered after the sweep; leave it off for a faster run that just gives you the recommended frequency + shaper type as numbers/dropdown, no picture.
- Stop is a general emergency stop (same action as everywhere else in the app) — it is not a "cancel this specific calibration" button.
Typical flow:
- Leave both axis switches on (or turn one off if you only want to redo one axis). Optionally turn Graph on if you want to see the curve.
- Tap Calibrate — the printer sweeps frequencies on the selected axis/axes (~1 minute).
- The frequency value and shaper-type dropdown update with the recommended result for each axis you tested. You can change the dropdown yourself before saving if you want to try a different shaper type.
- Tap Save to persist your choices.
💡 For the Y axis test: move the accelerometer to the bed (it must be on whatever moves for that axis). Tape or zip-tie it on for the 1-minute test.
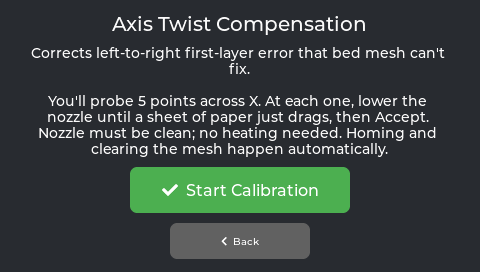
Launches the 5-point calibration wizard for Axis Twist Compensation. Fixes first layers that are uneven left-to-right despite re-meshing. Full guide: Axis Twist Compensation.

A guided version of the classic mark-extrude-measure rotation-distance calibration:
- Heats the extruder to a safe temperature for you.
- Marks the filament, then tap Extrude to push a fixed length through.
- Measure how far the mark actually moved (calipers or a ruler) and type it in on the numeric keypad.
- The panel computes and applies the corrected
rotation_distancefor you — no manual math.
Auto-cancels if left idle for 2 minutes (e.g. mid-measurement) rather than leaving the extruder primed indefinitely. If the corrected value keeps changing significantly between repeat runs, that points to a hardware issue (extruder gears/tension), not something this calibration itself can fix. Full guide: Calibration Explained.
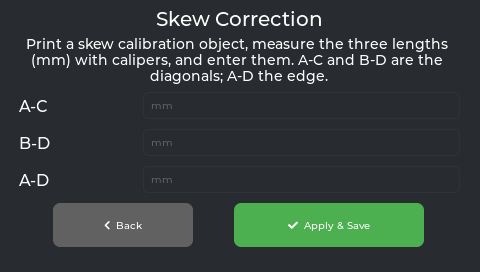
Corrects parts that come out as slight parallelograms instead of squares.
- Enter three caliper measurements from a printed test square: AC diagonal, BD diagonal, AD side.
- Tap Apply & Save — this sends the correction and saves it in one step. You don't need to run
SAVE_CONFIGseparately; the button already does that for you.
Full guide: Skew Correction.
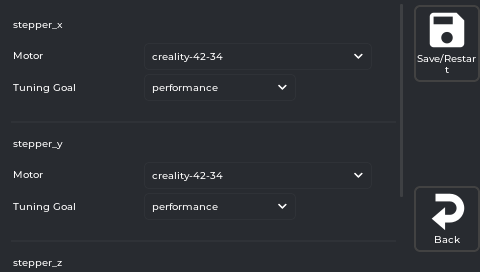
Quieter, cooler, sometimes smoother steppers. Select motor type and a goal, tap Save/Restart:
- Performance — prioritises current/torque (slightly louder)
- Silent — prioritises quiet operation
Settings are saved and reapplied every boot.
The row is disabled until the TMC Autotune module is installed (the installer does this during the print-quality mods step). Full guide: TMC Autotune.
A 4-column × 2-row grid of icon buttons plus a quick-action restart row at the top. Nothing is configured inline on this tab.
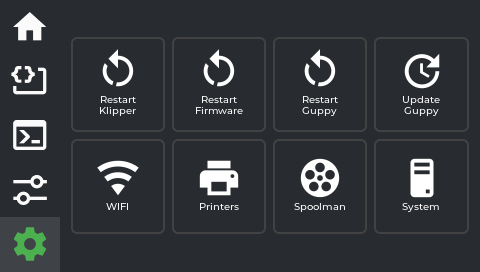
These execute immediately — no sub-panel opens:
| Button | What it does |
|---|---|
| Restart Klipper | Restarts the Klipper host process. Use after editing printer.cfg. |
| Restart Firmware | Resets the mainboard MCU (FIRMWARE_RESTART). Use after MCU-level config changes. |
| Restart Guppy | Restarts the OpenKE screen process only (not Klipper). Use if the UI feels stuck. |
| Update Guppy | Downloads and installs the latest OpenKE screen binary. Note: only swaps the binary — for full updates (Klipper mods, adaptive mesh config, etc.) re-run the full installer. |
| Button | Opens |
|---|---|
| WIFI | WiFi connection panel |
| Printers | Printer connection manager |
| Spoolman | Filament tracking panel |
| System | Screen settings + info panel |
Opens from Settings → WIFI.
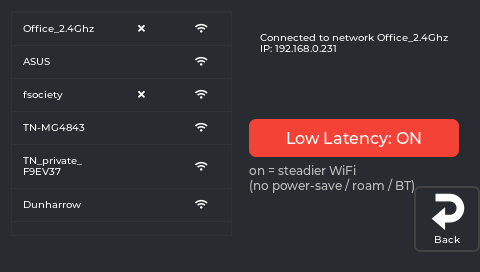
Networks are grouped into two lists — KNOWN NETWORKS (anything with a saved password) and OTHER NETWORKS IN RANGE — each row showing 4 signal-strength bars derived from the scan's RSSI. Rescans automatically on open; scan results are merged across scans (a network has to miss 3 scans in a row before it's dropped) so the list doesn't visibly reshuffle or shrink between scans the way a clear-and-redraw would.
Each row's tap targets are different depending on what it is — this was a deliberate fix (an earlier layout packed a status icon and an edit icon into two adjacent narrow columns, and a mistap between them could delete a saved password instead of opening network settings):
| Row type | Tapping the row body | Extra affordance |
|---|---|---|
| Connected network | Opens Network Details | A chevron (›) on the right — purely a visual hint, the whole row does the same thing |
| Known, not connected | Reconnects to it | A separately-spaced ✕ box — tap to forget it (asks you to confirm first; this deletes the saved password) |
| Not known (in range only) | Prompts for a password to connect | (none) |
Password entry has an eye-toggle button to reveal/hide what you're typing.
Low Latency is a compact link near the bottom (not a screen-dominating control) that reads "Low Latency: ON/OFF". Disables WiFi power-save, idle sleep, background roam scans, and Bluetooth. The KE's WiFi and Bluetooth share one 2.4 GHz radio and antenna — leaving BT on (it's unused) makes WiFi yield to it periodically and stutter. Low Latency eliminates that. Persists across reboots. Turn off to re-enable Bluetooth.
If Mainsail feels laggy, the camera stutters, or tap response feels slow — enable Low Latency first.
Reached by tapping the connected network's row (or its chevron) in the WiFi panel.

An info card (Signal, Security, IP address) for the connected network, plus two clearly labelled buttons:
- Configure Static IP — opens the Static IP panel below.
- Forget This Network (red outline) — deletes the saved password for this network. Same destructive action as the ✕ on a known-but-unconnected row in the WiFi panel, just reached from here instead.
Back returns to the WiFi panel.
Reached from Network Details → Configure Static IP.

Titled "Static IP - <network name>" — the config applies to that specific saved network, not
globally. DHCP / Manual is a plain view switch at the top (tapping between them doesn't change
anything on its own — it just shows different controls).
Manual view: 4 address rows — IP, Netmask, Gateway, DNS — each entered as 4 separate tap-sized octet boxes (not one free-text field). Typing an invalid value (outside 0–255) flags that box red immediately, in place, rather than only failing when you try to save.
- ✓ Save is pinned outside the scrollable field area, so it's always reachable and can never scroll out of view.
- Already have a static config? A Revert to DHCP button appears — a separate, explicit action (with its own Revert/Cancel confirmation) rather than something that happens as a side effect of switching back to the DHCP tab.
Back returns to Network Details.
Opens from Settings → Printers. Manages Moonraker connections.
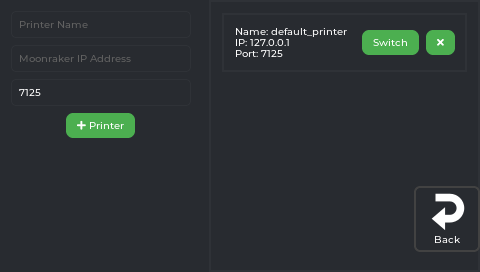
Each configured printer is shown as a card with its name, IP, and port, plus:
- Switch — reconnects OpenKE to that printer
- ✕ (close icon) — removes it from the config. Asks you to tap Confirm or Cancel first; there's no text label on the button itself, just the ✕ icon.
Add a printer: on the left, fill in Printer Name, Moonraker IP Address, and the port field
(pre-filled with 7125), then tap the green + Printer button. A keyboard appears for text entry.
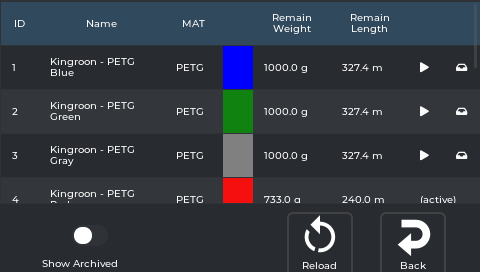
Opens from Settings → Spoolman. Requires a Spoolman server on your network — the button is greyed out until one is configured.
| Feature | What it does |
|---|---|
| Spool list | A table with columns ID, Name, MAT (material), Remain Weight, Remain Length, plus a colour swatch per spool. |
| Set active | Each non-archived, non-active row has a ▶ (play) icon in its row — tap it to make that spool active. The active row shows "(active)" instead of an icon. The active spool's filament use is deducted as you print. |
| Archive | A non-active, non-archived spool shows a 💾-style icon in its row — tap it to archive. An archived spool shows an ⬆-style icon instead — tap it to bring it back. You can't archive the currently active spool. Show Archived (a switch below the table, next to Reload/Back) toggles whether archived spools are listed at all. |
| Reload | Re-fetches the spool list from your Spoolman server. |
| Auto tracking | Once a spool is active, filament used by prints is subtracted automatically. No weighing. |
| Wrong-filament check | Before a print starts (and before a manual Load), a "Use this filament?" popup shows the active spool. Prevents "oops, wrong material" before it ruins a print. |
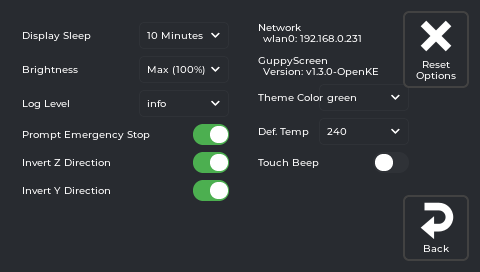
Opens from Settings → System. This is the main settings panel for the screen itself — everything that changes how OpenKE behaves.
Network info label (top of right column): shows each network interface and its IP address, plus the currently running OpenKE version. Read-only.
| Setting | Options | What it does |
|---|---|---|
| Display Sleep | Never / 30 Seconds / 1 Minute / 5 Minutes / 10 Minutes / 30 Minutes / 1 Hour | Dims the screen after this period of inactivity. Touch to wake. |
| Brightness | Low (10%) / Dim (25%) / Medium (50%) / Bright (75%) / Max (100%) | Backlight brightness. 10% is the minimum readable level. |
| Log Level | trace / debug / info / warn | Verbosity of guppyscreen.log. info is the default (weeks-long logs). Use debug before reporting a bug, then switch back. warn = errors only (smallest logs). trace = developer use only. |
| Prompt Emergency Stop | Toggle | On: tapping Emergency Stop shows a confirmation dialog first. Off: acts immediately, no dialog. Default on. |
| Invert Z Direction | Toggle | Flips Z jog buttons in the movement panel (up/down). |
| Invert Y Direction | Toggle | Flips Y jog buttons (front/back). Useful if the bed moves opposite to your expectation on a bed-slinger. |
| Setting | Options | What it does |
|---|---|---|
| Theme Color | Blue, Red, Green, Purple, Pink, Yellow | Changes the screen colour scheme. Takes effect immediately. |
| Def. Temp | Preset temperatures | Default extruder target used by Load/Unload when no explicit target has been set (e.g. on a cold boot). |
| Touch Beep | Toggle | Plays a short click sound through the buzzer on every tap. A test beep plays immediately when you enable it. |
Tap the Reset Options button (top-right corner of the System panel) to open a dialog with three choices:
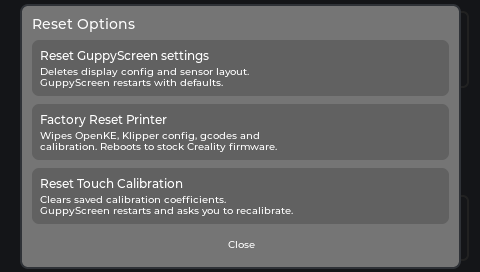
| Option | What it does |
|---|---|
| Reset GuppyScreen settings | Deletes the screen config and sensor layout (guppyconfig.json). OpenKE restarts with factory defaults. Your Klipper config and print files are not touched. |
| Factory Reset Printer | Wipes OpenKE, all Klipper config, gcodes, and calibration. Reboots to stock Creality firmware. Irreversible. WiFi and Creality cloud account are preserved. See Resetting & Uninstalling. |
| Reset Touch Calibration | Clears saved calibration. OpenKE restarts and shows the 9-tap calibration wizard immediately. |
Tap Close to dismiss without doing anything.
Back button (bottom-right of the System panel) returns to the Settings tab.