Getting Started
A walkthrough for first-time users of the FreeCAD AI Workbench. This guide assumes you have already installed the workbench and have FreeCAD 1.0+ running.
-
Open FreeCAD and create a new document (File > New), or open an existing
.FCStdfile. - Switch to the FreeCAD AI workbench using the workbench selector dropdown in the toolbar. Look for "FreeCAD AI" in the list.
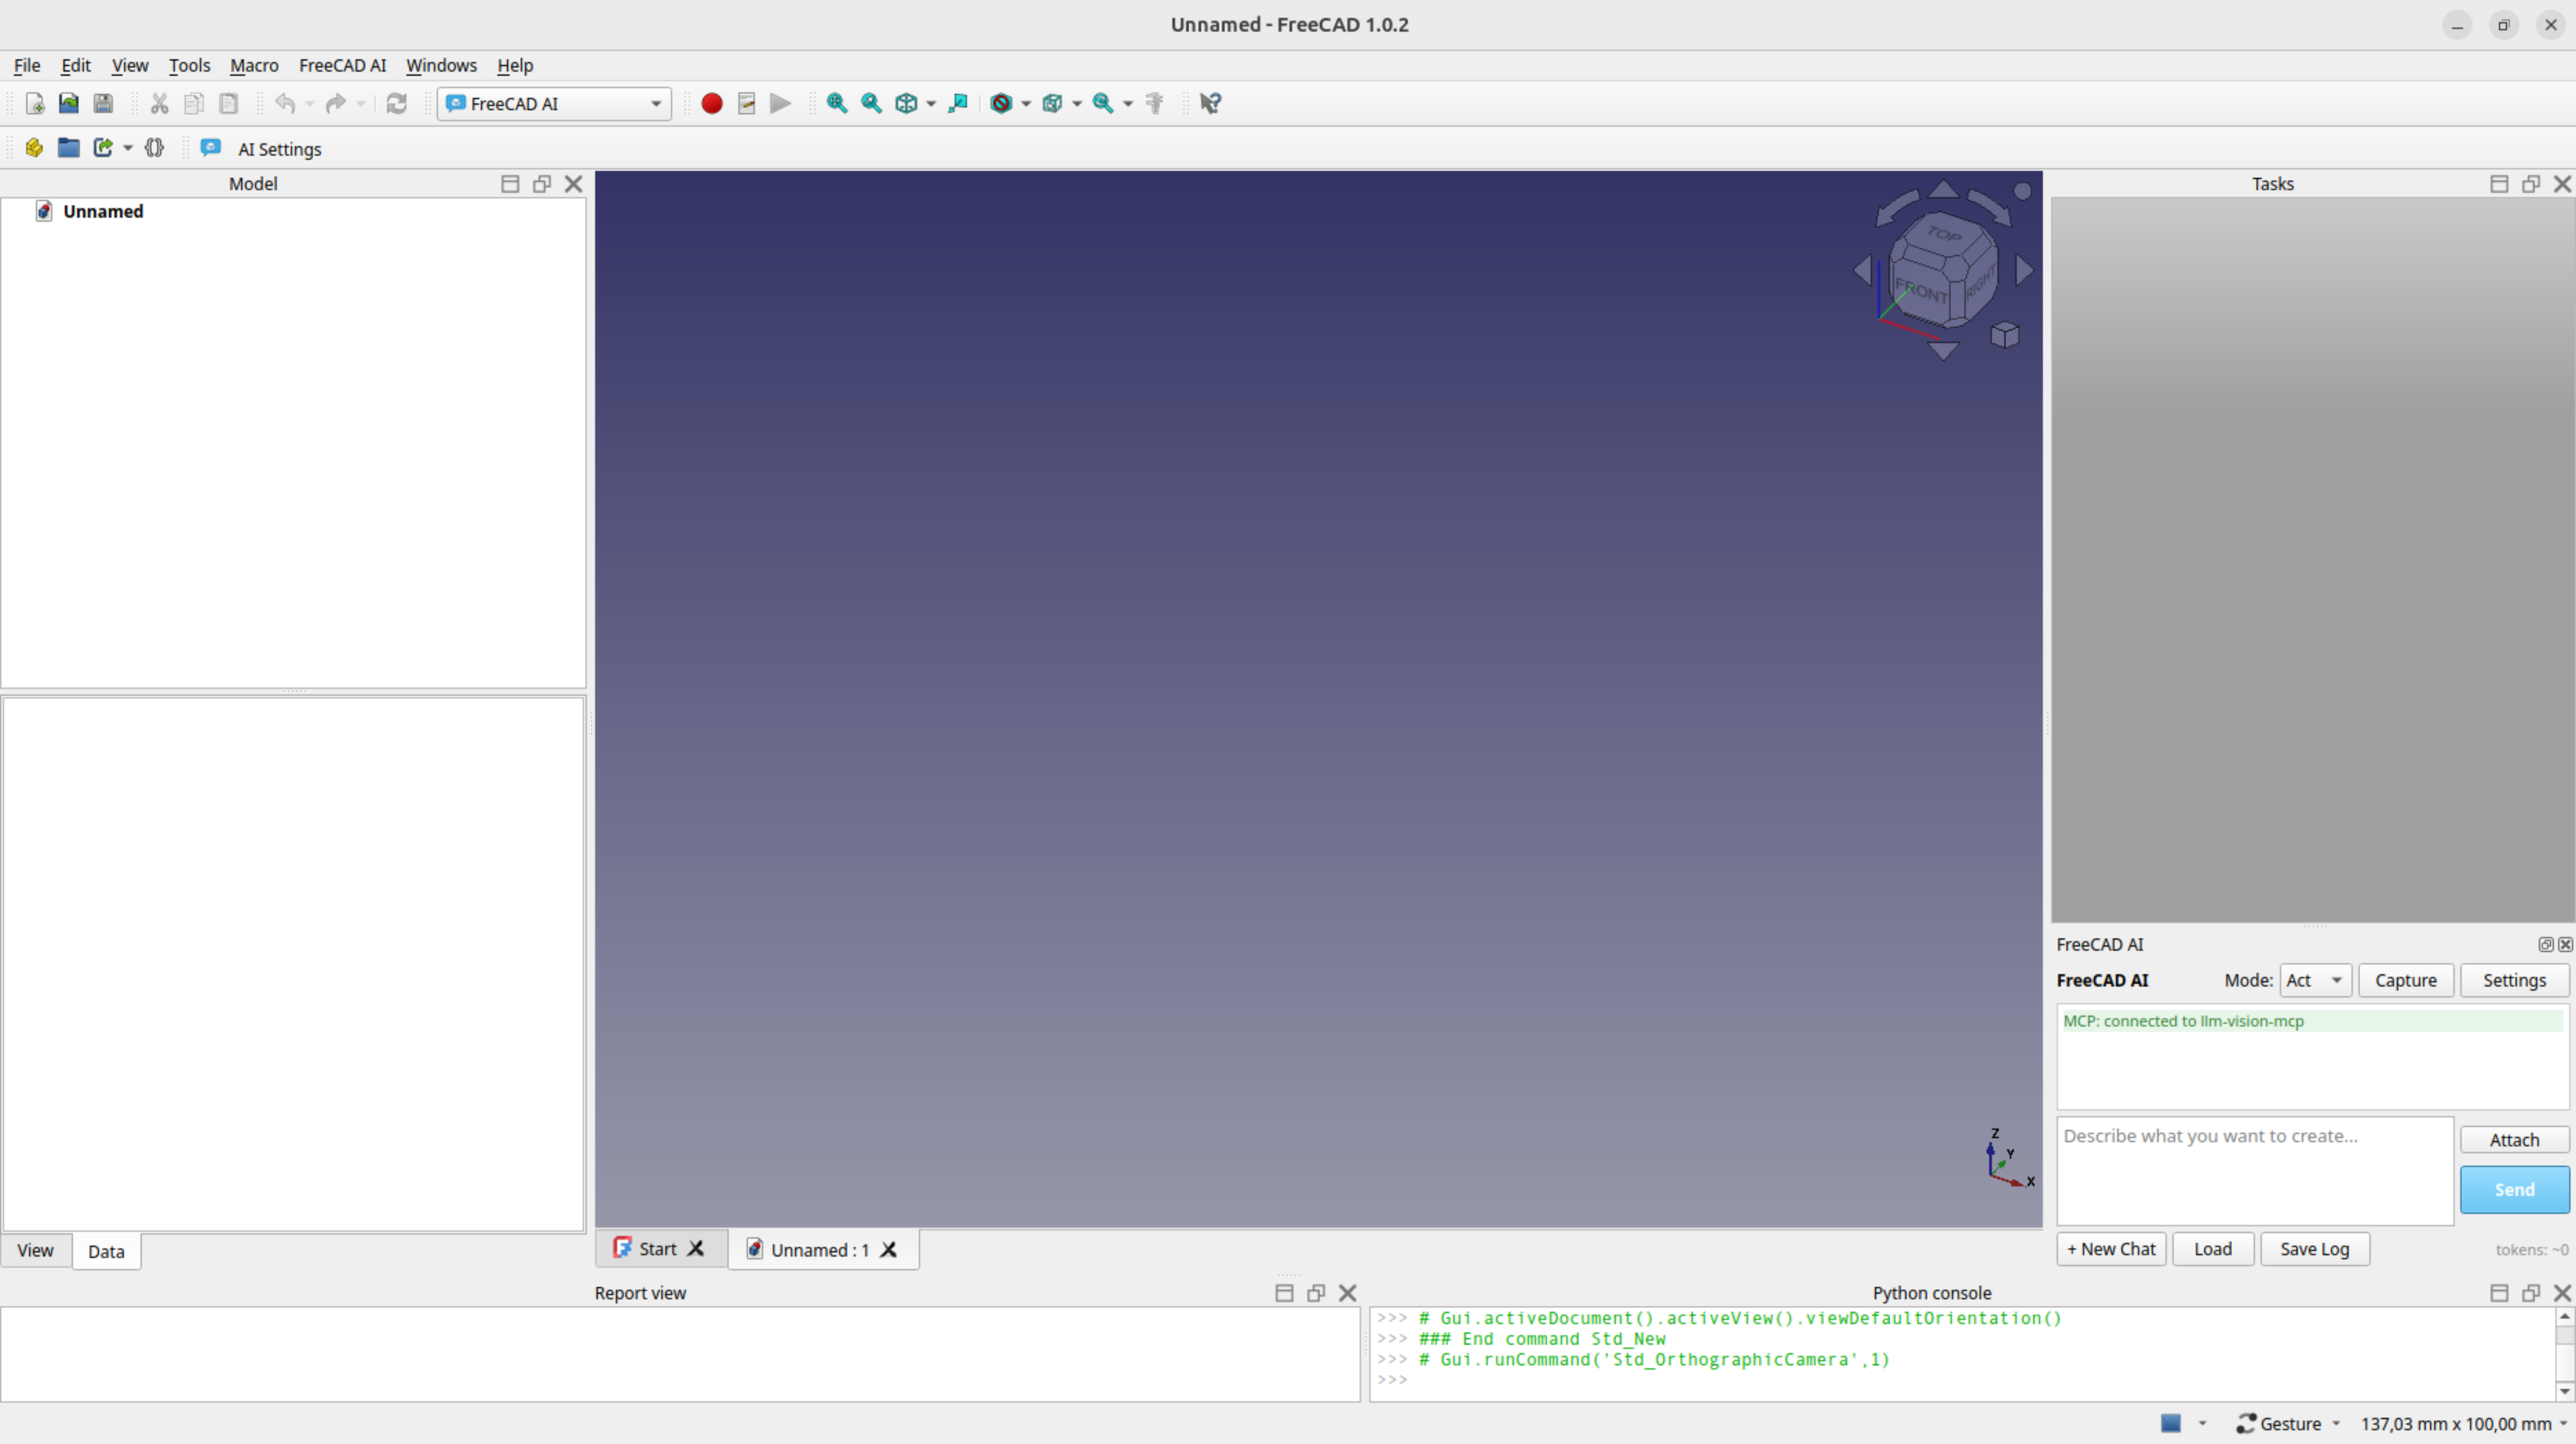
- The chat panel appears as a dock widget on the right side of the FreeCAD window. If it does not appear, go to View > Panels and enable "FreeCAD AI Chat".
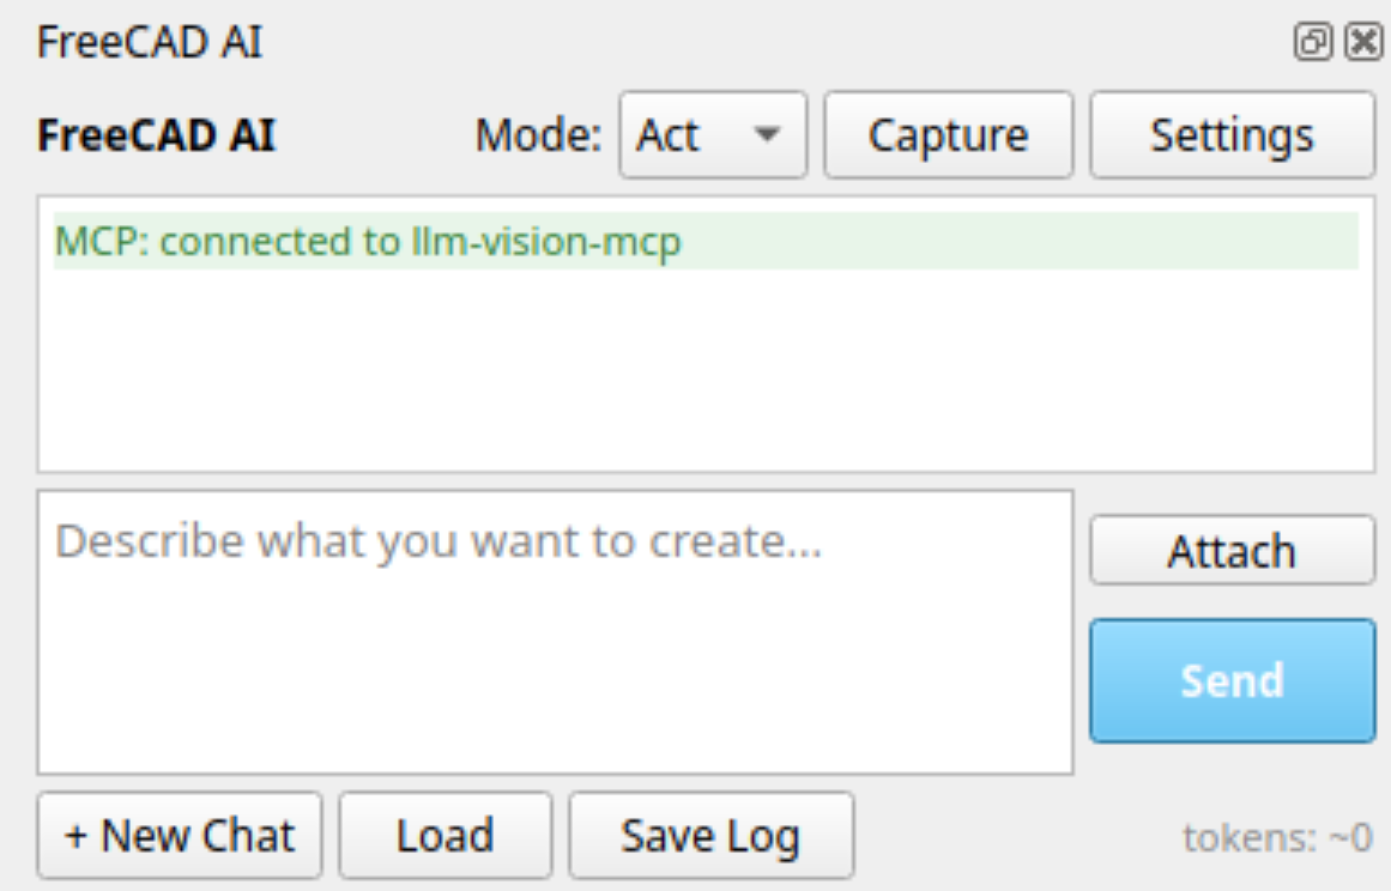 4. Configure your provider by clicking the gear icon at the bottom of the chat panel. You need to set at least:
- Provider: Choose between Anthropic, OpenAI, Ollama (local), or OpenRouter.
- API Key: Required for cloud providers (not needed for Ollama).
-
Model: Select or type a model name (e.g.,
claude-sonnet-4-20250514,gpt-4o,qwen3:32b).
Once configured, you can start typing in the chat input and press Enter to send a message.
The workbench has two execution modes, selectable via the dropdown at the top of the chat panel.
Plan mode is the review-first approach. When you ask the LLM to create or modify geometry:
- The LLM generates Python code and displays it in a fenced code block.
- The code is not executed automatically. You review it first.
- Each code block has Execute and Copy buttons:
- Execute: Runs the code directly in FreeCAD's Python interpreter.
- Copy: Copies the code to your clipboard so you can paste it into FreeCAD's Python console or a macro.
- If you ask a question (rather than a modeling request), the LLM answers normally without code.
Plan mode is ideal for learning, auditing what the AI produces, and situations where you want full control.
Act mode is the auto-execute approach. It has two execution paths depending on your provider's capabilities:
Tool calling (default and preferred):
When the LLM provider supports function calling (Anthropic, OpenAI, and capable Ollama models), the LLM invokes structured tools like create_body, pad_sketch, fillet_edges, etc. Each tool call:
- Is wrapped in a FreeCAD undo transaction for safety.
- Automatically rolls back on error.
- Returns structured results that the LLM uses to plan the next step.
- Appears in the chat as a collapsible tool call block showing the tool name, parameters, and result.
The LLM can chain multiple tool calls in a single turn to build complex models step by step.
Code generation (fallback):
If the provider does not support tool calling, Act mode falls back to code generation. The LLM generates Python code blocks that are automatically extracted and executed. A confirmation dialog appears before execution unless you have enabled auto-execute in settings.
Let's create a simple box with fillets to see how the workbench works.
-
Make sure you have a new, empty document (File > New).
-
Set the mode to Plan using the dropdown at the top of the chat panel.
-
Type the following in the chat input and press Enter:
Create a box 50mm x 30mm x 20mm with 2mm fillets on all edges -
Review the generated code. The LLM will produce Python code that uses FreeCAD's Part or PartDesign API. It will typically:
- Create a
Part::Boxwith the specified dimensions, or - Create a PartDesign Body with a sketch, pad, and fillet features.
- Create a
-
Click Execute on the code block to run it.
-
Press V then F (or View > Fit All) to center the result in the 3D viewport.
-
Inspect the model tree on the left to see the created objects.
If something looks wrong, use Edit > Undo (Ctrl+Z) to roll back.
Now let's try the same thing with automatic tool execution.
-
Switch the mode to Act using the dropdown.
-
Type the following and press Enter:
Create a cylinder with radius 10mm and height 25mm -
Watch the tool calls execute automatically. In the chat, you will see the LLM invoke tools like:
-
create_primitivewithshape_type: "cylinder",radius: 10,height: 25
-
-
The cylinder appears in the viewport as soon as the tool completes.
-
The LLM confirms what it did in natural language after the tool call.
Try a parametric workflow:
Create a PartDesign body, then sketch a 40x25mm rectangle on the XY plane,
pad it 15mm, and add 3mm fillets on all top edges
The LLM will chain multiple tool calls:
-
create_body-- creates the PartDesign Body container -
create_sketch-- adds a rectangle sketch on XY, attached to the body -
pad_sketch-- extrudes the sketch 15mm -
measure(edges) -- identifies which edges are on top -
fillet_edges-- applies 3mm fillets to the top edges
Each step appears in the chat with its parameters and result. If any step fails, the undo transaction rolls it back.
Skills are reusable instruction sets that guide the LLM through complex, multi-step construction patterns. They are stored as Markdown files in ~/.config/FreeCAD/FreeCADAI/skills/<name>/SKILL.md.
Type a slash command in the chat input to invoke a skill:
/enclosure 80x60x40mm, 2mm walls, snap-fit lid
When you invoke a skill:
- The skill's SKILL.md instructions are injected into the LLM prompt for that conversation turn.
- The LLM follows the step-by-step construction pattern defined in the skill.
- The LLM uses the standard tools (in Act mode) or generates code (in Plan mode) according to the skill's instructions.
The built-in enclosure skill demonstrates a complex multi-step workflow:
- Creates a PartDesign Body for the base.
- Sketches and pads the outer shell.
- Pockets the interior to create a hollow box.
- Creates a lid using
create_enclosure_lid(computes lip geometry automatically). - Positions the lid at the correct height.
- Adds an inner ridge to the base for snap-fit.
- Adds snap tabs to the lid that catch on the ridge.
- Hides construction sketches for a clean model tree.
This typically requires 15-20 tool calls and runs automatically in Act mode.
Create a new directory under ~/.config/FreeCAD/FreeCADAI/skills/ with a SKILL.md file:
~/.config/FreeCAD/FreeCADAI/skills/my-skill/SKILL.md
The SKILL.md file should contain:
- A heading with the skill name.
- A description of what the skill does.
- Step-by-step instructions for the LLM to follow.
- Any constraints or parameters the LLM should respect.
The skill is automatically discovered and available via /my-skill in the chat.
- User messages appear right-aligned with a colored background.
- Assistant messages appear left-aligned with Markdown rendering (code blocks, lists, etc.).
- Tool calls appear as collapsible blocks showing the tool name, parameters (as JSON), and the result.
- Errors appear in red with the error message.
- Enter sends the message.
- Shift+Enter inserts a newline (for multi-line messages).
- Up arrow (when input is empty) recalls the previous message.
- The mode dropdown (Plan/Act) switches execution modes.
- The gear icon opens the settings dialog.
- The stop button (appears during generation) cancels the current LLM request.
- The Capture button cycles viewport screenshot mode. Click repeatedly to switch between three states:
- Off (default styling) -- no automatic screenshots.
- Every message (blue text) -- attaches a viewport screenshot to every chat message you send.
- After changes (green text) -- attaches a screenshot only after tool calls modify the document. This is a session-only override; the persistent default is set in Settings > Behavior > Viewport capture.
- New: Starts a fresh conversation (clears chat history).
- Load: Opens a dialog to resume a previously saved session (shows the last 20 sessions).
- Settings (gear icon): Opens the full settings dialog.
- Save your FreeCAD document before using Act mode. While tool calls are wrapped in undo transactions, complex multi-step operations are safer with a saved checkpoint.
- Start with Plan mode to understand what the AI will do, then switch to Act mode once you trust the patterns.
- Be specific about dimensions. "Create a box" is vague; "Create a box 50x30x20mm" gives the LLM clear parameters.
- Use metric units (mm). FreeCAD defaults to millimeters, and all tool parameters expect mm values.
- The LLM automatically sees your document state (object names, types, dimensions) with each message. You do not need to describe what is already in the model.
- Reference objects by name. After creating objects, the LLM knows their internal names and can reference them in subsequent operations.
- Multi-turn conversations work. You can iteratively refine: "Make it taller", "Add fillets to the bottom edges", "Change the radius to 8mm".
- Failed operations are rolled back via undo transactions. The LLM sees the error and can retry with corrected parameters.
- If the LLM produces incorrect code in Plan mode, do not execute it. Ask the LLM to fix the issue or adjust your prompt.
- If a tool call fails in Act mode, check the error message in the tool result block. Common issues:
- "No active document" -- create or open a document first.
- "Body not found" -- the body name may have been renamed by FreeCAD; use
get_document_stateto check. - "Sketch not found" -- same naming issue; FreeCAD may assign different internal names than requested.
- If the model seems stuck or generates nonsensical output, click New to start a fresh conversation.
- Check the session log at
~/.config/FreeCAD/FreeCADAI/logs/latest_session.jsonfor debugging.
Next: Tool Reference | Configuration