Camera and Film Mode
Understudy started as a theatre tool, but the same mechanic — drop a mark, attach data — turns out to map cleanly onto film pre-viz. Camera marks are virtual tripods placed in real space, with real lens specs, and a live viewfinder showing what each lens would frame.
This is the mode for directors of photography, film directors, location scouts, and anyone planning shot coverage before they bring a real camera to a real space.
- Open Author mode on iPhone.
- Toggle the Drop kind picker from Actor to Camera.
- A row of lens-preset pills appears: 14, 24, 35, 50, 85, 135 mm.
- Tap 35 mm. Live on the AR camera feed, a viewfinder rectangle materialises showing exactly what a 35mm lens on a full-frame sensor would frame from where you're standing.
- Walk three steps forward. Tap 85 mm. The framing gets tighter.
- Tap the floor where you'd like a tripod. A small amber camera mark drops at that point.
- Walk to a different angle. Tap floor again. Now you have two camera positions covering the same scene.
You just blocked a two-shot in 60 seconds. No camera, no rental, no permit.
When Drop kind = Camera, a rule-of-thirds-grid framing rectangle stays anchored on the live AR feed showing what the selected lens would capture from the phone's current viewpoint:
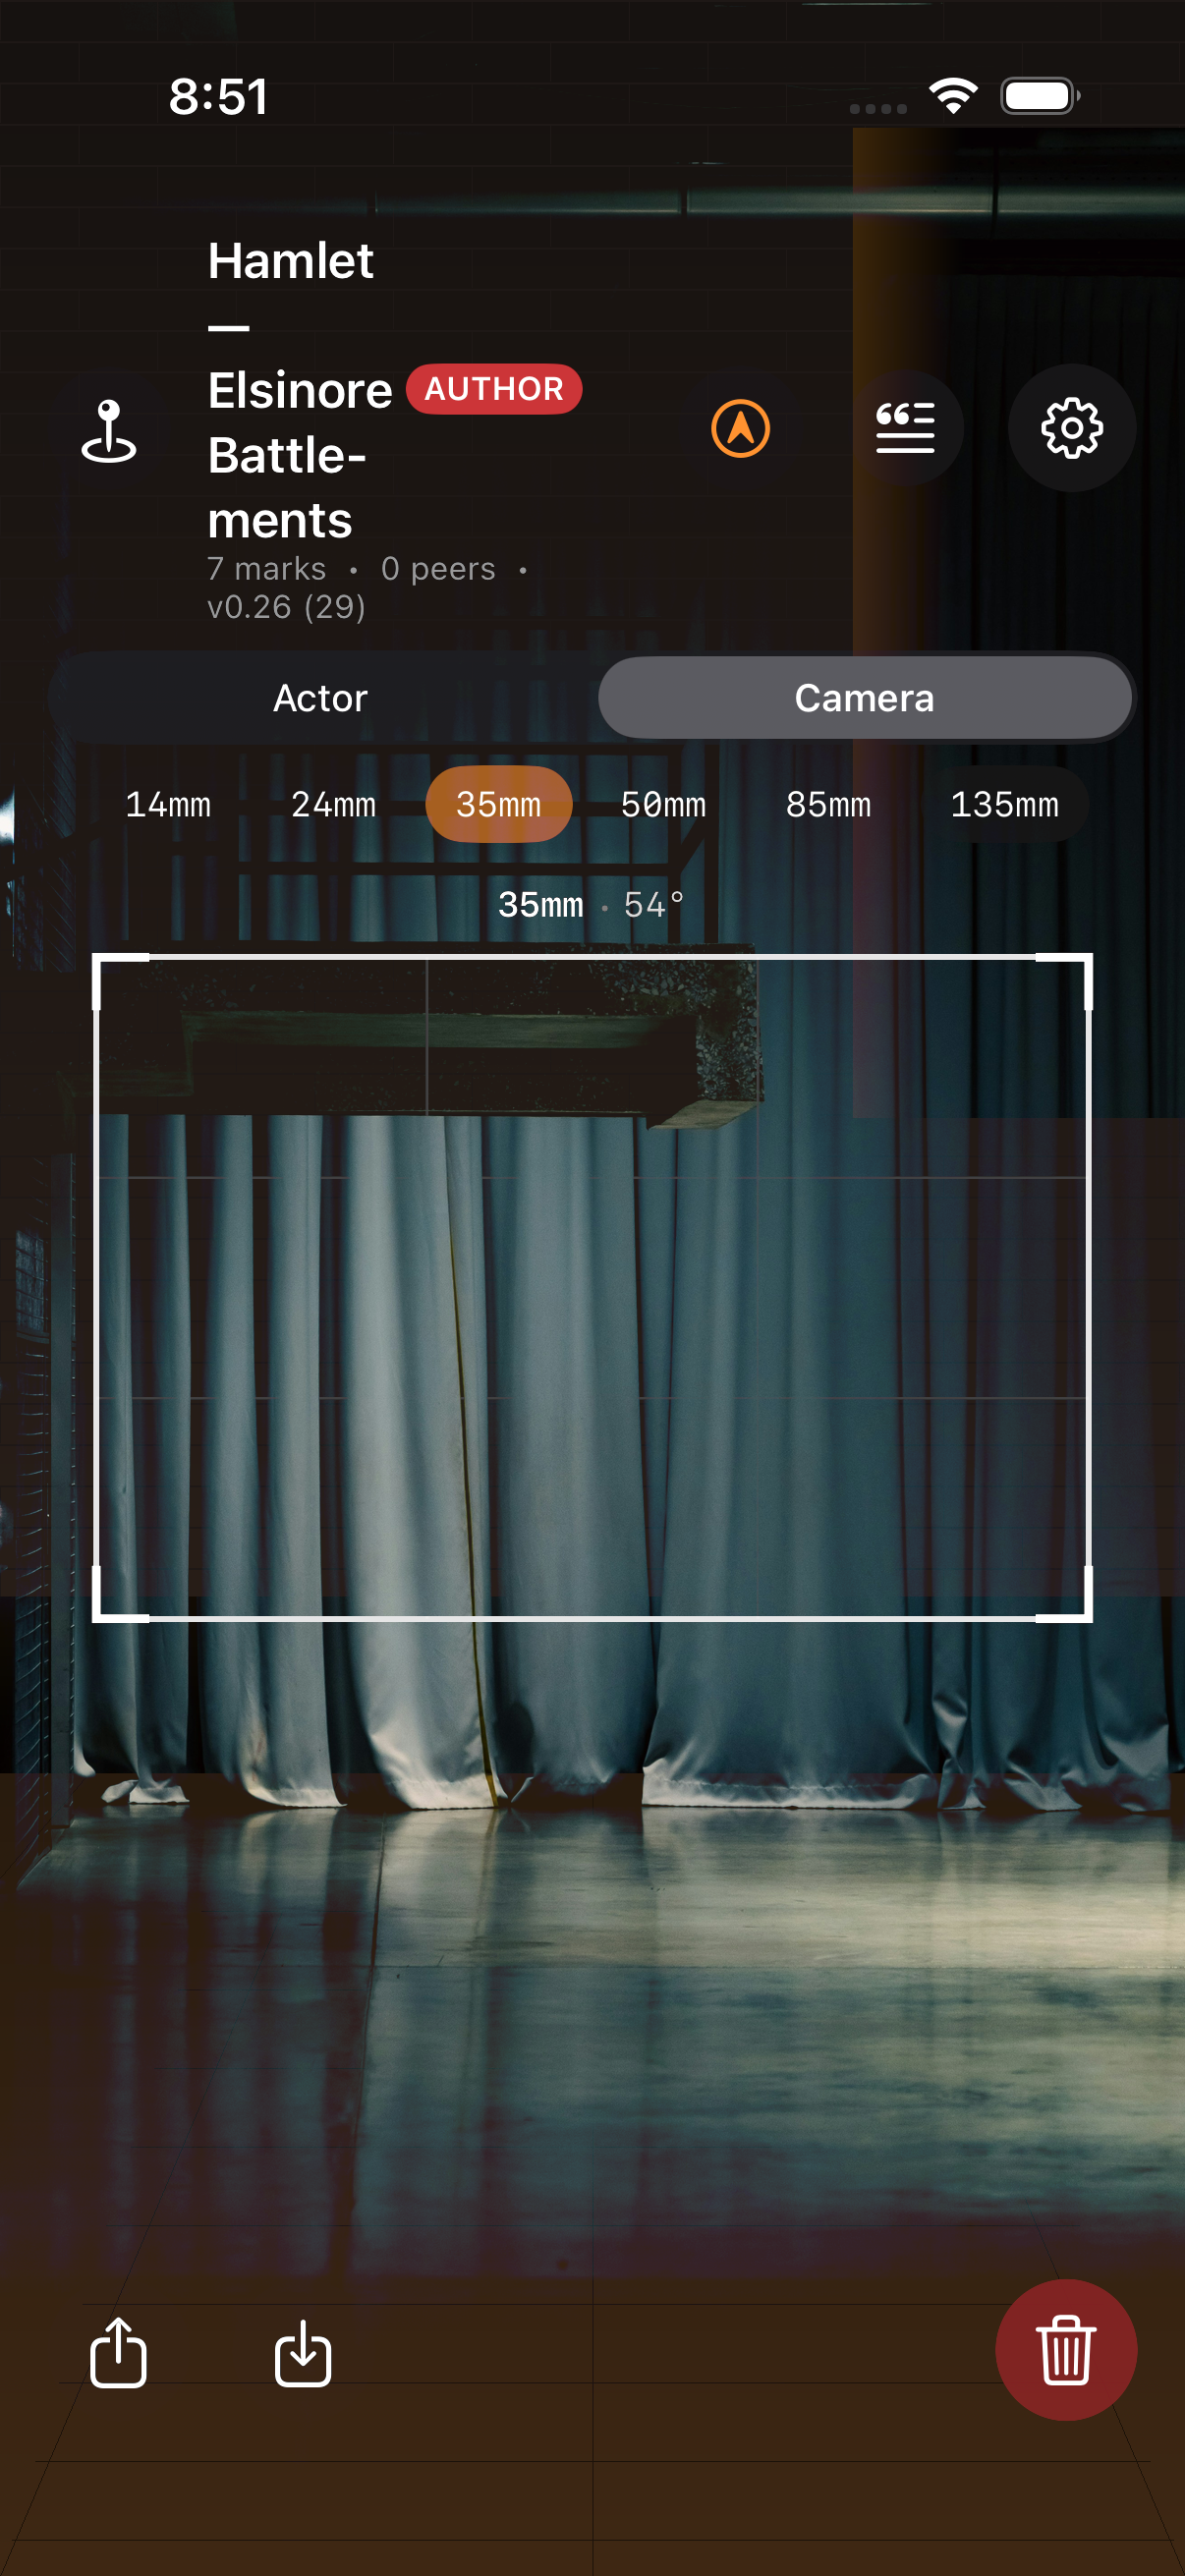
- Outer rectangle = exact frame edges
- Corner ticks = clear visual lock
- Rule-of-thirds grid inside = composition guide
- Lens chip top-right: "35mm · 54° HFOV"
- Dimmed exterior so the framing pops
Cycle through 14 / 24 / 35 / 50 / 85 / 135 mm presets to see each framing instantly. You can also use any custom focal length via the mark editor.
Camera marks are different from actor marks in three ways:
| Actor mark | Camera mark | |
|---|---|---|
| Sequence index | Part of the walk order (1, 2, 3…) |
-1 — bypasses the walk sequence |
| Cues | Lines, sounds, lights, beats | Lens spec only (no cues fire) |
| AR rendering | Cyan disc on the floor | Amber disc + tripod + camera body + FOV wedge |
| Visible in teleprompter? | Yes — its lines flow into the script | No — camera marks are reference only |
This separation is intentional. A film blocking with 8 camera positions and 30 actor marks shouldn't have the camera marks polluting the performer's teleprompter — but the director needs to see them all in the same 3D space to plan coverage.
When the director is in Vision Pro and a blocking has camera marks, the immersive stage renders them as virtual tripods:
- Amber disc on the floor at the tripod foot
- Vertical tripod rod at the configured
heightM(default 1.5 m) - A small camera body at the top of the rod, tilted by
tiltRadians - A translucent amber wedge spreading 3 m from the lens — visualising the field of view
A director walks through the room and sees four cameras with their frustums spreading from each — a 3D shot list in midair.
Lean into Tabletop Mode for an overhead model: the whole stage scales to ~12% and floats at table height, so you can review camera coverage like a model on a desk.
Open any camera mark's editor sheet for:
| Field | Range | Notes |
|---|---|---|
| Focal length | 14 – 200 mm | Drives FOV calculation. Six preset pills + custom slider. |
| Sensor | full frame default | Other presets: ARRI Alexa 35, Alexa Mini LF, RED Monstro 8K, Komodo 6K, Sony Venice 2, BMPCC 6K Pro, iPhone 15 Pro |
| Height | 0.3 – 2.5 m | Tripod height to sensor. Default 1.5 m. |
| Tilt | -45° – +45° | Vertical tilt about the X axis. |
| HFOV | derived | Read-only chip showing the resulting horizontal FOV. |
Different sensors produce different FOVs at the same focal length — which is the whole point. Drop a 50 mm mark, then swap from full-frame to Alexa Mini LF and watch the wedge get tighter (because Alexa LF has a slightly smaller imaging area on certain modes). This is what real DPs are doing in their head; Understudy makes it visible.
Camera body presets like "ARRI Alexa 35" populate sensor dimensions automatically from the body's nominal mode. They don't (yet) account for crop modes, anamorphic squeeze factors, or exotic glass like swing-tilt — those are v0.31+ items.
This is the biggest practical use case.
Scenario: you're scouting a Brooklyn industrial loft for a feature film. The DP can't visit until next month. You spend an hour walking the space with Understudy in Author + Camera mode, dropping camera marks at every angle the director might want.
You export the .understudy file. The DP loads it on her own iPhone in her studio. Vision Pro on, scan ghost optional, she walks her studio floor and sees every camera position she'd have on location — each with the right lens, the right tripod height, the right tilt, the FOV wedge spreading exactly as it would in the real space.
She knows what gear to ship before she ever sets foot in Brooklyn.
The other big use case.
Scenario: you're shooting a tight indie scene that needs four camera setups and you only have time for two takes per setup. You want to know which lenses cover the action without re-blocking.
In Understudy, you drop both actor marks (where performers stand) AND camera marks (where the camera lives) in the same blocking. Switch to Perform mode, walk the actor's path, and the director-on-Vision-Pro sees both the performer ghost and the four camera FOV wedges in the same 3D space.
You'll know in five minutes whether a 35 mm covers from cam-1 or whether you need to swap to a 24.
A blocking with camera marks exports the same way as a blocking without them. The Mark.kind field is actor or camera; older .understudy files (from v0.1 – v0.7) decode unchanged with kind defaulting to actor. Camera marks travel through the WebSocket relay to Android the same way actor marks do; the Android UI also has a viewfinder overlay (since v0.23).
So a film director using an iPhone, a DP using a Vision Pro, and a producer using an Android phone all see the same camera coverage when they're in the same room.
- The phone is the viewfinder, not a camera. It uses the iPhone's actual rear camera as the AR feed. The framing rectangle is virtual, and shows what your intended camera would frame from this exact spot — not what the iPhone's lens is currently seeing.
- Cycle lenses fast. The fastest way to feel the difference between 24, 35, and 50 mm is to walk the space cycling lenses. You'll develop a real sense of how each focal length sees a room.
- Combine with the room scan. If a LiDAR-capable iPhone has scanned the location, the visionOS director sees both the scan ghost AND the camera FOV wedges in 3D. Now you're storyboarding inside a virtual model of the actual venue.
- Camera body presets are a feature flag — you'll find them in the visionOS director panel's mark editor when editing a camera mark. The iOS picker uses the simpler 6-lens preset pills.
- Author's Guide — the rest of authoring (actor marks, cues, scripts).
- Room Scanning — capturing a venue with LiDAR.
- Director's Guide — what the visionOS view looks like with camera marks present.