




A cross platform UI crawler which scans view trees then generate and execute UI test cases.
With NoSmoke you can:
- conduct automated UI test without writing a single UI test scripts!!
- more accurate than mokey test!!
- one tool and configuration, multiple platform!
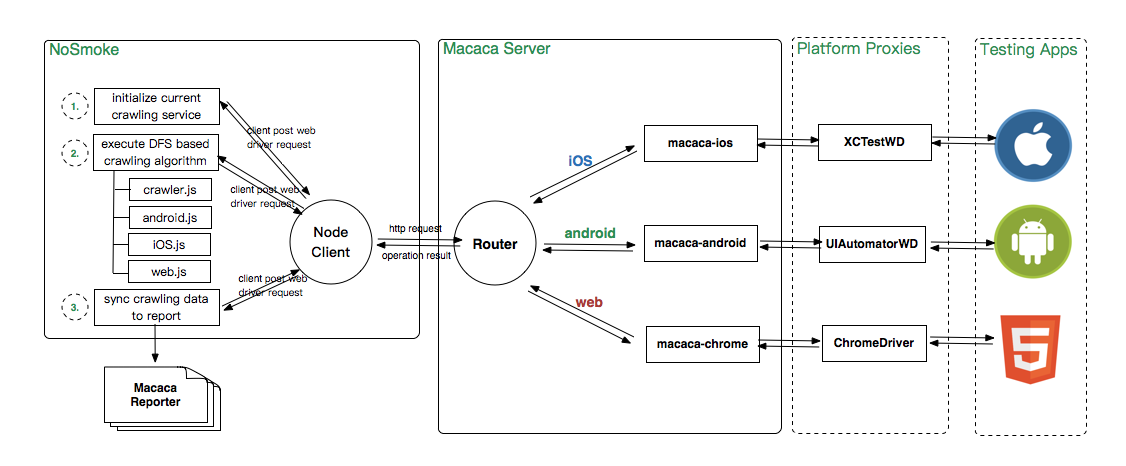
In order to design a multiplatform UI automation tool, the overall architcture is devided into 3 different layers.
-
The Proxy layer, which are tester drivers wrapping local platform testing tool like UIAutomator, XCUITest. They establishes sockets which recieve and executes requests in format of w3c webdriver protocol.
-
The Macaca-Server layer, which are node server created on host PC. It provides a set of cli-command based on which users can install the testing app and init the proxy on a specific device. Further it routes http request to proxies in various platforms.
-
The NoSmoke layer, it contains a node client which posting various crawling and analysis commands to Macaca-Server layer. The crawling algorithm in this module utilizes the node client to fetch window sources and convert it to a DFS tree model, then eventually send out a UI action to the target app via Macaca-Server and Proxy.
Since all the good ones are taken, NoSmoke comes from the ideas across smoke testing, but smoke is not good for health ...
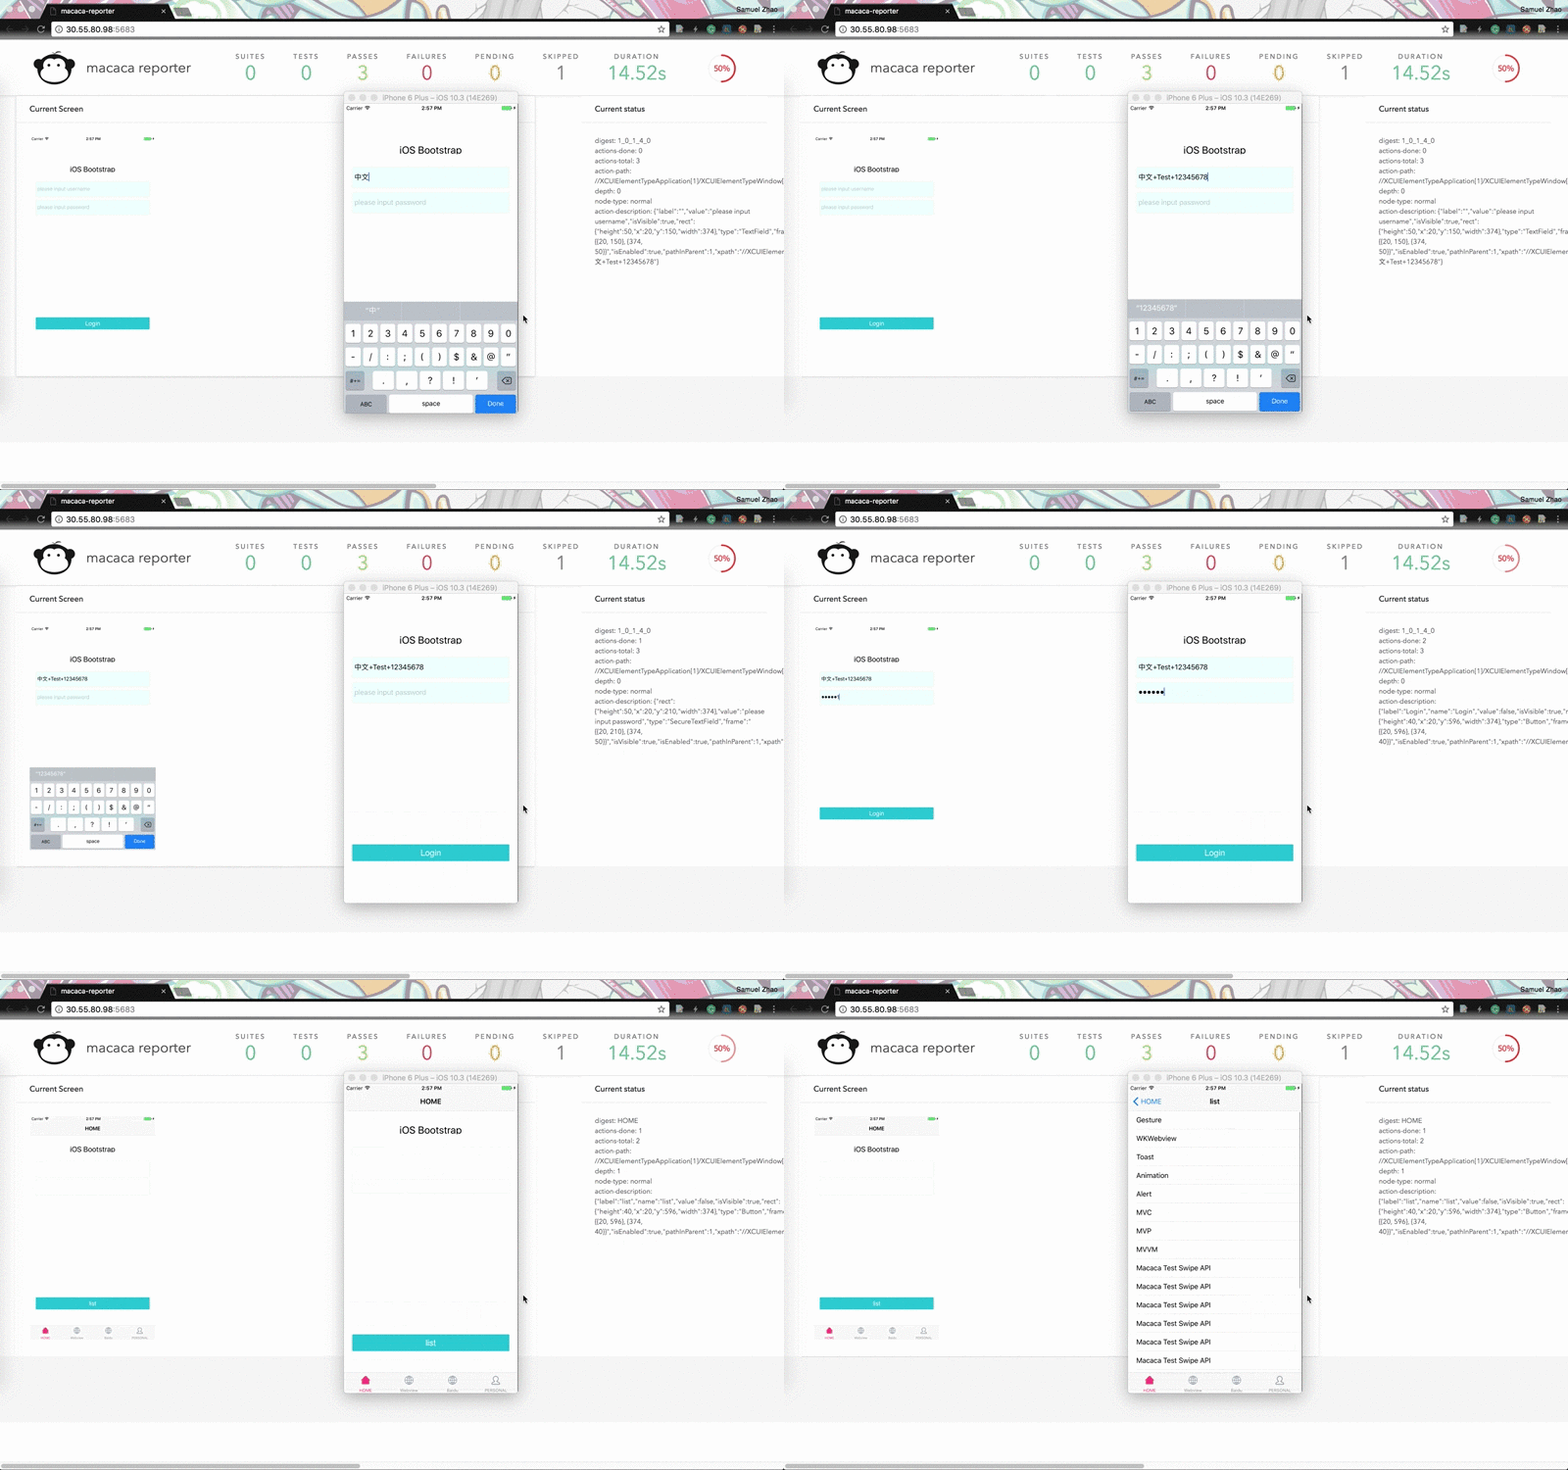
NoSmoke supports UI crawling and testing for iOS, Android and PC Web, macaca-reporter is used to gather and present the crawling process. During the execution of nosmoke, the current page and relevent action info will be revealed on reporter:


Refer to the crawler.config.yml file in the NoSmoke/public folder as a example. You can choose which platform to conduct the crawling task:
desiredCapabilities:
  platformName: 'iOS'
    deviceName: 'iPhone 6 Plus'
 	  app: 'https://npmcdn.com/ios-app-bootstrap@latest/build/ios-app-bootstrap.zip'
And the corresponding configuration for crawling the app:
crawlingConfig:
  platform: 'ios'   // platforms to run: Android, iOS, pc-web
  testingPeriod:    // maximun testing period for a crawling task, after which the task will terminate
  testingDepth :    // maximum testing depth of the UI window tree, exeeding which 'Back' navigation will be triggered
  newCommandTimeout:// time interval takes to examine current window source after a crawling UI action has been performed
  launchTimeout:    // time interval to wait after app has been launched.
  maxActionPerPage: // max UI actions filtered and performed perpage, this will provide greate memory optimization and prevent an Page for staying too long
  targetElements:   // array of hight priority UI element to perform
  asserts:          // provide for regex assert test cases for windows
  exclusivePattern: // specify the pattern hence you can let those element which contain the regex pattern be excluded from exection
  clickTypes:       // specify the types of UI element which can handle click events
  editTypes:        // specify the types of UI element which can handle edit events
  horizontalScrollTypes: // specify the types of UI element which can handle horizontal scroll
  tabBarTypes:      // specify the types of UI element may act as a control widget in master-detail pattern
  exclusiveTypes:   // specify the types of UI element in which all the sub-views will be exclueded from scanning and crawl
There are several hook API provided to provide further space to realize your own customization. You can intercept the 'performAction' function which is called everytime a UI action is executing, you can return your own promise object to replace the existing default performAction method.
/**
 * Method to perform action for the current platform.
 * @Params: action the action which belongs to current active node, and is going to be performed
 * @Params: crawler the crawler instance which contains the context information as well as crawler config
 * @Returns: your own promise to indicate that the performAction method has been fully customized
 * */
Hooks.prototype.performAction = (action, crawler) => {
  return new Promise((resolve, reject) => {
    ... execute your async tasks here
    ... and then call resolve to continue the framework's crawling process
  });
};
After an certain UI action has been performed, you can intercept the crawling task and manually execute any UI operation. After you are done, you can resume the crawling automation process.
/**
 * Method to intercept the crawling process after an specific action has been performed
 * @Params: action the action which belongs to current active node, and has just been performed
 * @Params: crawler the crawler instance which contains the context information as well as crawler config
 * @Returns: a promise to indicate the action has been handled and other wise the default logic will bypass it
 * */
Hooks.prototype.afterActionPerformed = function(action, crawler) {
  // Customize this action to wire through sliding view
  if ("verify whether to intercept the process and conduct manual opperation") {
    return new Promise(resolve, reject) => {
      ... execute your async tasks here
      ... and then call resolve to continue the framework's crawling process
    };
  } else {
    return null;
  }
};
- iOS simulator 11.0 and xcode 9.0 and above.
- Android 6.0 and above, supporting both device and simulator. For real device testing please install null-keyboard
Note You could also check environment by macaca doctor:
$ npm i macaca-cli -g
$ macaca doctor$ npm i macaca-android -g
$ npm i macaca-ios -g
$ npm i macaca-cli -g
$ npm i macaca-electron -gMethod 1: Install the nosmoke command line from npm
$ npm i nosmoke -gOpen the terminal and initialize macaca server macaca server --verbose
then in your workspace directory, execute the following command
$ nosmoke -h path-of-your-hook.js -c path-of-your-config.ymlFor full set of command please check:
nosmoke --help

  Usage: nosmoke [options]

  Options:

    -p, --port <d>    port to use (5678 default)
    -u, --udid <s>    udid of device
    -h, --hooks <s>   location of the hook.js file
    -c, --config <s>  location of the configuration file
    -s, --silent      start without opening reporter
    --verbose         show more debugging information
    -v, --versions    output version infomation
    -h, --help        output usage information
Method 2: Install via clone from github
$ git clone git@github.com:macacajs/NoSmoke.git --depth=1Open the terminal and initialize macaca server macaca server --verbose
then run the following under the nosmoke root dir:
$ bin/nosmoke -h path-of-your-hook.js -c path-of-your-config.ymlNote: -h is optional and -c (the path of the configuration file is a must) in order to run the crawler
Method 3: Supporting Docker as well(android):
$ docker run --privileged -v nosmoke-reporter:/root/reports --name nosmoke-1 -p 5037:5037 -it macacajs/nosmoke-android:1.0.0You can further passing the following arguments inorder, hence the entry point will automatically execute nosmoke with:
'path of your config' 'path of your hook' 'device id'
Note: for docker mode, you need to connect your device and grant the adb access writes to the docker env, otherwise the following error will occur:
Error: Command failed: /opt/android-sdk-linux/platform-tools/adb -s 4fea3345 forward tcp:9001 tcp:9001
  error: device unauthorized.
  This adb server's $ADB_VENDOR_KEYS is not set
  Try 'adb kill-server' if that seems wrong.
  Otherwise check for a confirmation dialog on your device.
When the npm program starts to execute and browser will automatically open the reporter-monitor, it may take several seconds for the program to start simulator. Once the testing target app installed, the crawler program will start execution and reporter's content will be updated.
If there is an error, please kindly drop an issue
 xudafeng |
 SamuelZhaoY |
|---|
This project follows the git-contributor spec, auto upated at Sun Mar 25 2018 16:18:54 GMT+0800.
The MIT License (MIT)