RenderingOsmDataWindows
Author: Jeff McKenna
This wiki page will be used to create a Cookbook Recipe for sharing freely available OpenStreetMap(OSM) data using MapServer, on the Windows platform. Assumptions are that you are able to use a Windows Command Prompt. This document is designed for installations on Windows 7 and Vista 32bit.
-
7-zip
- used to extract the compressed .osm files (although it is not necessary to extract them)
- supports .bz2 compression
- you should enable all formats through Tools/Options
- Go the Start Menu > 7-Zip > 7-Zip File Manager
- Within the 7-Zip File Manager choose Tools > Options
- Under the system tab choose 'Select all'
- Press OK: now any bz2 files should automatically open in 7-Zip
-
Cygwin
- download and save the installer (hint: don't delete this file after, as it can be used to modify your install)
- run the installer
- keep defaults
- for the "Choose a Download Site" select any mirror
- make sure you add the following packages:
- wget (in the "Web" category)
- unzip (in the "Archive" category)
- gcc (in the "Devel" category, named 'gcc-g++: C++ compiler)
- make (in the "Devel" category)
- python (in the "Python" category)
- click "Next"
- click "Finish"
-
Git
- install Windows binaries
- select "Run Git from the Windows Command Prompt" (leave the rest as default)
- after install, open a new command window and type: git
-
PostgreSQL
- make sure to install PostGIS 2.0
- see Step 2 below for full installation instructions
-
MS4W
- follow the instructions in Step 4 below.
-
osm2pgsql
- download the Windows binaries (2MB)
- extract inside your "Program Files" directory
- add that directory to your PATH environment variable (so you can open a command prompt window and type 'osm2pgsql --help')
-
Notepad++
- an excellent free text editor
- download/install the latest version
- Goto http://www.postgresql.org/download/windows
- Click on the link to "Download the one click installer," which will take you to: http://www.enterprisedb.com/products-services-training/pgdownload#windows.
- Click on the Version 9.1.4 (or whatever is latest) download button for your version of Windows. ('Win x86-32')
- Click "Save" (or whatever you browser supports)
- Navigate to where the installation file (named something like postgresql-9.1.4-1-windows.exe) is located and double-click on it to launch the installer.
- Click "Next" through the first few Setup wizard steps. *On the "Password" screen, type "postgres". Note: PostgreSQL has its own users and superusers, which are separate and distinct from Windows users and administrators. As a default, PostgreSQL installation sets up both a PostgreSQL superuser named "postgres" and a Windows system user account named "postgres" that will use the same password.
- Click "Next" through the rest of the Setup wizard steps, leaving all values as their defaults (such as the Port).
- The last step of the Setup wizard should ask if you want to launch something called "Stack Builder."
- Make sure that the checkbox for "Stack Builder" is checked.
- Click "Finish", which both finishes PostgreSQL installation and launches the Stack Builder.
- On the first page of the "Stack Builder" window, in the drop down, select "PostgreSQL on port 5432"
- Click "Next"
- On the next page, click on the "+" sign next to "Spatial Extensions"
- Check the box next to "PostGIS 2.0 for PostgreSQL 9.1 v2.0.0
- Click "Next" until presented with the "PostGIS 2.0.0" setup window.
- Start the installer through the Stack Builder or the standalone installer.
- Click "I Agree"
- Make sure "Create Database" is not selected
- Click "Next" until you get to a "Database Connection" page
- Enter "postgres" for the password and click "Next"
- Click "Yes" to the "Would you like us to register the GDAL_DATA environment variable (see Appendix C), click "Yes"
- Click "Close" on the "Installation Complete" window.
- Click "Finish" in the Stack Builder window
- In your Start Menu, goto PostgreSQL 9.1/pgAdmin III/
- This should bring up an administrative window, with an "Object Browser" on the left side of the window.
- In the Object browser, double click on the icon with the red "X" labeled "PostgreSQL (localhost:5432)"
- Enter your password, "postgres"
- The red "X" should disappear and a set of items should be listed below the "PostgresSQL" label.
- Click on the "+" sign next to the "Databases" icon
- There should be an icon with a red X labeled something like "template_postgis" (databases created by postgis install)
- Single click 'template_postgis"
- Click on the "+" sign next to the "template_postgis" icon
- There should be an icon labeled "Extensions"
- Click on the "+" sign next to the "Extensions" icon
- If you see the items "postgis" and "postgis_topology" listed under the extensions, congrats! PostGIS 2.0 is installed.

- Make sure the 'C:/Program Files/PostgreSQL/xx/bin/' directory is added to your PATH environment variable
- to test this, open a new command prompt window, and type: psql
- if not found, then you must add the above directory to your PATH environment variable (the following steps are for Windows7, but might be slightly different on other versions)
- Start > Control Panel > System
- Click Advanced System Settings
- On the "Advanced" Tab, at the bottom of the tab, click the "Environment Variables" buttons.
- In the "System variables" section - NOT the "User variables" section - select the "Path" variable
- Click Edit
- Put your cursor in the "Variable Value" input area
- Move the cursor to the far right and add a ; if the line does not already end with one
- Then add the custom path to a directory needed like "C:\Program Files\PostgreSQL\9.1\bin"
- Click "OK"
- Click "OK" again
- Now open a new command window and try the psql command
- These instructions assume that you already have a PostgreSQL 'postgres' user
- Open a command prompt and enter the following commands ( the password will always be: postgres )
         createdb -E utf8 -U postgres osm

         psql -U postgres -d osm -f "C:\Program Files\PostgreSQL\9.1\share\contrib\postgis-2.0\postgis.sql"

         psql -U postgres -d osm -f "C:\Program Files\PostgreSQL\9.1\share\contrib\postgis-2.0\spatial_ref_sys.sql"

         psql -U postgres -d osm -f "C:\Program Files\PostgreSQL\9.1\share\contrib\postgis-2.0\legacy.sql"
- We must also apply a patch. Download the patch file to your local machine: legacy-postgis-gist.sql (you might have to "File/Save Page As" in your browser). Then execute in the directory that you downloaded the file to:
psql -U postgres -d osm -f "legacy-postgis-gist.sql"
- try connecting to the 'osm' database:
psql -U postgres -d osm
- then type: \d
- a list of tables should be displayed, such as:
                   List of relations
     Schema |       Name        | Type  |  Owner
    --------+-------------------+-------+----------
     public | geography_columns | view  | postgres
     public | geometry_columns  | view  | postgres
     public | spatial_ref_sys   | table | postgres
- note: to exit that database connection, type: \q
- download the latest MS4W zip archive (such as 'ms4w_3.0.6.zip')
- extract the contents to the root of a drive (so you have something like C:/ms4w)
- also, download the MapServer 6.2-beta1 update, and extract that at the same C:/ drive
- open a command prompt window and cd to the ms4w directory
- execute the following command:
setenv.bat
- test MapServer by calling the CGI executable, with the command:
mapserv -v
- which should return something like:
         MapServer version 6.2.0-beta1 OUTPUT=GIF OUTPUT=PNG OUTPUT=JPEG OUTPUT=KML SUPPORTS=PROJ
         SUPPORTS=GD SUPPORTS=AGG SUPPORTS=FREETYPE SUPPORTS=CAIRO SUPPORTS=ICONV SUPPORTS=FRIBIDI
         SUPPORTS=WMS_SERVER SUPPORTS=WMS_CLIENT SUPPORTS=WFS_SERVER SUPPORTS=WFS_CLIENT
         SUPPORTS=WCS_SERVER SUPPORTS=SOS_SERVER SUPPORTS=FASTCGI SUPPORTS=THREADS SUPPORTS=GEOS
         INPUT=JPEG INPUT=POSTGIS INPUT=OGR INPUT=GDAL INPUT=SHAPEFILE
- now we need to install Apache. Execute the following command in that same window:
apache-install.bat
- and a message should be returned such as:
         Installing the Apache MS4W Web Server service
         The Apache MS4W Web Server service is successfully installed.
         Testing httpd.conf....
         Errors reported here must be corrected before the service can be started.
         The Apache MS4W Web Server service is starting.
         The Apache MS4W Web Server service was started successfully.
- Finally open your Web browser (Firefox, Chrome, or Internet Explorer) and goto http://127.0.0.1
- the MS4W homepage should be displayed such as:
- the MS4W homepage should be displayed such as:

Using either Windows Explorer or through the command window:
- create a new folder for all of our working files, inside the C:/ms4w/apps directory, and name it: osm
- inside the C:/ms4w/apps/osm directory, also create a 'data' folder
      C:/
         ms4w
             apps
                  osm
You have several choices/options for how to obtain the OSM data. Save the file inside the data directory: C:/ms4w/apps/osm/data
- Download the entire planet OSM file (~20 GB)
- released every Thursday, using this planet file will be the latest OSM data available
- extracts to ~250GB
- you may want to use another option if you need a specific region only
- Or, download a .osm file of a specific region (country, state, or province)
- a popular site for this is CloudMade
- there are other various sites for country extracts
- Or, use the HTTP API to download your specific region (this can only be used for small regions)
- goto http://www.openstreetmap.org/
- zoom the map to the small area that you want
- click on the 'Export' tab
- select the format: 'OpenStreetMap XML Data' and press 'Export'
- save the generated .osm file on your local machine
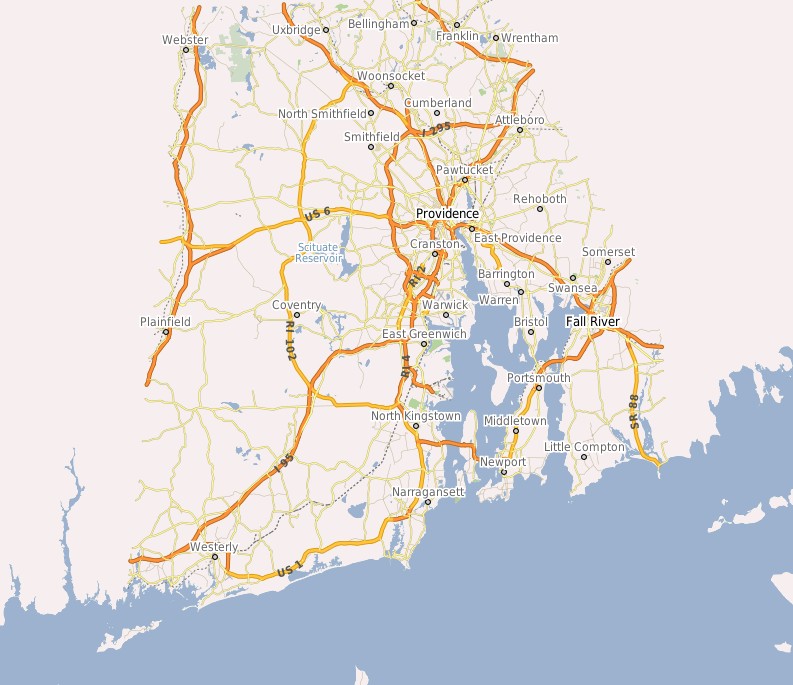
Note: During the creation of this document the file used was the .osm.bz2 file of Rhode Island downloaded from CloudMade

- We must add the "population" field to the osm2pgsql style file, so open this file in Notepad++ (right-click on the file and select 'Edit with Notepad++'): "C:\Program Files\osm2pgsql\default.style"
- add the following line at the bottom of that file:
node,way population text linear
- Now we must import the OSM data into our 'osm' table, by using the osm2pgsql commandline utility.
- First we must make sure to use the correct EPSG file, so open a command window and type:
SET PROJ_LIB=C:\ms4w\proj\nad
- Execute the following in that same command window, but substitute the bz2 filename with either your .osm file or your own .bz2 file ( use the password: postgres ):
osm2pgsql -U postgres -W -m -d osm -p osm -E 3857 -S "C:\Program Files\osm2pgsql\default.style" rhode_island.osm.bz2
- Verify that the tables were created, by either using pgAdmin III (StartMenu/Programs/PostgreSQL 9.1/pgAdmin III/) or connect to the database through the commandline and display the table names with the command:
psql -U postgres -d osm -c \d
- which returns a list of the new tables, such as:
 Schema |             Name              | Type  |
--------+-------------------------------+-------+
 public | geography_columns             | view  |
 public | geometry_columns              | view  |
 public | osm_line                      | table |
 public | osm_point                     | table |
 public | osm_polygon                   | table |
 public | spatial_ref_sys               | table |
- First we must obtain the MapServer/Basemaps code through Git (which you installed through Step 1)
- Open a command window and cd to the directory: C:/ms4w/apps/osm
- Execute the git clone command such as:
git clone https://github.com/mapserver/basemaps.git basemaps
- Now we will use a script to modify our table schema in the osm database
- cd to the /basemaps/contrib/ folder, and then execute:
psql -U postgres -d osm -f "osm2pgsql-to-imposm-schema.sql"
- Verify that the tables were created, by either using pgAdmin III (StartMenu/Programs/PostgreSQL 9.1/pgAdmin III/) or connect to the database through the commandline and display the table names with the command:
psql -U postgres -d osm -c \d
which returns a full list of the new tables, such as:
 Schema |             Name              | Type  |
--------+-------------------------------+-------+
 public | geography_columns             | view  |
 public | geometry_columns              | view  |
 public | osm_line                      | table |
 public | osm_new_admin                 | table |
 public | osm_new_admin_view            | view  |
 public | osm_new_aeroways              | table |
 public | osm_new_aeroways_view         | view  |
 public | osm_new_amenities             | table |
 public | osm_new_amenities_view        | view  |
 public | osm_new_buildings             | table |
 public | osm_new_buildings_view        | view  |
 public | osm_new_landusages            | table |
 public | osm_new_landusages_gen0       | table |
 public | osm_new_landusages_gen0_view  | view  |
 public | osm_new_landusages_gen1       | table |
 public | osm_new_landusages_gen1_view  | view  |
 public | osm_new_landusages_view       | view  |
 public | osm_new_mainroads             | table |
 public | osm_new_mainroads_gen0        | table |
 public | osm_new_mainroads_gen0_view   | view  |
 public | osm_new_mainroads_gen1        | table |
 public | osm_new_mainroads_gen1_view   | view  |
 public | osm_new_mainroads_view        | view  |
 public | osm_new_minorroads            | table |
 public | osm_new_minorroads_view       | view  |
 public | osm_new_motorways             | table |
 public | osm_new_motorways_gen0        | table |
 public | osm_new_motorways_gen0_view   | view  |
 public | osm_new_motorways_gen1        | table |
 public | osm_new_motorways_gen1_view   | view  |
 public | osm_new_motorways_view        | view  |
 public | osm_new_places                | table |
 public | osm_new_places_view           | view  |
 public | osm_new_railways              | table |
 public | osm_new_railways_gen0         | table |
 public | osm_new_railways_gen0_view    | view  |
 public | osm_new_railways_gen1         | table |
 public | osm_new_railways_gen1_view    | view  |
 public | osm_new_railways_view         | view  |
 public | osm_new_roads                 | table |
 public | osm_new_roads_gen0            | table |
 public | osm_new_roads_gen0_view       | view  |
 public | osm_new_roads_gen1            | table |
 public | osm_new_roads_gen1_view       | view  |
 public | osm_new_roads_view            | view  |
 public | osm_new_transport_areas       | table |
 public | osm_new_transport_areas_view  | view  |
 public | osm_new_transport_points      | table |
 public | osm_new_transport_points_view | view  |
 public | osm_new_waterareas            | table |
 public | osm_new_waterareas_gen0       | table |
 public | osm_new_waterareas_gen0_view  | view  |
 public | osm_new_waterareas_gen1       | table |
 public | osm_new_waterareas_gen1_view  | view  |
 public | osm_new_waterareas_view       | view  |
 public | osm_new_waterways             | table |
 public | osm_new_waterways_view        | view  |
 public | osm_new_waterways_gen0        | table |
 public | osm_new_waterways_gen0_view   | view  |
 public | osm_new_waterways_gen1        | table |
 public | osm_new_waterways_gen1_view   | view  |
 public | osm_point                     | table |
 public | osm_polygon                   | table |
 public | osm_roads                     | table |
 public | spatial_ref_sys               | table |
- First we need to get the extent of our data, so we will use PostGIS
- in the command window, execute the following:
psql -U postgres -d osm -c "SELECT extent(way) FROM osm_line"
which will return the extents such as:
                 extent
              ---------------------------------------------------
                 BOX(-8014118.79 5020536.82,-7906037.8 5178887.95)
                 (1 row)
- Next open the file /basemaps/Makefile in Notepad++
- add comments to lines 14-16, such as:
          #OSM_SRID=4326
          #OSM_UNITS=dd
          #OSM_EXTENT=-180 -90 180 90
- change line#19 for our database parameters, such as:
OSM_DB_CONNECTION=host=localhost dbname=osm user=postgres password=postgres port=5432
- change line#20 to use the extents returned by our previous PostGIS command, such as:
OSM_EXTENT=-8014118.79 5020536.82 -7906037.8 5178887.95
- change line#21 so that EPSG:900913 is removed, such as:
OSM_WMS_SRS=EPSG:4326 EPSG:3857 .....
- change line#24 so that Google-styled maps are produced, such as:
STYLE=google
Now we are ready to generate the mapfile.
- Through Windows Explorer or a command window, create a new folder 'generated' inside the C:/ms4w/apps/osm/basemaps directory
- Open the Cygwin Terminal window
- goto: StartMenu/Programs/Cygwin/Cygwin Terminal
- cd to our working directory: C:/ms4w/apps/osm/basemaps
cd c:/ms4w/apps/osm/basemaps
- execute: make
- Messages should be displayed, similar to:
            python generate_style.py  -s google -l 0 > generated/googlelevel0.msinc
            python generate_style.py  -s google -l 1 > generated/googlelevel1.msinc
            python generate_style.py  -s google -l 2 > generated/googlelevel2.msinc
            python generate_style.py  -s google -l 3 > generated/googlelevel3.msinc
            python generate_style.py  -s google -l 4 > generated/googlelevel4.msinc
            python generate_style.py  -s google -l 5 > generated/googlelevel5.msinc
            python generate_style.py  -s google -l 6 > generated/googlelevel6.msinc
            python generate_style.py  -s google -l 7 > generated/googlelevel7.msinc
            python generate_style.py  -s google -l 8 > generated/googlelevel8.msinc
            python generate_style.py  -s google -l 9 > generated/googlelevel9.msinc
            python generate_style.py  -s google -l 10 > generated/googlelevel10.msinc
            python generate_style.py  -s google -l 11 > generated/googlelevel11.msinc
            python generate_style.py  -s google -l 12 > generated/googlelevel12.msinc
            python generate_style.py  -s google -l 13 > generated/googlelevel13.msinc
            python generate_style.py  -s google -l 14 > generated/googlelevel14.msinc
            python generate_style.py  -s google -l 15 > generated/googlelevel15.msinc
            python generate_style.py  -s google -l 16 > generated/googlelevel16.msinc
            python generate_style.py  -s google -l 17 > generated/googlelevel17.msinc
            python generate_style.py  -s google -l 18 > generated/googlelevel18.msinc
            cpp -D_debug=1 -D_layerdebug=1  -DOSM_PREFIX=osm_new_ -DOSM_SRID=3857 -P -o osm-google.map osmbase.map -DTHEME=google -D_proj_lib=\"`pwd`\" -Igenerated
            sed -i 's/##.*$//g' osm-google.map
            sed -i '/^ *$/d' osm-google.map
            sed -i -e 's/OSM_PREFIX_/osm_new_/g' osm-google.map
            sed -i -e 's/OSM_SRID/3857/g' osm-google.map
            sed -i -e 's/OSM_UNITS/meters/g' osm-google.map
            sed -i -e 's/OSM_EXTENT/-8014118.79 5020536.82 -7906037.8 5178887.95/g' osm-google.map
            sed -i -e 's/OSM_WMS_SRS/EPSG:4326 EPSG:3857 EPSG:2154 EPSG:310642901 EPSG:4171 EPSG:310024802 EPSG:310915814 EPSG:310486805 EPSG:310702807 EPSG:310700806 EPSG:310547809 EPSG:310706808 EPSG:310642810 EPSG:310642801 EPSG:310642812 EPSG:310032811 EPSG:310642813 EPSG:2986/g' osm-google.map
            sed -i -e 's/OSM_NAME_COLUMN/name/g' osm-google.map
            sed -i -e 's/OSM_DB_CONNECTION/host=localhost dbname=osm user=postgres password=postgres port=5432/g' osm-google.map
            cp -f boundaries.sql.in boundaries.sql
            sed -i -e 's/OSM_PREFIX_/osm_new_/g' boundaries.sql
- You should have a new mapfile inside the basemaps directory named: osm-google.map
The generated mapfile (osm-google-map) does rely on some non-OSM data for reference layers (such as world boundaries), so we must execute a few more steps to gather/prepare this data:
- In Notepad++ open the file: /basemaps/data/Makefile
- change line#6 to remove the qix reference, such as:
%: %.shp ;
- change line#8 to remove the qix reference, such as:
.PRECIOUS: %.shp ;
- comment lines10-11, such as:
          #%.qix: %.shp
          #    $(SHPTREE) $< 8
- Through the Cygwin Terminal window, cd to the /basemaps/data/ directory, and execute the following command (warning: it may take about 10 minutes to download all data, as it is ~400 MB bzipped):
make
- You should now have the following shapefiles inside the /basemaps/data/ directory:
        10m_admin_0_boundary_lines_land.shp
        boundaries.shp
        ne_10m_admin_0_boundary_lines_land.shp
        processed_p.shp
        seed.shp
        shoreline_300.shp
        TM_WORLD_BORDERS-0.3.shp
- Finally we must be sure to create index files (.qix) for each shapfile, so they display fast in MapServer:
- in a regular Windows command window, cd to C:/ms4w/
- execute the following command:
setenv.bat
- now cd to C:/ms4w/apps/osm/basemaps/data/ directory
- execute the following command (warning: it may take a few minutes to generate the index files):
for %f in (*.shp) do shptree %f
- each shp should have an associated qix file now
We should make some minor adjustments to the generated mapfile. Open /basemaps/osm-google.map in Notepad++ and:
- change ~line#14 to something more descriptive, such as:
"wms_title" "Rhode Island OpenStreetMap Service"
- change ~line#16 to add the IMAGE parameters configured for MS4W, such as:
        WEB
           METADATA
              ...
              "wms_title" "Rhode Island OpenStreetMap Service"
           END
           IMAGEPATH "/ms4w/tmp/ms_tmp/"
           IMAGEURL "/ms_tmp/"
        END
- change ~line#20-21 to comment the CONFIG parameter, such as:
        #CONFIG "MS_ERRORFILE" "stderr"
        #CONFIG "PROJ_LIB" "/cygdrive/c/ms4w/apps/osm/basemaps"
shp2img is a simple commandline tool, that requires a mapfile and can output a map image, or display an error. After reviewing its documentation page, try the following:
- in a command prompt window, cd to C:/ms4w and execute the following command:
setenv.bat
- then cd to the C:/ms4w/apps/osm/basemaps directory, and try a shp2img command:
shp2img -m osm-google.map -o output.png -map_debug 3
which should generate a map imagefile named 'output.png', and display layer draw speeds, such as:
              msDrawMap(): rendering using outputformat named png (AGG/PNG).
              msDrawMap(): WMS/WFS set-up and query, 0.000s
              msDrawMap(): Layer 53 (land10), 0.009s
              msDrawMap(): Layer 54 (landuse10), 0.349s
              msDrawMap(): Layer 55 (waterarea10), 0.122s
              msDrawMap(): Layer 57 (railways10), 0.039s
              msDrawMap(): Layer 58 (roads10), 0.148s
              msDrawMap(): Layer 59 (aeroways10), 0.020s
              msDrawMap(): Layer 60 (borders10), 0.166s
              msDrawMap(): Layer 61 (places10), 0.069s
              msDrawLabelCache(): labelcache_map_edge_buffer = 10
              msDrawMap(): Drawing Label Cache, 0.024s
              msDrawMap() total time: 0.961s
              msSaveImage(output.png) total time: 0.192s
Since MapServer 6.0, you can now display your mapfile in an OpenLayers template, by calling the MapServer CGI/executable directly in your browser.
Construct a URL that contains:

   http://localhost/cgi-bin/mapserv.exe?

     mode=browse&

     template=openlayers&

     layers=all&

     map=C:/ms4w/apps/osm/basemaps/osm-google.map

or: http://localhost/cgi-bin/mapserv.exe?mode=browse&template=openlayers&layers=all&map=C:/ms4w/apps/osm/basemaps/osm-google.map
Step 11. Adding More OSM Data
This document showed how to download and process one single file (for the state of Rhode Island); but what if you want to add another state?
Good news: you can append your new OSM data files.  Once you have downloaded a new file (such as Connecticut downloaded from CloudMade), restart the process with the osm2pgsql command, but add the "-a" switch:

     osm2pgsql -U postgres -W -m -d osm -p osm -E 3857 -a -S "C:\Program Files\osm2pgsql\default.style" connecticut.osm.bz2

Then re-modify the tables:

     psql -U postgres -d osm -f "osm2pgsql-to-imposm-schema.sql"