Getting Started
GNOME Widget Panel currently supports GNOME Shell 46–50 and is alpha software. Check your GNOME version in Settings → System → About, and pick the matching plugin version from the support matrix.
The store listing is still under review, so this route may not be available to you yet.
- Open the extension page on extensions.gnome.org in a browser that has the GNOME Shell browser integration installed.
- Toggle the switch on the page to install and enable the extension.
Alternatively, search for "GNOME Widget Panel" in the Extension Manager app and install it from there.
This works today and needs no browser integration.
-
Download
gnome-widget-panel@mpashka.github.com.shell-extension.zipfrom the latest release. -
Install it:
gnome-extensions install --force ~/Downloads/gnome-widget-panel@mpashka.github.com.shell-extension.zip -
Log out and back in. GNOME Shell caches an extension's code for the lifetime of the session, so a freshly installed extension only becomes loadable after a new login. (On X11, Alt+F2 →
ris enough; on Wayland it is not.) -
Enable it:
gnome-extensions enable gnome-widget-panel@mpashka.github.comor switch it on in the Extensions / Extension Manager app.
For development, or to run the newest unreleased code, clone the repository and run ./install.sh; see the README and the developer workflow.
Open the settings with the gear button next to the extension in Extensions / Extension Manager, or run:
gnome-extensions prefs gnome-widget-panel@mpashka.github.comEverything lives on one screen and applies to the running panel immediately.
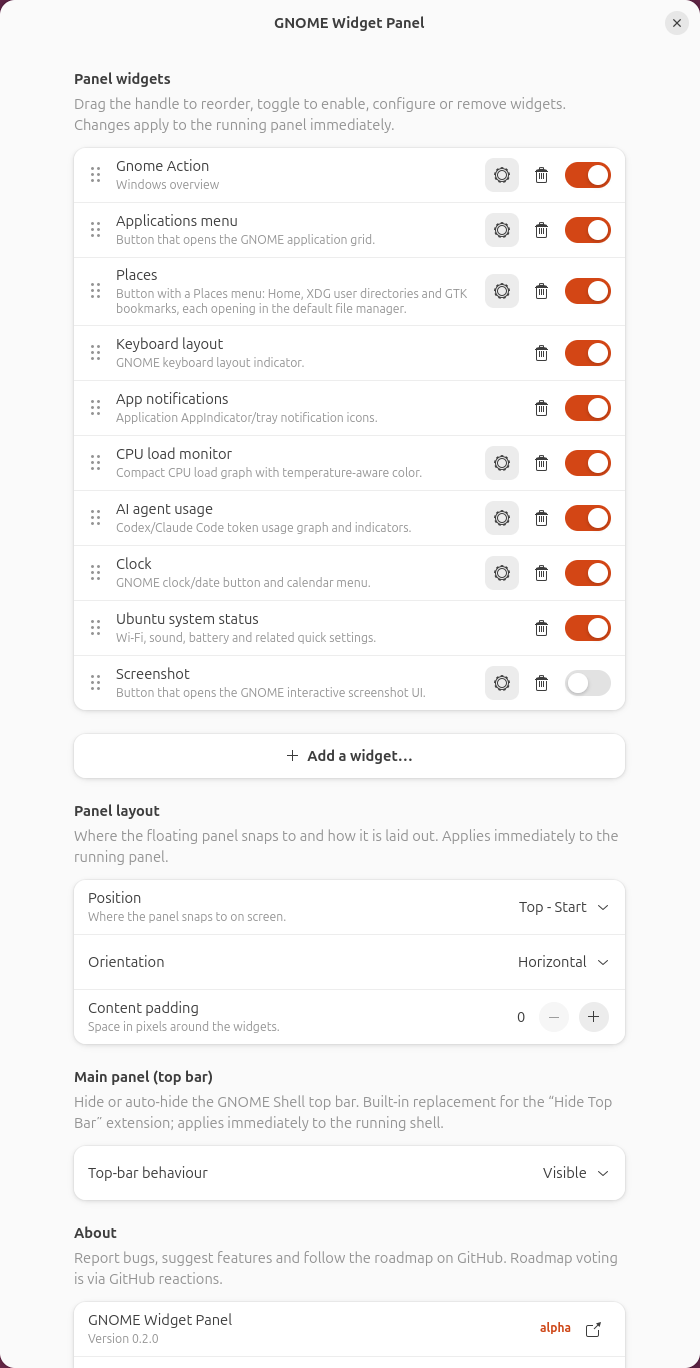
- Add, remove, reorder (drag the handle) or disable widgets. Changes appear immediately.
- Give a widget its own settings with its gear button — icon, label, colours, width, update interval or tooltip, depending on the widget.
- Under Panel layout, choose where the panel snaps and whether it is a horizontal bar or a vertical strip.
- Under Main panel (top bar), choose:
- Visible — leave GNOME's top bar unchanged. This is the default.
- Auto hide — hide it until you reach the top edge or open Overview.
- Hidden — keep it hidden.
- Start with Auto hide if you want more space while keeping easy access to the original top bar.
The default panel contains GNOME Action, Applications, Places, Keyboard layout, App notifications, CPU load, AI agent usage, Clock and System status.
The six-dot handle at the start of the panel is its grip:
- Drag it to move the panel anywhere on screen.
- Right-click it for the panel menu — Collapse/Expand, settings, release notes, the store page, and the bug and feature forms.
- Middle-click it to toggle the indicator drawer.
Choosing Collapse hides every widget and leaves only the handle, which keeps its menu so you can Expand again. The collapsed state is remembered across restarts.

For the AI workflow, continue to Using the AI widgets.
This is early software. When reporting a problem, include your GNOME version, panel configuration, and a screenshot or short screencast.