Workshop #1: Setting up the project
Workshop #1 is about setting up both the local environment for development and the first project. Therefore, you can find here topics such as:
- Java installation
- Git installation
- Gradle installation
- Gradle basics
- Spring Boot basics
You can find the source code that represents the status of the project after this workshop - here
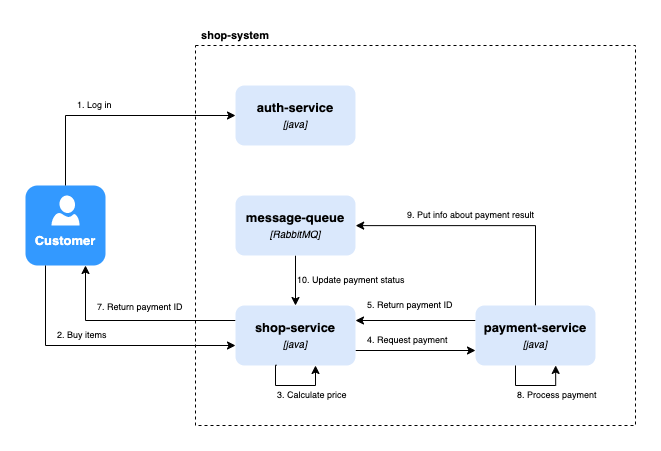
We need to create a system for a store that provides the possibility to buy items via store website.
Requirements:
A customer should:
- log in via 3rd party auth provider (e.g. Google, Facebook)
- browse shop items
- add items to the shopping cart
- make an order
- pay for the order
🎥 This part was done during live coding during workshops 🎥
This is a sample system architecture that we will implement to fulfill the mentioned business requirements:
Before we start, we need to have several tools installed on our machines.
Official page: https://www.jetbrains.com/idea/
Download: https://www.jetbrains.com/idea/download
Free Educational Licence (for students): https://www.jetbrains.com/community/education/#students
You can install Java using brew (official page):
brew install openjdkbrew install openjdk@17- Download OpenJDK from the official page: https://jdk.java.net
- Java 19: https://jdk.java.net/19
- Java 17: https://jdk.java.net/archive/
- Extract ZIP to
Program Files/Javadirectory - Set up the environment variables:
- Go to
This PC>Advanced System Settings>Advancedtab >Environment variables - Add OpenJDK
/bindirectory path toPathenvironment variable - Add
JAVA_HOMEenvironment variable that points to OpenJDK home directory
- Go to
- Download OpenJDK from the official page: https://jdk.java.net
- Java 19: https://jdk.java.net/19
- Java 17: https://jdk.java.net/archive/
- Extract
tar.gzfile using command:tar -xvf <openjdk_tar_gz_file> - Move the extracted directory using command:
sudo mv <extracted_directory> /opt/ - Update environment variables via
~/.bashrcfile by adding the following lines at the end of the file:
export JAVA_HOME=/opt/<extracted_directory>
export PATH=$PATH:$JAVA_HOME/binYou can install Git on MacOS using brew:
brew install gitYou can install Git on Windows using an installer from official page: https://git-scm.com/download/win
You can install Git on Debian/Ubuntu using apt:
sudo apt-get install git-allYou can install Gradle using brew:
brew install gradleYou can install Gradle manually by following the guide from official page: https://gradle.org/install/
Based on the information found on the official page, Gradle is a tool designed to be flexible enough to build almost any type of software including Java applications.
Really nice overview of Gradle can be found on the official site
Gradle project consists of two files that are responsible for configuration: settings.gradle and build.gradle. Optionally, it can also include the buildSrc directory that consists of shared configuration if we have multiple subprojects build.
Sample settings.gradle file:
rootProject.name = 'gradle-sandbox'
include('app-one', 'app-two', 'app-three')
Sample build.gradle file:
plugins {
    id 'java'
}

dependencies {
    implementation 'org.apache.commons:commons-lang3:3.12.0'
    implementation project(':libraries:library-one')
}

application {
    mainClass = 'io.mzlnk.projectignythe.appone.Application'
}
Gradle plugins are used to provide out-of-the-box useful configuration to our projects (e.g. running tests with JUnit or Spock). We can use external 3rd party plugins found on the Maven central repository or create our own under buildSrc directory.
Sample custom plugin:
plugins {
    id 'java'
}

repositories {
    mavenCentral()
}

dependencies {
    testImplementation 'org.junit.jupiter:junit-jupiter:5.8.2'
}

tasks.named('test') {
    useJUnitPlatform()
}
Gradle is a task-based build tool. It means that we are creating or using tasks in our project that are run in proper order to achieve the expected result (e.g. build the executable JAR).
Gradle supports nested subprojects so it is possible to create a mono repo with several applications configured under one Gradle project.
You can find more information about multi-project build on the official site
🎥 This part was done during live coding during workshops 🎥
Let's create a sample gradle multi-project build called gradle-sandbox that will contain two Java applications and two Java libraries.
The final project will look like this:
gradle-sandbox
∟ app-one
  ∟ src
  ∟ build.gradle
∟ app-two
  ∟ src
  ∟ build.gradle
∟ libraries
  ∟ library-one
    ∟ src
    ∟ build.gradle
  ∟ library-two
    ∟ src
    ∟ build.gradle
∟ settings.gradle
As we can see - our project will consist of:
- one root project
gradle-sandbox - two subprojects for apps:
app-oneandapp-two - one subproject for libraries directory
libraries - two subprojects for actual libraries:
library-oneandlibrary-two
To achieve our goal using gradle itself (without IntelliJ support) we need to:
- Create directory
gradle-sandbox - Create gradle project:
gradle init
- Follow the Gradle wizard:
- for type of the project to generate - select
1: basic - for build script DSL - select
1: Groovy - for rest options select the default values
- for type of the project to generate - select
- The
gradle inittask will generate:-
gradledirectory that contains gradle wrapper -
.gitignoreand.gitattributes -
gradlewandgradlew.bat(executables to use gradle wrapper) build.gradlesettings.gradle
-
- Create the following directories inside our project root directory
gradle-sandboxfor subprojects:/app-one/app-two/libraries/library-one/libraries/library-two
- In both app and library directories create:
-
build.gradlefile -
src/main/javadirectory that will contain our java files -
src/test/javadirectory that will contain our java files for tests
-
- In apps
build.gradlefiles write the following content:plugins { // apply the application plugin to add support for building a CLI application in Java: id 'application' } repositories { // use Maven Central for resolving dependencies: mavenCentral() } dependencies { // use JUnit Jupiter for testing: testImplementation 'org.junit.jupiter:junit-jupiter:5.8.2' } application { // define the main class for the application: mainClass = 'gradle.sandbox.app.one.AppOne' // for app-two: 'gradle.sandbox.app.two.AppTwo' } // we need to access the task 'test' to configure JUnit: tasks.named('test') { // Use JUnit Platform for unit tests: useJUnitPlatform() }
- In libraries
build.gradlefiles write the following content:plugins { // Apply the application plugin to add support for building a CLI application in Java. id 'java' } repositories { // Use Maven Central for resolving dependencies. mavenCentral() } dependencies { // Use JUnit Jupiter for testing. testImplementation 'org.junit.jupiter:junit-jupiter:5.8.2' } tasks.named('test') { // Use JUnit Platform for unit tests. useJUnitPlatform() }
- In
settings.gradlefile located in project root directory write the following content:// define name for the build (if not present - name will be taken from its directory name) rootProject.name = 'gradle-sandbox' // define subprojects here include( 'app-one', 'app-two', 'libraries:library-one', ':libraries:library-two' )
- To check if you configured everything correctly run the following command from project root directory:
You should see the following output:
gradle -q project
------------------------------------------------------------
Root project 'gradle-sandbox'
------------------------------------------------------------

Root project 'gradle-sandbox'
+--- Project ':app-one'
+--- Project ':app-two'
\--- Project ':libraries'
     +--- Project ':libraries:library-one'
     \--- Project ':libraries:library-two'
Now, let's add external dependency for app-two - Guava library from Google. To do so, let's edit our /app-two/build.gradle file and add proper dependency:
dependencies {
    // ...

    // This dependency is used by the application.
    implementation 'com.google.guava:guava:31.0.1-jre'
}
Now, we can use the library in our application code
package gradle.sandbox.app.two;

import com.google.common.collect.Lists;

import java.util.List;

public class AppTwo {

    public static void main(String[] args) {
        // we used the linked external library in build.gradle here:
        List<Character> characters = Lists.charactersOf("app-two");

        System.out.println("Hello World from app-two!");
    }

}We can also used gradle modules as a dependencies for other ones. As an example - we will add library-one as a dependency for app-one to use functionalities provided by the library-one
- Create some util method that the
library-onewill providepackage gradle.sandbox.library.one; public class LibraryOneUtil { public void hello() { System.out.println("Hello from library-one!"); } }
- Add
library-oneas a dependency in app-onebuild.gradlefile:dependencies { // use the internal library created as a gradle subproject: implementation(project(":libraries:library-one")) // ... }
- Now we can use libraries functionalities in
app-oneapplication code:package gradle.sandbox.app.one; import gradle.sandbox.library.one.LibraryOneUtil; public class AppOne { public static void main(String[] args) { // we used the linked internal library in build.gradle here: var util = new LibraryOneUtil(); util.hello(); System.out.println("Hello World from app-one!"); } }
To build the whole project - just run the following command from the root project directory:
gradle clean buildTo see what tasks are executed and in which order - add --info parameter to the command.
To run all tests from all subprojects - run the following command from the root project directory:
gradle checkYou can view the source code for this sandbox - here
You can easily create a Spring Boot application in two ways: using Spring Initializr website or creating a project via IDE (IntelliJ IDEA Ultimate only).
You can create a Spring Boot application and configure all necessary dependencies using Spring Initializr site. Just navigate to the page, enter all necessary information and download the generated ZIP file with the project template that can be open in the IDE.
If you have IntelliJ IDEA Ultimate (available for Educational License) - you can create the same project template as done via Spring Initializr by native wizard in the IDE itself.
To do so:
- Navigate to
Filetab - Click
New>Project... - Choose
Spring InitializrfromGeneratorstab located on the right side of the opened wizard.
In our case, we need to create the following Gradle subprojects for the components:
shop-servicepayment-serviceauth-service
🎥 This part was done during live coding during workshops 🎥
Due to the fact that we want to create a module in our gradle project (called project), we will use New Module wizard from IntelliJ instead of New Project wizard:
- Right-click on
projectdirectory in Project Explorer and chooseNew->Module: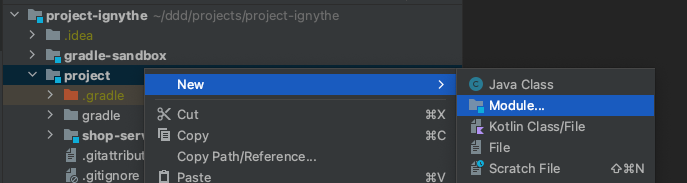
- Choose
Spring InitializrfromGeneratorstab and provide all necessary information: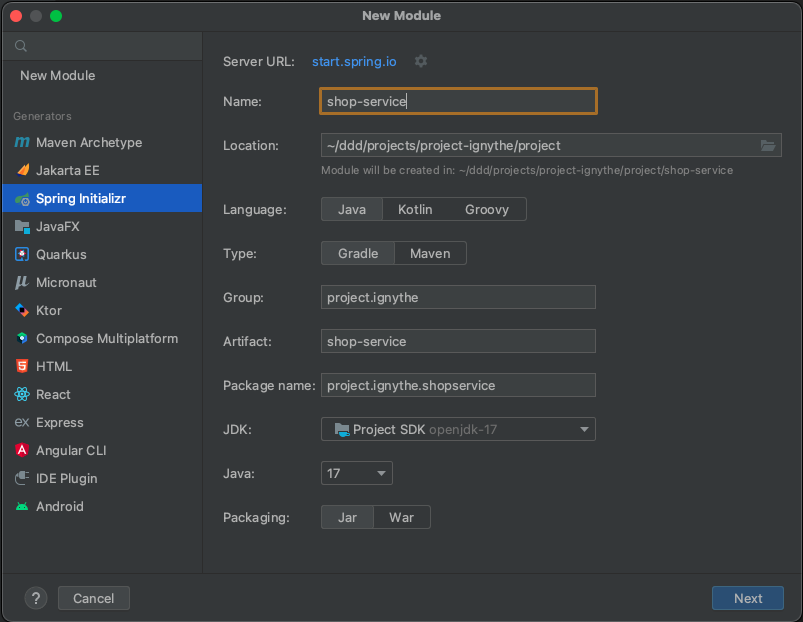
- In next step choose dependencies you need (for now we will use only
Spring Webone) and clickCreate: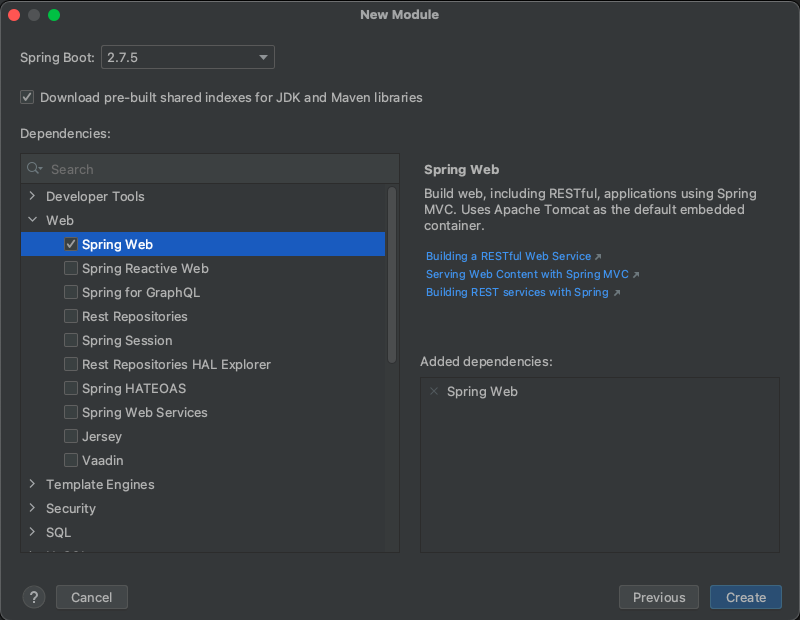
We will do the same for payment-service and auth-service, so our project directory should look like this:
project-ignythe
∟ project
  ∟ auth-service
  ∟ payment-service
  ∟ shop-service
You can view the source code for this step - here
Based on the official site, Spring Boot is a framework that allows you to easily create stand-alone, production-grade Spring based app that you can "just run" without any additional code setup. Spring Boot provides a default configuration for different areas such as database management, REST API exposure, observability, etc. via so-called starters that can be added to our project via project dependencies. Therefore it makes web applications development really fast.
Based on the definition that can be found on the official documentation site:
In Spring, the objects that form the backbone of your application and that are managed by the Spring IoC container are called beans. A bean is an object that is instantiated, assembled, and managed by a Spring IoC container. Otherwise, a bean is simply one of many objects in your application. Beans, and the dependencies among them, are reflected in the configuration metadata used by a container.
In other words, Spring provides us a container (called Spring IoC container) where we can define our components (like controllers, repositories, services, etc.) and dependencies between them without worrying about object instantiation and implementing connection structure - Spring does it for us.
Dependency injection is a design pattern in which a component receives other components that it depends on - it does not create them itself but only defines the proper dependencies.
Example without DI:
public class PaymentService {

    private final PaymentProvider paymentProvider = new CreditCardPaymentProvider();

    public PaymentService() {
    }

}
Example with DI:
public class PaymentService {

    private final PaymentProvider paymentProvider;

    public PaymentService(PaymentProvider paymentProvider) {
        this.paymentProvider = paymentProvider;
    }

}
Inversion of Control is the design pattern where some external sources (e.g. Spring container, framework, service) have control of creating and injecting object instances instead of us. Therefore, we can say that the control flow of the program is inverted.
How IoC works in Spring:
@Component
public class PaymentService {

    // ...

}@Configuration
public class PaymentModule {
@Bean
public PaymentService paymentService() {
return new PaymentService();
}
}🎥 This part was done during live coding during workshops 🎥
First of all, we will provide an implementation for shop-service.
In the beginning let's create a project structure. We will follow the domain-like approach, so the package structure will look like the following one:
project
∟ ignythe
  ∟ shopservice
    ∟ api
    ∟ application
    ∟ common
    ∟ domain
In the next step, let's define some domain objects that will be used in our service.
package project.ignythe.shopservice.domain.item;

import java.util.UUID;

public record Item(UUID id, String name, int amount) {
}
We created a domain object for shop item that contains the identifier, name of the item and its available amount in the shop.
Now, we will create a component that will handle our items' data - let's call it ItemService.
package project.ignythe.shopservice.domain.item;

import java.util.List;
import java.util.UUID;

public class ItemService {

    private final List<Item> items;

    public ItemService() {
        this.items = initializeItems();
    }

    public List<Item> list() {
        return items;
    }

    private List<Item> initializeItems() {
        return List.of(
                new Item(UUID.randomUUID(), "Apple", 10),
                new Item(UUID.randomUUID(), "Orange", 20),
                new Item(UUID.randomUUID(), "Pear", 35)
        );
    }
}
What we have done here:
- Created field that hold list of
Itemobjects - Created private method that initializes some stub items (until we provide the repository layer)
- Created public method that lists all available items
To inject our ItemService component as a Spring one, we need to declare it as a bean. One way of achieving this is to create separate class annotated with @Configuration and provide method annotated with @Bean that creates instance of ItemService type.
package project.ignythe.shopservice.domain.item;

import org.springframework.context.annotation.Bean;
import org.springframework.context.annotation.Configuration;

@Configuration
public class ItemModule {

    @Bean
    public ItemService itemService() {
        return new ItemService();
    }

}Last step is to create a controller component that will define all REST API endpoints we want to have exposed
package project.ignythe.shopservice.api;

import org.springframework.http.ResponseEntity;
import org.springframework.web.bind.annotation.GetMapping;
import org.springframework.web.bind.annotation.RequestMapping;
import org.springframework.web.bind.annotation.RestController;
import project.ignythe.shopservice.domain.item.Item;
import project.ignythe.shopservice.domain.item.ItemService;

import java.util.List;

@RestController
@RequestMapping("/items")
public class ItemController {

    private ItemService itemService;

    public ItemController(ItemService itemService) {
        this.itemService = itemService;
    }

    @GetMapping
    public ResponseEntity<List<Item>> list() {
        var items = itemService.list();
        return ResponseEntity.ok(items);
    }

}
What we have done here:
- Created
ItemControllerclass annotated with:-
@Controllerto tell Spring that this is a controller component -
@RequestMapping("/items") to tell Spring that this controller exposes endpoints with path starting with/items(e.g.http://localhost:8080/items/{itemId}`
-
- Created field that stores reference to
ItemServicecomponent - Created constructor that takes
ItemServiceas a parameter (Spring will handle dependency injection here itself due to@Controllerannotation present that makes automatically the controller a Spring bean) - Created method
list()annotated with@GetMappingthat tells Spring that this method should be used if we callGET /itemsendpoint (e.g.GET http://localhost:8080/items) - Make method
list()returnResponseEntity.ok(items)that make our endpoint return HTTP 200 response with list of items in the response body.
We can run our shop-service application in two ways:
- Using IntelliJ IDEA by clicking green arrow available in
ShopServiceApplicationclass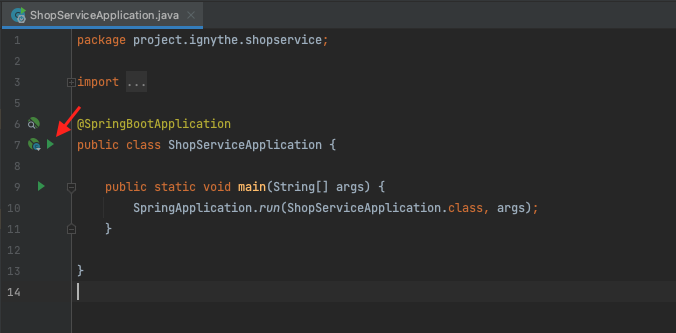
- Using gradle task run from
projectdirectory:gradle :shop-service:bootRun