Workshop #3: Enhancing API layer
Workshop #3 is about enhancing the API layer - not only the REST one but the API contract in general (e.g. between modules communicating with each other). Therefore, you can find topics such as:
- HTTP basics (methods, status codes, etc.)
- REST API conventions
- Swagger definitions
- Java components visibility
- SOLID
This workshop
You can find the source code that represents the status of the project after this workshop - here
Let's recollect what the HTTP is and what is the proper way to use it in terms of building efficient and readable REST APIs :)
HTTP stands for Hyper Text Transfer Protocol. This protocol is used to transfer data (HTML documents, CSS/JS files, JSON data, etc.) over the Internet between clients and servers via HTTP requests and HTTP responses.
We can distinguish 5 mostly used HTTP methods: GET, POST, PUT, DELETE, PATCH (full list available on https://developer.mozilla.org/en-US/docs/Web/HTTP/Methods site).
| HTTP Method | Description | Safe | Idempotent | Has request body | Has response body |
|---|---|---|---|---|---|
| GET | Read a resource | Yes | Yes | Optional | Yes |
| POST | Create a new resource | No | No | Yes | Yes |
| PUT | Update a resource | No | Yes | Yes | Yes |
| DELETE | Delete a resource | No | Yes | Optional | Optional |
| PATCH | Update partially a resource | No | No | Yes | Yes |
HTTP response status codes indicate the result of the processed HTTP request. They are grouped into five classes:
-
1xx: Informational responses -
2xx: Successful responses -
3xx: Redirection responses -
4xx: Client error responses -
5xx: Server error responses
A full list of HTTP status codes can be found at https://developer.mozilla.org/en-US/docs/Web/HTTP/Status site.
Let's take a sample GET request:
https://api.example.com:3000/shop/v1/items?category=fruits
and decompose it into the parts:
-
http://- request protocol (http or https) -
api.example.com- host -
3000- port (forhttpdefault port is80and forhttpsis443) -
/shop/v1/items- request URI -
?category=fruits- query params
Additionally, an HTTP request can contain:
- request body (it can be in plain text, x-www-form-urlencoded, binary, JSON, etc.)
- request headers
Each HTTP response contains:
- response headers
- response body
- HTTP status code
According to Red Hat, REST API (also known as RESTful API) is an application programming interface (API or web API) that conforms to the constraints of REST architectural style and allows for interaction with RESTful web services. REST stands for representational state transfer and was created by computer scientist Roy Fielding.
An API is a set of definitions and protocols for building and integrating application software. It’s sometimes referred to as a contract between an information provider and its consumer.
Let's see what rules we should follow to build an understandable and efficient REST API.
You should NOT use any verbs in the request URI in a designed REST API. This should be done by using the proper HTTP method (see HTTP methods table for more details).
Bad practice:
GET http://api.example.com/shop/v1/list-items
POST http://api.example.com/shop/v1/items/create
Good practice:
GET http://api.example.com/shop/v1/items
POST http://api.example.com/shop/v1/items
The request URI should always describe the resource which you will manage (the HTTP method indicates in which way). It is also important to design proper resource nesting.
Bad practice:
GET http://api.example.com/shop/v1/items/by-id/1
GET http://api.example.com/shop/v1/items/employees
Good practice:
GET http://api.example.com/shop/v1/items/1
GET http://api.example.com/shop/v1/basket/items
You should use kebab-case naming convention while building request URIs to keep good readability.
Bad practice:
GET http://api.example.com/shop/v1/shopEmployees
GET http://api.example.com/shop/v1/shop_employees
Good practice:
GET http://api.example.com/shop/v1/shop-employees
You should always return proper status code that informs about the actual status (e.g. if request has been processed successfully or client provided invalid data in request body). You can find a full list of status codes with detailed descriptions at https://developer.mozilla.org/en-US/docs/Web/HTTP/Status site.
For reading data requests (the GET ones) you can provide filtering support using query parameters instead of e.g. creating a new endpoint.
Bad practice:
GET http://api.example.com/shop/v1/fruit-items
GET http://api.example.com/shop/v1/items/fruit-and-vegetables
GET http://api.example.com/shop/v1/items?type=fruit
GET http://api.example.com/shop/v1/items?type=fruit&type=vegetable
You can also consider providing support for pagination - especially if you expect large amount of items returned in a responses for reading specific data. Pagination parameters consists of two properties:
-
limit: how many entries should be returned in response -
offset: number of entries that should be skipped before selecting records
Example:
GET http://api.example.com/shop/v1/items?limit=100&offset=300
It tells us to retrieve maximum of 100 items but skipping the first 300 ones
You should also consider providing support for API versioning. For example, you want to offer a breaking change in your system that will change system behavior but you have to keep the contract established with your current API. Therefore, you can create version two of the API that will have a new contract with the consumer while the old one stays untouched.
Example:
GET http://api.example.com/shop/v1/items
GET http://api/example.com/shop/v2/items
You should also provide a unified and consistent response structure for any errors returned by your API (e.g. the client errors or the server ones) because lots of consumers of your API can be other systems that not understand like human. Therefore, standardized error responses can be very helpful for consumers to easily provide error handling on their side.
Example:
{
    "type": "http://api.example.com/errors/v1/item-not-found",
    "title": "Item Not Found",
    "detail": "Item with id '12' not found",
    "status": 404
    "instance": "/items/12"
}
More details about designing problem responses can be found in RFC document at https://www.rfc-editor.org/rfc/rfc7807.
Swagger is a suite of tools for API developers from SmartBear Software and a former specification upon which the OpenAPI Specification is based
According to the official site, OpenAPI Specification (OAS) defines a standard, language-agnostic interface to RESTful APIs which allows both humans and computers to discover and understand the capabilities of the service without access to source code, documentation, or through network traffic inspection. When properly defined, a consumer can understand and interact with the remote service with a minimal amount of implementation logic.
An OpenAPI definition can then be used by documentation generation tools to display the API, code generation tools to generate servers and clients in various programming languages, testing tools, and many other use cases
Now let's dig into code and see how we can write readable and easily extensible REST APIs in Spring Boot.
First of all, we should avoid accepting or returning domain objects in our API via controllers. If we did this (e.g. return domain object for GET request), we wouldn't be able to make changes in our domain (e.g. add additional property) without changing the response returned by our API.
Therefore, we can provide additional types used only by the controller that describe the structure of incoming requests and returned responses by our API. From a technical point of view, we can use so-called DTOs (Data Transfer Objects) whose purpose is to hold the data we want to transfer between layers (here: from the presentation layer to an API consumer).
Let's see an example:
public ResponseEntity<BasketResponse> create(@RequestBody BasketCreateRequest createRequest) {
        var createdBasket = basketStorage.createBasket(createRequest);
        return new ResponseEntity<>(basketMapper.toBasketResponse(createdBasket), HttpStatus.CREATED);
    }
public record BasketCreateRequest(String name) {
}public record BasketResponse(Long id,
String name,
List<BasketItemDetails> items) {
public record BasketItemDetails(String name,
String description) {
}
}We can see that our controller defines a POST request for creating a new item. It consumes data whose structure is defined by the BasketCreateRequest and returns a response described by the BasketResponse. Implementing an endpoint in such way, we are able to freely modify our Basket domain object and still keep the same input and output of the POST endpoint.
Our controllers are part of the presentation layer. Therefore, they should not implement any business logic (e.g. connecting to a database, making some computations, etc.) but delegate these actions to a service layer.
Let's see an example:
@RestController
@RequestMapping("/baskets")
public class BasketController {

    private final BasketStorage basketStorage;
    private final BasketMapper basketMapper;
    private final BasketItemMappper basketItemMappper;

    public BasketController(BasketStorage basketStorage, BasketMapper basketMapper, BasketItemMappper basketItemMappper) {
        this.basketStorage = basketStorage;
        this.basketMapper = basketMapper;
        this.basketItemMappper = basketItemMappper;
    }

    @GetMapping("/{id}")
    public ResponseEntity<BasketResponse> get(@PathVariable Long id) {
        var basket = basketStorage.getById(id);
        return ResponseEntity.ok(basketMapper.toBasketResponse(basket));
    }

    @PostMapping
    public ResponseEntity<BasketResponse> create(@RequestBody BasketCreateRequest createRequest) {
        var createdBasket = basketStorage.createBasket(createRequest);
        return new ResponseEntity<>(basketMapper.toBasketResponse(createdBasket), HttpStatus.CREATED);
    }

    @GetMapping("/{id}/items")
    public ResponseEntity<Collection<BasketItemResponse>> listItems(@PathVariable Long id) {
        var items = basketStorage.getById(id).getBasketItems()
                .stream()
                .map(basketItemMappper::toBasketItemResponse)
                .toList();

        return ResponseEntity.ok(items);
    }

    @PostMapping("/{id}/items")
    public ResponseEntity<BasketItemResponse> createItem(@PathVariable(name = "id") Long basketId,
                                                         @RequestBody BasketItemCreateRequest createRequest) {
        var createdItem = basketStorage.createBasketItem(basketId, createRequest);
        return new ResponseEntity<>(basketItemMappper.toBasketItemResponse(createdItem), HttpStatus.CREATED);
    }

}
We can see here that the BasketController exposes endpoints for managing baskets and basket items but all the logic is delegated to a BasketStorage via proper methods. The controller itself is responsible only for handling requests and returning the response to the consumers in a proper format.
We can also implement some validation of the data we expect from an API consumer to prevent accepting data that make no sense (e.g. rejecting negative value for the price of an item). To not reinvent the wheel, we can use the javax-validation library or ready-to-use spring-boot-starter-validation spring-boot starter that consists of the javax-validation.
To do so, let's add a proper dependency in our build.gradle file in the dependencies section (the newest version of the starter can be found here:
implementation 'org.springframework.boot:spring-boot-starter-validation:2.7.5'Now, let's use the library features to provide a proper validation for one of the endpoints:
@RestController
@RequestMapping("/items")
public class ItemController {

    private final ItemService itemService;

    public ItemController(ItemService itemService) {
        this.itemService = itemService;
    }

    @PostMapping
    public ResponseEntity<Item> create(@RequestBody @Valid ItemCreateRequest createRequest) {
        var createdItem = itemService.create(createRequest);
        return new ResponseEntity<>(createdItem, HttpStatus.CREATED);
    }

}
public record ItemCreateRequest(@NotBlank String name,
String description,
@Positive BigDecimal unitPrice,
UnitType unitType) {
}We can see that we used three new annotations here:
-
@Valid- it tells Spring that the object we are consuming as a request body should be validated -
@NotBlank- the validation will fail (proper exception will be thrown) if the provided value is a blank string -
@Positive- the validation will fail (proper exception will be thrown) if the provided value is not a positive number
You can find all annotations available for validation purposes here: https://docs.jboss.org/hibernate/beanvalidation/spec/2.0/api/javax/validation/constraints/package-summary.html
When the API consumer provides such an invalid request body for this endpoint, they will receive an HTTP 400 Bad Request response with a default error response body. We will learn how to customize this error response body in the next chapter Handling errors.
You might have noticed that if you e.g. try to access the non-existing item (via its ID) you get an HTTP 500 Internal Server Error instead of the expected HTTP 404 Not Found one that automatically informs you that an item for a given ID does not exist. Let's see how we can achieve it to return a proper error response in this case.
First, let's see what is the implemented behavior for accessing a non-existent item in an ItemService:
public class ItemService {

    // ...

    public Item getById(Long id) {
        return itemRepository.findById(id)
                .orElseThrow(() -> new ItemNotFoundException(id));
    }

    // ...

}
We can see that the proper exception is thrown. Therefore, we need to provide a mechanism to handle this exception and return proper error response based on it.
We can achieve it by providing a component annotated with @RestControllerAdvice that will consists of handlers for all of the exceptions we expect to be thrown in our app. Due to the fact that handling error responses is strictly related to the presentation layer, let's put our component in api.error package:
@RestControllerAdvice
public class ExceptionControllerAdvice {

    @ExceptionHandler(BasketNotFoundException.class)
    public ResponseEntity<ErrorResponse> handleException(BasketNotFoundException ex) {
        var error = new ErrorResponse("Basket Not Found", ex.getMessage());
        return new ResponseEntity<>(error, HttpStatus.NOT_FOUND);
    }

}
We can see here that our ExceptionControllerAdvice component consists of one method handleException(BasketNotFoundException ex) annotated with @Exceptionhandler. This annotation tells Spring to use this method to handle a given exception if thrown during the handling request and return the proper response body to the API consumer (via returned ResponseEntity object). We can do the same thing for other exceptions as well.
The last action item that will make our REST API more efficient and (most of all) more readable - is proper API documentation. Therefore, we will use Swagger to provide descriptions for the endpoints our application exposes.
First, we need to add dependency via build.gradle in order to use Swagger:
implementation 'org.springdoc:springdoc-openapi-ui:1.6.13'The library works out-of-the-box - therefore, if we run our application now, we will be able to access two endpoints:
-
http://localhost:8080/v3/api-docsthat returns information about the API the application exposes in JSON format (more about OpenAPI Specification you can find here -
http://localhost:8080/swagger-ui/index.htmlthat provides API documentation in friendly UI format
As might have noticed, the generated API docs does not contain much information about the endpoints just the default ones. Let's see how we can customize them.
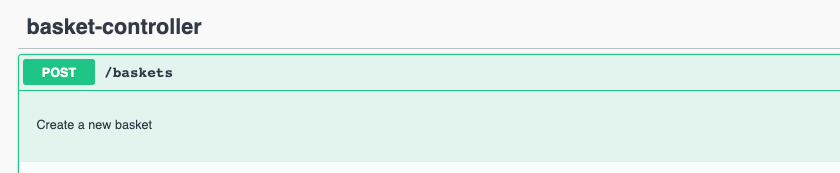
This annotation can be used to provide additional information (like description) for a given endpoint. It is used on the endpoint method.
Example:
@Operation(description = "Create a new basket")
@PostMapping
public ResponseEntity<BasketResponse> create(@RequestBody BasketCreateRequest createRequest) {
    var createdBasket = basketStorage.createBasket(createRequest);
    return new ResponseEntity<>(basketMapper.toBasketResponse(createdBasket), HttpStatus.CREATED);
}
Result in Swagger UI:
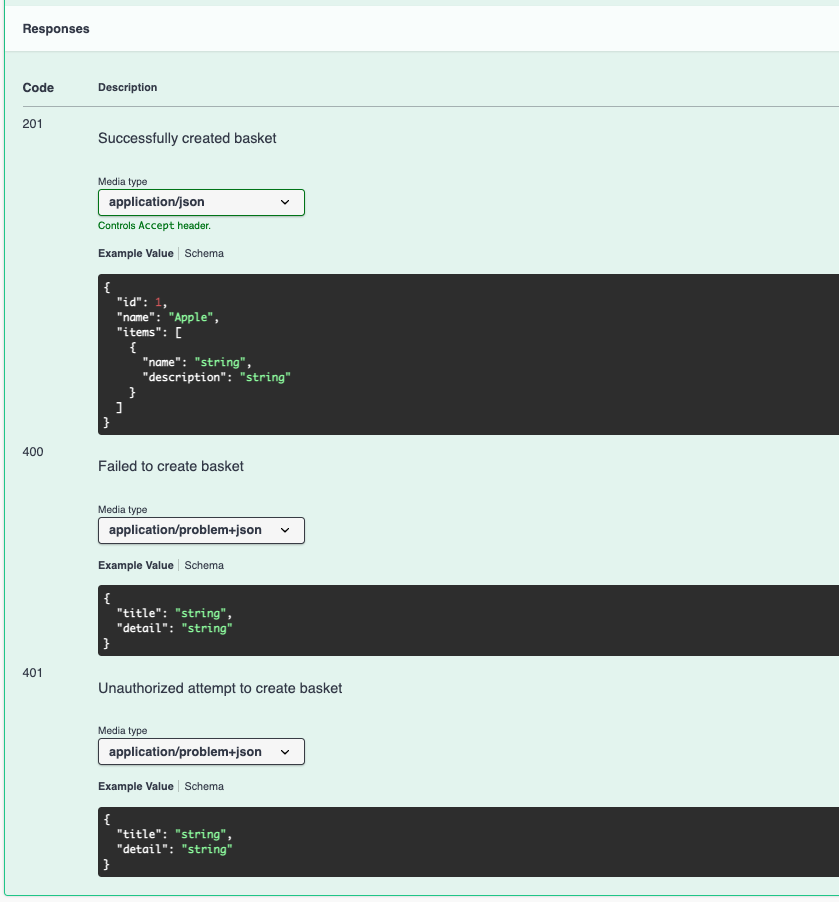
This annotation (along with @ApiResponse one) can be used to provide additional information about the responses that can be returned from a given endpoint. It is used on the endpoint method.
Example:
@ApiResponses({
            @ApiResponse(description = "Successfully created basket",
                    responseCode = "201",
                    content = @Content(mediaType = MediaType.APPLICATION_JSON_VALUE, schema = @Schema(implementation = BasketResponse.class))
            ),
            @ApiResponse(description = "Failed to create basket",
                    responseCode = "400",
                    content = @Content(mediaType = MediaType.APPLICATION_PROBLEM_JSON_VALUE, schema = @Schema(implementation = ErrorResponse.class))
            ),
            @ApiResponse(description = "Unauthorized attempt to create basket",
                    responseCode = "401",
                    content = @Content(mediaType = MediaType.APPLICATION_PROBLEM_JSON_VALUE, schema = @Schema(implementation = ErrorResponse.class))
            ),
    })
    @PostMapping
    public ResponseEntity<BasketResponse> create(@RequestBody BasketCreateRequest createRequest) {
        var createdBasket = basketStorage.createBasket(createRequest);
        return new ResponseEntity<>(basketMapper.toBasketResponse(createdBasket), HttpStatus.CREATED);
    }
Result in Swagger UI:
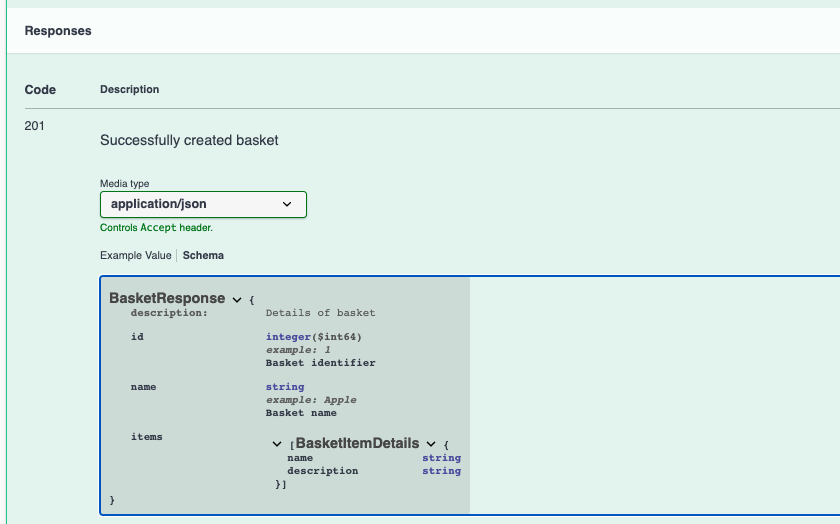
This annotation is used to provide additional information for objects/fields in response/request body of the exposed endpoints. It is used either on a DTO class related to the API object or class field.
Example:
@Schema(description = "Details of basket")
public record BasketResponse(@Schema(description = "Basket identifier", example = "1") Long id,
                             @Schema(description = "Basket name", example = "Apple") String name,
                             List<BasketItemDetails> items) {

    public record BasketItemDetails(String name,
                                    String description) {
    }

}
Result in Swagger UI:
Apart from the REST API layer, we should also take care of rest of the project components to make the whole system scalable and maintainable. Therefore, one of the ways is to properly group code/components by their functionality into so-called domains.
To create maintainable application code, we can follow the convention to group components' code by the domain they are related to. Such a grouping makes the code more readable and still maintainable in terms of structure, especially when our application grows and contains hundreds of classes.
Let's see an simple example how we can structure code of our shop-service:
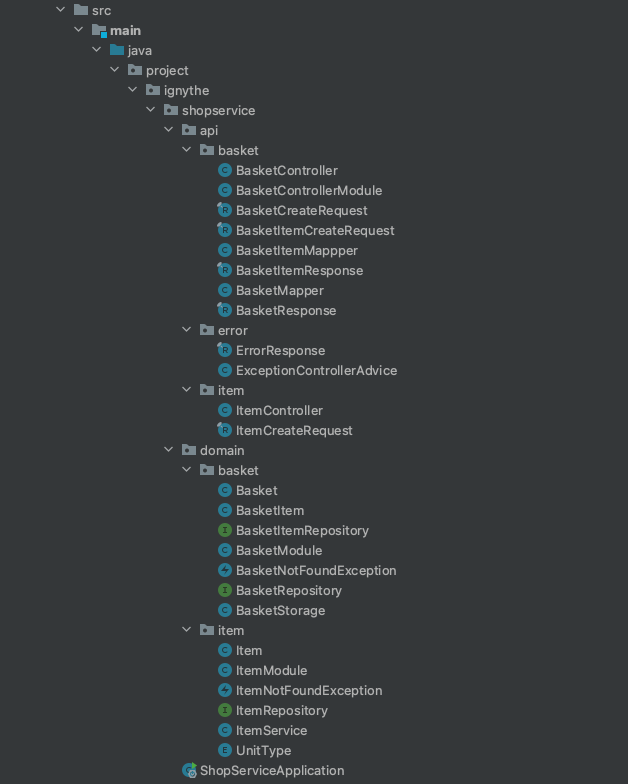
Here we can see two top-level groups:
-
apipackage that represents the presentation layer -
domainpackage that represents the domain layer (including service and persistence layer)
Then the domain layer itself is grouped by the features:
-
itemthat consists of all components related to managing items in the app -
basketthat consists of all components related to managing baskets in the app (including basket items)
We should always try to create components that are responsible for doing one thing - it makes the application structure more readable and a lot easier to test. As a result, we have reusable parts that we can use to create application flows (e.g. create an item, read list of items in a basket, etc.).
Here is an example of a BasketController. This is a controller, so it is a part of a presentation layer. Therefore, it should be responsible only for handling requests from a user and providing a response in a proper format. It should not contain any code that is strictly related to business logic (e.g. creating a new entry in a database).
@RestController
@RequestMapping("/baskets")
public class BasketController {

    private final BasketStorage basketStorage;
    private final BasketMapper basketMapper;
    private final BasketItemMappper basketItemMappper;

    public BasketController(BasketStorage basketStorage, BasketMapper basketMapper, BasketItemMappper basketItemMappper) {
        this.basketStorage = basketStorage;
        this.basketMapper = basketMapper;
        this.basketItemMappper = basketItemMappper;
    }

    @Operation(description = "Create a new basket")
    @ApiResponses({
            @ApiResponse(description = "Successfully created basket",
                    responseCode = "201",
                    content = @Content(mediaType = MediaType.APPLICATION_JSON_VALUE, schema = @Schema(implementation = BasketResponse.class))
            ),
            @ApiResponse(description = "Failed to create basket",
                    responseCode = "400",
                    content = @Content(mediaType = MediaType.APPLICATION_PROBLEM_JSON_VALUE, schema = @Schema(implementation = ErrorResponse.class))
            ),
            @ApiResponse(description = "Unauthorized attempt to create basket",
                    responseCode = "401",
                    content = @Content(mediaType = MediaType.APPLICATION_PROBLEM_JSON_VALUE, schema = @Schema(implementation = ErrorResponse.class))
            ),
    })
    @PostMapping
    public ResponseEntity<BasketResponse> create(@RequestBody BasketCreateRequest createRequest) {
        var createdBasket = basketStorage.createBasket(createRequest);
        return new ResponseEntity<>(basketMapper.toBasketResponse(createdBasket), HttpStatus.CREATED);
    }

     // other endpoints implementation in an analogical way

}
We can see that this implementation of the controller is responsible for:
- providing API documentation via Swagger annotation
- exposing an endpoint for creating a new basket
- delegating handling creating a new basket to a
BasketStorage - mapping response returned from
BasketStorageto a proper format defined in API docs viaBasketMapper - returning the response with the proper HTTP status code
These all aspects are related to the responsibilities of the presentation layer.