Repository navigation
LuaUI BitmapSlicer
A small Windows tool that turns an interface bitmap into the numbers a window script needs. It ships with LuaUI Ext.
Window scripts point at artwork by rectangle - { 653, 0, 325, 73 } means "start
653 across and 0 down, take 325 by 73". Reading those four numbers off in an image
editor, for every button and every frame piece, is slow and easy to get wrong by a
pixel. The slicer finds the pieces for you and hands you a finished Lua table.
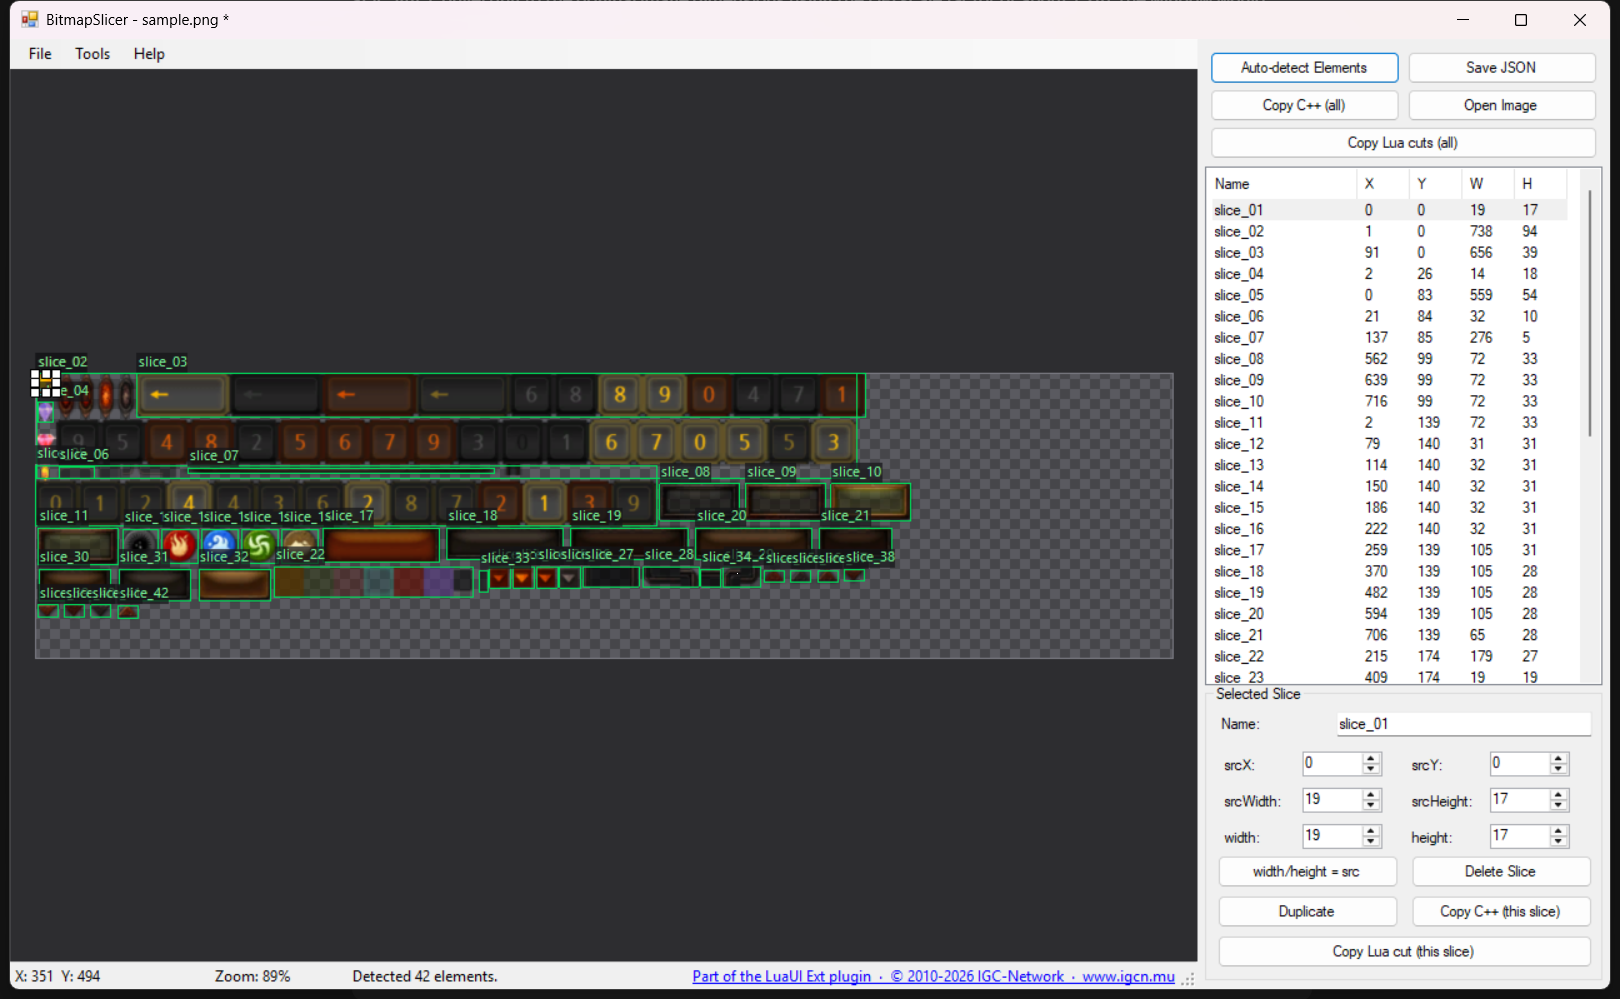
Above: an atlas straight after Auto-detect Elements. Green boxes are the pieces it found - 42 here - the list on the right holds their coordinates, and the buttons copy them out as Lua. The names are still the ones the tool generated; naming them is the next step, and the one that decides how your script reads.
- Open your image - File > Open Image, or drag the file onto the window. PNG and JPG both work.
- Tools > Auto-detect Elements. Every piece separated from its neighbours by background becomes its own slice.
- Look at the preview before you commit. Green shows what the tool treats as artwork, yellow boxes show the pieces it is about to cut. Both update live as you change any setting.
-
Name the pieces - click one, type in the Name field (or press F2). The names
become the keys in your table, so
btnHoverbeatsslice7. - Copy Lua cuts (all) and paste into your window script.
What lands on the clipboard:
-- Cuts from CommandWindowFrame.png, in bitmap pixels: { sx, sy, sw, sh }
local SR = {
	header   = { 653,   0, 325,  73 },
	frameMid = { 327,  60, 323,   8 },
	btnHover = { 780,  76, 123,  33 },
}
Which you then use by name, instead of scattering raw numbers through the script:
btn:setImage(ui.STATE.HOVER, R.slot.frame, unpack(SR.btnHover))Detection works by deciding, for every pixel, whether it is artwork or background, and then boxing whatever stays connected. The dialog is where you tell it how to make that decision.
You are not guessing: green marks the pixels being counted as artwork, yellow marks the slices that will be created, and both redraw as you change a number. Get the overlay right, then press Detect.
| Option | Values | Default | What it does |
|---|---|---|---|
| Alpha mode | on / off | on, when the image has transparency | Background is the transparent area. Greyed out for an image that has no transparency at all - there would be nothing to go on. |
| Alpha threshold | 1-255 | worked out from the image | How opaque a pixel must be to count as artwork. Raise it to drop the faint halo around sprites, which is what glues touching neighbours into one box; lower it to keep soft or semi-transparent artwork that is being missed. |
| Color mode | on / off | on, for JPG and BMP | Background is one colour instead of transparency. |
| Background | a colour | sampled from the image corners | Which colour that is. Set it with Choose..., or Alt+click any background pixel in the image. |
| Color tolerance | 0-255 | 24 | How far a pixel may differ from that colour and still count as background. Raise it for gradients and JPG artefacts; too high and it starts eating the artwork. |
| Min. element width | 1-4096 | 3 | Boxes narrower than this are discarded. Raise it to drop specks and noise, lower it to catch 1-2 px details. |
| Min. element height | 1-4096 | 3 | The same for height. A thin divider line needs a low value here. |
| Merge fragments within (px) | 0-256 | 0 (off) | Joins pieces of one sprite that are separated by a gap this small - a button and its detached shadow, say. Keep it low: a large value welds neighbouring sprites into a single box. |
In colour mode a transparent pixel is never treated as artwork, so a PNG with both transparency and a coloured backdrop is usually cleaner in alpha mode.
Artwork is rarely laid out perfectly, so expect to correct a few pieces. Every fix is one right-click away.
| What you see | What to do |
|---|---|
| two pieces caught in one box, because they touch | right-click > Split horizontally / vertically here - it cuts at the cursor |
| a grid of cells caught as one box | right-click > Split into grid... |
| one piece detected as several fragments | raise Merge fragments within N px a little; keep it small or neighbours fuse together |
| small icons missed entirely | lower Min. element size |
| specks and noise picked up as slices | raise Min. element size |
| the box has slack around the artwork | right-click > Fit to content |
| a faint border got cut off | right-click > Grow to content |
| a soft edge is included and you want only the solid part | right-click > Trim to opaque |
| something was not found at all | drag a box over it by hand |
Fit, Grow and Trim are also available for every slice at once, under Tools.
Two things the tool cannot work out on its own: pieces drawn inside other pieces - a bar inside a frame - and pieces that overlap. Draw those by hand.
The tool has to know what counts as background.
- PNG with transparency - the transparent area is the background, and the threshold is picked for you. If faint artwork is being missed, or separate sprites are being glued together, nudge the threshold and watch the green.
- JPG or a photo-like image - background is a colour, sampled from the corners. If those corners are not representative, pick the right colour with the Choose... button, or hold Alt and click any background pixel to sample it. Color tolerance decides how close a pixel has to be to count as background.
Names become Lua table keys, so a few characters are not allowed there. The tool
handles it rather than refusing: anything unusual becomes an underscore, a name
starting with a digit gets one in front, and a name that happens to be a Lua
keyword is written as ["end"]. Two pieces with the same name would quietly
overwrite each other in the table, so the second one gets a _2 suffix.
You will still get a cleaner script by naming things yourself, in the style you write code in.
Each slice also carries a width/height - how large it should be drawn. Lua UI
does not take that from the table: a control is drawn at the size you gave the
control. So the Lua export writes the four source numbers only, and where you set a
render size that differs, the line carries a -- drawn 120x30 note as a reminder.
The width/height = src button resets them to the size of the cut.
Save JSON stores the whole set - image, names, every rectangle. Reopen it later
from File > Load JSON, or by dragging the .json onto the window, and carry on. It
is worth saving whenever you have an atlas you will re-cut after an artwork update.
Individual pieces can also be exported as PNG files, from File > Export Slices to PNG.
| Key or mouse | Does |
|---|---|
| mouse wheel | zoom |
| middle button, or right-drag | pan |
F |
fit the image to the window |
1 |
zoom to 100% |
F2, or double-click in the list |
rename the selected slice |
Ctrl+Z |
undo - up to 100 steps, including auto-detect |
| drag on empty space | draw a new slice |
| drag a slice, or its handles | move or resize it |
Help > How to use and Help > Shortcuts repeat this inside the tool.
- Designing a window - where these numbers go, and how a frame is cut into three pieces
-
Controls -
setImageon buttons and images