Repository navigation
How To Use
This page covers the main workflows inside File Converter Pro.
- Drag and drop files directly onto the main window
- Use Ctrl+O to open a file picker
- Use Ctrl+P to add an entire folder
- Drag files directly onto
File Converter Pro.exeto pre-load them on launch
- Add your files
- Select the target format
- Press Ctrl+Shift+C or click the Convert button
- The output file is saved in the same folder as the source by default
Failed or cancelled PDF/Word conversions and PDF/DOCX merges preserve the existing destination file. Merge outputs are staged and validated before replacement; an existing merge from the same timestamp is never overwritten.
File Converter Pro can convert images into searchable PDFs: a normal PDF with a hidden text layer added by optical character recognition, so you can select, copy and search the text inside. This works through the bundled scanlayer library, which uses Tesseract (auto-detected at runtime, see External Tools).
To use it:
- Add one or more images (
.png,.jpg,.jpeg,.bmp,.tiff,.webp,.heic, …) - Tick "Use OCR for images in PDFs" on the conversion panel
- Click Images → PDF; the output is a searchable PDF
OCR runs per image. If an image can't be recognized (no text found, or OCR fails), it is embedded as a plain image page instead of producing an empty text layer, so the conversion still succeeds.
OCR applies to all three image→PDF modes: a single image → PDF, multiple images merged into one PDF, and separate PDF per image (when "Create separate PDF per image" is enabled). Orientation of the source can be handled automatically or forced (see below). Watch folders and scheduled tasks can use the same engine by adding ocr = true (see Automation).
OCR needs Tesseract to be present. If it is not detected, scanlayer reports the missing dependency so you know what to install (see External Tools).
OCR currently applies to images → PDF only; there is no PDF → Word OCR stage. Text-only PDF → Word reports scanned/image-only PDFs instead of producing an empty document.
- Add supported files (what can be converted to each target is listed in Supported Formats → Batch conversion)
- Click Batch Convert
- Choose the target format: PDF, DOCX, or PNG
- Pick the destination folder
- Watch the progress bar; a summary reports how many files were converted
Batch is not a universal 3×3 conversion matrix: PDF and DOCX identity copies are supported, images can target all three formats (except PSD/DNG/RAW), and document-to-DOCX support is limited to TXT, RTF, and ODT.
The file list shows entries as numbered items (1. name_of_file), so you can verify the order before converting.
- Ctrl+N – New project
- Ctrl+Shift+O – Open a project
- Ctrl+S – Save the current project
Projects save your file list, target format, and any notes you added. Double-clicking a .fcproj file reopens the session instantly (requires file association, enabled during install).
Each project you open or create shows as a tab in the top bar, right next to the "File Converter Pro" title. Up to 5 projects can be open at once:
- Click a tab to switch to that project; clicking the tab of the project you are already on opens the project info dialog
- Right-click a tab for a menu with Project Information and Close tab
- Double-click a tab to rename it or edit its notes
- Click the ✕ on a tab to close it; closing the last tab returns to a blank session
- Reopening a project that is already open switches to its existing tab instead of creating a duplicate, and you are told the project is already open
Each tab keeps its own file list, target format, and notes, so you can switch between projects without losing your place.
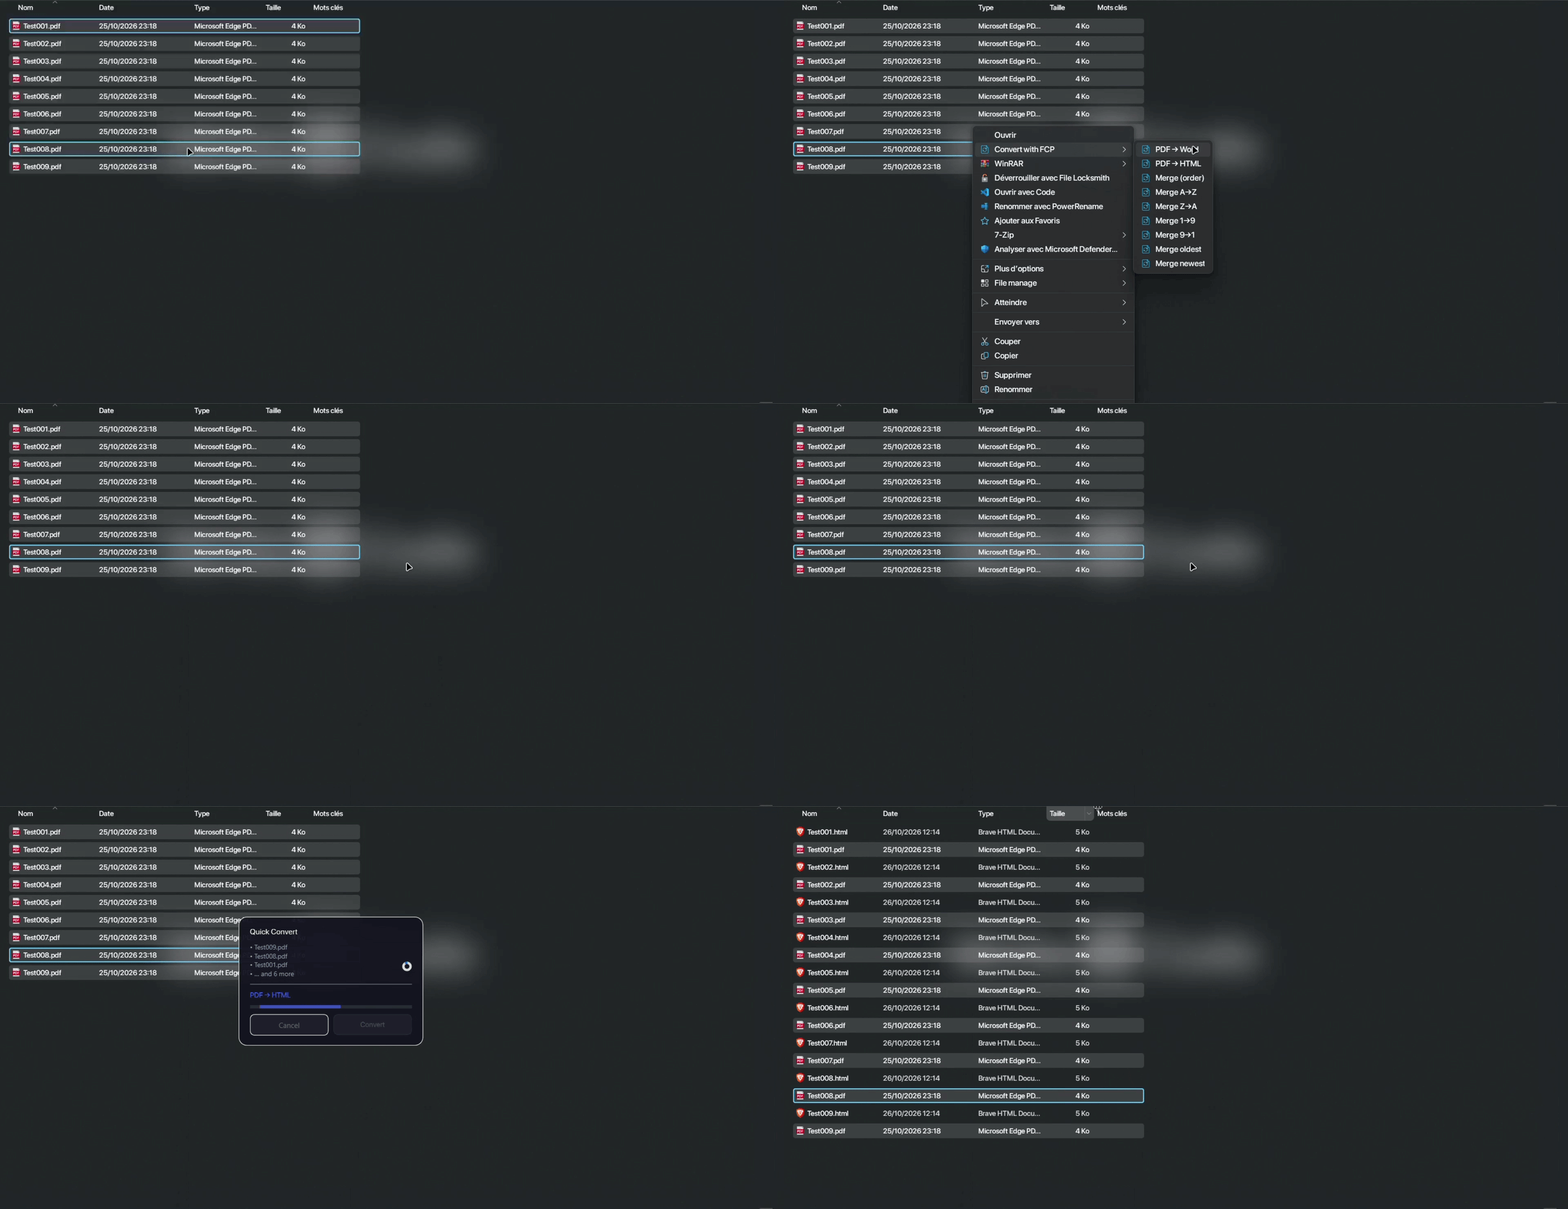
Right-click any supported file in File Explorer -> Convert with FCP -> choose the target format. A Quick Convert window opens, runs the conversion, and closes automatically.
| Shortcut | Action |
|---|---|
| Ctrl+N | New project |
| Ctrl+Shift+O | Open a project |
| Ctrl+S | Save the project |
| Shortcut | Action |
|---|---|
| Ctrl+O | Add files |
| Ctrl+P | Add a folder |
| Ctrl+A | Select all |
| Ctrl+Delete | Clear the list |
| Shortcut | Action |
|---|---|
| Ctrl+Shift+C | Start conversion |
| Shortcut | Action |
|---|---|
| Ctrl+H | History |
| Ctrl+, | Settings |
| F2 | Toggle theme |
| F3 | Change language |
| Esc | Close secondary windows |
| Shortcut | Action |
|---|---|
| Ctrl+Q | Quit |
| F1 | Keyboard shortcuts help |
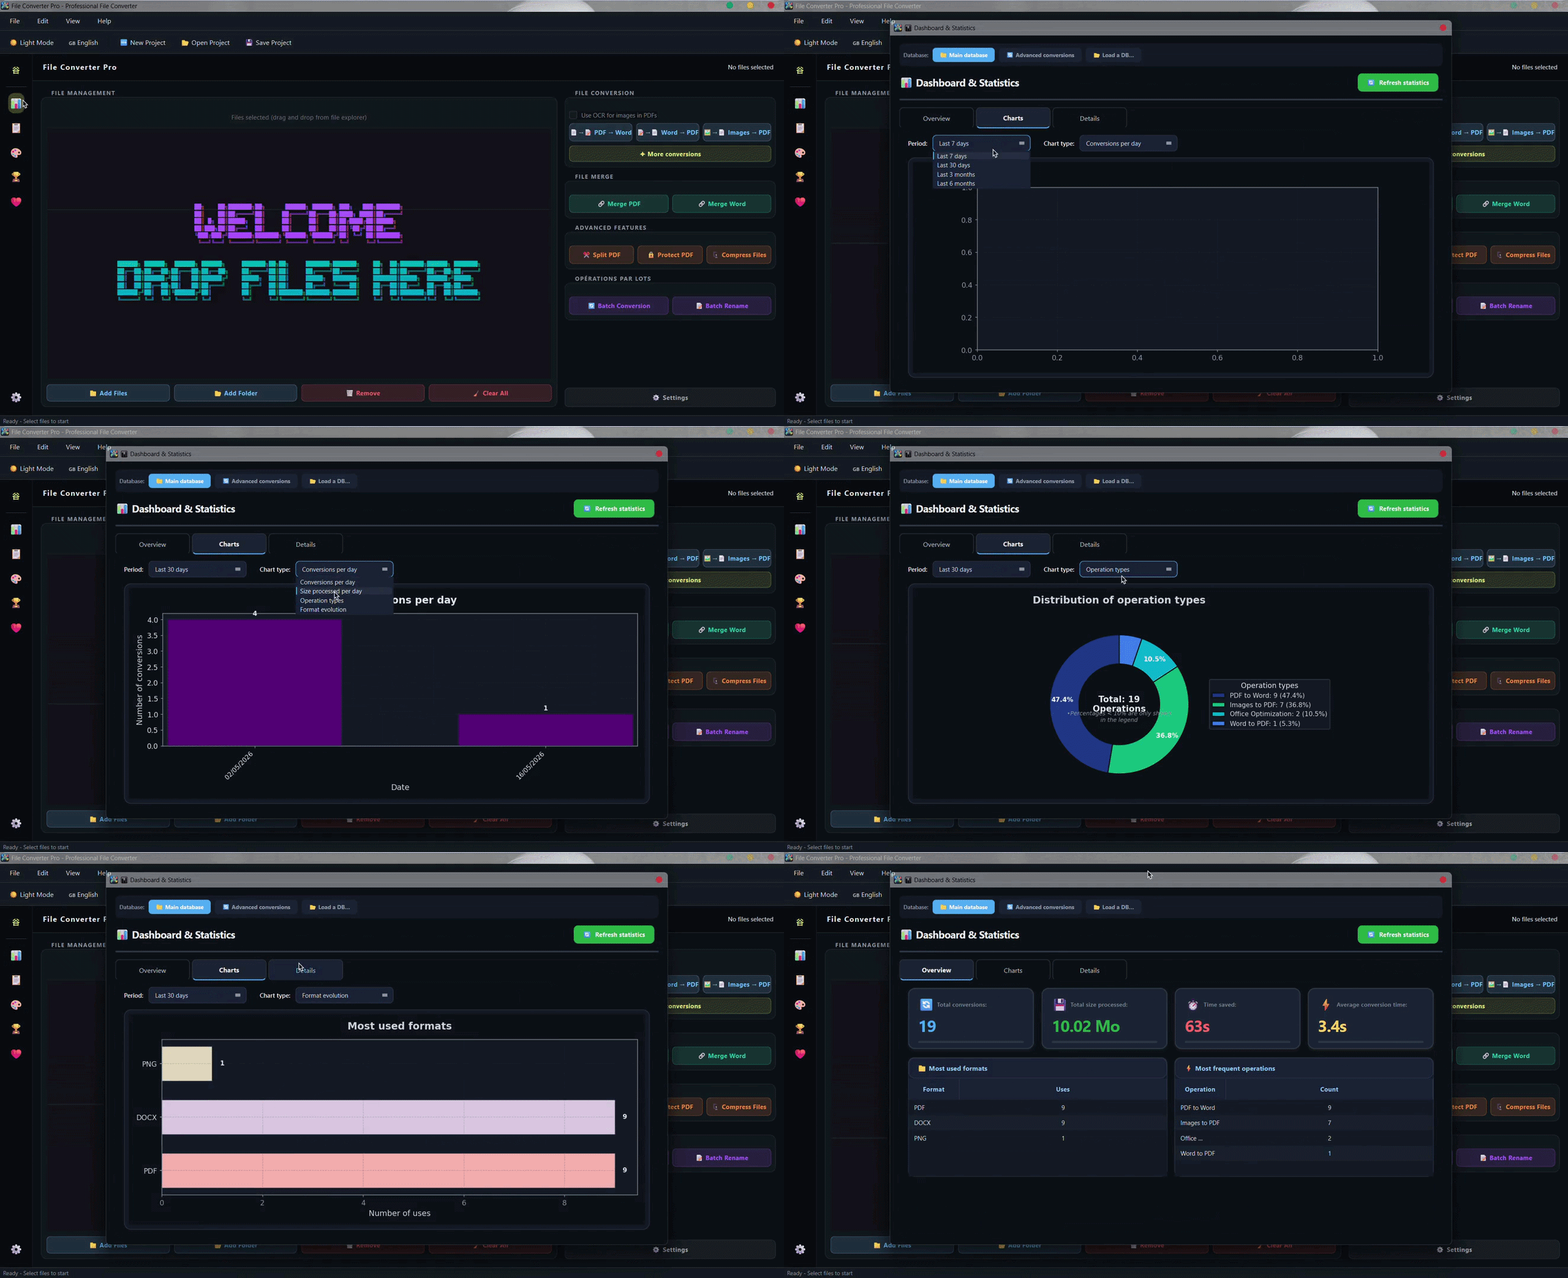
A full Matplotlib-powered analytics panel showing your conversion history at a glance:
- Animated bar chart – conversions per day
- Animated filled line chart – processed data volume per day
- Animated donut chart – operation type breakdown
- Animated horizontal bar chart – format evolution over time
- Filterable history table with CSV and JSON export
The separate History window also offers Print to PDF and Export JSON.
A complete gamification system backed by SQLite:
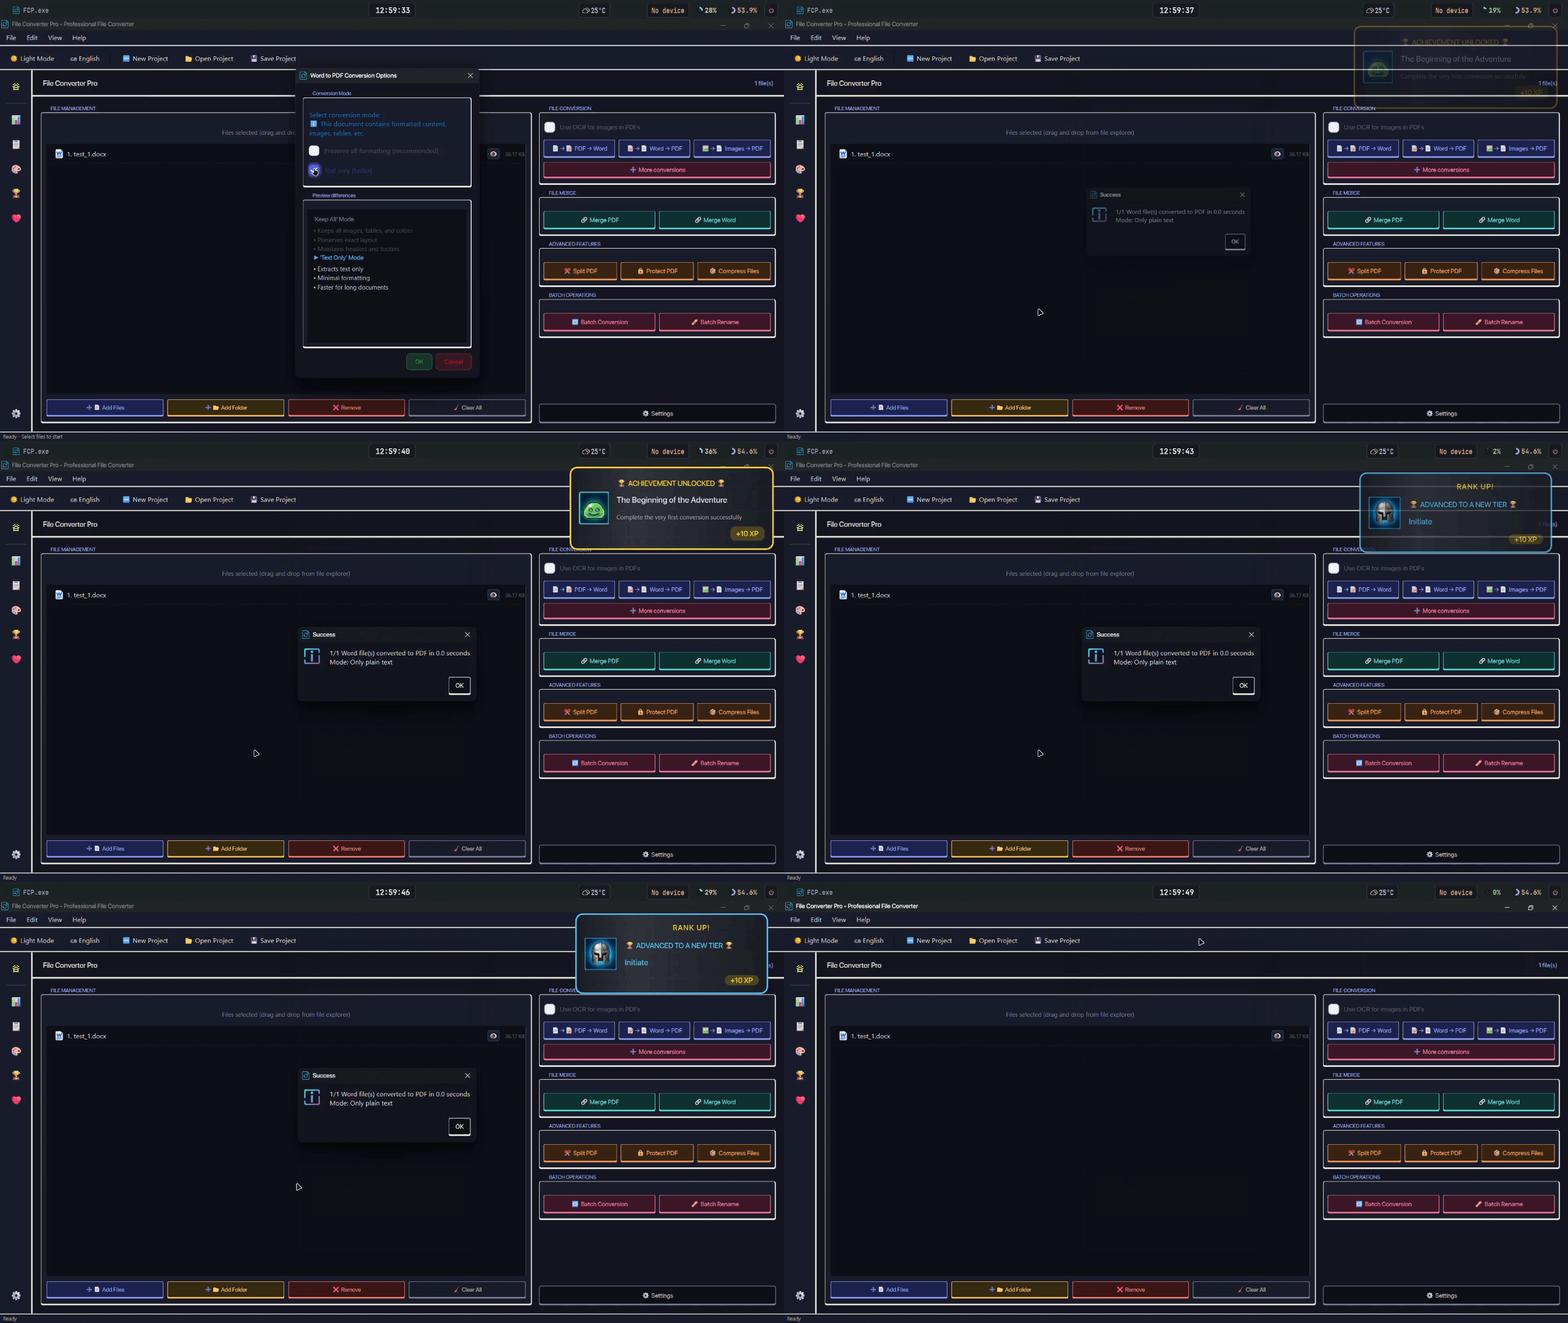
- Achievements unlock based on conversion counts, format diversity, streaks, and special events
- Animated pop-ups appear in real time when an achievement is earned
- Rank-up celebration dialogs at milestone ranks
- Full achievements panel to browse locked and unlocked states
Access settings via Ctrl+, or the toolbar.
Interface
- Automatically open last project on startup
- Enable system notifications
- Enable achievements and trophies
- Show file previews
- Show dashboard on startup
- Create separate PDF per image (instead of merging)
- Use system theme
- Save frequent configurations automatically (creates
[Auto]templates after repeated successful operations) - Clean temporary files automatically (on app close and at batch start)
- Create backup before conversion (
.bakcopy viashutil.copy2)
Themes
File Converter Pro ships with Dark and Light themes. The active theme follows your Windows setting by default; toggle it with F2 or change it in Settings → Themes. Custom themes, including Advanced Conversions styling, are covered in Themes.
Conversion
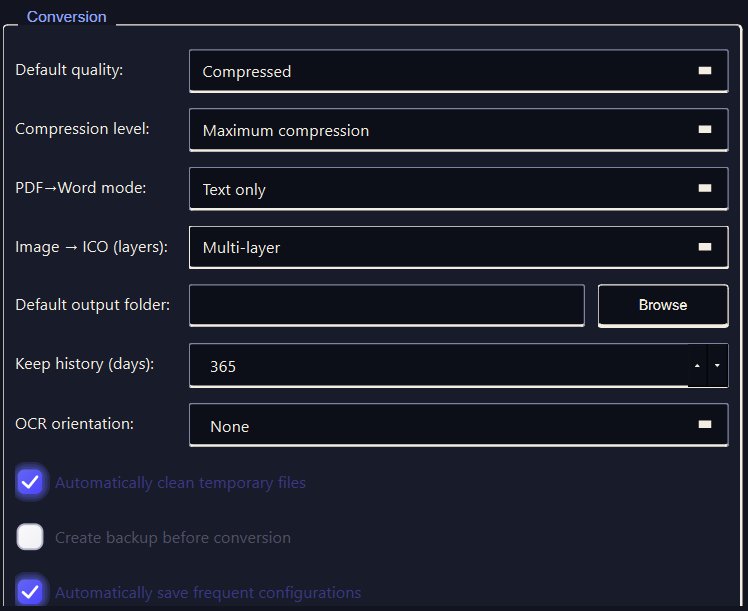
- Default quality: Standard quality / High quality / Low quality
-
Image → ICO layer size: when converting an image to a
.icofile, choose the icon layer size: Multi (recommended, embeds several sizes so Windows picks the sharpest one) or a single fixed size (256x256, 128x128, 64x64, 48x48, 32x32, 16x16) - Use OCR for images in PDFs: per-conversion checkbox on the Images → PDF panel (off by default); see OCR
- OCR orientation: None, Automatic (recommended), or Custom to enter an angle in degrees
The Automation tab shows the current state of your watch folders and scheduled tasks. Configuration is done via TOML files in the automation/ folder (click Open automation/ folder to open it directly). This folder is empty by default, you need to create your own TOML file(s).
You can either create one TOML file per watch folder/task, or put all your configurations in a single file. An example covering both watch folders and scheduled tasks is available here: example_automation.toml.
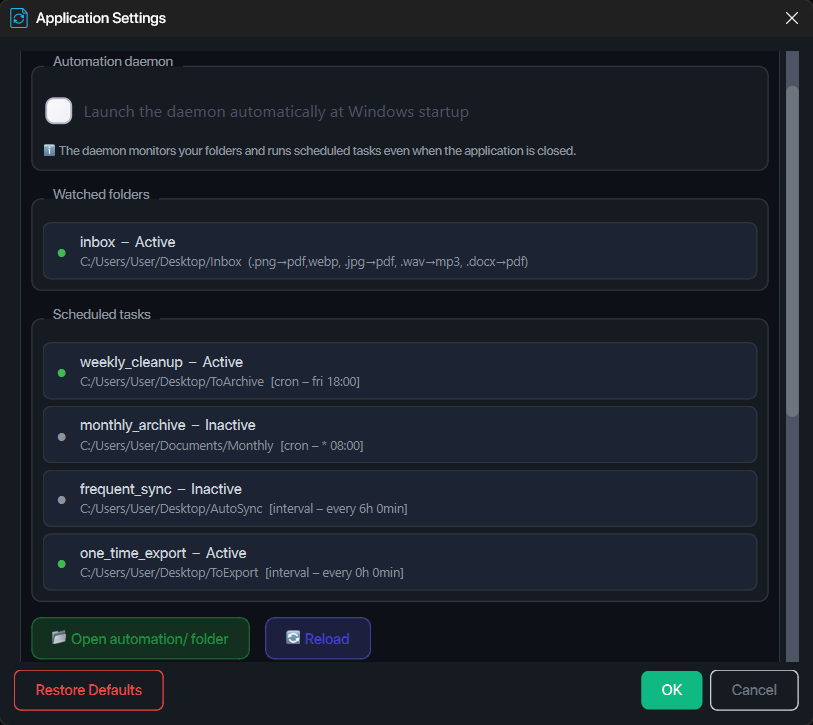
Automation daemon
The daemon is a background process that monitors your folders and runs scheduled tasks even when the main application is closed. Enable Launch the daemon automatically at Windows startup to have it run silently in the background at all times.
After creating or editing a TOML file, click Reload to apply changes without restarting.
Watch Folders
A watch folder monitors a directory and converts files automatically as soon as they appear.
[watch_folders.inbox]
path             = "C:/Users/User/Desktop/Inbox"
output_dir       = "C:/Users/User/Desktop/Converted"
enabled          = true    # set to false to disable without deleting the config
recursive        = false   # set to true to also watch sub-folders
convert_existing = false   # convert files already present on startup
ocr              = false   # set to true to OCR image -> PDF rules into searchable PDFs

  [watch_folders.inbox.rules]
  png  = ["pdf", "webp"]  # multiple output formats
  jpg  = "pdf"
  wav  = "mp3"
  docx = "pdf"
Each entry under [watch_folders] is a named folder you define. The rules section maps input formats to one or more output formats.
Add ocr = true to a watch folder or scheduled task to make its image -> PDF rules produce searchable PDFs, using the same orientation as the OCR setting. The plain-image fallback and merged-PDF behavior are described there.
Scheduled Tasks
A scheduled task converts files in a folder at a defined time or interval. Three trigger types are available:
cron – runs on a recurring schedule (daily, weekly, monthly):
[scheduled_tasks.weekly_cleanup.trigger]
type        = "cron"
day_of_week = "fri"   # mon, tue, wed, thu, fri, sat, sun, or * for every day
hour        = 18
minute      = 0

# Monthly: use day = 1 for the 1st of every month
[scheduled_tasks.monthly_archive.trigger]
type   = "cron"
day    = 1
hour   = 8
minute = 0
interval – runs every N hours or minutes:
[scheduled_tasks.frequent_sync.trigger]
type  = "interval"
hours = 6       # or: minutes = 30
date – runs once at a specific date and time. After a successful run, the task's enabled flag is set to false in its TOML file so it is not re-queued on startup; it is not deleted:
[scheduled_tasks.one_time_export.trigger]
type   = "date"
run_at = "2026-06-03T23:45:00"   # ISO 8601 format
If a one-time task fails, it stays enabled so it can retry on the next scheduler run.
Each scheduled task also needs a path, output directory, and rules, same as watch folders:
[scheduled_tasks.weekly_cleanup]
path       = "C:/Users/User/Desktop/ToArchive"
output_dir = "C:/Users/User/Desktop/Archives"
enabled    = true
recursive  = true

  [scheduled_tasks.weekly_cleanup.rules]
  png  = "webp"
  jpg  = "pdf"
docx = "pdf"The Privacy tab lets you read the Terms of Use and Privacy Policy at any time. If you decline the Privacy Policy, the application becomes unusable until you accept it again.
The Language tab lists all available translations. To switch, select a language and click OK.
Want to add your own language? See Internationalization.
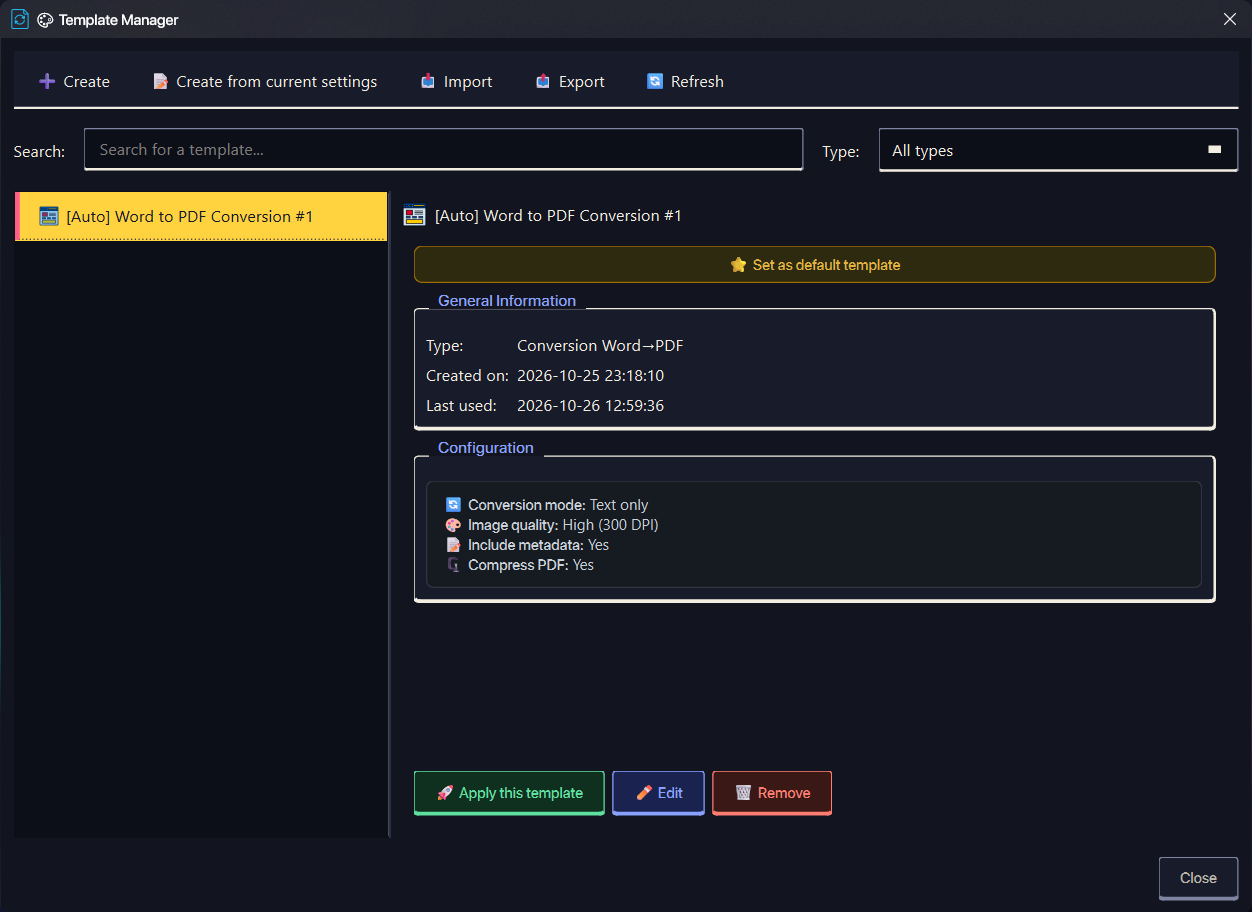
The Template Manager lets you save reusable conversion configurations and apply them whenever you need them.
- Create a new template from scratch, or Create from current settings to save your current conversion options as a template
-
Frequent configurations: configurations you reuse often are promoted to
[Auto]templates automatically (disable this in Settings) - Each template stores its type (e.g. PDF to Word Conversion), creation date, last used date, and its specific configuration (e.g. conversion mode)
- Set as default template to apply it silently for supported operation types (PDF → Word, Word → PDF, Images → PDF, compression, and file optimization)
- Apply this template to use it on your current selection
- Edit or Remove existing templates
- Export all templates creates an importable JSON backup; Export this template shares one configuration; Import loads the backup format
- Use Search and the Type filter to quickly find a template
- Refresh reloads the template list
Some conversions rely on third-party command-line tools; see Optional Tools for what each one unlocks and where to get it.
When a conversion needs one of these tools, the app looks for it automatically in this order:
- System PATH (a tool installed normally, e.g. via winget, is found first)
- App-local folders (see below)
-
Common system install locations (e.g.
C:\Program Files\...) - The config file (see below)
The app does not bundle FFmpeg or 7-Zip. Installing FFmpeg system-wide and leaving it on PATH is enough for normal use. If you prefer an app-local copy, or want to ship a portable folder with the tools, place the executables in one of these locations and the app will detect them automatically:
| Tool | Install to (pick one) |
|---|---|
| ffmpeg |
<exe folder>\ffmpeg\ffmpeg.exe or <exe folder>\_internal\ffmpeg.exe
|
| ffprobe |
<exe folder>\ffmpeg\ffprobe.exe or <exe folder>\_internal\ffprobe.exe
|
| 7-Zip |
<exe folder>\7zip\7z.exe or %LOCALAPPDATA%\.file_converter_app\7zip\7z.exe
|
<exe folder> is the folder containing FCP.exe after a one-folder build. The _internal folder and the per-user %LOCALAPPDATA%\.file_converter_app folder work the same way.
To override automatic detection for one or more tools, edit the config file. The app checks these locations in order:
- Installed app:
<exe folder>\config\external_binaries.conf - Bundled app:
<exe folder>\_internal\config\external_binaries.conf - Source run:
src\config\external_binaries.conf - Working-directory fallback:
config\external_binaries.conf
The first existing file wins. Setting FCP_EXTERNAL_BINARIES_CONF makes that path the only config file considered.
Fill in the full path to the executable, one per line:
[binaries]
ffmpeg = C:\ffmpeg\bin\ffmpeg.exe
ffprobe = C:\ffmpeg\bin\ffprobe.exe
ghostscript = D:\Tools\gs\bin\gswin64c.exe
tesseract = C:\Program Files\Tesseract-OCR\tesseract.exe
The config also recognizes 7z, imagemagick, libreoffice, wkhtmltopdf, and pandoc.
Accepted value syntax:
- Absolute paths:
C:\tools\ffmpeg.exe - Environment variables:
%LOCALAPPDATA%\ffmpeg\ffmpeg.exe - Home shortcut:
~\ffmpeg\ffmpeg.exe - Relative paths (resolved against the folder that contains the
config/folder):fake_dir\gs.exe
Leave a value empty to keep automatic detection for that tool. WeasyPrint GTK/Pango DLL directories can be configured in the optional [directories] section as weasyprint_dll = C:\GTK\bin; D:\msys64\ucrt64\bin; the WEASYPRINT_DLL_DIRECTORIES environment variable is checked first.