Use instructions
Need help until it is ready? Come ask your question on the Gitter channel
See the sections below for information on each section.
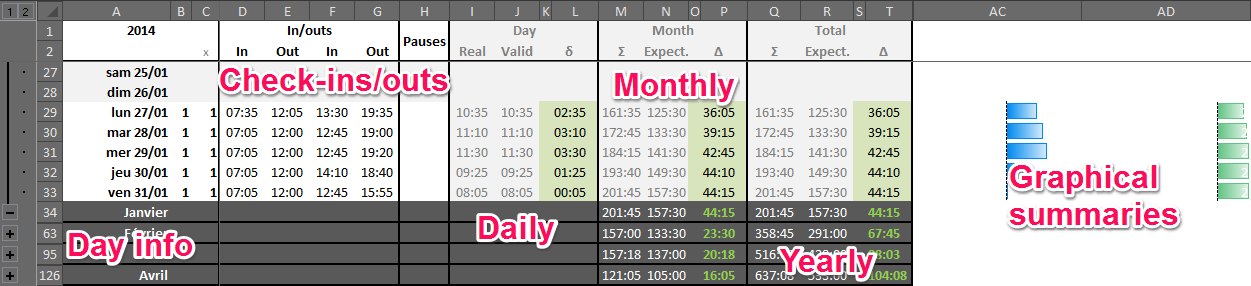
This is pretty straightforward. You should not need to change this.
If a number is supplied on column B, the tracker will apply the corresponding rule set to the current line (provided the rule set is defined in configuration tab).
If any other value is set, the timesheet will consider this line as a non-worked day.
By default, the monthly summary takes all rule sets into account. If you want to focus on only one rule set, you just need to set the corresponding number in column B on the corresponding summary.


If you specify a rule set number in B2 and have not modified the monthly summary lines, this rule set number will be applied to all summaries, thus providing you with a view for that specific rule set.
Since you can use any non-number value to mark a day as non-worked, you can use letters to remember why this day was not worked. This is of course entirely up to you but here are some suggestions:
| Value | Meaning |
|---|---|
| Empty | Day usually not worked (typically week-end) |
A |
Normal absence |
H |
Statutory holiday (Labor day, …) |
S |
Sick leave |
C |
Sick child day |
💡 The important rule if you use this approach is to choose codes you can easily remember or understand.
This column can be used to specify when you are not present at work a full day. You just need to adapt the value. Some examples:
| Value | Represents |
|---|---|
1 |
Full day |
0.51
|
Half day |
1/2 |
Other representation for half day |
1 Decimal separator depends on your locale settings.
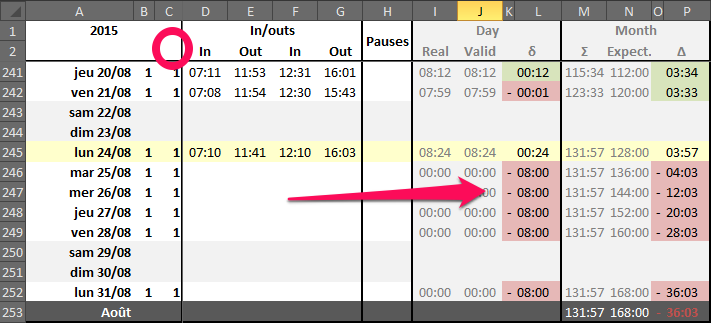
By default, days in the future are not taken into account in the calculations. This is to avoid the sum for the month being negative only because you have not logged in the next three weeks yet.
Yet you may wish to see what times you can get in or out to make the end of month (say, you had to leave early yesterday and now you want to know how to adapt your time for the next few days to get back on track). This would be difficult in the current state.
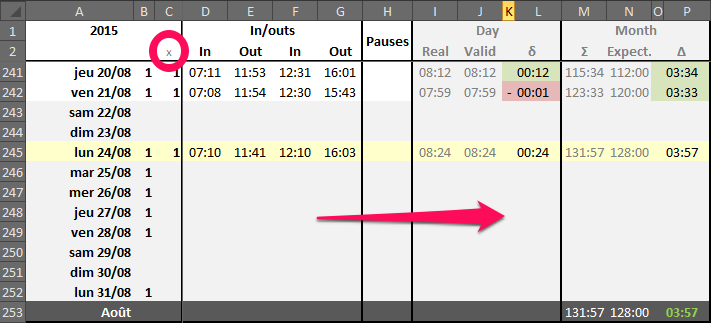
This can be easily performed by unchecking cell C2, thus disabling the control on future dates:
This timesheet was created for getting in the morning, taking a break at lunch and getting out once the day is over. Thus you have the main four columns.
In some companies, pause time (cigarette, coffee) are not counted as work time. Moreover, you may have the need to get out of work for a short appointment.
You need to calculate the sum of this pause time yourself and enter it in this column. It will be deduced from your total time.
- Column
I: actual time you spent at work. - Column
J: the time that was logged. This is the time you spent once the selected rule set has been applied. - Columns
K-L: difference between the time you logged and the time you were supposed to (positive if you logged more, negative if you logged less).
- Column
M: the time you logged since the beginning of the month. - Column
N: the time you are expected to have logged since the beginning of the month. - Columns
O:P: the difference between the two (positive if you logged more than the expected, negative otherwise).
- Column
Q: the time you logged since the beginning of the year. - Column
R: the time you are expected to have logged since the beginning of the year. - Columns
S:T: the difference between the two (positive if you logged more than the expected, negative otherwise).
These columns are a quick representation of the daily and monthly difference between logged and expected.
- Column
AC: daily. - Column
AD: monthly.
Migrating from one version of the tracker to another is easy: you should copy range B3:H3791 and paste in the same position on the new sheet.
💡 New versions may have changed the formatting. If you want to be sure to benefit from all the latest changes, we recommend using the Paste special > Formulas (see screenshot below). You should also restrict the range to what has already been filled in.
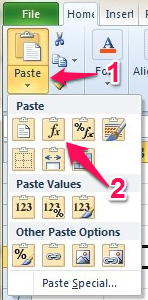
1 Assuming you did not insert new lines
💡 This paragraph is concerned with versions 2.0+ of the time tracker.
The tracker sheet does not have a line for February 29th but you can easily add one by duplicating the line for February 28th and changing the date.
When you work for several client, you may be at one on the morning and another on the afternoon. You can duplicate the line for that day, set a different rule set for each and specify a 0.5 day length ratio on both.

Duplicate a summary line and specify a different rule set on each.

Duplicating lines will make migrating your document a pain. You will need to reproduce all these duplications in the target before pasting the data from your old sheet. This might be manageable if you only added a line because this is an odd year, but I do not envy you if you wanted to follow all part-time missions in a single file.
- Select the line you want to copy.
- Select the line above which you want to insert the duplicate.
- Right click the row header line and click
Insert Copied Cells.
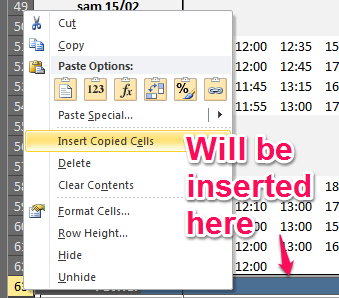
- Voilà! Now you are free to edit the date, rule set or whatever you need.
