-
Notifications
You must be signed in to change notification settings - Fork 5
Custom Monster Cards
For many of you, this is probably the exciting part. In fact, it may be so exciting that you skipped right over the previous tutorial about spell cards. Don't do that. Monster cards are actually just spell cards that summon monsters, and I'm not going to repeat things that were already covered there, so go back and read it over.
Once you've done that, you can move on to the next section.
The first card we will create is a Banner unit. A true classic. Blue Eyes White Dragon. This will cover the basic skeleton of a Monster Card, and common things you must set for all monster cards as well as more on specific card pools for monster cards.
Download the card art here, then download the monster art here. They're both static images. Animated characters are much more complicated, so they're covered in their own dedicated tutorial.
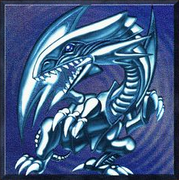
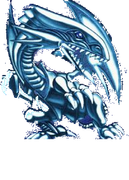
Of course Blue Eyes will be placed in the Pyreborne clan and have the Dragon subtype.
For monster cards we make a card with a singular effect to spawn a character. Then we define the character to spawn. As shown below.
{
  "$schema": "https://github.com/Monster-Train-2-Modding-Group/Trainworks-Reloaded/releases/latest/download/schema.json",
  "cards": [
    {
      "id": "BlueEyesCard",
      "cost": 3,
      "card_type": "monster",
      "rarity": "rare",
      "class": "ClassPyreborne",
      "pools": [
        "UnitsAllBanner",
        "UnitsPyreborneBanner"
      ],
      "card_art": "@BlueEyesCardArt",
      "effects": [
        "@SpawnBlueEyes"
      ]
    }
  ],
  "characters": [
    {
      "id": "BlueEyesCharacter",
      "names": {
        "english": "Blue Eyes White Dragon"
      },
      "character_art": "@BlueEyesCharacterArt",
      "size": 5,
      "attack_damage": 3000,
      "health": 2500,
      "subtypes": [
        "SubtypesData_Dragon",
        "SubtypesData_BannerUnit"
      ]
    }
  ],
  "effects": [
    {
      "id": "SpawnBlueEyes",
      "name": "CardEffectSpawnMonster",
      "param_character": "@BlueEyesCharacter"
    }
  ],
  "game_objects": [
    {
      "id": "BlueEyesCardArt",
      "type": "card_art",
      "extensions": {
        "card_art": {
          "sprite": "@BlueEyesCardSprite"
        }
      }
    },
    {
      "id": "BlueEyesCharacterArt",
      "type": "character_art",
      "extensions": {
        "character_art": {
          "sprite": "@BlueEyesCharacterSprite"
        }
      }
    }
  ],
  "sprites": [
    {
      "id": "BlueEyesCardSprite",
      "path": "textures/card_art/blueeyes.png"
    },
    {
      "id": "BlueEyesCharacterSprite",
      "path": "textures/character_art/blueeyes_character.png"
    }
  ]
}A few things to note.
-
card_type- We set this tomonster, be sure to set this properly. The game uses this to define the look and feel of the card. If it were set to spell it would still work; however, the card would not have the attack, health, and capacity icons present on the bottom and top of the card. -
names- Notice we don't setnamesin the card's definition. The name of a monster card will be fetched from the character spawned by the card so no need to set that here it will be ignored. -
pools- We add this to two card pools:-
UnitsAllBanneris the main pool containing ALL banner units. You should put your banner units in this pool, otherwise it will not be picked for the Unit Banner reward after the ring 3 major boss battle. -
UnitsPyreborneBanneris the pool containing just Pyreborne's banner units. This pool is used for Pyreborne Banner map rewards.
-
A new top level section. characters specifies a list of characters we will define. Characters are any units you see in battle, your units, enemy units, even Flying Bosses, and the Titans all can be defined here, they are all the same type of data.
  "characters": [
    {
      "id": "BlueEyesCharacter",
      "names": {
        "english": "Blue Eyes White Dragon"
      },
      "character_art": "@BlueEyesCharacterArt",
      "size": 5,
      "attack_damage": 3000,
      "health": 2500,
      "subtypes": [
        "SubtypesData_Dragon",
        "SubtypesData_BannerUnit"
      ]
    }
  ],
We define one character with id BlueEyesCharacter we will use this in the effects section coming up shortly. We give this character a name which in english is Blue Eyes White Dragon, like with card names you can specify translations in the other langauges supported by Monster Train 2.
-
character_art- Just like with cards, characters also need a sprite, we define this later. -
size- This is how much space the unit takes, this can be a number from 1 to 6, here this unit will take 5 capacity on the floor. -
attack_damage- This is how much attack the character has, staying true to his homage its 3000. -
health- The units HP. 2500. -
subtypes- Important field this determines what subtypes the character has. To make a unit a banner unit the special hidden subtypeSubtypesData_BannerUnitis used. We also want to make it the Dragon subtype so the subtype corresponding to that isSubtypesData_Dragon. The full list of subtypes is in the schema and will be present in autocomplete they are fairly intuitive what they are given the name.
  "effects": [
    {
      "id": "SpawnBlueEyes",
      "name": "CardEffectSpawnMonster",
      "param_character": "@BlueEyesCharacter"
    }
  ],
Here we show a new CardEffect type - CardEffectSpawnMonster. This card effect, you guessed it. Spawns a monster. All you need to tell it is which character to spawn, we specify the BlueEyesCharacter we just defined. Remember to reference it we need to prepend an '@' to its id. All monster cards will have an effect that spawns the character in.
These sections will be simple since we are defining an non-animated sprite with just a static image.
Here is the game object definition. Just like with cards we specify we want a character art gameobject created for us. Be sure to set the type as character_art you can't reuse the card art GameObjects for character art as they have a different structure. You can reuse the card sprite for the character_art by setting sprite below to be the same sprite reference for the card art.
    {
      "id": "BlueEyesCharacterArt",
      "type": "character_art",
      "extensions": {
        "character_art": {
          "sprite": "@BlueEyesCharacterSprite"
        }
      }
    }
{
"id": "BlueEyesCharacterSprite",
"path": "textures/character_art/blueeyes_character.png"
}Once your JSON is saved, rebuild your project and copy to the Bepinex/plugins folder.
If you check the logbook and search in Pyreborne you will see that the new card is in the logbook but hasn't been discovered yet. If you don't then check the following
- All
@references match defined IDs - There are no trailing commas in your JSON
- The sprite path is correct
Make sure that the BepinEx logs don't produce any warning or error text, If you have the console enabled simply checking for red/yellow text.
You can give yourself the card by using one of the console mods if you are using Patty's DevConsole mod you can use the command card BlueEyesCard during a run to get the card for testing.