Datum Capture Part 2
This guide explains how to integrate the SolarNode plug-in from Part 1 into the SolarNode runtime, using the Eclipse IDE. If you have not started from the previous part you will want to go back and follow that first before continuing here.
The source for this part of the guide is available as well.
In this part we will:
- Add support for configuring our
DatumDataSourcevia the SolarNode Settings API - Add OSGi Blueprint configuration to wire up our
DatumDataSourceinto the SolarNode runtime
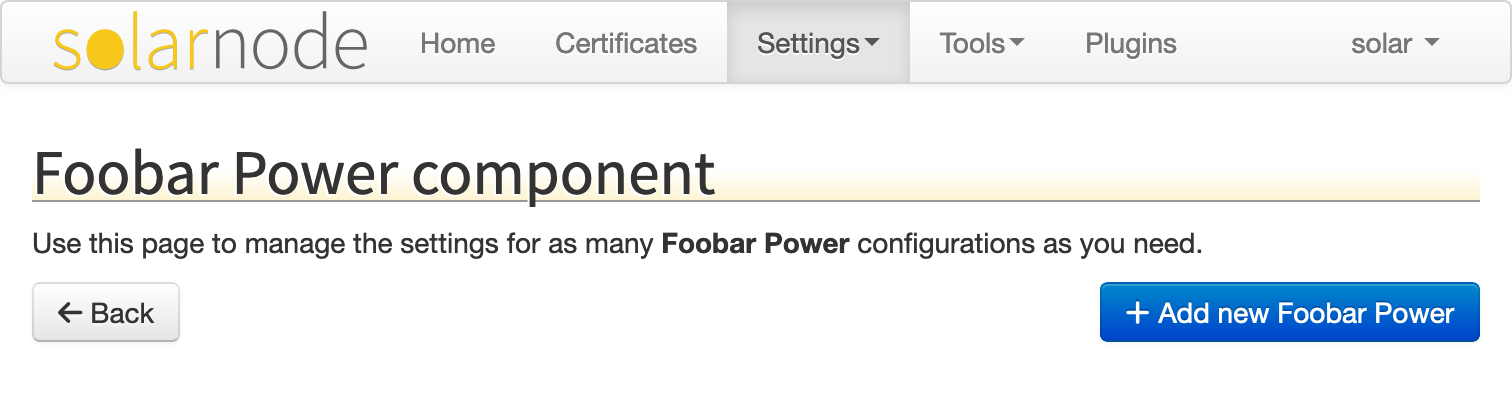
The SolarNode application defines a way for plug-ins to describe themselves to the runtime, to support showing users what plug-ins are installed as well as allowing them to configure components within the plug-in. SolarNode provides a web-based GUI that makes it easy for users to configure those components using a web browser. For example, here is a picture of what we will end up with at the end of this guide:

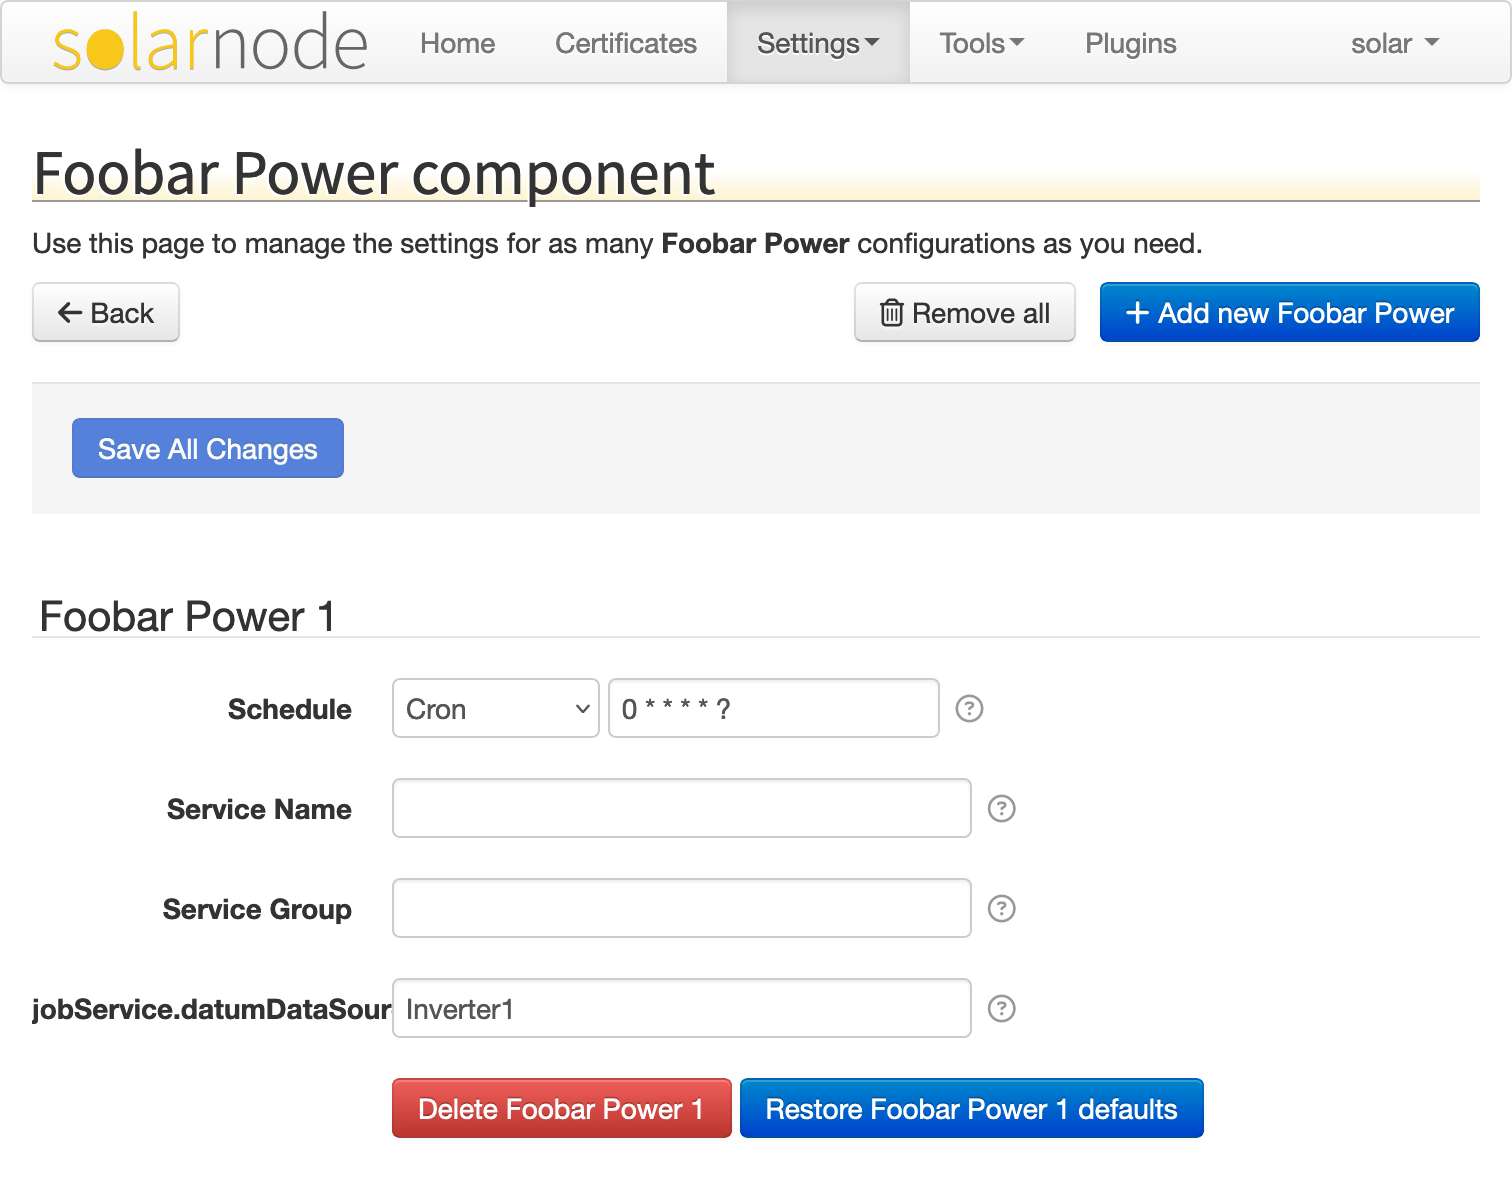
Clicking on the Manage button for the Foobar Power component then results in a screen like this:
☝️ Ignore the odd looking
jobService.datumDataSour...label, that will be addressed in part 3.
The mechanism for plug-ins to describe themselves in this way is called the Settings API. Classes that wish to participate in this system expose metadata about their configurable properties, and then SolarNode displays a GUI based on that metadata. The process is similar to the built-in Settings app on iOS: iOS applications can publish configurable property definitions and the Settings app displays a GUI that allows users to modify those properties.
There are a few interfaces defined in the Settings API, which we will detail next.
The net.solarnetwork.settings.SettingSpecifierProvider interface defines the way a class can
declare themselves as a configurable component. This API looks like this:
public interface SettingSpecifierProvider {

	/**
	 * Get a unique, application-wide setting ID.
	 *
	 * <p>
	 * This ID must be unique across all setting providers registered within the
	 * system.
	 * </p>
	 *
	 * @return unique ID
	 */
	String getSettingUid();

	/**
	 * Get a non-localized display name.
	 *
	 * @return non-localized display name
	 */
	String getDisplayName();

	/**
	 * Get a MessageSource to localize the setting text.
	 *
	 * <p>
	 * This method can return {@literal null} if the provider does not have any
	 * localized resources.
	 * </p>
	 *
	 * @return the MessageSource, or {@literal null}
	 */
	MessageSource getMessageSource();

	/**
	 * Get a list of {@link SettingSpecifier} instances.
	 *
	 * @return list of {@link SettingSpecifier}
	 */
	List<SettingSpecifier> getSettingSpecifiers();

}
The getSettingUid() method defines a unique ID for the configurable component. By convention the
class or package name of the component (or a derivative of it) is often used as the ID.
The getSettingSpecifiers() method performs the real work, by returning a list of all the
configurable properties of the component, as a list of SettingSpecifier instances.
The net.solarnetwork.settings.SettingSpecifier API forms the basis of the metadata exposed for
each configurable property in the Settings API. This API looks like this:
public interface SettingSpecifier {
/**
* A unique identifier for the type of setting specifier this represents.
*
* <p>
* Generally this will be a fully-qualified interface name.
* </p>
*
* @return the type
*/
String getType();
/**
* Localizable text to display with the setting's content.
*
* @return the title
*/
String getTitle();
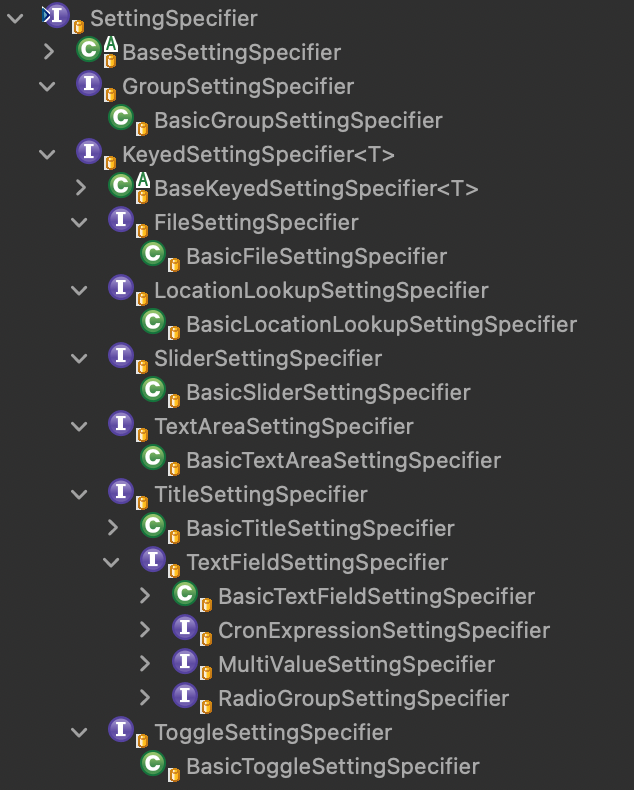
}Wow, there is not much there! In reality there are more specialized interfaces that extend that one. Here is a view of the class hierarchy that builds off of this interface:
We will focus on just one of these interfaces for this guide: the
net.solarnetwork.settings.TextFieldSettingSpecifier. That API looks like this (simplified for this
guide):
public interface TextFieldSettingSpecifier extends SettingsSpecifier {

	/**
	 * Get the key for this setting.
	 *
	 * @return the key to associate with this setting
	 */
	String getKey();

	/**
	 * Get the default value for this setting.
	 *
	 * @return the default value
	 */
	String getDefaultValue();

	/**
	 * Get transient flag. If a setting is transient, its associated value is never actually
	 * persisted and the {@link #getDefaultValue()} is treated as its "current" value.
	 *
	 * @return boolean
	 */
	boolean isTransient();

	/**
	 * Flag indicating the text should be hidden when editing.
	 *
	 * @return {@literal true} to hide the text
	 */
	boolean isSecureTextEntry();

}
The getKey() method returns the name of a configurable key, which will map to a writable property
on our configurable component. If you recall, the FoobarDatumDataSource class exposes a writable
sourceId property that we want users to be able to configure:
	public void setSourceId(String sourceId) {
		this.sourceId = sourceId;
	}
Next, we will make that sourceId value configurable at runtime, via the SolarNode GUI.
To recap what we have learned, we know we want to:
- update our
FoobarDatumDataSourceclass to implement thenet.solarnetwork.settings.SettingSpecifierProviderAPI - expose a
net.solarnetwork.settings.TextFieldSettingSpecifierinstance that allows thesourceIdproperty to be configured by the user
We will need to import some additional packages to support the Settings API. Open the
META-INF/MANIFEST.MF file in Eclipse and navigate to the Dependencies tab. Then add the
following package imports:
net.solarnetwork.settingsnet.solarnetwork.settings.supportorg.springframework.context
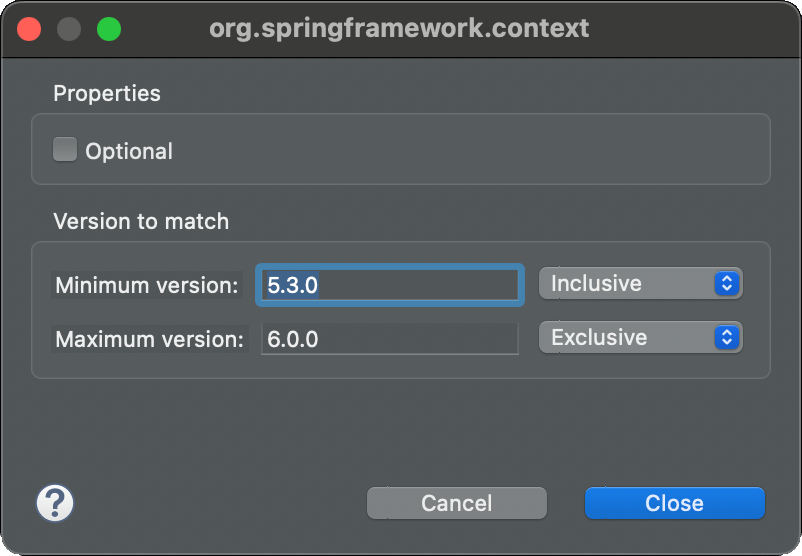
Note by convention we usually define a version range for the
package import. For example the org.springframework.context package, the version range should
be limited to >= 5.3 and < 6.0. OSGi plug-ins and packages follow Semantic Versioning,
so defining version ranges like this explicitly declares the package versions your plug-in
requires. If you click on the Properties button of that package in the
Eclipse editor, you can change the version range:
Now open up the FoobarDatumDataSource class and add make it implement the
SettingSpecifierProvider API:
public class FoobarDatumDataSource extends DatumDataSourceSupport
		implements DatumDataSource, SettingSpecifierProvider {
Then we can add a minimal implementation of the required methods:
@Override
public String getSettingUid() {
	return "net.solarnetwork.node.example.datum_capture.foobar";
}

@Override
public List<SettingSpecifier> getSettingSpecifiers() {
	// start with settings for the uid and groupUid properties of our parent class
	List<SettingSpecifier> results = getIdentifiableSettingSpecifiers();

	// add a setting for the sourceId property
	results.add(new BasicTextFieldSettingSpecifier("sourceId", DEFAULT_SOURCE_ID));
	return results;
}
The getSettingSpecifiers() method levereges the getIdentifiableSettingSpecifiers() method
provided by the parent class to provide configurable settings for the uid and groupUid
properties common to most SolarNode services. Then it adds a BasicTextFieldSettingSpecifier for
the sourceId property, configured with that property's default value DEFAULT_SOURCE_ID.
The OSGi Blueprint service provides a way for OSGi bundles (bundle in OSGi is the same thing as a plug-in in Eclipse) to declare and instantiate their services when deployed into an OSGi container by way of an XML file deployed with the bundle. If you are familiar with the Spring Framework's XML configuration, you will find Blueprint very similar. SolarNetwork uses the Eclipse Gemini implementation of that service.
What we would like to provide is a way for users to manage instances of the FoobarDatumDataSource
dynamically. They should be able to configure more than one instance and configure each with a
different sourceId value. The SolarNode application provides support for this, in conjunction with
another OSGi service called Configuration Admin. Each component instance should also
register a periodic job to call the readCurrentDatum() method for us.
We will not go into the details of how this all works, but this guide will show you how to get this done. Also note that strictly speaking, you do not have to use Blueprint to configure the plug-in. We are using Blueprint here because it is very convenient and easy to configure.
We will need to import a few more packages to support configuring the periodic job to call our data
source. Open the META-INF/MANIFEST.MF file again in Eclipse and navigate to the Dependencies
tab. Then add the following package imports:
net.solarnetwork.common.osgi.servicenet.solarnetwork.supportorg.springframework.beansorg.springframework.contextorg.springframework.context.supportorg.springframework.core
Be warned there will be a lot of action coming up here! You do not have to understand all of it,
just have faith and we will try to point out only the most important things. The OSGi Blueprint
service will look for XML files located in the OSGI-INF/blueprint path of the plug-in. Create
those directories in the net.solarnetwork.node.example.datum-capture project now, and then create
a new file named module.xml with the following content:
<?xml version="1.0" encoding="UTF-8"?>
<blueprint xmlns="http://www.osgi.org/xmlns/blueprint/v1.0.0"
	xmlns:xsi="http://www.w3.org/2001/XMLSchema-instance"
	xmlns:ctx="http://www.springframework.org/schema/context"
	xmlns:osgix="http://www.eclipse.org/gemini/blueprint/schema/blueprint-compendium"
	xmlns:beans="http://www.springframework.org/schema/beans"
	xsi:schemaLocation="
		http://www.osgi.org/xmlns/blueprint/v1.0.0
		http://www.osgi.org/xmlns/blueprint/v1.0.0/blueprint.xsd
		http://www.eclipse.org/gemini/blueprint/schema/blueprint-compendium
		http://www.eclipse.org/gemini/blueprint/schema/blueprint-compendium/gemini-blueprint-compendium.xsd
		http://www.springframework.org/schema/beans
		http://www.springframework.org/schema/beans/spring-beans-4.3.xsd
		http://www.springframework.org/schema/context
		http://www.springframework.org/schema/context/spring-context-4.3.xsd">

	<!-- The DatumQueue provides access to local database storage for our datum. -->
	<bean id="datumQueue" class="net.solarnetwork.common.osgi.service.DynamicServiceTracker">
		<argument ref="bundleContext"/>
		<property name="serviceClassName" value="net.solarnetwork.node.service.DatumQueue"/>
		<property name="sticky" value="true"/>
	</bean>

	<!-- The PlaceholderService can resolve placeholder values at runtime, for example
	     in the sourceId of our data source. -->
	<bean id="placeholderService" class="net.solarnetwork.common.osgi.service.DynamicServiceTracker">
		<argument ref="bundleContext"/>
		<property name="serviceClassName" value="net.solarnetwork.node.service.PlaceholderService"/>
		<property name="sticky" value="true"/>
	</bean>

	<!-- The DatumMetadataService allows our data source to publish metadata, such as the device
	     manufacturer or serial number, to SolarNetwork. -->
	<bean id="datumMetadataService" class="net.solarnetwork.common.osgi.service.DynamicServiceTracker">
		<argument ref="bundleContext"/>
		<property name="serviceClassName" value="net.solarnetwork.node.service.DatumMetadataService"/>
		<property name="sticky" value="true"/>
	</bean>

	<!-- support localized strings for the settings in the GUI -->
	<bean id="messageSource" class="org.springframework.context.support.ResourceBundleMessageSource">
		<property name="basenames">
			<array>
				<value>net.solarnetwork.node.example.datum_capture.FoobarDatumDataSource</value>
				<value>net.solarnetwork.node.service.support.DatumDataSourceSupport</value>
				<value>net.solarnetwork.service.support.BasicIdentifiable</value>
			</array>
		</property>
	</bean>

	<!-- support localized strings for the periodic job settings in the GUI -->
	<bean id="jobMessageSource" class="net.solarnetwork.support.PrefixedMessageSource">
		<property name="prefix" value="datumDataSource."/>
		<property name="delegate" ref="messageSource"/>
	</bean>

	<!-- publish a "component factory" so our Foobar Inverter appears in the settings GUI -->
	<service interface="net.solarnetwork.settings.SettingSpecifierProviderFactory">
		<bean class="net.solarnetwork.settings.support.BasicSettingSpecifierProviderFactory">
			<property name="displayName" value="Foobar Power"/>
			<property name="factoryUid" value="net.solarnetwork.node.example.datum_capture.foobar"/>
			<property name="messageSource" ref="messageSource"/>
		</bean>
	</service>

	<!-- Register a managed-service factory so individual FoobarDatumDataSource component instances
	     can be created in the setting GUI and then configured. We register a ManagedJob service
	     so SolarNode polls the data source for datum at the configured schedule. -->
	<osgix:managed-service-factory factory-pid="net.solarnetwork.node.example.datum_capture.foobar"
			autowire-on-update="true" update-method="configurationChanged">
		<osgix:interfaces>
			<beans:value>net.solarnetwork.node.job.ManagedJob</beans:value>
		</osgix:interfaces>

		<!-- SimpleManagedJob is the class that implements ManagedJob for us, and delegates
			 to the DatumDataSourcePollManagedJob to poll for datum from our data source -->
		<bean class="net.solarnetwork.node.job.SimpleManagedJob"
				init-method="serviceDidStartup" destroy-method="serviceDidShutdown">
			<argument>
				<bean class="net.solarnetwork.node.job.DatumDataSourcePollManagedJob">
					<property name="datumMetadataService" ref="datumMetadataService"/>
					<property name="datumQueue" ref="datumQueue"/>
					<property name="datumDataSource">

						<!-- Here is our DatumDataSource, which will generate datum when polled by
						     the DatumDataSourcePollManagedJob job -->
						<bean class="net.solarnetwork.node.example.datum_capture.FoobarDatumDataSource">
							<property name="messageSource" ref="jobMessageSource"/>
							<property name="placeholderService" ref="placeholderService"/>
						</bean>
					</property>
				</bean>
			</argument>

			<!-- the schedule defines when the ManagedJob runs; in this case
			     we define a cron style trigger, that by default runs once/minute -->
			<argument value="0 * * * * ?"/>

			<!-- we can also publish the FoobarDatumDataSource instance itself as a service
			     by configuring serviceProviderConfigurations here... this is optional but
			     generally a good idea -->
			<property name="serviceProviderConfigurations">
				<map>
					<entry key="datumDataSource">
						<bean class="net.solarnetwork.node.job.SimpleServiceProviderConfiguration">
							<property name="interfaces">
								<list>
									<value>net.solarnetwork.node.service.DatumDataSource</value>
								</list>
							</property>
							<property name="properties">
								<map>
									<entry key="datumClassName" value="net.solarnetwork.domain.datum.AcDcEnergyDatum"/>
								</map>
							</property>
						</bean>
					</entry>
				</map>
			</property>
		</bean>

	</osgix:managed-service-factory>

</blueprint>
Quite a lot of the start of the XML is simply declaring various namespaces used by the document. The
interesting configuration starts with the <service ... > line:
<!-- publish a "component factory" so our Foobar Inverter appears in the settings GUI -->
<service interface="net.solarnetwork.settings.SettingSpecifierProviderFactory">
	<bean class="net.solarnetwork.settings.support.BasicSettingSpecifierProviderFactory">
		<property name="displayName" value="Foobar Power"/>
		<property name="factoryUid" value="net.solarnetwork.node.example.datum_capture.foobar"/>
		<property name="messageSource" ref="messageSource"/>
	</bean>
</service>
This declares an OSGi service of type net.solarnetwork.settings.SettingSpecifierProviderFactory,
which will be implemented by the inner <bean> declared
net.solarnetwork.settings.support.BasicSettingSpecifierProviderFactory class. The
SettingSpecifierProviderFactory API informs the SolarNode application that we have a configurable
component which allows any number of those components to be instantiated at runtime. Notice the
factoryUid value declared there is the same as declared in our FoobarDatumDataSource class:
@Override
public String getSettingUid() {
	return "net.solarnetwork.node.example.datum_capture.foobar";
}
The final element is the <osgix:managed-service-factory ... declaration:
<!-- Register a managed-service factory so individual FoobarDatumDataSource component instances
	 can be created in the setting GUI and then configured. We register a ManagedJob service
	 so SolarNode polls the data source for datum at the configured schedule. -->
<osgix:managed-service-factory factory-pid="net.solarnetwork.node.example.datum_capture.foobar"
		autowire-on-update="true" update-method="configurationChanged">
This integrates our class with the OSGi Configuration Admin service we mentioned earlier, and
basically allows the SolarNode GUI to let users add and remove any number of instances of the
FoobarDatumDataSource class at runtime, as a periodic job that calls that readCurrentDatum()
method for us. Notice that the factory-pid attribute has the same UID as declared in our
FoobarDatumDataSource class.
The data source itself finally shows up within the managed job bean:
<!-- Here is our DatumDataSource, which will generate datum when polled by
	 the DatumDataSourcePollManagedJob job -->
<bean class="net.solarnetwork.node.example.datum_capture.FoobarDatumDataSource">
	<property name="messageSource" ref="jobMessageSource"/>
	<property name="placeholderService" ref="placeholderService"/>
</bean>Now we are ready to start up the SolarNode application in Eclipse. If you have not read through the Build Guide guide, read that now and then return here.
Now launch the SolarNode OSGi platform (via Run > Run Configurations... for example) and in the Console you should see many messages logged, ending up with this:
Mar-08 13:53:46 INFO org.springframework.web.servlet.DispatcherServlet - FrameworkServlet 'setup': initialization completed in 22 ms
The SolarNode application is now running, but it will not be collecting any samples from the
FoobarDatumDataSource yet because we have not configured an instance of one yet. To do that, open
a web browser and point it at http://localhost:8080/.
☝️ Note that 8080 is the default port configuration for the SolarNode web server. You may have configured this to something else, so use that port instead.
Go to the Settings > Settings link at the top, and you will see a screen like the following (if
prompted to login, and you are using the net.solarnetwork.node.setup.develop plug-in, then the
default login username is -11 and password solar):
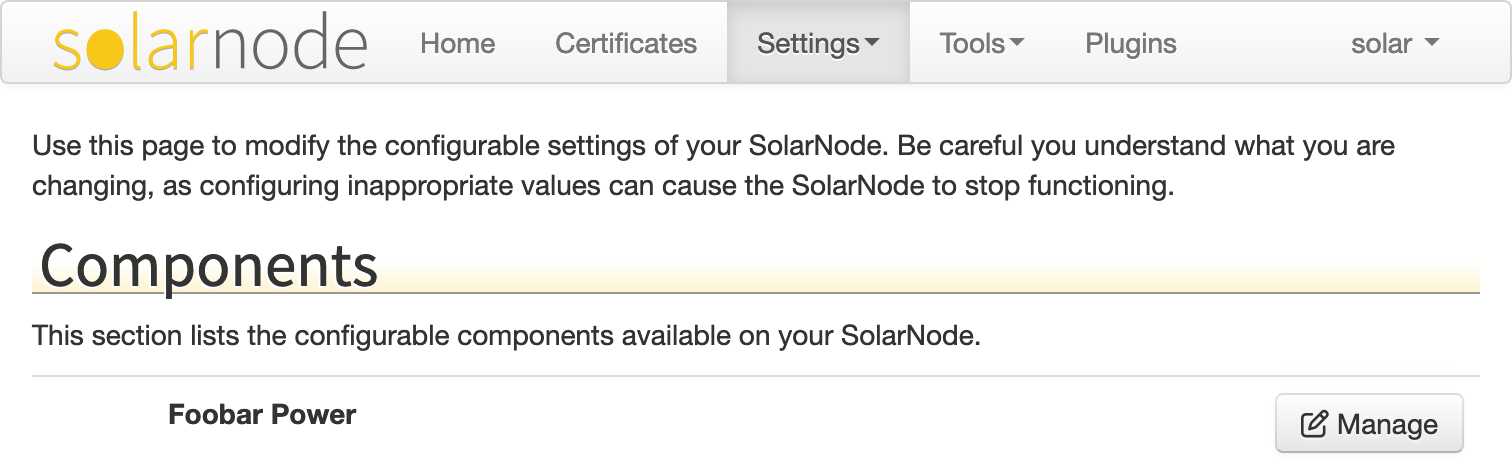
Click on the Manage link next to Foobar Power and you will come to the configuration screen for the FoobarDatumDataSource, which should look like this:
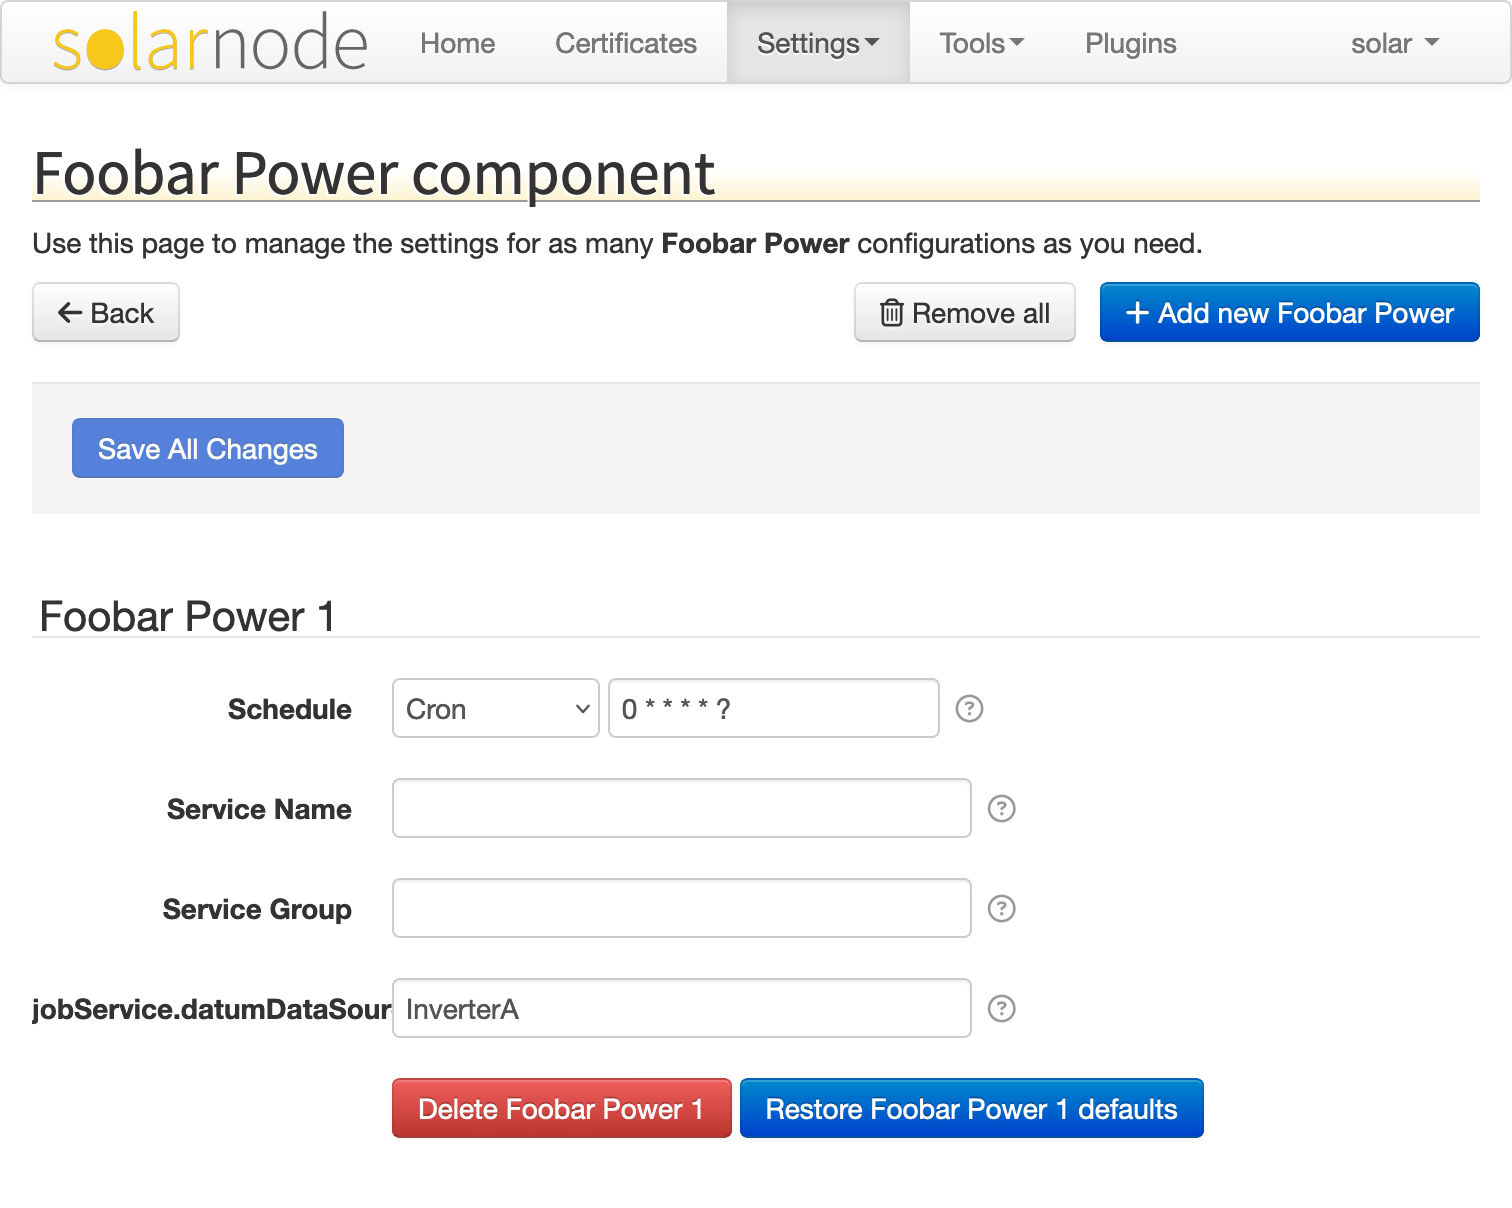
Click on the Add new Foobar Power button and then click the Add button in the dialog that appears. The screen will refresh, and then it should look like this:
You have now deployed an instance of the FoobarDatumDataSource class into the SolarNode
application. If you now return to the Eclipse console and watch for a little while, about once per
minute you should see messages where SolarNode is reading samples from this data source, like this:
Persisted datum locally: Datum{kind=Node,sourceId=Inverter1,ts=2023-04-22T18:32:06.003599Z,data={i={watts=152}, a={wattHours=3}}}
Your first SolarNode plug-in is working, and emitting datum as desired, well done! As per the design
of the data source, you will notice for each sample that the watts value collected is somewhat
random, and the wattHours will be ever increasing.
Now go ahead and modify the sourceId from Inverter1 to something else like InverterA.

After you change the value, press tab to leave the text field and register the change, then you can
tap the Save All Changes button. Once saved, check back in the logs. You should see messages
related to InverterA appear now, like:
Persisted datum locally: Datum{kind=Node,sourceId=InverterA,ts=2023-04-22T20:07:32.986475Z,data={i={watts=552}, a={wattHours=53}}}
In Part 3 we will refine the plug-in to support localized messages and tips for the SolarNode GUI to display.