SolarSSH Guide
SolarSSH provides a way to connect to SolarNode devices over the internet even when those devices are not directly reachable due to network firewalls or routing rules. It works via a SSH proxy server that your SSH client and SolarNode both connect to. The proxy server then forwards all traffic between your client and SolarNode. In this way all traffic over the internet is secured via SSH.
SolarSSH does not maintain permanently open SSH connections to SolarNode devices. Instead the connections are established on demand when needed. This allows you to connect to a SolarNode when you need to perform maintenance, but not require SolarNode maintain an open SSH connection to SolarSSH.
The SolarSSH proxy server supports two ways for clients to establish connections:
- via a HTTP websocket (browser)
- via a direct SSH connection
The browser method allows you to connect to SolarNode directly from a web browser, without needing any additional software installed on your computer. The direct SSH method requires you to have a compatible SSH client available.
For SolarNode devices to support SolarSSH, they need to have the sn-solarssh SolarNodeOS package
installed. That can be installed via
sudo apt-get install sn-solarsshbut most likely it is already installed. The System SSH Support SolarNode plugin must also be
installed. Most likely that is already installed, as it comes with the solarnode-app-core
SolarNodeOS package.
Finally, for an optimal experience SolarNode should be integrated with SolarIn/MQTT, which is
provided by the SolarNet MQTT integration SolarNode plugin. Most likely that is already
installed, as it comes with the solarnode-app-core SolarNodeOS package.
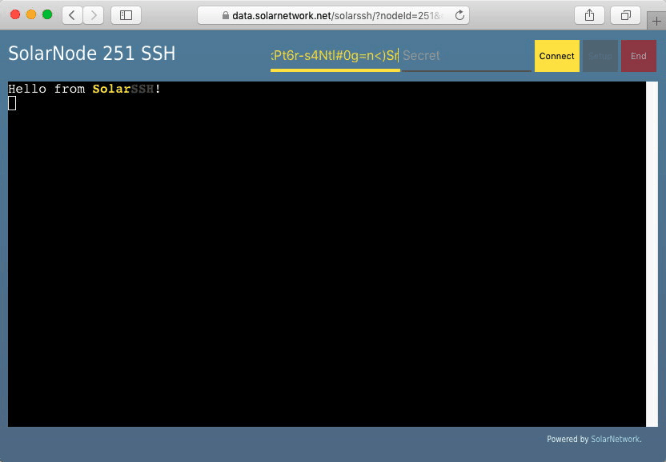
The SolarSSH Web Terminal application allows you to establish a connection
to a SolarNode device from within your browser. Once connected you'll have both OS-shell level
access as well as access to the SolarNode Setup UI. Simply provide any User security token
credentials and then optionally any SolarNode solar OS user's credentials to connect. You can
skip the OS user credentials if you only want to access the SolarNode Setup UI.
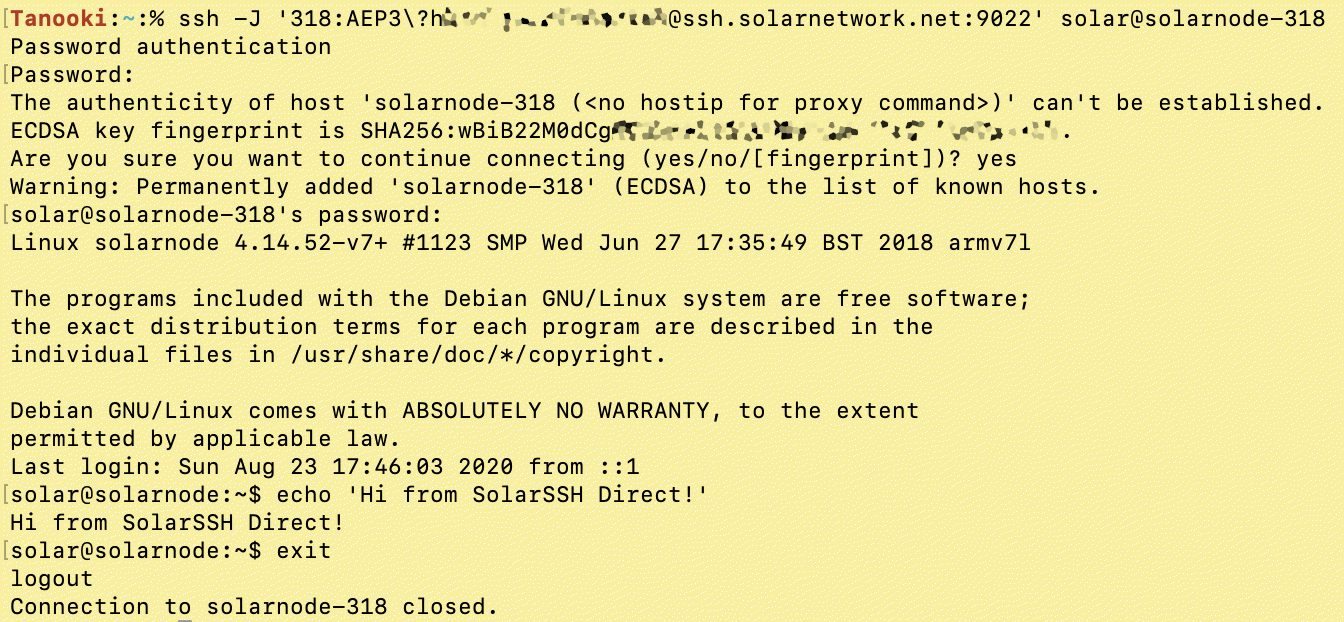
SolarSSH supports establishing direct SSH connections by way of a SSH "jump" host.
The standard SolarSSH server hosted by SolarNetwork Foundation is available at
ssh.solarnetwork.net:9022. This method allows full SSH integration, including port forwarding,
scp, and sftp support.
The "jump" connection user is formed by combining a node ID with
a user security token, separated by a : character. The general form of a SolarSSH
direct connection "jump" host thus looks like this:
NODE:TOKEN@ssh.solarnetwork.net:9022
where NODE is a SolarNode ID and TOKEN is a SolarNetwork user security token.
The actual SolarNode user can be any OS user (typically solar) and the hostname can be anything.
A good practice for the hostname is to use one derived from the SolarNode ID, e.g. solarnode-123.
Using OpenSSH a complete connection command to log in as a solar user looks like this, passing
the "jump" host via a -J argument:
ssh -J 'NODE:TOKEN@ssh.solarnetwork.net:9022' solar@solarnode-NODE
⚠️ WARNING: SolarNetwork security tokens often contain characters that must be escaped with a\character for your shell to interpret them correctly. For example, a token like9gPa9S;Ux1X3kK)YN6&gmight need to have the;)&characters escaped like9gPa9S\;Ux1X3kK\)YN6\&g.
You will be first prompted to enter a password, which must be the token secret. You might then be prompted for the SolarNode OS user's password. Here's an example screen shot:
If you find yourself using SolarSSH connections frequently, a handy bash or zsh shell function
can help make the connection process easier to remember. Here's an example that give you a
solarssh command that accepts a SolarNode ID argument, followed by any optional SSH arguments:
function solarssh () {
  local node_id="$1"
  if [ -z "$node_id" ]; then
    echo 'Must provide node ID , e.g. 123'
  else
    shift
    echo "Enter SN token secret when first prompted for password. Enter node $node_id password second."
    ssh -o StrictHostKeyChecking=no -o UserKnownHostsFile=/dev/null -o LogLevel=ERROR \
      -J "$node_id"'SN_TOKEN_HERE@ssh.solarnetwork.net:9022' $@ solar@solarnode-$node_id
  fi
}
Just replace SN_TOKEN_HERE with a user security token. After integrating this into your shell's configuration (e.g. ~/.bashrc or ~/.zshrc) then you
could connect to node 123 like:
solarssh 123