Eclipse Setup Guide
This guide explains how to setup a development environment for contributing to or modifying SolarNetwork code using the popular Eclipse IDE. Although Eclipse is not actually required to work with SolarNetwork code, it is a very good option and the remainder of this guide will describe setting up Eclipse for viewing and running the code for development purposes.
⚠️ Note the Developer VM guide provides a more streamlined way to get a SolarNetwork development environment set up, using a pre-configured virtual machine. This guide is useful if you would like to use Eclipse on your native development machine, instead of relying on a virtual machine.
The SolarNode platform consists of many small OSGi bundle projects that, when combined and run in an OSGi container, form a complete SolarNode platform. Each OSGi bundle comes configured as an Eclipse IDE plug-in project (Eclipse refers to OSGi bundles as "plug-ins" and its OSGi development tools are collectively known as the Eclipse Plugin Development Environment or just PDE.
The SolarNet platform consists of several Spring Boot applications that, when run together, form a complete SolarNet platform.
Download a recent version of the Eclipse IDE from http://www.eclipse.org/downloads/. The Eclipse IDE for Java EE Developers edition is usually the best option.
Most likely you will want to start with a new workspace for SolarNetwork development. When you launch Eclipse it might ask you for a workspace location, at which time you can point it at a new directory, or once Eclipse is running you can choose File > Switch Workspace > Other... to create a new one.
You'll need to install Git LFS (large file support) as well. You can
install the Java implementation of Git - optional LFS support plug-in to support LFS within
Eclipse. You might also want to make sure to have LFS installed in your operating system if you want
to be able to use git from your command line. On macOS this can be done via Homebrew via brew install git-lfs. On Linux most distributions provide a git-lfs package you can install.
This guide will describe using SSH to access the Git repositories (it is possible to use HTTPS,
however this guide will not discuss that). You'll need to make sure you have your SSH keys set up
properly. On GitHub, make sure your public SSH key (~/.ssh/id_rsa.pub usually) has been uploaded
in your GitHub account.
If ~/.ssh/id_rsa.pub SSH key doesn't yet exist you can generate via Eclipse in Preferences >
General > Network Connections > SSH2 > Key management. Click on Generate RSA Key and
enter/confirm a passphrase. Do not forget your passphrase as you'll need it later.

The SolarNetwork platform is broken up into multiple Git repositories. You will need to clone a few of them to work on any SolarNetwork application. You can clone a Git repository by going to Window > Open Perspective > Git Repository Exploring (you may need to choose Open Perspective > Other... if Git does not appear there).
First clone the solarnetwork-build repository. This repository is quite large (and uses Git LFS).
In the Git Repositories view, click on the Clone a Git repository icon, then select ssh as
the protocol and fill in the desired repository URI as
git@github.com:SolarNetwork/solarnetwork-build.git:

Click the Next button and after a moment the Branch Selection screen will appear. The
master branch should already be selected for you. SolarNetwork follows the
Gitflow model of
branching, so you should also select the develop branch. There may be other branches available,
and you can just ignore them for now.

Click the Next button to show the Local Destination screen. Choose a directory to clone the
repository into. Select develop for the Initial branch. Do not check the option to
import all existing projects, we will import only a subset of projects laster on.

Click the Finish button to clone the repo.
If you want to configure Gitflow integration into git, the .git/config settings should look like
this:
[gitflow "branch"]
	master = master
	develop = develop
[gitflow "prefix"]
	feature = feature/
	release = release/
	hotfix = hotfix/
	support = support/
	versiontag =
Once the clone completes, we can import the projects into Eclipse by selecting
File > Import > Git > Projects from Git. Click Next and choose Exisiting local repository.
The solarnetwork-build repository you just cloned should be listed. Select that, then simply
choose Next where it already has Import existing Eclipse projects selected:

On the next project selection screen, you should deselect all projects except for:
solarnetwork-osgi-libsolarnetwork-osgi-target

Click the Finish button to import the projects.
Next you need to clone a couple more repositories. The general steps are the same as in the previous section, except that this time you'll want to import all projects after cloning. You can do either by selecting the Import existing Eclipse projects option when cloning or by importing them afterwards like you did previously.
The list of repositories you must clone is:
- git@github.com:SolarNetwork/solarnetwork-common.git
- git@github.com:SolarNetwork/solarnetwork-external.git

Note that Eclipse will report errors in most projects, which we will fix in the next step.
Eclipse PDE provides you with an OSGi development environment based on the Equinox OSGi container that allows you to write, compile, and run OSGi bundles in easily. SolarNetwork depends on a number of 3rd-party OSGi bundles, and those bundles, combined with the SolarNetwork bundles, are combined into what Eclipse calls a Target Platform. You must configure the Target Platform so that Eclipse can compile and compile and run the SolarNetwork bundles.
Back in the Java EE perspective in Eclipse, open the solarnetwork-osgi-target project and then
the defs/solarnetwork-gemini.target file.

Click on the Set as Target Platform link in the upper-right.

This will create and activate the Eclipse target platform, and all Eclipse errors for all projects should go away. If any errors remain, select those projects and choose Project > Clean... to have Eclipse re-compile those projects again. Sometimes Eclipse incorrectly reports problems, and cleaning those projects will resolve the errors. You will find references to this situation on the web called "the Eclipse dance."
If you will be developing code to contribute to the SolarNetwork project, you should also import the
SolarNetwork Eclipse code templates and formatter configuration. The templates are located in the
/solarnetwork-osgi-target/defs/solarnetwork-codetemplates.xml file. To import them, open the
Eclipse preferences, go to Java > Code Style > Code Templates and click the Import...
button, and select the solarnetwork-codetemplates.xml file.

To import the formatter configuration, open the Eclipse preferences, go to Java > Code Style >
Formatter and click the Import... button, and select the solarnetwork-codeformat.xml file.
The settings should look similar to this:

To ensure the formatting is consistent across all developers of the code, make the formatting applied automatically when files are saved. Go to Java > Editor > Save Actions and click the Perform the selected actions on save checkbox, then check Format source code and select Format all lines. The settings should look similar to this:

In order to run the SolarNetwork platform within Eclipse, you must configure the OSGi runtime
environment. First, create the directory /solarnetwork-osgi-target/config. Then copy all the files
from /solarnetwork-osgi-target/example/config into that directory.

Some plug-ins expose properties that can be configured to suit different operating environments. These plug-ins will always provide default values for the configurable properties, so you only need to create custom properties files if the default values do not match your local environment.
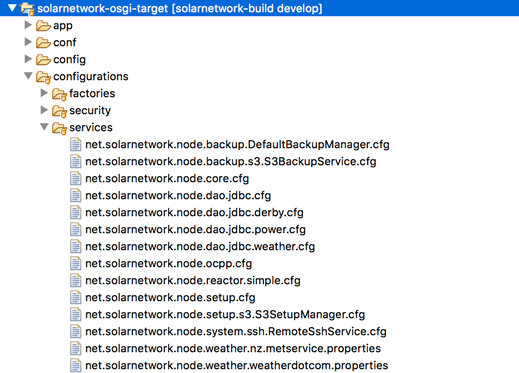
The plug-in properties are configured via Java Properties files located in the
/solarnetwork-osgi-target/configurations/services directory. If a plug-in project exposes
configurable properties, it will have an example properties file in the example/configuration
directory within that project. These files will have particular names which must not be changed
because the plug-in will look for its properties file based on the pre-defined name. To customize
the properties for a plug-in, copy the desired example/configuration/*.properties file into
/solarnetwork-osgi-target/configurations/services, rename them to have a .cfg extension, and
then modify the copied file as necessary. The example files will contain all available configurable
properties, along with documentation on each property.
For example, the net.solarnetwork.node.dao.jdbc project exposes some configurable properties as
detailed in example/configuration/net.solarnetwork.node.dao.jdbc.properties. This plug-in
configures the JDBC connection used by the SolarNode for persisting data. If you want to customize
the JDBC connection in any way, copy this file to
/solarnetwork-osgi-target/configurations/services/net.solarnetwork.node.dao.jdbc.cfg and modify it
as desired.
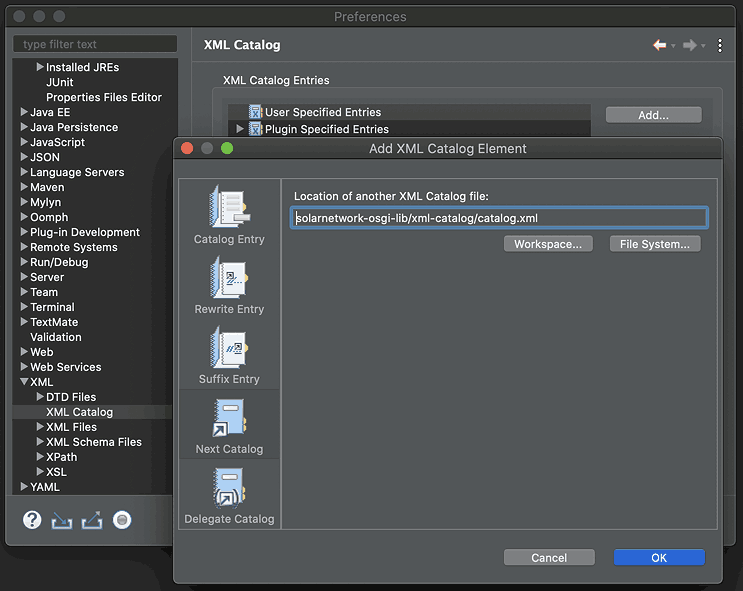
You can configure an XML Catalog to help speed up XML validation within Eclipse. In the Eclipse
preferences, navigate to XML > XML Catalog. Click on Add... and then Next Catalog. Fill
in solarnetwork-osgi-lib/xml-catalog/catalog.xml for the location and click OK.
Now that you've got a basic Eclipse set up, you'll want to consult the setup guides for specific SolartNetwork applications to get started working on what you're interested in:
- For SolarNode development: go to the SolarNode Development Guide
- For SolarNet development: go to the SolarNet Development Guide