Repository navigation
Install on Linux Wine
Wine lets a Linux computer run some Windows applications. TDSBLive still runs as the Windows application; your browser and OBS can remain normal Linux applications.
The project has live Wine qualification evidence, including Wine 11.17 Staging on the owner's machine. That is evidence for the tested setup, not a promise for every distribution or runner. Bottles instructions below follow its upstream documentation and are not a separate project qualification of every Bottles configuration.
If Wine offers to install Wine Mono or Wine Gecko, choose Cancel for those optional components. TDSBLive includes its own .NET runtime and uses your normal browser. Its tested Wine setup runs without those extra installations. Keep your existing settings folder; you do not need to delete it to dismiss the prompt.
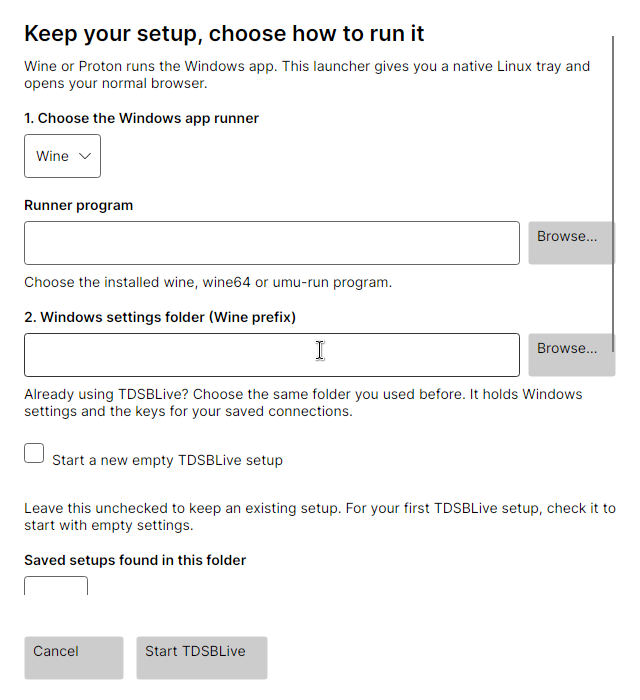
The 1.0.1 release includes a native Linux tray and setup window. Download
TDSBLive-1.0.1-linux-x64-wine.tar.gz from the official release page.
It includes the Linux launcher, the complete Windows backend and .NET runtime.
A fully native Linux backend remains deferred.
- Install Wine using your distribution's software manager or the
Wine project. If your existing setup works, keep its
runner and settings folder. Run TDSBLive as your ordinary user, without
sudo. - Extract the complete Linux archive into a folder you will keep, such as
Applications/TDSBLivein your home folder. Keep all extracted files together. - Open
TDSBLive, the Linux launcher. If your file manager cannot start it, open a terminal in that extracted folder and enter./TDSBLive. The archive already gives it permission to run. - In Set up TDSBLive on Linux, choose Wine under
1. Choose the Windows app runner. Check Runner program; use Browse…
to choose the installed
wineorwine64program if it was not found. - Under 2. Windows settings folder (Wine prefix), choose your existing prefix if you have used TDSBLive before. A prefix is Wine's folder containing its Windows-style drive, settings and connection keys.
- Leave Start a new empty TDSBLive setup unchecked to retain your settings. Choose your setup from Saved setups found in this folder. If it is stored elsewhere, use Existing TDSBLive setup folder and Browse….
- For your first installation, choose a separate empty prefix and check Start a new empty TDSBLive setup. Read the displayed destination first.
- Keep 3. TDSBLive Windows application pointed to the included
backend/TDSBLive.exe. Optionally check Add TDSBLive to my applications menu. - Choose Start TDSBLive. Keep the window open while Wine prepares the setup.
- Check the editor in your normal Linux browser. Find the blue T in your desktop panel and use Open editor, Restart or Quit from its menu.
Save edits before restarting or quitting. A missing tray opens the TDSBLive is running window with the same buttons. Closing that window or the browser keeps TDSBLive running. See Tray and desktop controls.
The launcher saves its choices after the backend reaches its running state. Cancel closes setup without creating a prefix. The optional application-menu shortcut does not enable automatic sign-in startup. Keep the extracted folder in place so the shortcut continues to work.
A different prefix can make saved settings appear missing. Return to your original prefix instead of deleting data or starting an empty setup. Native Linux OBS can use the local viewing URLs; check an overlay and sound before broadcasting.
The following manual paths remain available for older downloads and existing setups. The older v0.1.0 release uses the Windows ZIP path. These paths do not use the new native Linux launcher. Bottles remains a separate backend workflow; native-companion support for Bottles is not qualified.
Direct Wine is useful if Wine already works on your computer and you are comfortable entering a short command. Bottles provides a graphical way to manage separate Wine environments. Choose one path for your first installation. Switching between them creates different environments unless you deliberately migrate your data.
Install Wine using the instructions for your Linux distribution and Wine's official site. Package names and commands differ between distributions, so a command for Ubuntu should not be copied blindly onto Arch or Fedora. Use a current compatible version; do not assume an old distribution package matches the project's tested version.
Run Wine as your ordinary user. TDSBLive does not need to be launched with sudo.
- Download the application ZIP from the project's releases. The Source code ZIP is not the application.
- In your file manager, create an
Applicationsfolder in your home directory if you want one. - Extract the complete application ZIP into a folder named
TDSBLiveinside it. - Open that folder and check that
TDSBLive.exeand its neighboring files are present.
The example below assumes the EXE is at ~/Applications/TDSBLive/TDSBLive.exe. If the archive created an extra folder, locate the actual EXE and adjust the path. Do not run it from inside the archive.
A prefix is Wine's own Windows-style folder. It contains a pretend C: drive, settings and application data. Giving TDSBLive a separate prefix helps you keep its data apart from other Windows programs.
Open your application menu and look for Terminal. A terminal is a window where you type an instruction and press Enter. Copy the entire line below, paste it into that window, and press Enter. Many Linux terminals use Ctrl+Shift+V to paste.
WINEPREFIX="$HOME/.local/share/tdsblive-wine" wine "$HOME/Applications/TDSBLive/TDSBLive.exe"This command tells Wine which environment to use and which program to open. $HOME means your home folder. The quotation marks keep paths with spaces together. Wine creates the prefix on its first use, so the first launch can take longer than later launches.
Use this same prefix path each time you launch or update the app. If you start it without WINEPREFIX, Wine may use its default environment instead, making your saved settings appear to be missing.
Leave the terminal open while you are checking the application. Use TDSBLive's Quit TDSBLive control when finished. If you later make a launcher shortcut, have it run this same command rather than changing the prefix.
TDSBLive's application package includes its .NET runtime. Do not install dotnet48 just because this is a Windows application. That dependency belongs to other applications' instructions, such as Streamer.bot's Wine setup.
Bottles officially recommends its Flatpak distribution. Install it using the link in Bottles' installation guide, or find Bottles in your software center's Flathub source. Follow that guide if you need to set up Flatpak first.
- Open Bottles and complete its first-run setup.
- Create a new bottle. Give it a recognizable name such as
TDSBLive. - Choose the Application environment for this ordinary application. Start with the supplied Wine runner unless you have a specific reason to choose another one.
- Open that bottle's details.
- Choose Run executable, browse to the extracted
TDSBLive.exe, and run it. - Keep using this bottle for later launches. If you add a saved program entry, check that it opens the same EXE in the same bottle.
Upstream describes environments and running an executable. Button wording can vary between Bottles versions.
A Flatpak application has limited access to folders outside its own area. If the chooser cannot reach your extracted program, or neighboring assets are inaccessible, give Bottles access to that application folder. Its folder access guide explains the options, including Flatseal. In Flatseal, select Bottles and add the specific folder under its filesystem permissions. Restart Bottles afterward. You do not need to grant access to your entire computer just to run this app.
Open http://127.0.0.1:17474/editor. You should see TDSBLive's editor or guided setup. No HTTPS certificate is required.
Wine is running on the same computer, so the local browser can reach this address. This is not the same situation as running an application inside a separate virtual machine.
Native Linux OBS can also use the local overlay URL. You do not need to run OBS inside Wine just to display a TDSBLive page.
Streamer.bot's Linux support is experimental. Follow its own Linux installation guide, including its Wine dependencies. Its current guidance recommends Wine 11.9 or later and lists .NET Framework 4.8 and other components. Those requirements are separate from TDSBLive's bundled runtime. Speaker.bot's speech setup has additional requirements; the upstream Linux guide identifies SAPI as needed for it.
Do not move a working bot installation into a new prefix merely to put everything together. TDSBLive connects to the bots through their configured local WebSocket servers; they do not need to share a prefix.
With direct Wine, the usual location is inside the prefix's drive_c/users directory, then the Wine user's AppData/Local/TDSBLive folder. The Wine user name can vary. Bottles keeps each bottle in its own managed location.
Use TDSBLive's backup feature before changing environments. After quitting all applications in an environment, a separate copy of the entire prefix or bottle can protect environment-specific data too. Do not delete the original to troubleshoot a launch problem.
Use session-only credentials while getting started. Windows credential protection can behave differently under compatibility layers. If persistent credentials are unavailable, keep the session-only setting and enter the connection secret again after a restart. Do not create a plain-text workaround.
Next: First setup. For problems, see Troubleshooting.