Red Tide Visual Briefing
A picture brief for Germany - Red Tide. The theater map and SAM profile are generated from the campaign's actual airfield coordinates and order of battle; the flow/ORBAT charts render on GitHub. For the full text product — assessment, kneeboard threat card, and read-aloud brief — see red-tide-intel-assessment.md. To build a brief — real friendly ORBAT, mission-brief template, package recipes, comms cards, and the phase plan — see the Campaign Briefing Handbook.
🟡 Provenance — this brief predates the build. The ORBAT diagram matches
red_tide.yamland the airfields/threats are real, so the picture is sound. But the static theater map and SAM-ring PNGs are a snapshot — bases, the FLOT, and SAM positions move as the campaign is flown, so trust the live Retribution map over these images on the night. And the SAM rings are reach guidance, not a promise the networked-IADS "kill-C2" mechanic works (it was built for the retired Skynet engine; the fork now runs MANTIS — unverified in-game). File-grounded working reference: the Campaign Briefing Handbook.
The Warsaw Pact opened the war and overran Hamburg and Copenhagen (the ✕ fields). The Soviet thrust has culminated, and the 414th JFG — boxed into the south-west — now leads the NATO counteroffensive (blue axes) to roll the front east and take it all back.
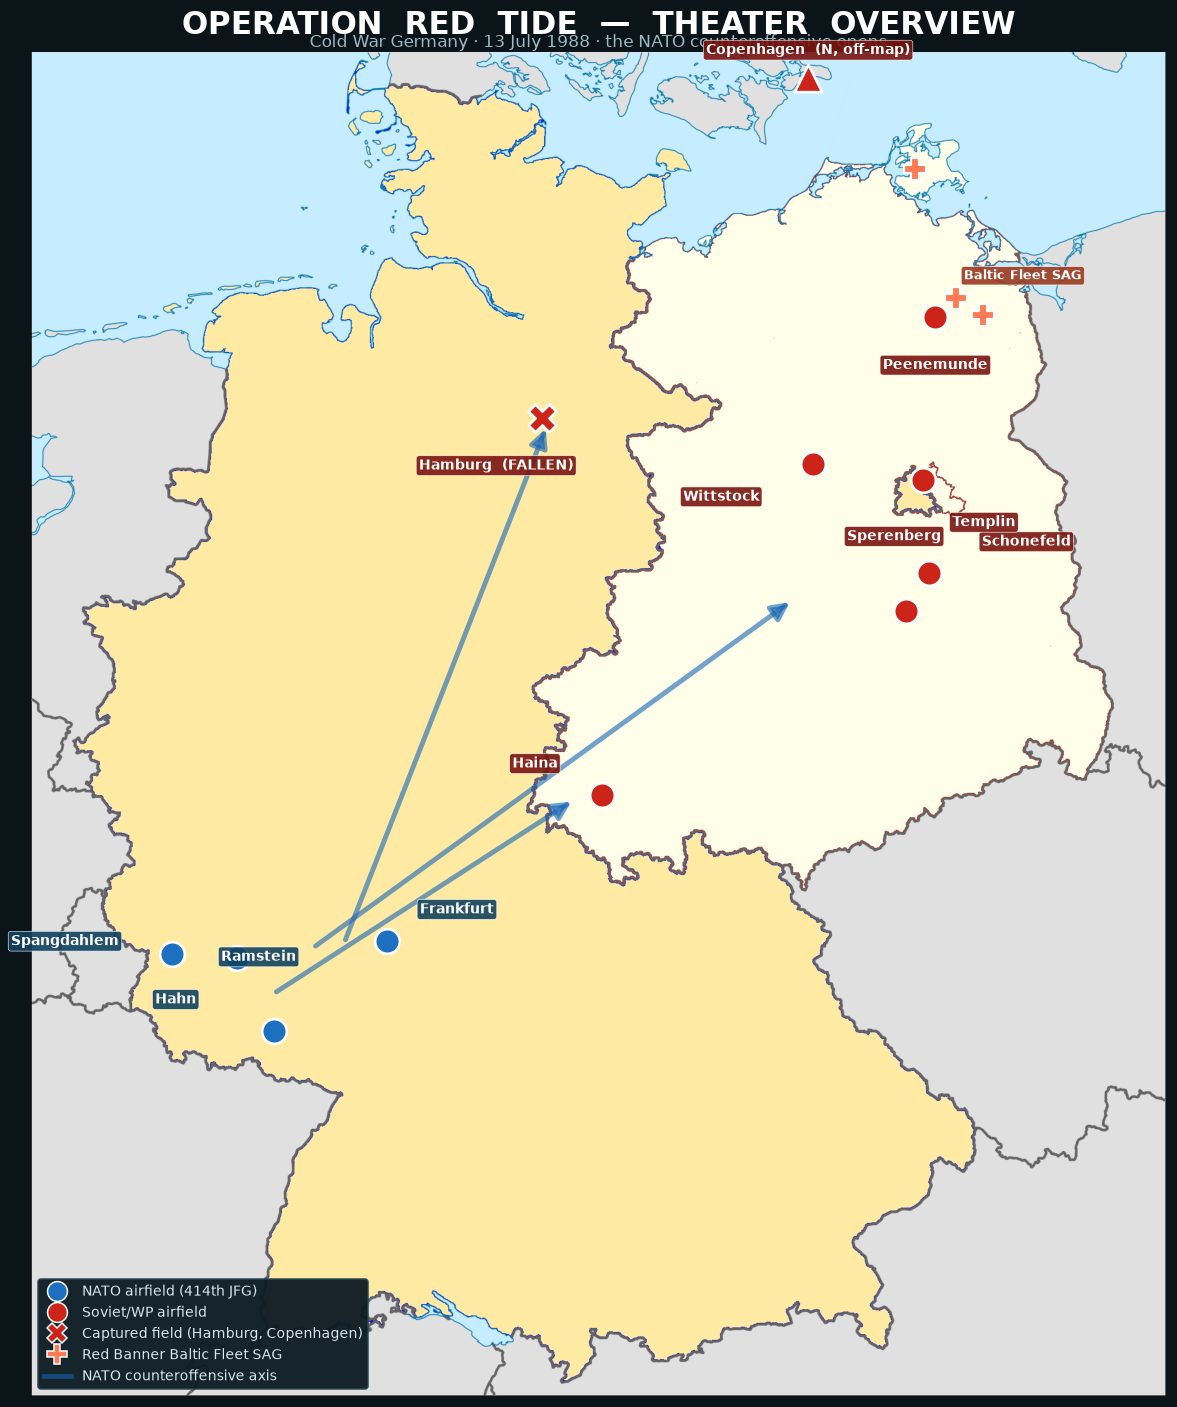
Read it at a glance: NATO holds the SW corner (Ramstein · Spangdahlem · Hahn · Frankfurt). Red owns the centre, east, and the whole north — Hamburg captured, Copenhagen a Soviet maritime-strike enclave (off the top of the map), and the Red Banner Baltic Fleet SAGs across the approaches. The shaded inner-German border on the map is the old line; the Soviet thrust drove west of it (Hamburg, Haina) before it culminated, and the counteroffensive (blue axes) pushes back east to restore and pass it.
Base map: divided-Germany (FRG/DDR) outline supplied by the squadron; markers and axes are plotted from the campaign's real GermanyCW airfield coordinates.
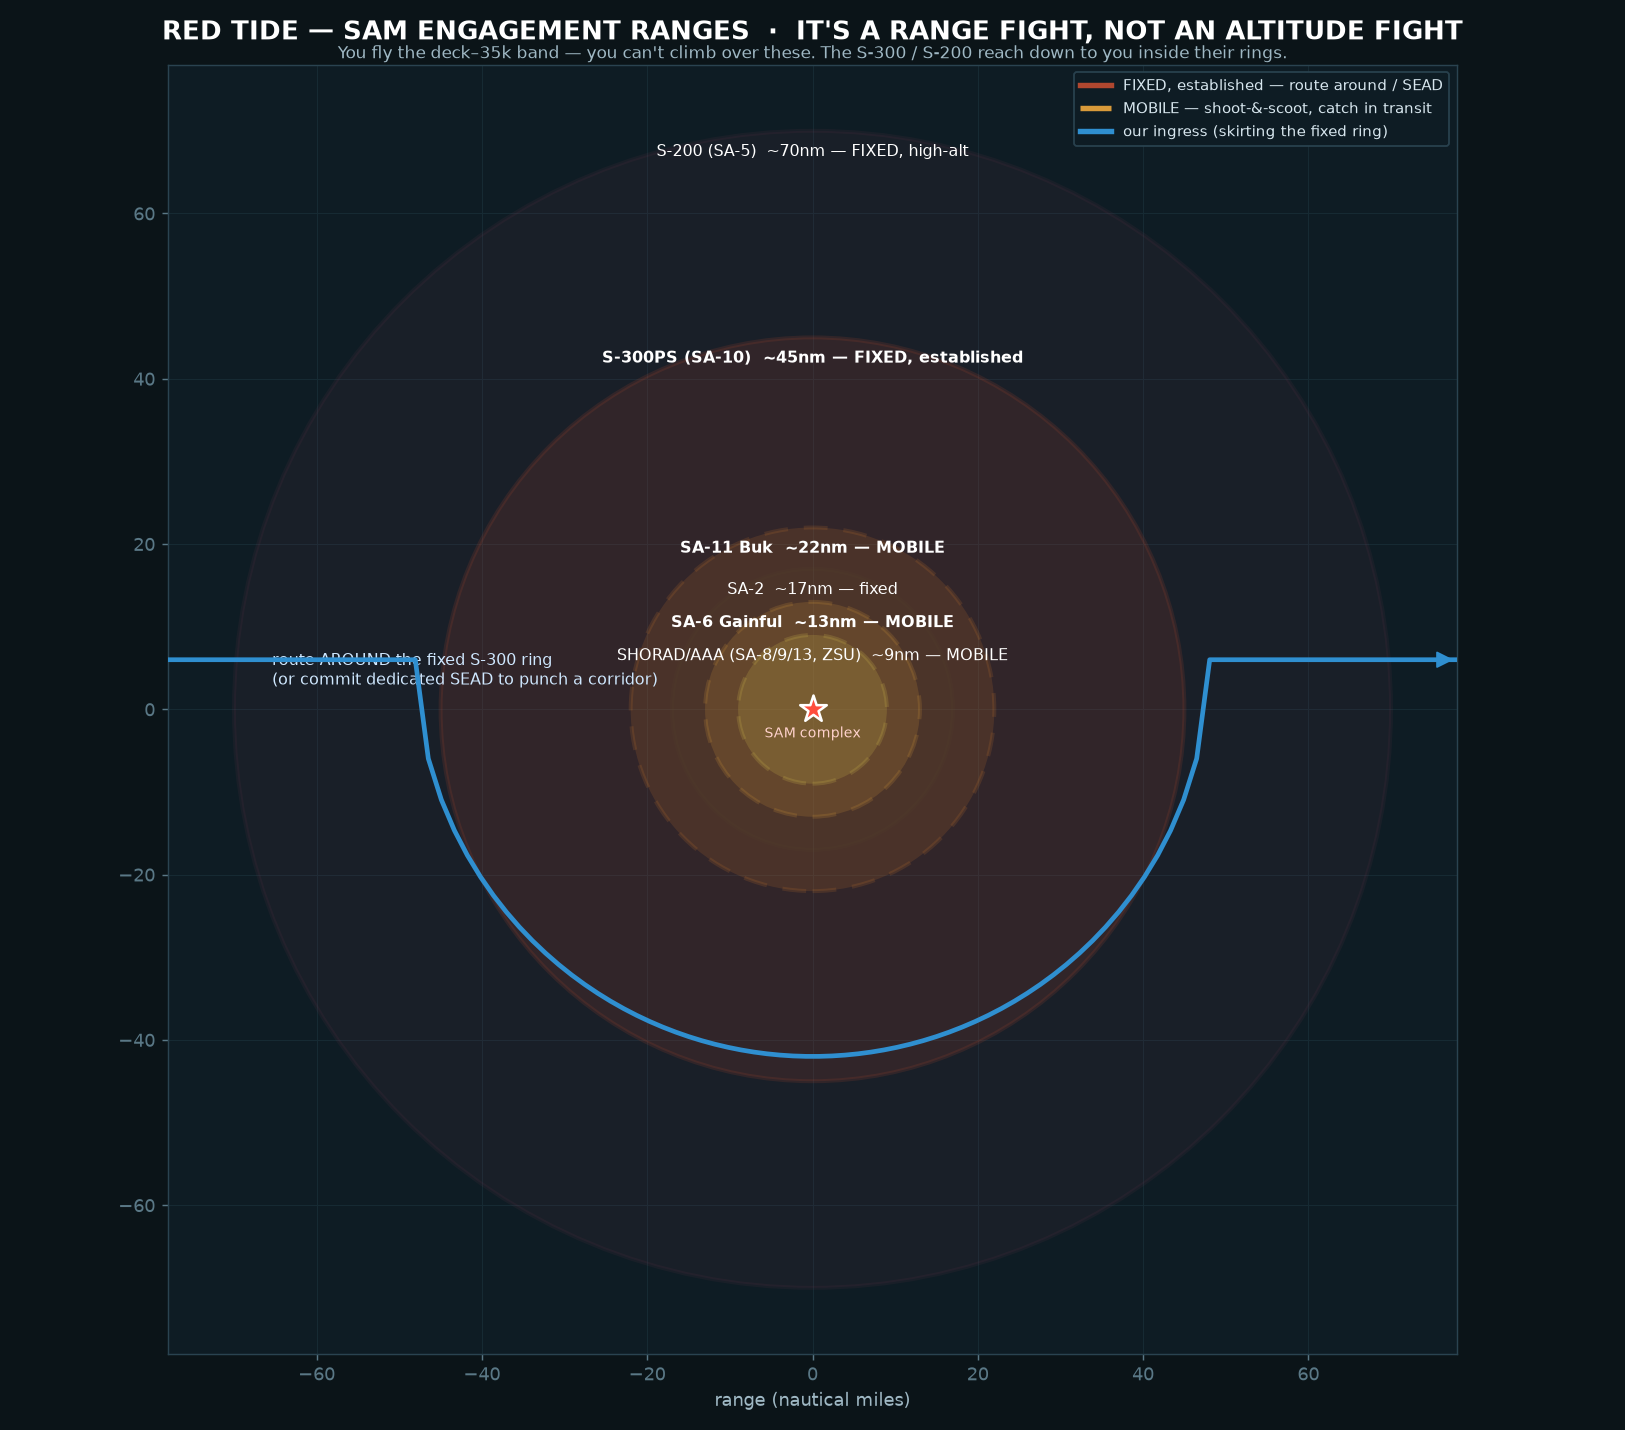
The IADS is the center of gravity. You fly the deck–35k band, so you can't climb over these — the S-300 / S-200 are established and on, and reach down to you inside their rings. Route around the fixed rings or commit dedicated SEAD; catch the mobile Buk / SA-6 / SHORAD in transit.
flowchart TD
    A([Counteroffensive opens<br/>tempo is OURS now]):::hd
    A --> B[1 · Pry open the SAM net<br/>Buk/SA-6 in transit · route/SEAD the fixed S-300]:::t
    B --> C[2 · Burn the Backfires<br/>924 GMRAP 'Baltic Backfires' @ Copenhagen]:::t
    B --> D[3 · Kill the enablers<br/>144th Mainstay · 203rd Midas @ Schönefeld]:::t
    C --> E[4 · Starve the salient<br/>An-26 air bridge · follow-on echelons]:::t
    D --> E
    E --> F[5 · Strangle & retake<br/>Hamburg · Copenhagen]:::t
    F --> G([6 · Open the Straits<br/>kill CPH fighters → Baltic SAGs]):::hd
    classDef hd fill:#13405a,stroke:#2f8fd0,color:#eaf4ff;
    classDef t fill:#241016,stroke:#e0402f,color:#ffd9d2;
graph TD
    HQ[["16th Air Army<br/>+ Baltic Fleet Aviation"]]:::hq

    HQ --> CPH["🛬 Copenhagen / Kastrup — FALLEN"]:::cap
    CPH --> CPH1["924 GMRAP 'Baltic Backfires' · Tu-22M3 ⚓"]:::pri
    CPH --> CPH2["'Naval Fulcrums' · MiG-29A"]:::u
    CPH --> CPH3["4 Gv Naval Assault · Su-24M"]:::u

    HQ --> HAM["🛬 Hamburg — FALLEN"]:::cap
    HAM --> HAM1["85 GvIAP · MiG-29A"]:::u
    HAM --> HAM2["357 Assault 'Grachi' · Su-25"]:::u
    HAM --> HAM3["336 'Krokodil' · Mi-24P"]:::u

    HQ --> SPB["Sperenberg — deep rear"]:::f
    SPB --> SPB1["1023 'Medved' · Tu-95MS"]:::u
    SPB --> SPB2["326 TBAP · Tu-22M3"]:::u
    SPB --> SPB3["831 GvIAP · Su-27"]:::u

    HQ --> SCH["Schönefeld — C2 / support"]:::f
    SCH --> SCH1["144 'Mainstay' · A-50 👁"]:::pri
    SCH --> SCH2["203 'Midas' · Il-78M ⛽"]:::pri

    HQ --> HAI["Haina — spearhead"]:::f
    HAI --> HAI1["33 IAP · MiG-23MLD"]:::u
    HAI --> HAI2["19 Gv · MiG-27K"]:::u
    HAI --> HAI3["368 'Grachi' · Su-25"]:::u

    HQ --> OTH["Templin · Wittstock · Peenemünde"]:::f
    OTH --> OTH1["185 GvIAP · MiG-21bis (real livery)"]:::u
    OTH --> OTH2["20 Gv · Su-17M4 · Coastal Fulcrums"]:::u

    classDef hq fill:#3a1020,stroke:#e0402f,color:#fff;
    classDef cap fill:#5a1622,stroke:#ff7b54,color:#ffd9d2;
    classDef f fill:#241016,stroke:#e0402f,color:#ffd9d2;
    classDef u fill:#181016,stroke:#7a3a3a,color:#e8c9c4;
    classDef pri fill:#7a2a18,stroke:#ffae84,color:#ffe;
Highlighted: the priority kills — 924 GMRAP Backfires, the 144th Mainstay, the 203rd Midas.
All regiments, personalities, and the Soviet operation name ("ZAPAD") are fiction in the Red Storm Rising tradition and freely editable. The theater map and SAM profile are generated from the real GermanyCW airfield coordinates and the campaign's order of battle.
This page is the online copy of docs/campaigns/red-tide-visual-briefing.md in the repo. Edit that file; the wiki is mirrored from docs/wiki/ on merge to main.