Repository navigation
Installation Windows
This guide takes you from zero to a Valheim server online, with an admin panel and a website, on your Windows computer. It is written for people who have never set up a server: each step says what to click, what will show on screen and what to do if something looks different.
You will not need to type any commands. Everything is done by an app, Heimdall Nexus, and by your web browser.
Tip
Already know Valheim servers and the inside of Windows? Skip to the quick reference for veterans at the end of the page.
At the end you will have:
- the Valheim dedicated server running on your PC, turned on and off with a button;
- the panel (Jarl), a page in your browser to run the server: mods, backups, settings;
- the server website, with live status and the mod list, to show your friends;
- the Heimdall Nexus app, a window that turns everything on and off.
How long it takes: 20 to 40 minutes. Almost all of it is downloading Valheim (about 2 GB), and you only have to wait.
The path, in short:
- Download the app
- Open the app
- Start the installation
- Fill in the wizard in the browser
- Wait for the installation to finish
- Meet the Heimdall control center
- Start the server and sign in to the panel
- Join the server from Valheim
- Let friends join over the internet
- Get the PC ready to be a server
| Minimum | How to check | |
|---|---|---|
| Windows | Windows 10 (version 1809 or newer), Windows 11 or Windows Server 2019/2022, 64-bit | Press Windows + R, type winver and press Enter
|
| Memory | 8 GB. The server alone uses 2 to 4 GB | Press Ctrl + Shift + Esc, open the Performance tab and click Memory |
| Disk space | 10 GB free on drive C: | Open File Explorer and click This PC |
| Account | A Windows administrator account | If you install programs on the PC yourself, you probably have one |
| Internet | To download the game; later, for friends to connect |
If you will also play on the computer that runs the server, plan on 16 GB of memory: the game and the server together go over 8 GB.
- Dedicated server: Iron Gate's official program that keeps a Valheim world running without anyone having to play on it. Players join as if it were a friend's world.
- Heimdall Nexus app: the window that installs everything and then turns Heimdall and the server on and off.
- Wizard: the five screens that open in the browser during installation, where you choose the server name, the world and the passwords.
- Panel (Jarl): Heimdall's admin page, opened in the browser.
- Windows service: a program that runs in the background, with no window. The server, the panel and the website become services. That is why they keep working with the app closed.
-
IP: a computer's "address" on the network. At home it looks like
192.168.0.25. On the internet, your home has another number, the public IP. - Port: a numbered "door" into the computer. Valheim uses ports 2456 and 2457; the website uses 80.
- CGNAT: when your provider shares one public IP among many customers. With CGNAT, opening router ports does nothing (step 9 shows how to check).
- Crossplay: a Valheim mode where players meet through a Microsoft service. It works without touching the router, even with CGNAT, but only on a server without mods (vanilla).
- Router: your home internet box. For friends outside to join, it sometimes needs setting up (step 9 explains).
- Open the latest release page: github.com/brkihel/Heimdall-Nexus/releases/latest.
- Scroll down to Assets, at the bottom of the page.
- Click the file that starts with
HeimdallNexus-Windows-and ends in.exe, likeHeimdallNexus-Windows-1.1.exe(the number changes with each version). It is a small download, about 1.5 MB.
The same list has a file ending in -source.zip. You do not need it: the
app downloads it by itself at the right time.
Note
Your browser may be wary of the file. New programs that few people have downloaded yet sometimes get a warning. This is normal, and the file is the one published on the project's GitHub.
- Microsoft Edge: if it says the file "isn't commonly downloaded", hover over the warning, click the three dots (…) and then Keep. If it asks again, click Show more and Keep anyway.
- Google Chrome: if a warning shows in the downloads list, click it and choose Keep (or Download anyway).
- Open your Downloads folder (in File Explorer or from the browser's download list).
-
Double-click the
HeimdallNexus-Windows-….exeyou downloaded.
Important
The first time, Windows may show a blue screen saying "Windows protected your PC". That is SmartScreen, and it does this with every new program that does not have a paid digital signature yet. To go on:
- Click More info (the small link below the text).
- A Run anyway button appears. Click it.
This window opens:
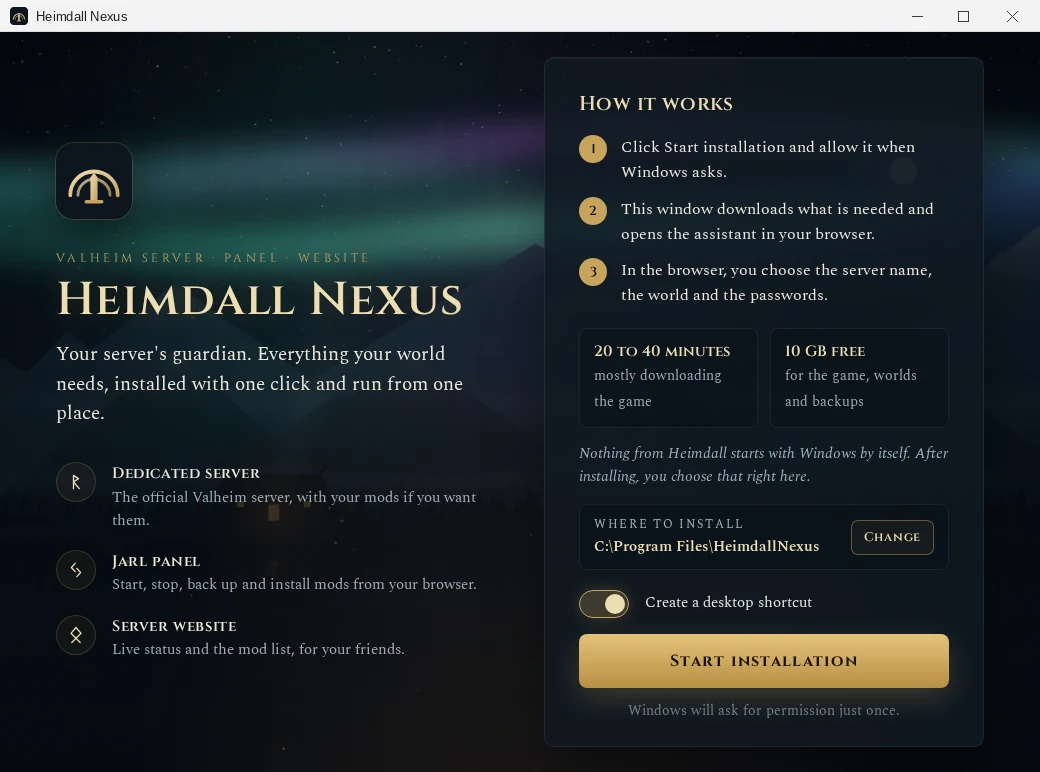
On the left is what will be installed. On the right, the three steps of the installation, how long it takes and how much space it needs.
Note
If a message about "WebView2" appears, click Yes. WebView2 is a free Microsoft component the app uses to show its window. It comes with Windows 11 and most of Windows 10; if yours lacks it, the app downloads it straight from Microsoft in a minute or two and then opens.
- Choose where to install, in the Where to install box (explained just below). If you do not want to change anything, leave it: Heimdall goes to drive C:.
- Choose whether you want a desktop shortcut (the switch just above the button). On, the app is easier to find later. It is also in the Start menu either way.
- Click Start installation.
- Windows asks: "Do you want to allow this app to make changes to your device?". Click Yes.
That question comes only once. It is needed because Heimdall creates Windows services and opens the game's ports in the firewall, and only an administrator can do that.
The window now shows the progress:
- Check the computer: makes sure Windows and the free space are enough.
- Download Heimdall Nexus: downloads the package and checks that it arrived whole.
- Prepare Heimdall's Python: installs a Python just for Heimdall. It stays out of sight and does not disturb other programs. The app first checks that the installer is the official one.
- Open the assistant in the browser: your browser opens by itself.
This takes one to three minutes. When the browser opens, go to step 4.
The Where to install box shows where Heimdall will live. To change it, click Change:
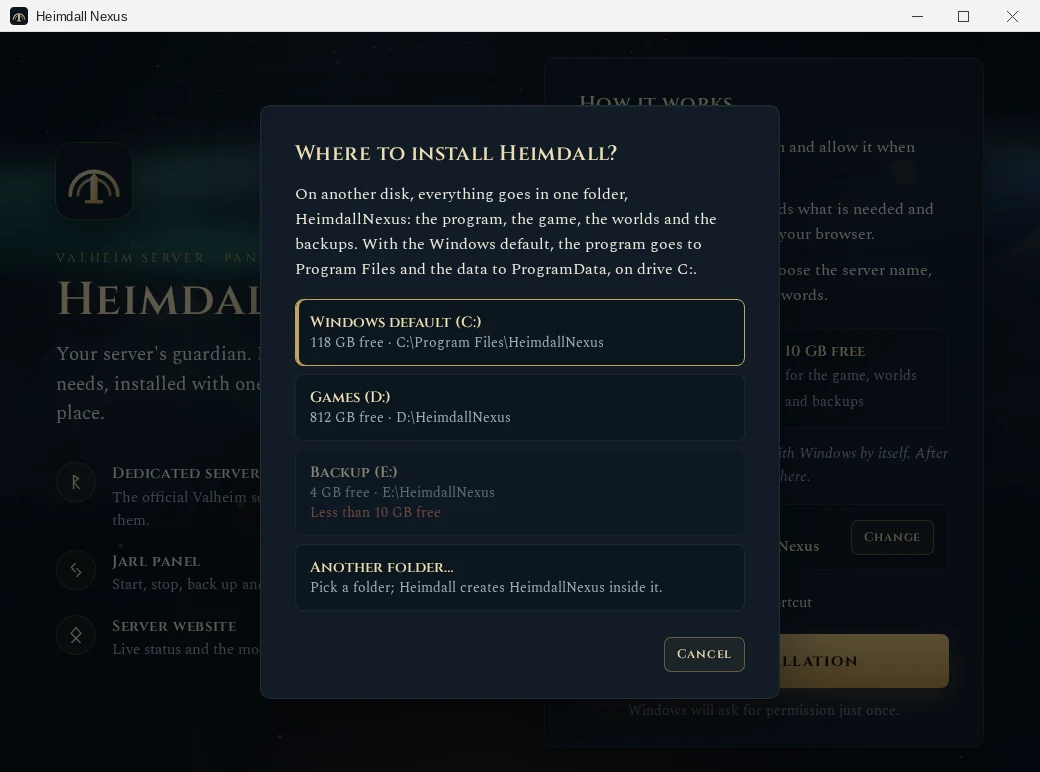
| Option | What happens |
|---|---|
| Windows default (C:) | Like any program: the program goes to C:\Program Files\HeimdallNexus and the data to C:\ProgramData\HeimdallNexus. |
Another disk (for example D:) |
Everything goes in one folder, D:\HeimdallNexus: the program, the game, the worlds and the backups. Good for keeping C: for Windows alone. |
| Another folder… | Opens Windows' folder picker; Heimdall creates HeimdallNexus inside the folder you pick. |
Each disk shows its free space. A disk with less than 10 GB free is greyed out, with the reason in red.
On another disk, the folder looks like this:
D:\HeimdallNexus\
  README.txt         what each folder is
  program\           the program: panel, website, Python (leave it alone)
  data\              your data
    valheim\saves\       the worlds
    valheim\backups\     the world backups
    valheim\current\     the Valheim server and the mods
    logs\                each service's logs
Note
Why the app may refuse a folder. Some parts of Heimdall run with Windows'
highest power and run what is in the program folder. If any user could
change it (or swap the whole folder for another), ordinary malware could use
that to take over the computer. So the folder is created locked, and the
app only accepts a place no ordinary user can change, rename or replace. In
practice:
-
the root of a disk (like
D:\) works: Heimdall createsD:\HeimdallNexusthere; -
a folder your account created (like
D:\Games) is refused, with the explanation; - USB drives, external disks and disks that are not NTFS are refused too.
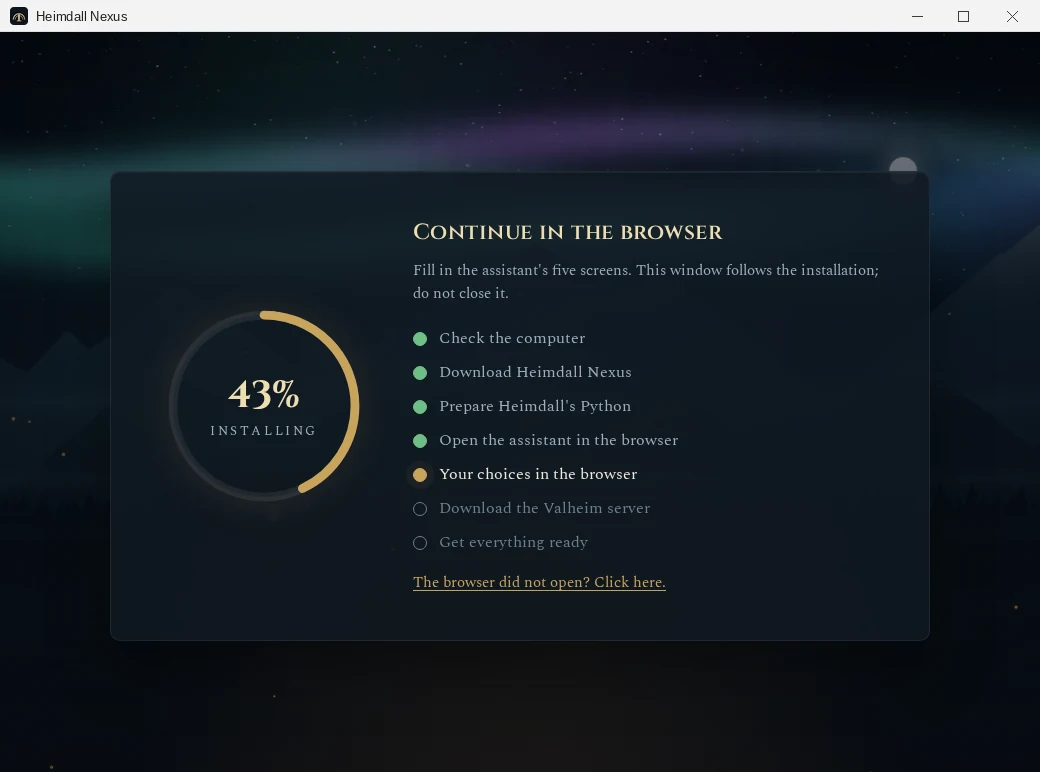
While you fill in the wizard, the app window looks like this:
Warning
Do not close the app window until the installation ends. It is the one following the work. If you close it by mistake, it first asks whether you really want to stop.
The browser did not open? Click The browser did not open? Click here. in the app window.
The wizard has five screens. The fields come with an example, and you can go back and fix things before installing. Almost everything you choose here can be changed later from the panel. The exception is the addresses on screen 1, and it is flagged there.
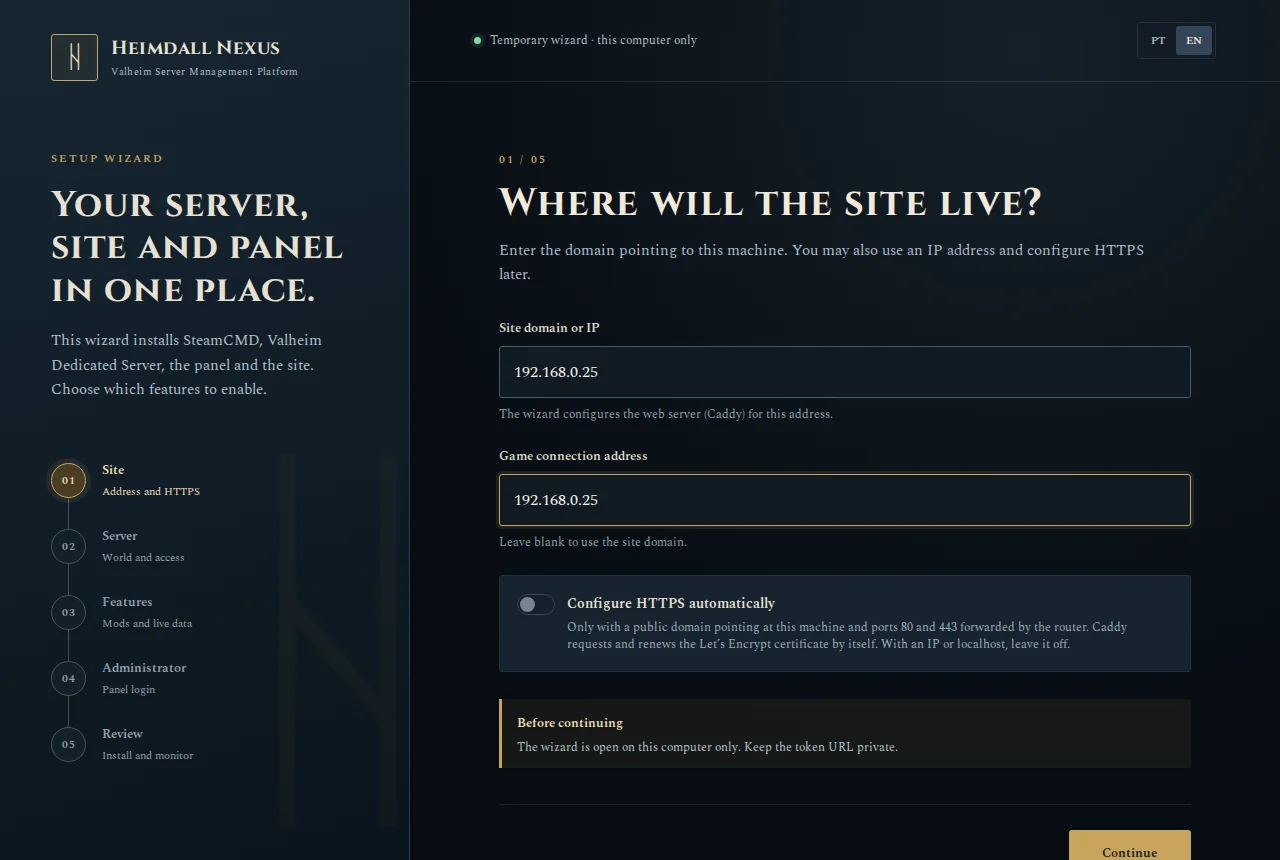
| Field | What to enter |
|---|---|
| Site domain or IP | The address of the website and the panel. The app's Open the panel and Open the website buttons use it. |
| Game connection address | The address the website shows to friends, for them to type in Valheim. Blank uses the same as above. |
| Configure HTTPS automatically | Leave it off unless you have a domain (explained below). |
Tip
You can change them later, in the panel's Server Config → Endereço (version 1.3.0 or newer; see Changing the address later). Still, get them right now: they are what the app's buttons and the website's links use from the first minute.
What to put in "Site domain or IP":
| Your situation | What to put |
|---|---|
You have a domain (for example myserver.com) pointing at your internet |
The domain |
| No domain | The PC's IP on your network, something like 192.168.0.25 (see below how to find it) |
To find the PC's IP:
- Press Windows + R, type
ncpa.cpland press Enter. The Network Connections window opens. - Double-click the connection you use (Wi-Fi or Ethernet) and click Details….
- Look for IPv4 Address, something like
192.168.0.25. Use that number.
Tip
Pin that IP on the router before installing. The router may give the PC another IP after a restart, and then the app's buttons point at the old address. To avoid that, sign in to the router (way B in step 9 shows how) and look for DHCP Reservation, Static IP or Address Reservation. Without HTTPS, the website itself keeps opening at any of the PC's addresses, even the new IP.
What to put in "Game connection address": what friends will type in Valheim. It depends on how they will join, explained in step 9. If you have not read it yet, read it before filling this in:
| How friends will join | What to put |
|---|---|
| Only people in your home | Leave it blank (uses the PC's IP) |
| Through ports opened on the router | Your public IP, or a dynamic DNS name like myserver.duckdns.org
|
| Through crossplay (server without mods) | Leave it blank: friends join with the six-digit code, and the address is only informative |
| Through a tunnel or virtual network | The address the service gives |
HTTPS is the padlock in the browser. It only works with a real domain and ports 80 and 443 forwarded by the router. In that case, turn it on and enter your email: the certificate is requested and renewed by itself. With an IP, leave it off; the site works normally, just without the padlock.
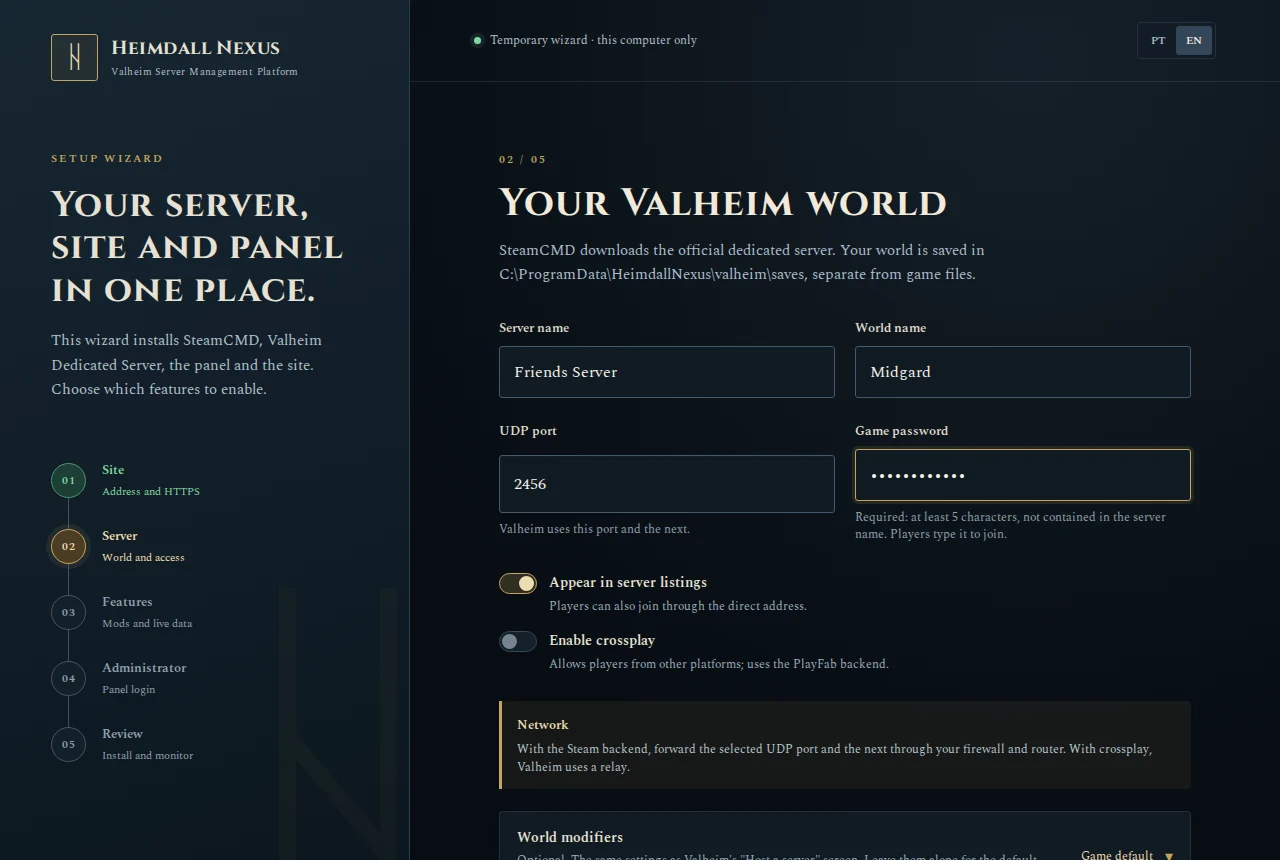
| Field | What to enter |
|---|---|
| Server name | The name players see. E.g. Friends Server. |
| World name | The saved world's name. Letters, numbers, spaces, - and _ only. E.g. Midgard. |
| UDP port | Keep 2456, Valheim's default. It uses this one and the next (2457). |
| Game password | What players type to join. At least 5 characters, and it cannot appear in the server name. |
| Appear in server listings | On: the server shows in Valheim's public list. Off: only people who know the address can join. Off is fine to start. |
| Enable crossplay | The easiest way for friends to join over the internet: it works without touching the router, on any internet, and also lets Xbox and PC Game Pass players in. Friends join with a six-digit code that changes whenever the server restarts. But it only works for a server without mods (vanilla). Using mods? Leave it off. No mods? Turn it on. Step 9 explains the differences. |
| World modifiers | The same as Valheim's "Host a server" screen: combat difficulty, death penalty, resources, raids, portals. Leave them alone for the default game. |
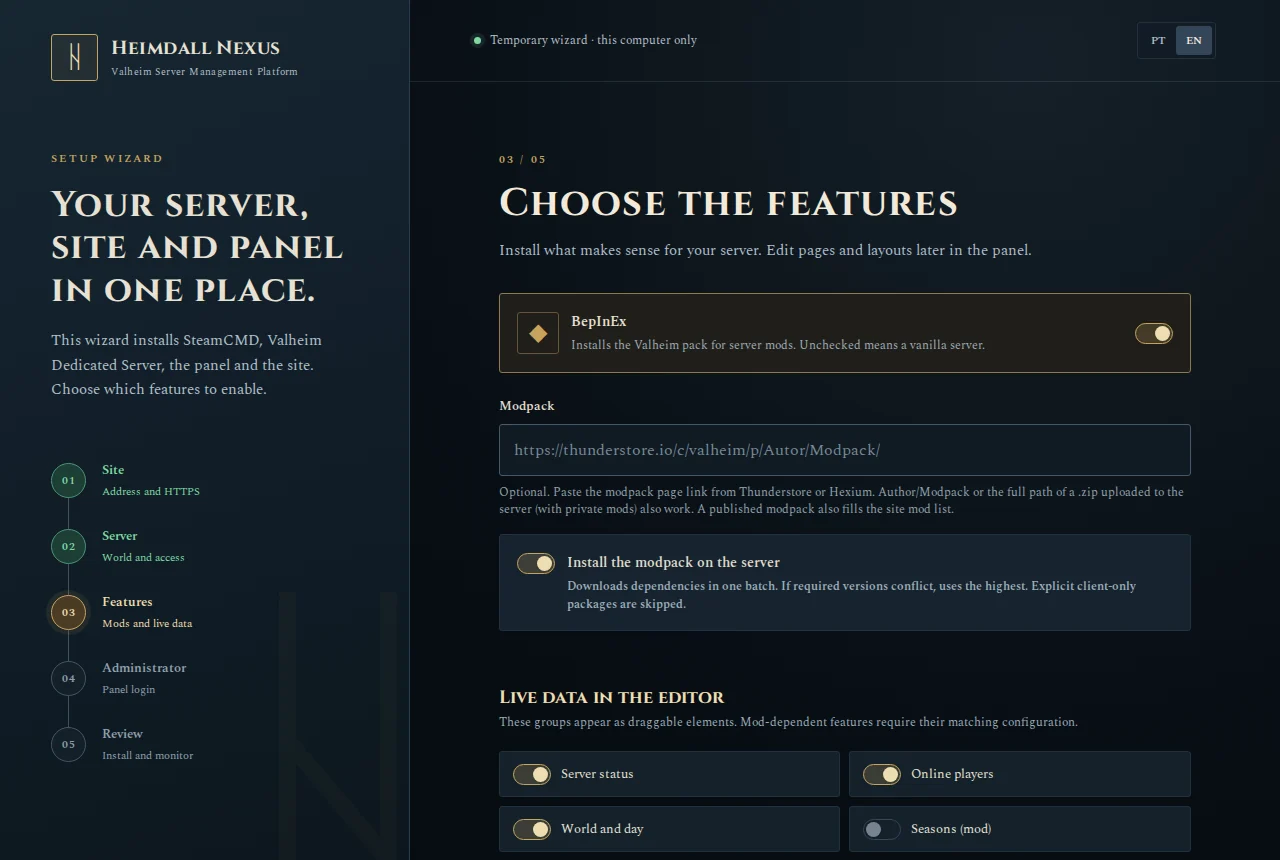
| Field | What to enter |
|---|---|
| BepInEx | Valheim's "mod loader". Turn it on for a modded server; off for the original game (vanilla). With mods, crossplay on screen 2 must stay off: the two do not work together. |
| Modpack | Optional. A mod pack link from Thunderstore or Hexium, or the path of a .zip on the computer, like C:\Mods\MyPack.zip. Unsure? Leave it blank: mods can be installed later from the panel. |
| Install the modpack on the server | On: downloads and installs the pack's mods on the server. Off: the pack only shows in the website's mod list. |
| Live data in the editor | Information the website shows by itself: whether the server is up, how many players, the in-game day. Leave them as they are. |
Note
On a modded server, each player also needs the same mods on their own computer. Heimdall takes care of the server; players usually install mods with r2modman or the Thunderstore app.
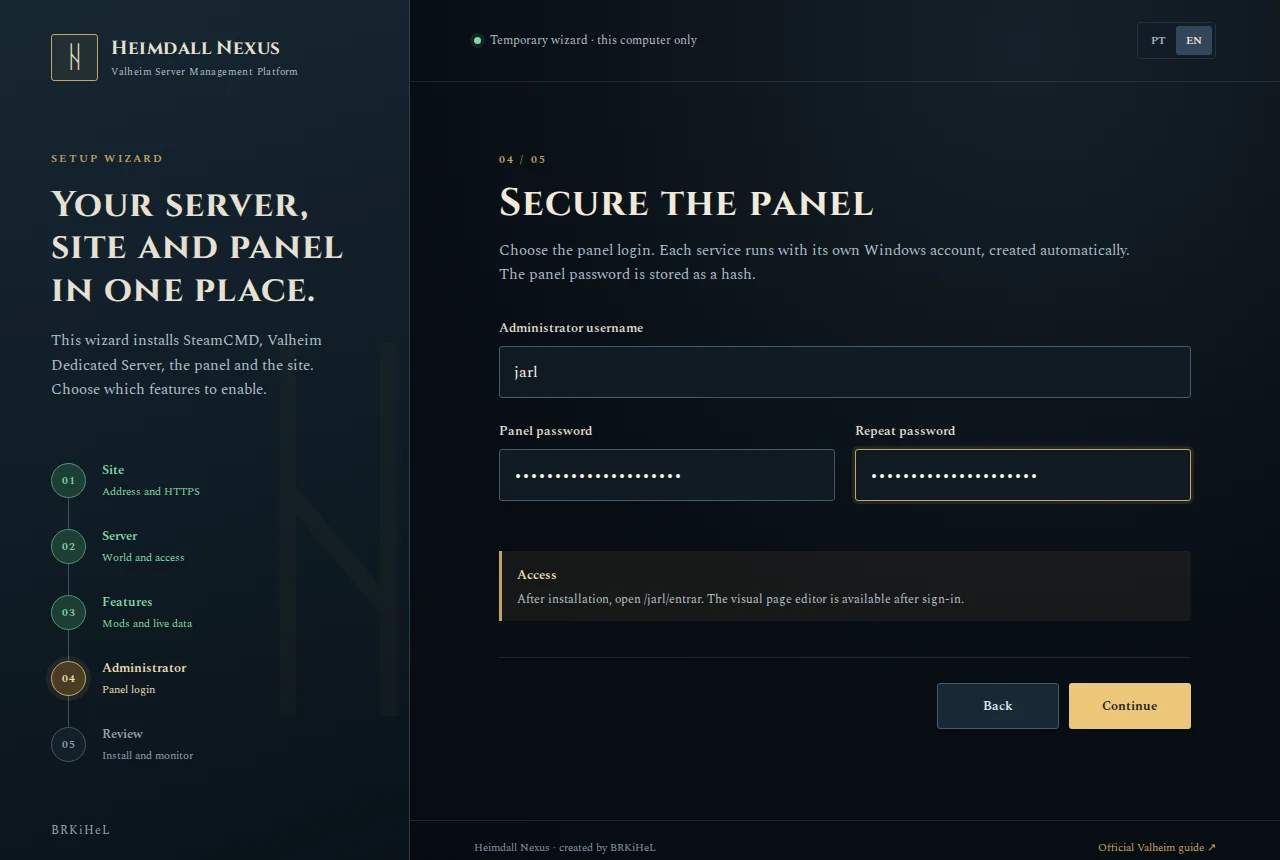
| Field | What to enter |
|---|---|
| Administrator username | The panel login. jarl is fine. |
| Panel password | The password to sign in to the panel. At least 10 characters. Not the game password: this one is yours alone. |
| Repeat password | The same password again. |
Tip
Write this password down somewhere safe, or keep it in a password manager. You will need it to sign in to the panel.
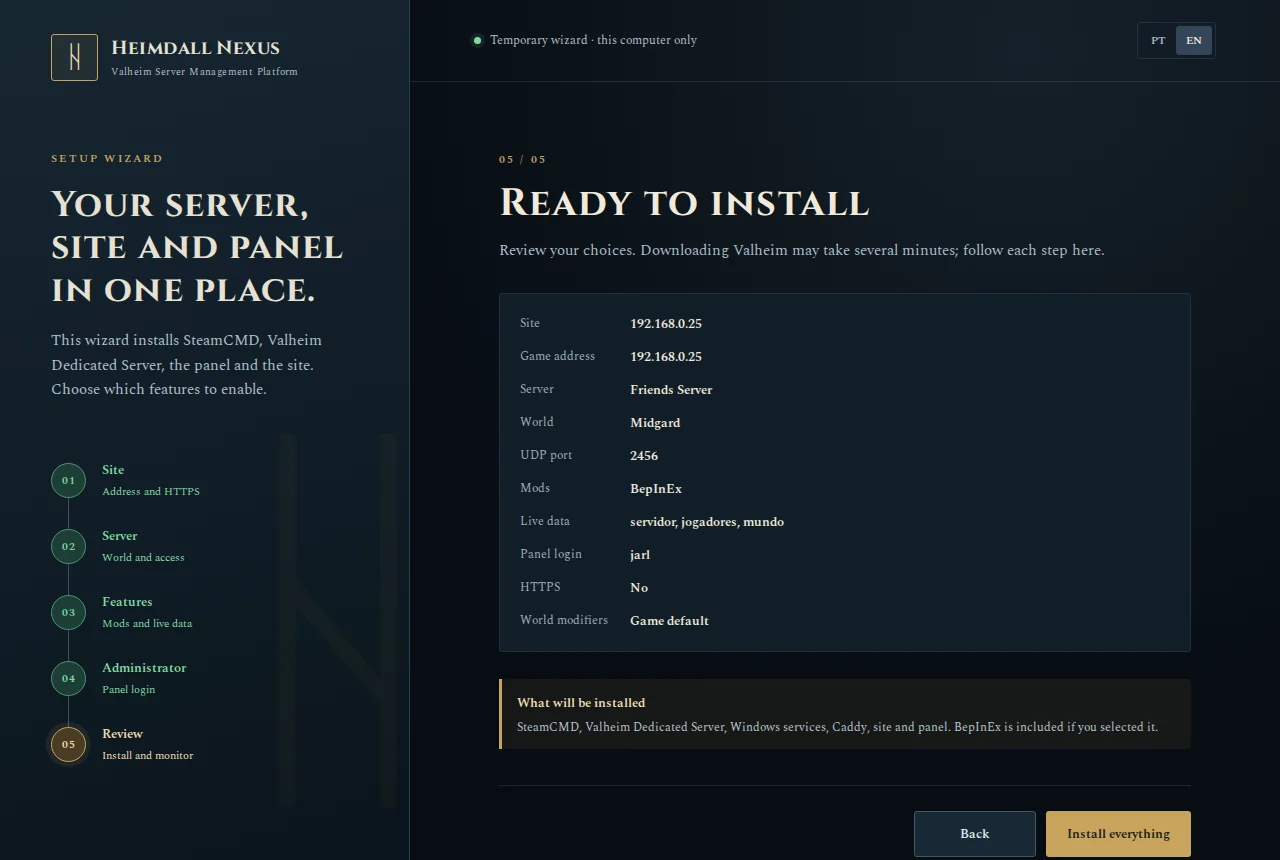
Check the summary. If something is wrong, click Back. If all is right, click Install everything.
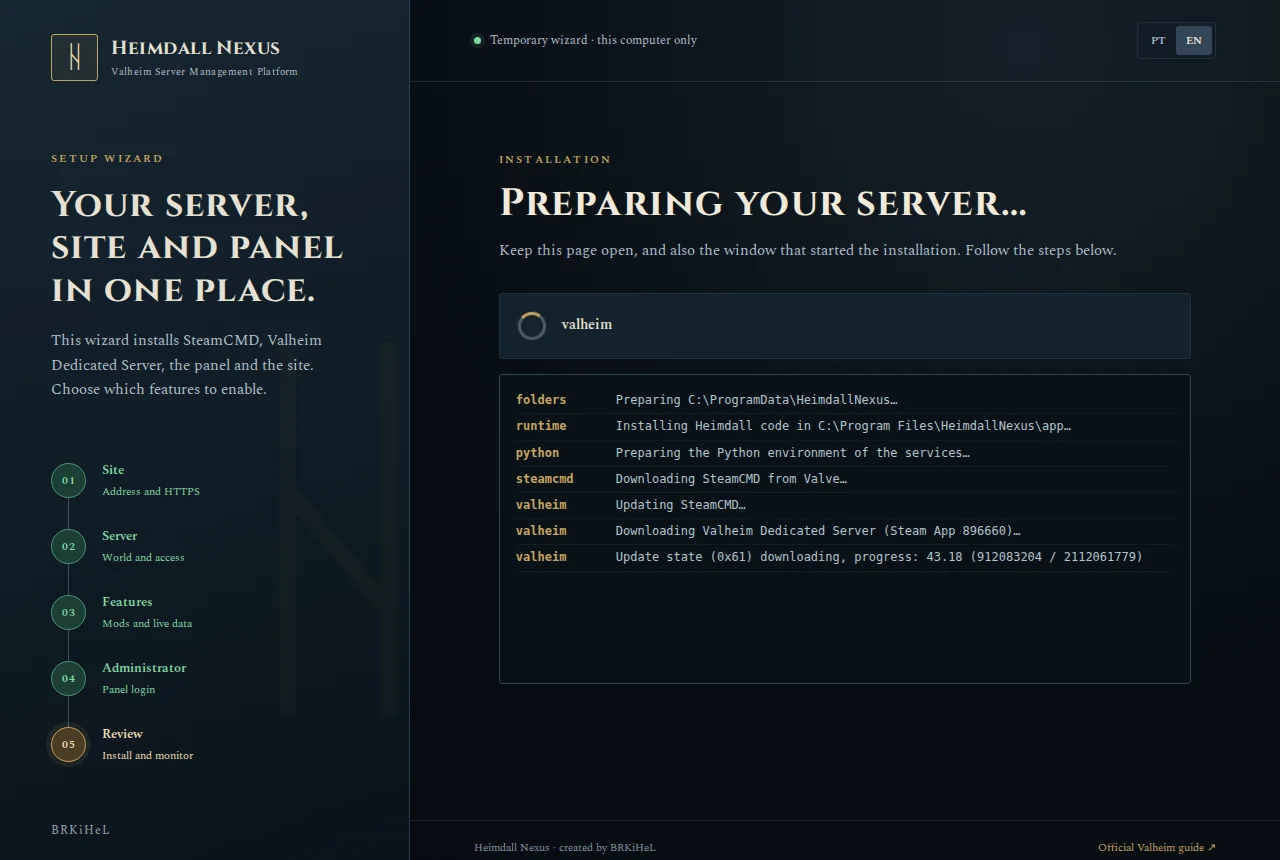
Now you just wait. The browser shows each step as it happens:
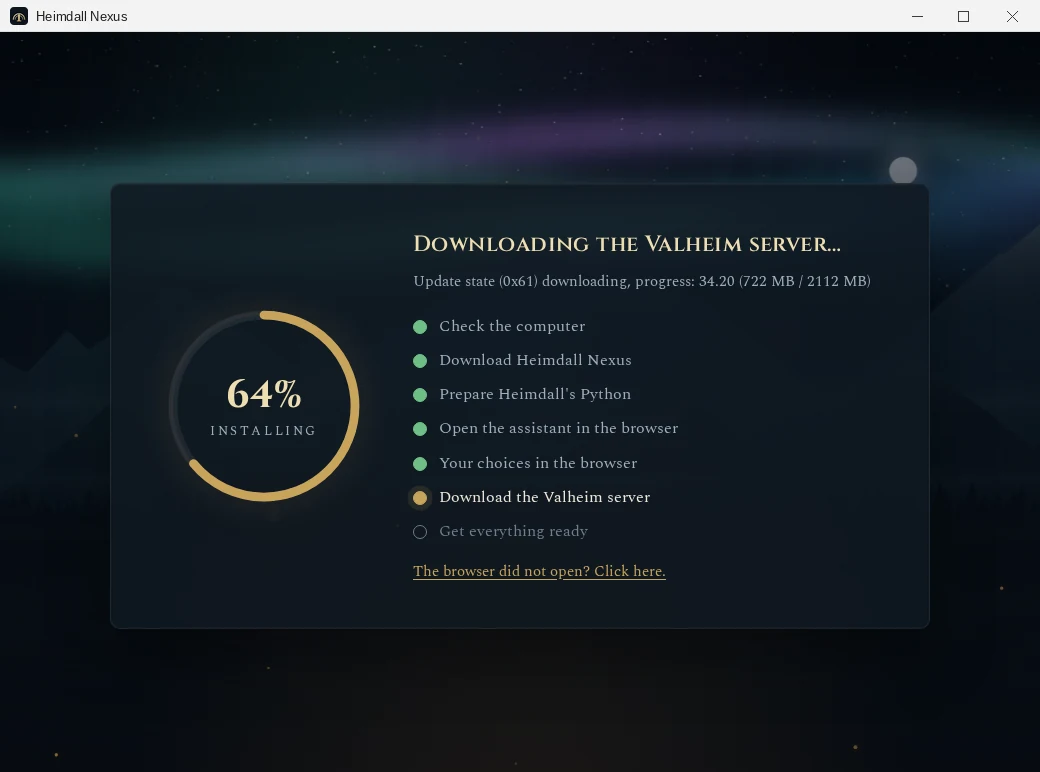
And the app window follows along, with the percentage in the ring:
| What shows | What is happening | Time |
|---|---|---|
folders, runtime, python
|
Creates the folders, copies Heimdall and prepares its libraries | 1 to 3 min |
steamcmd |
Downloads SteamCMD, Valve's official tool for downloading servers | seconds |
valheim |
Downloads the Valheim server (about 2 GB) | 5 to 20 min |
bepinex, modpack
|
Installs the mod loader and the modpack, if you chose them | 1 to 5 min |
website |
Prepares and publishes the website | seconds |
services, firewall
|
Creates the Windows services and opens the game's ports in the firewall | seconds |
While Valheim downloads, the percentage may sit still for a while. That is normal: keep waiting.
Note
If a step fails, the message shows in red in the browser and in the app, with a Retry button in the browser. The cause is usually the internet or disk space. Fix it and click the button: what was already done is not redone.
When the browser shows Heimdall Nexus is ready, the installation is over:
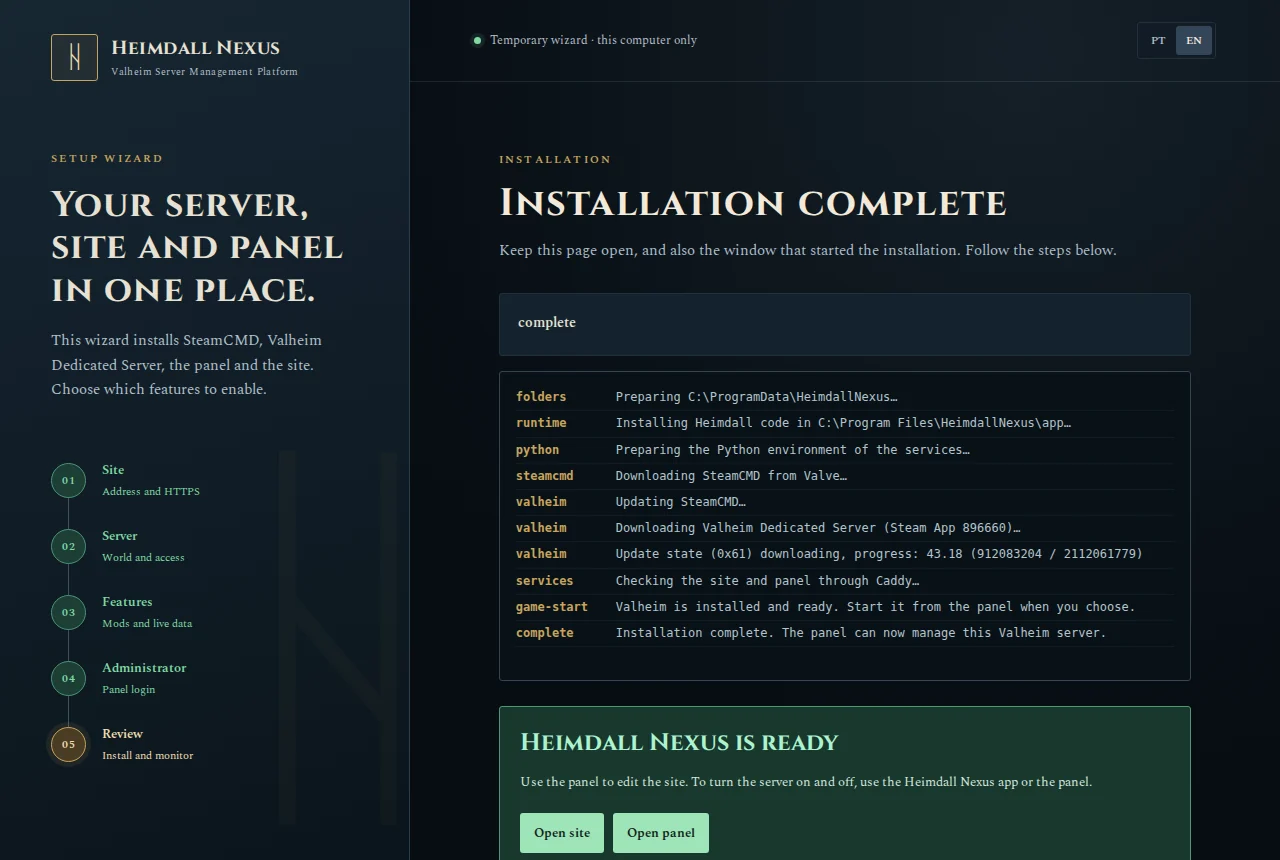
A few seconds later, the app says so too, with a green ring:
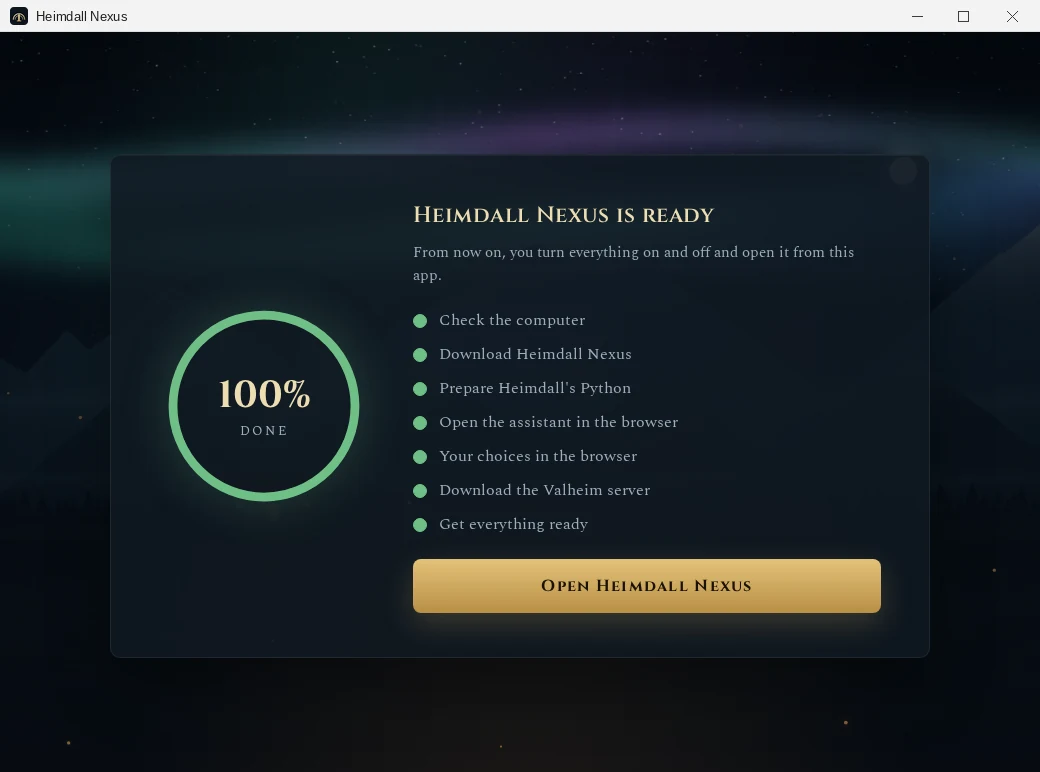
Click Open Heimdall Nexus. The installation window closes and the control center opens, explained in the next step.
Tip
The HeimdallNexus-Windows-….exe file in Downloads can now be deleted.
The app is installed on the computer and lives in the Start menu (and on
the desktop, if you asked for the shortcut) as Heimdall Nexus.
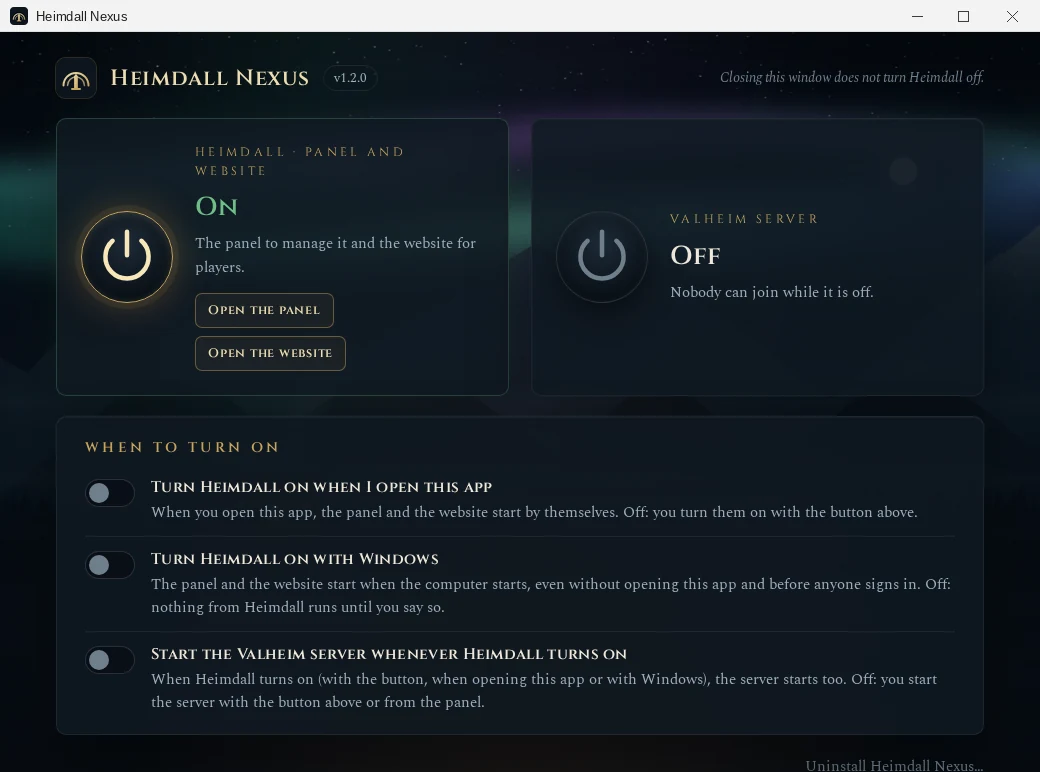
From now on, whenever you open Heimdall Nexus from the Start menu or the shortcut, this is the window you get:
| Button | What it turns on and off |
|---|---|
| Heimdall · panel and website | The admin panel and the server's website. With it on, the Open the panel and Open the website buttons work. |
| Valheim server | The game server. On, players can join. |
To turn something on or off, click its round button. It shows the state:
- dark: off;
- with a turning ring: starting, stopping or saving the world. Wait;
- lit, golden: on.
Before turning something off, the app asks if you are sure. When the server stops, the world is saved first.
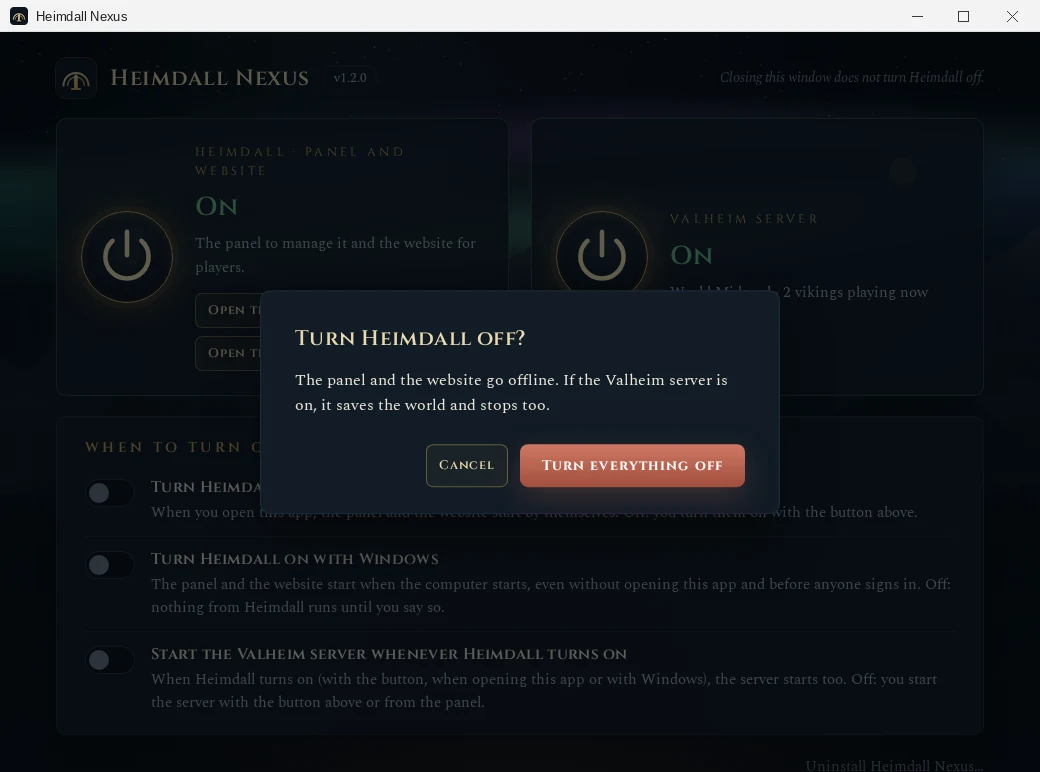
Important
Closing the window turns nothing off. The server, the panel and the website keep running by themselves, with no window open. To turn them off, use the round buttons.
Here you choose whether anything starts by itself. All of them start off: nothing from Heimdall runs until you say so.
| Switch | When it is on |
|---|---|
| Turn Heimdall on when I open this app | Opening the app turns the panel and the website on. |
| Turn Heimdall on with Windows | The panel and the website start when the computer starts, even if nobody opens the app or signs in to Windows. |
| Start the Valheim server whenever Heimdall turns on | Whenever Heimdall turns on (with the button, when opening the app or with Windows), the server starts too. |
Which combination?
- It is the PC you use every day (games, work): leave all of them off and use the buttons only when you want to play. The PC spends nothing on the server when you do not want it to.
- It is a PC that stays on just to be a server: turn on "with Windows" and "server whenever Heimdall turns on". After a power cut or a Windows update, everything comes back by itself.
- In the control center, click the round Valheim server button.
- Wait for the ring to stop turning and the text to change to On. The first time, Valheim creates the world, which takes 1 to 3 minutes.
- Click Open the panel. The browser opens the panel's sign-in page.
- Type the panel password you chose on screen 4 and sign in.
- You land on the Console, which shows the live log, the list of what
the server is doing. It is ready for players when the line
Game server connectedappears.
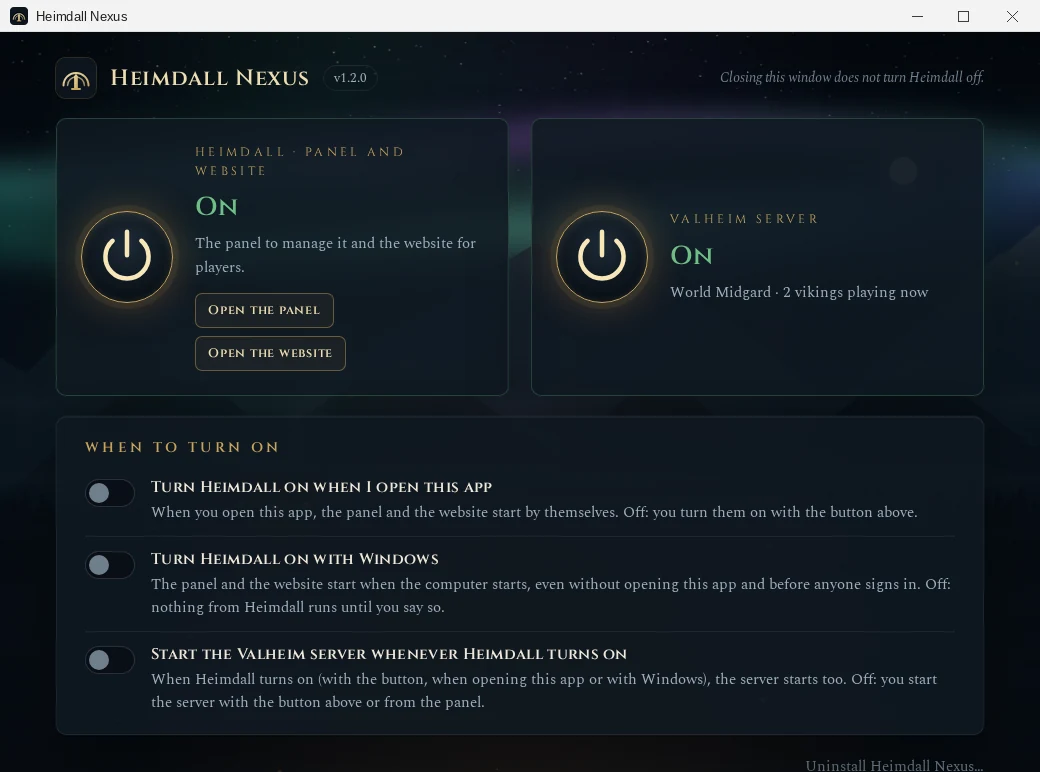
With the server on, the control center shows the world's name and how many vikings are playing.
Tip
The panel's Console also has Start and Stop buttons. Use whichever you like: the app and the panel always show the same state.
Never end the server from Task Manager: that way it does not save the world. Turn it off from the app or the panel.
- Open Valheim and click Start Game.
- Pick your character and click Start.
- Go to the Join Game tab, for joining other people's games.
- Use the join-by-address button (Join IP or Add server, depending on
the game version) and type:
-
on the server's own PC:
127.0.0.1:2456; -
on another computer at home:
SERVER-IP:2456, for example192.168.0.25:2456.
-
on the server's own PC:
- Type the game password from screen 2.
Important
With crossplay on, 127.0.0.1 and your home IPs (192.168.…) do not
work, not even on the server's own PC. Join with the six-digit code
(step 9 shows where to find it), like
your friends. This is Valheim's own rule.
Done, you are on your server. For friends outside your home, follow step 9.
Inside your home, everything already works. For people far away, the connection has to cross the internet to your PC, and this is where most people get stuck. Read calmly: this step explains why it sometimes does not work, and every way out.
When a friend tries to join, their connection first reaches your router. For safety, the router blocks everything coming from outside that nobody asked for. So a server at home only gets friends from outside in one of these ways:
- Crossplay: your server calls a Microsoft "meeting point" (the PlayFab service Valheim uses), and friends meet it there. Since it is your server calling out, the router lets it through. It works on any internet.
- Opening ports on the router: you tell the router that Valheim's connections may come in and should go to your PC. Friends join through your home's public IP. It only works if your provider does not use CGNAT (explained below).
- A tunnel or virtual network: a program makes a path from outside, a bit like crossplay, but run by another company. It is the way out for people with CGNAT who use mods, or do not want crossplay.
Note
And when Valheim hosts from the game itself? When you tick "Start server" inside Valheim, the game also uses a meeting point (Steam's or crossplay's), which is why friends can join without touching the router. The dedicated server, which is what Heimdall installs, works the same way with crossplay on. With crossplay off, it expects friends to arrive directly through the ports, and then the router has to allow it.
| Crossplay | Open ports | Tunnel or virtual network | |
|---|---|---|---|
| Router changes | No | Yes | No |
| Works with CGNAT | Yes | No | Yes |
| How friends join | Six-digit code | PUBLIC-IP:2456 |
The address the service gives |
| What changes by itself | The code, on every server restart | The public IP, when the provider changes it | Depends on the service |
| Modded server | Does not work (vanilla only) | Works | Works |
| Xbox players | Can join | Cannot | Cannot |
| Cost | Free | Free | Free or paid, depending on the service |
Which one:
- Server without mods (vanilla): use crossplay (way A). It works on any internet and asks nothing of the router.
- Modded server, internet without CGNAT: open the ports (way B).
- Modded server, internet with CGNAT: ask your provider for a public IP (see the tip in the CGNAT section) and open the ports, or use a tunnel or virtual network (way C), or rent a server.
Not sure whether you have CGNAT? Find out whether your internet has CGNAT shows how to check in two minutes.
Warning
Crossplay is for servers without mods. With crossplay on, Valheim changes how it connects players, and mods (BepInEx) stop working for them: at most, a mod that runs only on the server and asks nothing of players survives. If your server has mods, skip to way B or way C.
If you turned Enable crossplay on in screen 2 of the wizard, skip to item 4.
- In the panel, open Server Config.
- Turn Crossplay on and click Save.
- The panel offers Restart to apply. Click it.
- On the panel's Console, wait for the server to be ready and look in the
log for a line with
join code. It has a six-digit code. - Send the code to your friends. In Valheim, they go to Join Game, click Join IP (or Add server) and type the code instead of an address.
Important
The code changes every time the server restarts: when you turn it off and on, after a Windows restart, a game update or a settings change. The old code stops working. Whenever it restarts, get the new code from the Console and send it to your friends again.
Crossplay's limits:
- the connection goes through Microsoft's meeting point, which may add a little delay (ping) compared with a direct connection;
- neither on your PC nor at home can you join with
127.0.0.1or192.168.…: everyone joins with the code; - it does not work with a modded server (see the warning above).
Many providers, especially fiber and mobile internet, share one public IP among several customers. That is called CGNAT. With CGNAT, the public IP is not yours alone, and opening router ports does nothing: your friends' connection stops at the provider before it reaches your home.
To find out:
- Check your public IP. Search "what is my ip" in the browser and write the number down.
- Check the IP your router gets from the provider. Sign in to the router (as in way B, items 1 and 2) and look, on the home page or under Status, for a field called WAN IP, Internet IP, External IP or WAN IPv4 Address.
- Compare:
| What you saw | What it means |
|---|---|
| Both numbers are the same | No CGNAT. Opening ports works (way B). |
The WAN IP starts with 100. (from 100.64 to 100.127) |
CGNAT. No mods: crossplay (A). With mods: a public IP from your provider, or a tunnel (C). |
| The numbers are different | Almost always CGNAT. No mods: crossplay (A). With mods: a public IP from your provider, or a tunnel (C). |
The WAN IP starts with 192.168., 10. or 172.
|
There are two routers in a row (the provider's and yours). See the tip in way B. |
Tip
You can get out of CGNAT, and for a modded server that is usually the best way. Many providers give you a public IP if you ask support, free or for a small fee. Ask: "Is my connection behind CGNAT? Can you give me a public IP?". Do not confuse it with a static IP, which is something else and usually costs more; for gaming, a public IP is enough.
This only works without CGNAT. It gives the most direct connection, but every router has a different menu. It is the standard way for a modded server. The general route is:
-
Find the router's address. Press Windows + R, type
ncpa.cpland press Enter. Double-click your connection, click Details… and look for IPv4 Default Gateway. It is usually192.168.0.1or192.168.1.1. - Sign in to the router. Type that number in the browser. The username and password are usually on a sticker under the device.
- Find the ports section. Its name changes by brand: Port Forwarding, Virtual Server or NAT.
-
Create a rule with:
- protocol UDP;
- ports 2456 to 2457;
- destination IP: your PC's IP (the
192.168.0.25from screen 1).
- Save.
- Find your public IP: search "what is my ip" in the browser.
- Friends join with
PUBLIC-IP:2456, with Valheim's Join IP button.
The Windows firewall was already opened by the installation: only the router is left.
Tip
Your PC's IP may change when the router restarts, and then the rule points the wrong way. To avoid that, look in the router for DHCP Reservation (or Static IP, Address Reservation) and pin your PC's IP.
Tip
Your public IP may change too, whenever the provider wants or when the
modem restarts. If friends suddenly cannot join, check the IP again and send
the new number. To avoid this, use a dynamic DNS (DDNS) service such as
DuckDNS or No-IP: it gives you a fixed name, like myserver.duckdns.org, that
always points at your current IP. Many routers have a ready DDNS option.
Note
Two routers in a row (the provider's modem and a router of yours): the rule has to exist on both, or the provider's modem has to be in bridge mode. If you cannot change the provider's modem, ask their support to put it in bridge mode, or use crossplay (without mods only).
Here a program from another company makes the path the router will not. There are two kinds:
| Kind | How it works | Examples |
|---|---|---|
| Game tunnel | A program on your PC opens a public address at the tunnel company and passes connections on to your server. Friends install nothing. | playit.gg, Localtonet |
| Virtual network | You and each friend install the same program, and everyone is "on the same network", as if you lived in the same house. | Tailscale, ZeroTier, Radmin VPN |
Things to know before choosing:
- Valheim uses UDP, and not every tunnel accepts UDP on its free plan. Check before paying;
- with a tunnel, friends use the address the service shows, instead of your public IP; the server stays the same;
- with a virtual network, friends join with the IP the program gives your PC
(for example
100.64.12.34:2456), and only people on the network can join; - these services are not part of Heimdall: follow each one's own guide.
Note
Rather not depend on any of this? A rented server (a VPS) has its own public IP and stays on all the time. Heimdall runs there too, on Linux: see Installation on Linux.
The website and the panel use TCP ports 80 and 443. To open them from outside:
- without CGNAT: create a router rule like way B's, with protocol TCP and ports 80 and 443;
- with CGNAT: the website only opens from outside through a tunnel that accepts websites (HTTP), such as Cloudflare Tunnel. At home, it works normally.
Crossplay does not carry the website: it is only for the game.
For friends to join, your PC has to be on, with the server on and online. If the PC shuts down, goes to sleep or the internet drops, the server disappears for everyone. The game mostly uses your internet's upload speed: with many players, a low upload can cause lag for everyone. If that becomes a problem, the natural next step is a rented server.
This step only matters if the server will stay on for a long time, for example while friends play without you.
If the computer goes to sleep, the server stops with it.
On Windows 11:
- Open Settings (Windows + I).
- Go to System → Power (or Power & battery).
- Open Screen, sleep & hibernate timeouts (or Screen and sleep).
- In When plugged in, put my device to sleep after, choose Never.
On Windows 10:
- Open Settings (Windows + I).
- Go to System → Power & sleep.
- Under Sleep, in When plugged in, PC goes to sleep after, choose Never.
The screen can still turn off by itself: that does not affect the server.
After Windows restarts, Heimdall only comes back by itself if you turned on the switches from step 6. Without them, open the app and use the buttons.
So Windows Update does not restart in the middle of a game, set your Active hours in Settings → Windows Update → Advanced options.
| I want to... | Where |
|---|---|
| Turn the server on or off | The Heimdall Nexus app (Start menu), or panel → Console |
| Open the panel or the website | App → Open the panel / Open the website |
| Install and update mods | Panel → Mod Manager |
| Back up the world | Panel → Backups → Create backup now. You can also schedule it in Tarefas (tasks) |
| Change the server's name, password or port | Panel → Server Config |
| Change the website or game address, turn HTTPS on or off | Panel → Server Config → Endereço (how) |
| Edit the website | Panel → Aparência (appearance) → Layout Editor |
Every panel screen is explained in Operations. Where the files live, if you ever need them:
| What | Where |
|---|---|
| Worlds | C:\ProgramData\HeimdallNexus\valheim\saves |
| Backups | C:\ProgramData\HeimdallNexus\valheim\backups |
| Server log | C:\ProgramData\HeimdallNexus\valheim\logs |
| Server mods | C:\ProgramData\HeimdallNexus\valheim\current\BepInEx\plugins |
C:\ProgramData is hidden in File Explorer. To open it, copy the path, paste it
into File Explorer's address bar and press Enter.
Installed on another disk? Replace C:\ProgramData\HeimdallNexus with
<disk>:\HeimdallNexus\data. For example, the worlds are in
D:\HeimdallNexus\data\valheim\saves. The folder's README.txt explains each part.
Version 1.3.0 or newer. In the panel, open Server Config. The Endereço (address) card changes the website and panel address, the connection address the website shows players, and HTTPS:
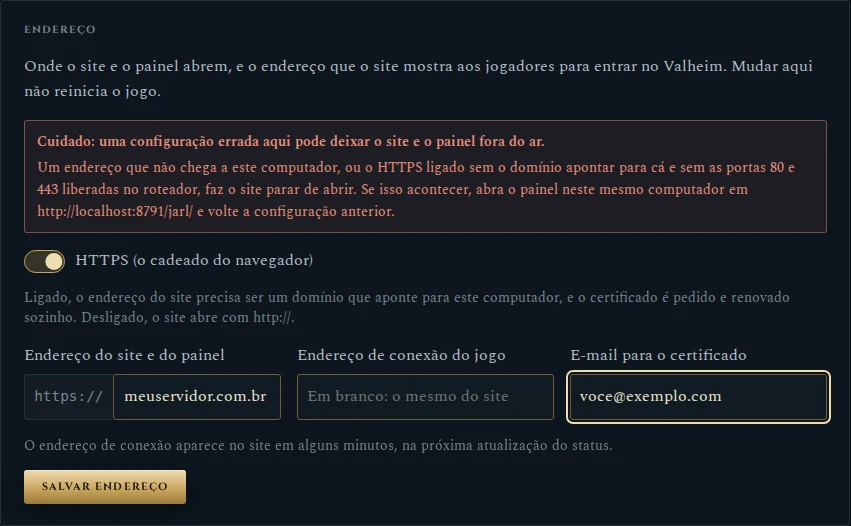
- Read the red warning. A wrong address takes the website and the panel offline. It also says how to get back in (see below).
-
Choose HTTP or HTTPS with the switch. It shows
http://orhttps://in front of the address.-
Off (HTTP): for an IP, like
192.168.0.25, or a domain. - On (HTTPS): only for a domain of yours already pointing at this PC, with TCP ports 80 and 443 forwarded by the router. An e-mail for the certificate field appears: the certificate is requested and renewed by itself, in its name.
-
Off (HTTP): for an IP, like
-
Type the website address, without
http://(paste it with it and the switch follows). - Game connection address: what friends type in Valheim. Blank uses the website's (see the table on screen 1).
- Click Salvar endereço (save address) and confirm.
Heimdall updates everything that depends on the address: the website, its links, the app's Open the panel and Open the website buttons and what friends see. The game does not restart. Turning HTTPS on or off restarts the panel once by itself, and the page opens the new address.
Important
Did the website go offline after the change? On this same computer, open
http://localhost:8791/jarl/ in the browser. That address reaches the
panel directly, without the website server. Put the previous settings back in
Server Config → Endereço and save.
- In the panel, open Sobre e atualizações (about and updates).
- Click Procurar atualizações (check for updates).
- Read the list of changes and click Atualizar (update).
The panel disappears for a few seconds and comes back by itself. The Valheim server is not restarted: whoever is playing will not even notice.
There are two ways to start, and both lead to the same place:
- From the app: open Heimdall Nexus and click Uninstall Heimdall Nexus…, at the bottom.
- From Windows: Settings → Apps → Installed apps, find Heimdall Nexus, click the three dots (…) and Uninstall.
The app asks two things. First, whether you really want to uninstall:
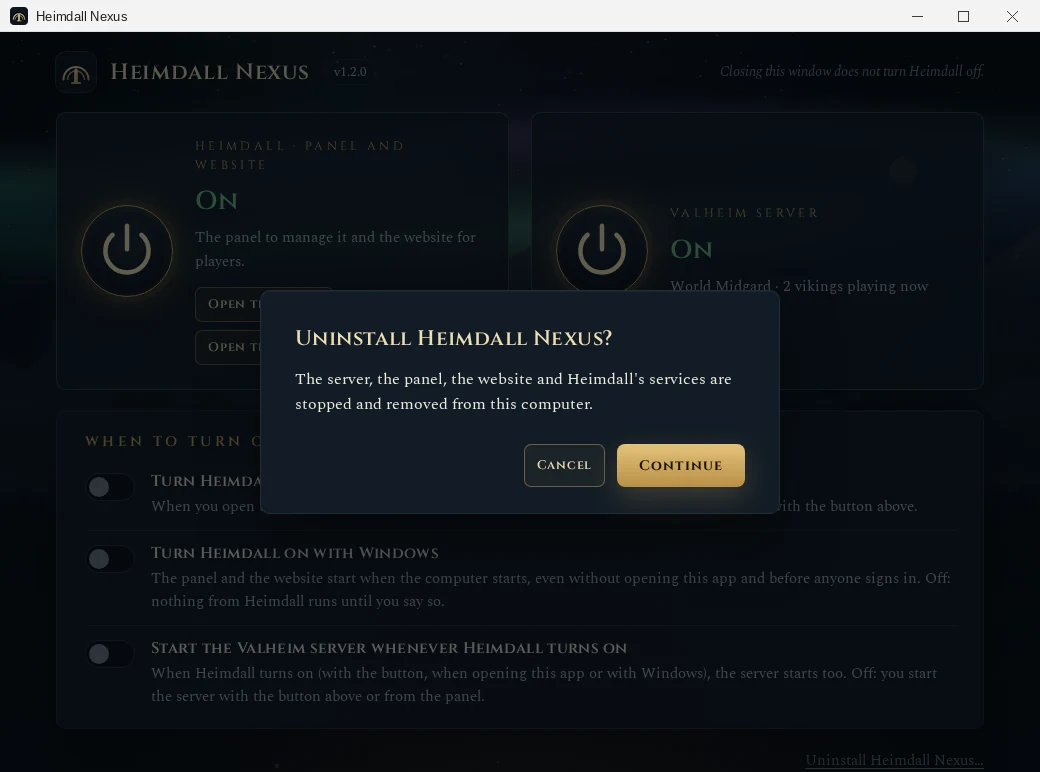
Then, what to do with your worlds:
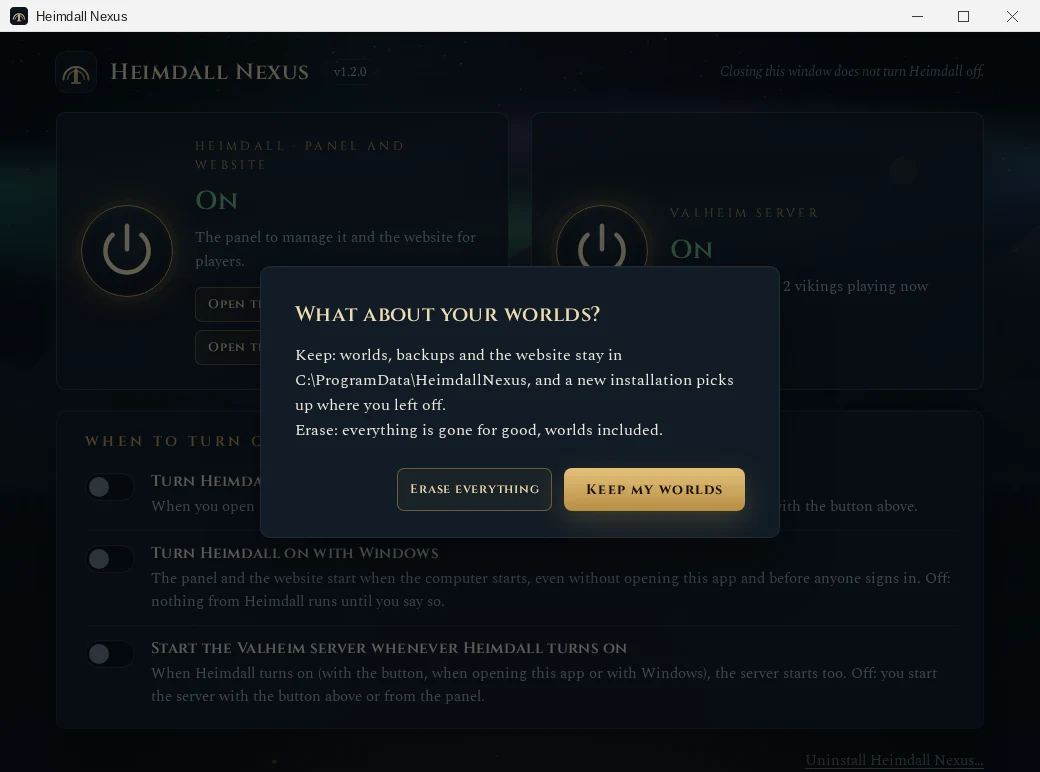
| Choice | What happens |
|---|---|
| Keep my worlds | Removes Heimdall but keeps worlds, backups, the website and settings in C:\ProgramData\HeimdallNexus. If you install again, everything comes back as it was. |
| Erase everything | Removes everything, worlds included. There is no undo. |
If you kept the worlds and install again, the app already suggests the same place in Where to install, to pick up where you left off.
Caution
Before choosing Erase everything, keep a copy of the world: download a
backup from the panel or copy the C:\ProgramData\HeimdallNexus\valheim\saves
folder somewhere else.
Windows asks for permission (click Yes) and, within a minute or two, the farewell appears:
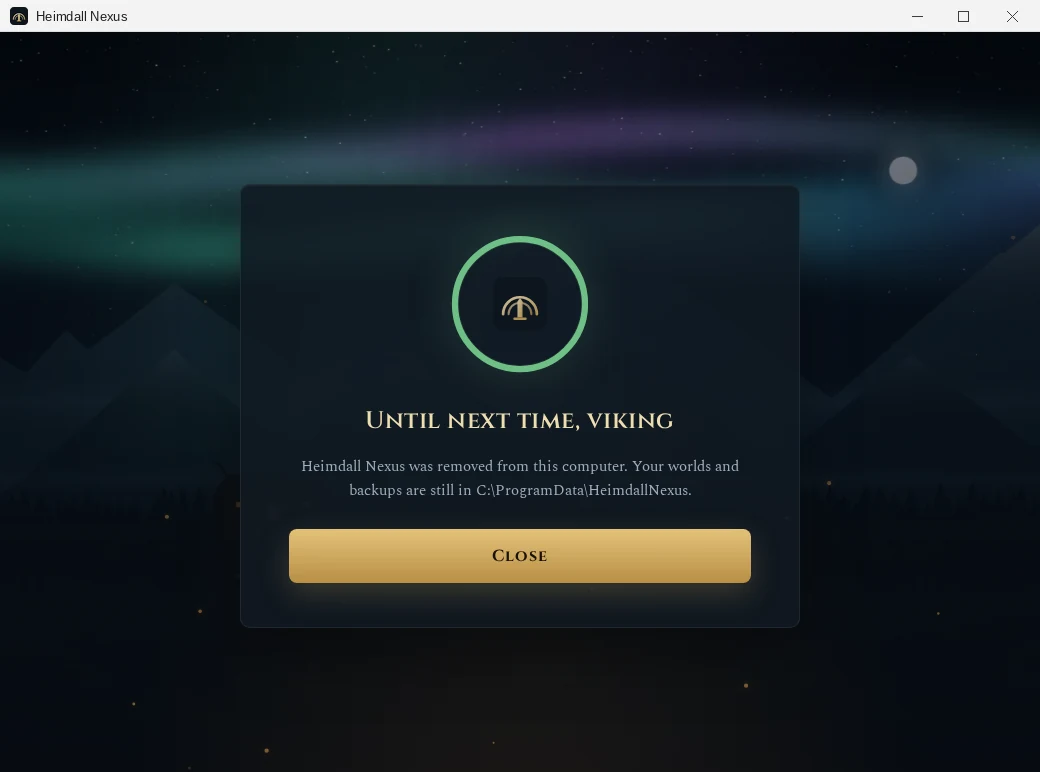
To reinstall from scratch: uninstall choosing Erase everything, download the app again (step 1) and follow the guide from the start.
The Sagas add the map, the stories, the Armory and the rankings to the website (see the Sagas guide). They need BepInEx on.
Installing the server part is the only time you need a command:
- In the app, turn the Valheim server off (Heimdall can stay on).
- Open the Start menu, type PowerShell, right-click Windows PowerShell and choose Run as administrator. Click Yes when Windows asks.
- Copy the two commands below, paste them into the window (right-click inside it) and press Enter:
$app = "$env:ProgramFiles\HeimdallNexus\app"
& "$env:ProgramFiles\HeimdallNexus\venv\Scripts\python.exe" "$app\deploy\windows\install-sagas.py" "$app\dist\sagas\HeimdallSagas.Bridge.dll"- When it finishes, close PowerShell and start the server from the app.
- Follow the Sagas guide from step 4 of the Installation section (the program each player installs).
Click More info, the small link below the text. Only then does the Run anyway button appear.
No harm done: nothing was installed. Click Start installation again and, this time, choose Yes.
Your Windows account is not an administrator. Ask whoever runs the computer to type the password, or sign in with an administrator account and install from it.
In the app window, click The browser did not open? Click here. The wizard only opens on this computer and while the app window is open.
Open the HeimdallNexus-Windows-….exe again and click Start installation.
What was already downloaded is reused.
Another program is using port 80, the website's port. The usual suspects are IIS, XAMPP, WAMP, Apache and old versions of Skype. Close or uninstall that program and click Retry in the wizard.
If you do not know which one it is, a veteran finds out like this, in
PowerShell: Get-Process -Id (Get-NetTCPConnection -LocalPort 80 -State Listen).OwningProcess.
Read the message: it says why. The most common case is a folder your account
created, like D:\Games. Pick the disk from the list (like Games (D:)), and
Heimdall creates D:\HeimdallNexus at its root. The
reason for this lock is explained in step 3.
Open http://localhost:8791/jarl/ on this same computer, sign in to the panel
and put the settings back in Server Config → Endereço. If you turned HTTPS
on, check that the domain points at your internet's public IP and that TCP
ports 80 and 443 are forwarded by the router.
The message on screen says why. For the details, the logs are in
C:\ProgramData\HeimdallNexus\logs, one folder per service. If you need help,
open an issue with the
message, without passwords and without links containing token=.
Only the Windows account that did the installation turns Heimdall on and off without a password. Sign in with it, or right-click the app and choose Run as administrator.
The first time, wait up to 3 minutes. If it does not come, check the last lines of the log on the panel's Console: mod errors show there. To test without mods, turn BepInEx off in Server Config and start the server again.
- With crossplay: check that they are using the current code. It changes on every server restart; get the new one from the panel's Console.
- With crossplay and mods: the two do not work together. Turn crossplay off in Server Config and use way B or C from step 9.
- With open ports: check whether your internet has CGNAT. If it does, opening ports does nothing; see the ways out in step 9. If not, check the router rule: protocol UDP, ports 2456-2457 and the right PC IP. And check that your public IP has not changed.
With crossplay on, Valheim does not accept 127.0.0.1 or your home IPs. Join
with the six-digit code, like your friends.
This is one of the few cases that needs a command. Open PowerShell as administrator (as in step 2 of the Sagas extension), paste both commands and press Enter:
$app = "$env:ProgramFiles\HeimdallNexus\app"
& "$env:ProgramFiles\HeimdallNexus\venv\Scripts\python.exe" -X utf8 "$app\deploy\windows\run.py" "$app\servicos\painel\definir-senha.py"
Type the new password twice. It does not show while you type, and that is normal.
Heimdall uses Valve's official server, Caddy (the website's server) and WinSW
(which turns programs into services). All of them are downloaded from their
official sources and checked before running. If the antivirus complains, allow
the C:\Program Files\HeimdallNexus folder.
No. The app only turns things on and off and shows their state. The server, the panel and the website run by themselves, with the window closed.
With the buttons off, nothing from Heimdall runs. It only uses memory and processor while it is on.
Yes. Join with 127.0.0.1:2456. Just check the memory: 16 GB is comfortable
for both together.
Yes. The game's worlds are in
%USERPROFILE%\AppData\LocalLow\IronGate\Valheim\worlds_local. In the panel,
open Mundo (world) → Usar um mundo gerado no jogo (use a world made in
the game) and follow the instructions on screen.
Yes, in Server Config, in the panel. The change applies on the server's next restart.
Each part runs with its own Windows account, with no password and no administrator power, and only sees its own folders. The one privileged part answers a closed list of actions, and the panel asks for a password. The app window never runs as administrator and loads nothing from the internet. Even so, only open router ports if you want friends from outside to join.
Installation: HeimdallNexus-Windows-<version>.exe (C# .NET Framework 4.8 +
WebView2, asInvoker). The window runs unelevated; installing and removing run
in an elevated process with no window (--install-worker, --uninstall-worker)
that talks to the window over a named pipe. The app downloads the tag's
-source.zip and checks it against the embedded SHA-256, installs the official
Python 3.12 (signature checked) into C:\Program Files\HeimdallNexus\python
and starts setup_server.py --no-browser, opening the wizard in the user's browser.
Without the app (Windows Server, remote install, automation), with Git and PowerShell as administrator:
git clone https://github.com/brkihel/Heimdall-Nexus.git C:\HeimdallNexus-src
cd C:\HeimdallNexus-src
powershell -ExecutionPolicy Bypass -File .\deploy\windows\install.ps1   # -Direct: wizard over the network (HTTP)
install.ps1 -Direct makes the wizard listen on the network and prints a link
with the server's IP. It is plain HTTP; use it only on a trusted network and
open TCP port 8765. This route does not install the app; update with
deploy\windows\update.py and remove with deploy\windows\uninstall.ps1 [-RemoveData] [-RemovePython] [-Yes].
Where everything lives
With the Windows default, as in the table. Installed on another disk,
everything is under <disk>:\HeimdallNexus: replace C:\Program Files\HeimdallNexus
with …\HeimdallNexus\program and C:\ProgramData\HeimdallNexus with
…\HeimdallNexus\data. Both paths are recorded in HKLM\SOFTWARE\HeimdallNexus
(AppBase, DataDir and Root), which only administrators change; the
services, the scripts, the app and the uninstaller read them from there. The
folder is created owned by Administrators without inheriting the disk's
permissions, and the app refuses a place where an ordinary user could rename or
replace any folder on the path.
| Path | Contents |
|---|---|
C:\Program Files\HeimdallNexus\HeimdallNexus.exe |
The app; desktop.json next to it says where the panel, site and status are |
C:\Program Files\HeimdallNexus\app |
The services' code (only administrators can write) |
C:\Program Files\HeimdallNexus\python, \venv, \git
|
Private Python, libraries and the MinGit used by updates |
C:\Program Files\HeimdallNexus\services |
WinSW and each service's definition (.xml) |
C:\Program Files\HeimdallNexus\tools |
Caddy |
C:\ProgramData\HeimdallNexus\valheim\current |
The game (SteamCMD), BepInEx and mods |
C:\ProgramData\HeimdallNexus\valheim\saves |
The worlds |
C:\ProgramData\HeimdallNexus\valheim\server.env |
Launch options (Jarl → Server Config) |
C:\ProgramData\HeimdallNexus\etc\heimdall.env |
Installation settings (Linux's /etc/heimdall-nexus/heimdall.env) |
C:\ProgramData\HeimdallNexus\state\site |
The website's editable pages |
C:\ProgramData\HeimdallNexus\web |
The published website, served by Caddy |
C:\ProgramData\HeimdallNexus\logs\<service> |
Each service's logs |
%APPDATA%\HeimdallNexus\desktop-app.json |
The app's preferences, per Windows account |
C:\ProgramData\HeimdallNexus does not inherit Windows' permissions: by
default only SYSTEM and administrators get in, and each service gets only the
folders it needs.
Services
All are installed as Manual. The "Turn Heimdall on with Windows" switch sets them to Automatic (the game only with the third switch). The installing account gets, through SDDL, the right to start, stop and change the start type of each service without being an administrator.
| Service | Account | Role |
|---|---|---|
heimdall-executor |
LocalSystem | The only privileged part; answers a fixed list of actions |
heimdall-panel |
NT SERVICE\heimdall-panel |
The panel (Jarl) on 127.0.0.1:8791 |
heimdall-valheim |
NT SERVICE\heimdall-valheim |
The Valheim server |
heimdall-web |
NT SERVICE\heimdall-web |
Caddy: website, panel proxy and HTTPS |
heimdall-jobs |
LocalSystem | Public status, saga feed and scheduled tasks |
heimdall-sagas-jobs |
NT SERVICE\heimdall-sagas-jobs |
Sagas import, stories and map |
Get-Service heimdall-*                  # state of all of them
Restart-Service heimdall-panel          # restarts the panel without touching the game
Stop-Service heimdall-valheim           # stops the game (it saves the world first)
Get-Content C:\ProgramData\HeimdallNexus\valheim\logs\heimdall-valheim.log -Tail 50 -Wait
Differences from Linux
| On Linux | On Windows |
|---|---|
install.sh in a terminal |
The app (or install.ps1) |
| systemd and timers | Windows services (WinSW) and two jobs services |
| journald | Log files per service; the game's restarts on each start and keeps the 3 previous runs |
| Nginx and Certbot | Caddy, with automatic HTTPS |
valheim and panel users |
Virtual accounts NT SERVICE\...
|
| The executor's unix socket | 127.0.0.1:8792 with mutual shared-secret authentication |
deploy/update.sh |
deploy\windows\update.py (Jarl runs it for you) |
deploy/reset-vm.sh |
Uninstall from the app with Erase everything |
deploy/install-sagas-extension.sh |
deploy\windows\install-sagas.py |
On shutdown, Windows sends Ctrl+C to Valheim, which saves the world and exits;
the service waits up to 150 seconds before forcing it. BepInEx is loaded
through winhttp.dll (Doorstop); with it unchecked, the launcher disables it
even if the file is in the folder. The full design is in
docs/WINDOWS.md.