Installation
-
- This pipeline was developed with Guppy version 6.0.1
- However this should be compatible with any guppy version from version 5+
- To get Guppy version 6.0.1 enter:
wget https://mirror.oxfordnanoportal.com/software/analysis/ont-guppy_6.1.1_linux64.tar.gz - This will download the package into your current directory
Firstly install mamba into your conda-base:
# install mamba
conda install mamba -n base -c conda-forgeThe easiest means of installation involves the use of YAML files containing the exact conda environments used in the development of this package. The three YAML files are:
- NanoMetaPipe.yaml
- NanoMetaPipe_HMM.yaml The idea behind these is to allow you to carry out the analysis using the exact same environments that were used for develpoment, thereby reducing the chances of errors occuring due to software version compatibility. As such 'NanoMetaPipe.yaml' corresponds to the environment used for the main NanoMetaBasecall and NanoMetaPipe workflows; while, 'NanoMetaPipe_HMM.yaml' was used for the classification confirmation workflow. To install these conda environments, you must have installed conda!!! (See above instructions). After this, use the commands below to install.
# create a conda environment for the NanoMetaPipe conda environment
conda env create -f NanoMetaPipe.yaml
# create a conda environment for the classification connfirmation conda environment
conda env create -f NanoMetaPipe_HMM.yaml
# create a conda environment for the Re conda environment
conda env create -f NanoMetaPipe_R.yaml
Be aware that the names the conda environments will be saved under will NOT be the filenames of the YAML files. The names of the environments generated in this way will be:
- NanoMetaPipe.yaml generates a conda environment named nanometa_main
- NanoMetaPipe_HMM.yaml generates a conda environment named nanometa_hmm
It is possible to change the names of the environment before you run the
conda env createcommand above. To change the name of the environment before creation: - Open the YAML file
- Change the name on the first line of the file.
# example
name: nanometa_main # original name in the YAML file
name: metagenomics_env # new name of the conda environment- save the file
- run the
conda env createcommand as shown above e.g.conda env create -f NanoMetaPipe.yaml. Note that in this scenario, only the name of the conda environment that will be create is changed. Not the name of the YAML file. That remains the same
To install the most up-to-date versions of the tools described in the CSV file provided in NanoMetaPipe Overview, do the following:
# create an environment for the main pipeline: NanoMetaPipe
conda create -n metagenomics_env
# activate the environment
conda activate metagenomics_env
# install the packages
mamba install -c conda-forge -c bioconda assembly-stats bcftools bedtools biom-format blast biopython blast bowtie2 bracken bwa bwa-mem2 fastool fastqc flye jellyfish kraken2 krakentools kraken-biom krona minimap2 nanofilt nanoplot nanoqc ont-fast5-api pigz pip porechop python qcat quast racon samtools sra-tools trimmomatic trinity
# After installation, run additional steps to update taxonomies
ktUpdateTaxonomy.sh
# For your information, when you want to exit out of an environment to activate another one use:
conda deactivateAgain, the easiest way to install these tools is via conda:
# create environment
conda create -n hmm
# activate
conda activate hmm
# install packages
mamba install -c bioconda -c conda-forge hmmer vsearch muscle trimal pigzTo install R, please go to the official website: https://www.r-project.org/ and install the R package that suits your system. After this, we would also recommend you install RStudio to carry out Microbiome analysis: https://posit.co/download/rstudio-desktop/
Below is a guide to download and install the full RefSeq nucleotide database for Kraken taxonomic classification
# make the folder
mkdir Kraken_DB
# download the taxonomy files
kraken-build --download-taxonomy --db Kraken_DB --threads 12
# download the libraries you want for your database
# bacteria
kraken2-build --download-library bacteria --db Kraken_DB --threads 12 --no-masking
# viruses
kraken2-build --download-library viral --db Kraken_DB --threads 12 --no-masking
# protozoa
kraken2-build --download-library protozoa --db Kraken_DB --threads 12 --no-masking
# fungi
kraken2-build --download-library fungi --db Kraken_DB --threads 12 --no-masking
# archaea
kraken2-build --download-library archaea --db Kraken_DB --threads 12 --no-masking
# plant
kraken2-build --download-library plant --db Kraken_DB --threads 12 --no-masking
# plasmids
kraken2-build --download-library plasmids --db Kraken_DB --threads 12 --no-masking- In some instances, an error might occur during the installation of the database after running the
kraken2-buildcommand:ERROR: "rsync_from_ncbi.pl: unexpected FTP path (new server?) for https://ftp.ncbi.nlm.nih.gov/genomes/all/GCF/900/128/725/GCF_900128725.1_BCifornacula_v1.0"- This can be solved by opening the
rsync_from_ncbi.plscript that is installed along with kraken2 and change line below:
 	# original line
 	if (! ($full_path =~ s#^ftp://${qm_server}${qm_server_path}/##)) {
 	# changed to:
 	if (! ($full_path =~ s#^https://${qm_server}${qm_server_path}/##)) {
- This can be solved by opening the
- Other errors that can come up during installation is:
rsync_from_ncbi.pl: unexpected FTP path (new server?) for na- To fix this, the
assembly_summary.txtthat is created from thekraken2-buildcommand has to be fixed. This means:
 	# change into the library affected. Here it is in the bacteria
 	# there should be a file named: assembly_summary.txt
 	awk -v FS='\t' '$20 != "na" {print $0}' assembly_summary.txt > new_assembly_summary.txt
 	cp new_assembly_summary.txt assembly_summary.txt
- To fix this, the
Download the necessary SILVA Ref database from https://www.arb-silva.de. If you have specific targets of interest that you wish to confirm the presence of then you can specifically download just those organisms using the browser: https://www.arb-silva.de/browser/. An example image is shown below:
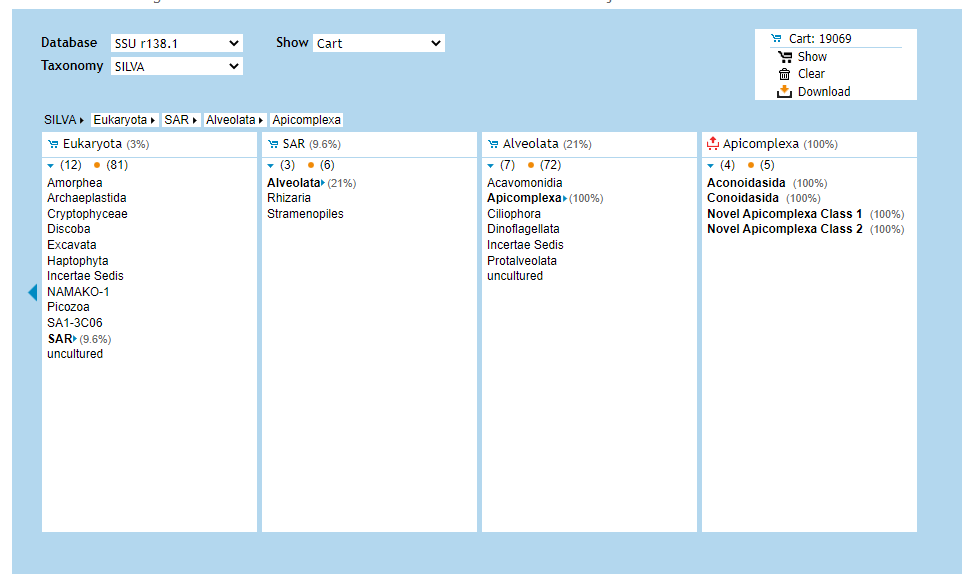
Here, all sequences in the Apicomplexa phylum are in the cart, ready for download. Once downloaded, place the downloaded zipped folder in the folder of choice and de-compress it. The full path to this database will be passed to the SSU_rRNA.py script.