Repository navigation
03. Deployment Architecture
Read this before Deploying Terraform. The mode you choose determines how your tfvars are configured, what post-deploy steps are required, and how beacons call back. Both modes deploy the same seven-host infrastructure. Only the front door changes.
One question determines your mode:
Can your targets reach the public internet?
| If: | Use: |
|---|---|
| You're doing general study, AV evasion practice, or payload testing against internet-accessible targets | Direct Access |
| Your targets are inside a closed VPN platform (cyber range) reachable only over OpenVPN | Tunneled Access |
If you don't have a specific target platform in mind yet, start with Direct Access. It requires a domain you own, but it's the simpler path and covers most use cases. You can rebuild in Tunneled Access later, but switching modes requires terraform destroy and a fresh terraform apply.
| 🌐 Direct Access (internet-accessible targets) | 🔐 Tunneled Access (OpenVPN tunnel targets) | |
|---|---|---|
| Use when | Targets on the public internet | Targets only reachable via OpenVPN |
| Domain required | Yes. You own and control the domain. | No. Redirector is reached by its public Elastic IP. |
| TLS | Let's Encrypt cert via Certbot (one manual step after deploy) | Self-signed cert auto-generated at deploy time |
| Scanner blocking | Enabled. redirect.rules filters AV vendors, TOR exits, scanner UAs. |
Disabled. Not useful in isolated lab networks. |
| VPN routing | None | OpenVPN client on redirector + WireGuard tunnel from team server VPC to redirector |
| C2 callback address | Your domain (stable across redeploys if you keep the same domain) | Redirector's public Elastic IP over HTTPS (default). The tun0 IP is only for targets fully isolated from the internet. |
| Key tfvars | redirector_domain = "yourdomain.tld" |
redirector_domain = "", enable_vpn_tunnel = true, enable_redirector_htaccess_filtering = false
|
| Extra post-deploy step | Point A record at redirector EIP, run Certbot | Upload .ovpn, start vpn-tunnel
|
| Wiki path | Prerequisites → Deploying Terraform → Verify → First Run Track A → C2 pages | Prerequisites → Deploying Terraform (skip DNS step) → Verify → First Run Track B → C2 pages |
Both modes deploy the same underlying infrastructure. The topology below is fixed regardless of which mode you choose.
+----------------------------------------------------------------------+
|                    redStack Network Architecture                     |
+----------------------------------------------------------------------+

                          [ Operator ]
                       Browser / MobaXterm
                              |
                   HTTPS :443 |  SSH (key)
                              |
+-----------------------------+----------------------------------+
|             TeamServer VPC (10.50.0.0/16)                      |
|   +--------------------------------------------------------+   |
|   | guacamole                Elastic IP: <Public IP>       |   |
|   | 10.50.x.x                                              |   |
|   +--+----+-------+-------+---------+----------------------+   |
|      |    |       |       |          |      Guacamole-managed  |
|     SSH  SSH     VNC     RDP     SSH/xRDP       Sessions       |
|      v    v       v       v          v                         |
|  +------++------++------++--------++------+                    |
|  |mythic||sliver||adaptix||windows||kali  |                    |
|  +------++------++------++--------++------+                    |
|                ( no public IPs )                               |
+-----------------------------+----------------------------------+
                              |
       VPC Peering: 10.50.0.0/16 <-> 10.60.0.0/16
                              |
+-----------------------------+----------------------------------+
|             Redirector VPC (10.60.0.0/16)                      |
|   +--------------------------------------------------------+   |
|   | redirector              Elastic IP: <Public IP>        |   |
|   | 10.60.x.x                                              |   |
|   | Apache :80/:443  (X-Request-ID + URI validation)       |   |
|   +--------------------------------------------------------+   |
+-----------------------------+----------------------------------+
                              ^
                              |
                    [ Targets / Implants ]
The redirector lives in its own isolated VPC deliberately. In a real engagement, the redirector would be an external VPS (Linode, Vultr, DigitalOcean), and the C2 servers would sit on private infrastructure. The two VPCs mirror that separation inside AWS. This means:
- C2 servers have no public IPs. The only path to them from the internet is through the redirector.
- Burning the redirector is contained. If it's burned or flagged, the C2 backends are unaffected. Destroy and rebuild the redirector independently.
Every lab host has /etc/hosts entries for every other host, populated at deploy time. You never type IPs inside the lab: ssh admin@mythic, ping kali, and scp ./payload.exe admin@adaptix: all resolve correctly.
Direct Access is the standard internet-facing deployment. Beacons on target systems call back to a domain you own, which resolves to the redirector's public Elastic IP. The redirector validates the request, strips the URI prefix, and forwards traffic to the appropriate C2 backend over VPC peering.
The redirector runs Apache with three layers of gatekeeping before any request reaches a C2 server: IP reputation filtering via redirect.rules, header token validation (X-Request-ID), and URI prefix routing. Requests that fail any check receive a convincing CloudEdge CDN decoy page rather than an error.
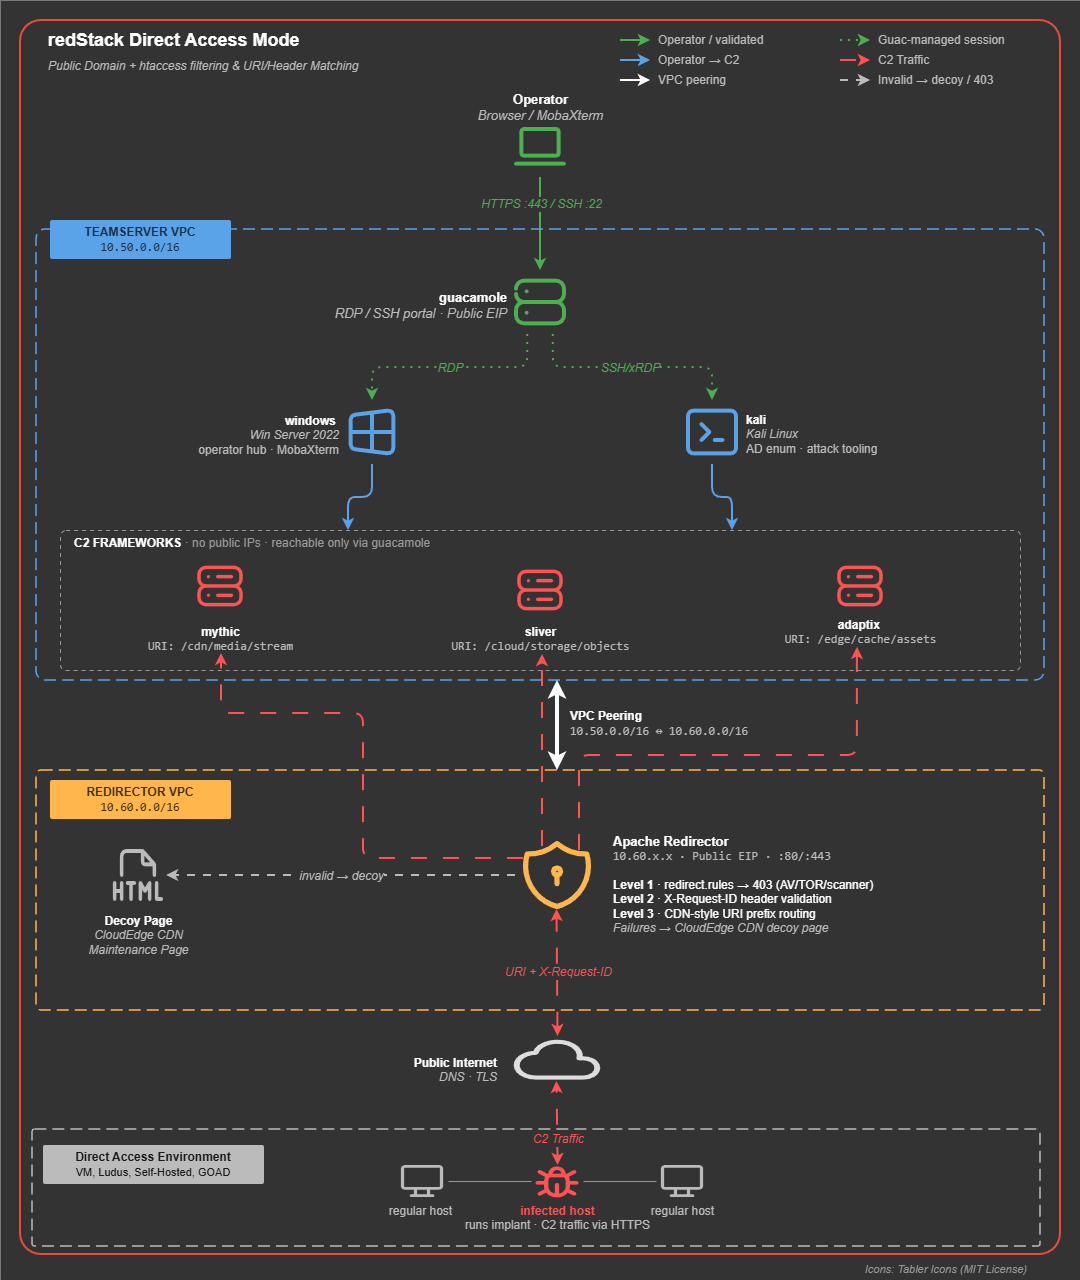
- A domain you own and control (apex
yourdomain.tldor a subdomain likec2.yourdomain.tld) - Access to your registrar's DNS to set an A record pointing to the redirector EIP
- The EIP is printed in
deployment_info.txtafterterraform apply
redirector_domain                    = "yourdomain.tld"
enable_vpn_tunnel                  = false  # default, can omit
enable_redirector_htaccess_filtering = true # default, can omit- After
terraform apply, note the redirector Elastic IP fromdeployment_info.txt - Set your domain A record to that IP. Allow DNS to propagate (
dig +short yourdomain.tldreturns the EIP) - SSH to the redirector via Guacamole and run Certbot:
sudo certbot --apache -d yourdomain.tld- Run the redirector test script to confirm all layers are healthy:
sudo /home/admin/test_redirector.shFull walkthrough at First Run Track A and Redirector.
Use Direct Access any time targets have outbound internet access and can reach the redirector's public Elastic IP or your domain directly. No VPN tunnel required. Deploy with default settings.
Repo: https://github.com/Orange-Cyberdefense/GOAD
Multi-machine AD lab with pre-configured misconfigurations covering ADCS, Kerberoasting, AS-REP Roasting, ACL abuse, and more. Supports deployment on VMware, VirtualBox, Azure, and AWS.
| Deployment | Internet access | Notes |
|---|---|---|
| AWS | Yes | Targets in their own VPC with IGW; callback to your domain |
| VMware / VirtualBox (NAT) | Yes | Targets share host's connection; callback to public IP |
| VMware / VirtualBox (host-only) | No | Use Tunneled Access instead |
[!TIP] GOAD in AWS pairs naturally with redStack: both live in AWS, and targets can reach the redirector over the public internet with no extra routing.
Site: https://ludus.cloud
Self-hosted cyber range automation platform built on Proxmox. Deploys complex AD environments from templates. Ranges can be configured with or without internet access.
- Enable internet access on the Ludus range and targets call back to your domain over HTTPS.
- Ranges with internet access disabled need the Tunneled Access mode instead.
Any VMware, VirtualBox, or Hyper-V lab where VMs have outbound internet access.
| Network type | Internet access | Use |
|---|---|---|
| NAT | Yes | VMs share host IP; callback to public domain |
| Bridged | Depends on router | Usually yes; callback to public domain |
| Host-only / Internal | No | Use Tunneled Access instead |
Tunneled Access is for working against targets that live inside a closed VPN network: cyber ranges like Hack Smarter Labs (the featured partner platform for redStack), HackTheBox Pro Labs, VulnLab, and OffSec Portal. In this mode the redirector becomes your OpenVPN gateway and every internal lab host can reach the target subnets as if they were on the same network.
There is no domain involved. Beacons call back to the redirector's public Elastic IP over HTTPS. The same URI prefix routing and X-Request-ID validation apply. The front door is an IP rather than a hostname. Targets fully isolated from the internet are the exception and use the tun0 IP over HTTP (see OpenVPN Tunnel Environments, Step 5).
The VPN routing in Tunneled Access requires a WireGuard tunnel between Guacamole and the redirector. This is not optional infrastructure. It exists because of a hard AWS limitation.
AWS VPC peering only delivers packets whose destination falls inside one of the two peered VPC CIDR blocks (10.50.0.0/16 or 10.60.0.0/16). When a Windows or Kali host tries to reach a target at 10.13.38.33 (a cyber range IP), the AWS fabric sees a packet destined for an address outside either VPC's CIDR and silently drops it. Route tables, security groups, and disabling source_dest_check make no difference. VPC peering will not forward traffic to external CIDRs.
WireGuard solves this by acting as a Layer 3 tunnel. Guacamole receives traffic destined for cyber-range CIDRs via normal same-VPC routing, encapsulates it inside WireGuard UDP frames addressed to the redirector's VPC IP (10.60.x.x), and ships them over the peering link. The peering link sees a packet destined for a valid VPC IP and forwards it. The external target IP rides inside the encrypted WireGuard payload, invisible to the AWS fabric.
WireGuard is configured automatically at first boot. Guacamole generates both keypairs, writes its own config, and SSHes into the redirector to push the peer config and start the service. No pre-deployment key setup is required.
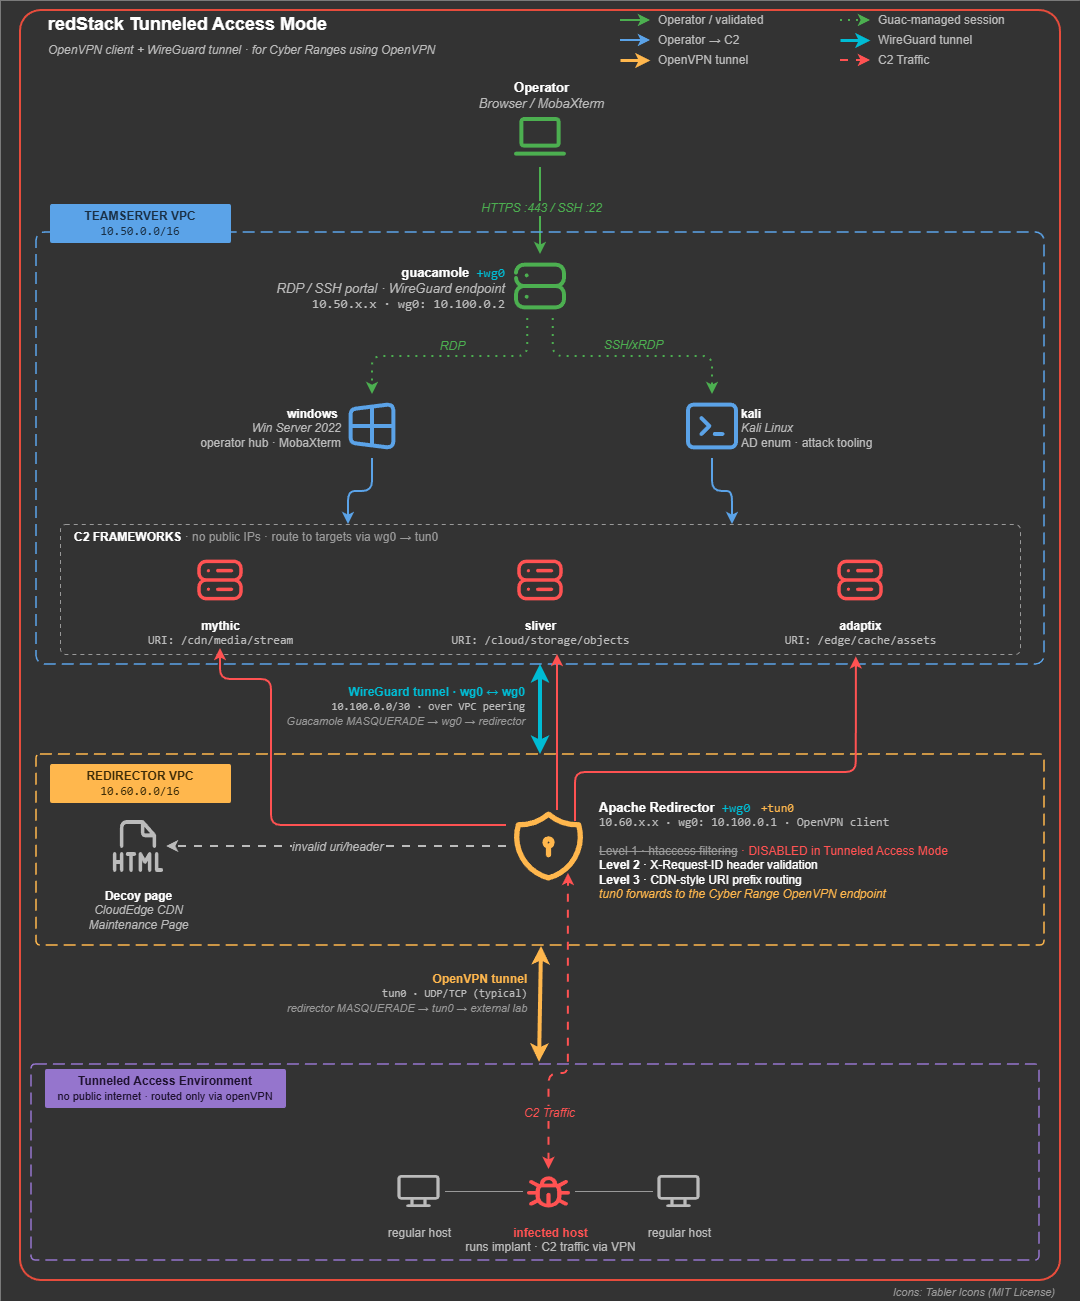
Double NAT: internal source IP is masqueraded to 10.100.0.2 at guacamole (WireGuard hop), then masqueraded to the tun0 IP at the redirector (OpenVPN hop). Targets see the tun0 IP as the source. Conntrack on both hops reverses the NAT on the return path.
- An
.ovpnfile from your cyber range platform (see Supported Platforms above for portal links) - The
.ovpnfile is not needed beforeterraform apply. It is only needed before you start working a target.
redirector_domain                    = ""     # blank: redirector uses its public IP
enable_vpn_tunnel                  = true   # installs OpenVPN + WireGuard, enables routing
enable_redirector_htaccess_filtering = false  # scanner blocking off (not useful in isolated labs)
Custom target CIDRs (optional): the defaults cover common cyber range subnets. Add or override if your platform uses different ranges:
vpn_tunnel_cidrs = ["10.10.0.0/16", "10.13.0.0/16", "10.129.0.0/16"]- After
terraform apply, open the Redirector (SSH) connection in Guacamole - Upload your
.ovpnfile via the Guacamole sidebar (Ctrl+Alt+Shift> Devices > upload), then move it:
mv ~/*.ovpn ~/vpn/- Start the VPN service:
sudo systemctl start vpn-tunnel
journalctl -u vpn-tunnel -f
Wait for "Initialization Sequence Completed."
- Your C2 callback address is the redirector public Elastic IP (from
deployment_info.txt), used with HTTPS on 443. This is the default for platforms with internet egress, including Hack Smarter Labs. See OpenVPN Tunnel Environments Step 5 for per-framework values and the isolated-targettun0exception.
Full walkthrough at First Run Track B and OpenVPN Tunnel Environments.
Platforms that provide OpenVPN connection packs compatible with this setup.
Download your .ovpn file from the platform portal and drop it in ~/vpn/
on the redirector. Hack Smarter Labs is the featured partner platform and is
listed first; the others work identically through the same tunnel.
Portal: https://www.hacksmarter.org/catalog
Featured partner platform for redStack. Community-backed, with AD chain labs, web app labs, and guided courses. Strong AD coverage at varying difficulty levels. Offers individual labs and an All Access subscription. Includes dedicated Sliver C2 labs, which pair directly with the redStack C2 stack.
Notable content: AD chains (Odyssey, Triathlon, Dismay), web app labs (CORS, file upload, race conditions), and dedicated Sliver C2 labs.
Labs use varying subnets, so route the specific target /16s you need (take them from the machine's IP). Do not use a supernet that contains the lab VPCs (10.50.0.0/16, 10.60.0.0/16). The Guacamole WireGuard AllowedIPs is taken directly from this list and its tunnel endpoint is the redirector's 10.60.x IP, so a broad range like 10.0.0.0/8 swallows the endpoint and deadlocks the tunnel.
vpn_tunnel_cidrs = ["10.1.0.0/16"] # one entry per target subnet; never 10.50/16 or 10.60/16Portal: https://www.hackthebox.com
The most widely used platform for individual machines and Pro Labs. Machines are isolated VMs; Pro Labs are multi-machine AD environments modeled after real-world enterprise networks.
| Lab type | VPN CIDRs | Notes |
|---|---|---|
| Individual machines |
10.10.0.0/16, 10.129.0.0/16
|
Starting Point uses 10.129.x.x
|
| Pro Labs |
10.10.0.0/16, 10.13.0.0/16, 10.129.0.0/16
|
Offshore, RastaLabs, Cybernetics, APTLabs, etc. |
Multi-machine AD environments like these benefit most from having all C2 servers, Kali, and Windows on the same routed network, the same pattern that makes Hack Smarter Labs AD chains a strong fit for redStack.
vpn_tunnel_cidrs = ["10.10.0.0/16", "10.13.0.0/16", "10.129.0.0/16"]Portal: https://www.offsec.com/labs/individual/
OffSec's practice lab environment, aligned with OSCP/OSEP certification paths.
Machines use the 192.168.x.x range.
vpn_tunnel_cidrs = ["192.168.0.0/16"]Portal: https://www.vulnlab.com
AD-focused chain labs, shorter and more tightly scoped than HTB Pro Labs. Well-suited for practicing specific attack paths (ADCS, Kerberoasting, RBCD) without a full Pro Lab commitment.
vpn_tunnel_cidrs = ["10.10.0.0/16"][!NOTE] You can update
vpn_tunnel_cidrson a live deployment without destroying. Runterraform applyto update the VPC route table, then reload WireGuard on both Guacamole and the redirector:sudo wg-quick down wg0 && sudo wg-quick up wg0
Note
WireGuard starts automatically at boot. The OpenVPN tunnel (vpn-tunnel) does not. Start it manually each session. Stop it with sudo systemctl stop vpn-tunnel when done.
Regardless of mode, all C2 traffic passes through the same three-layer validation at the redirector. What changes between modes is the address beacons use to reach the redirector (domain vs the redirector's public IP) and whether scanner blocking is active.
                    [ Target / Implant ]
                           |
                           |  HTTPS yourdomain.tld/<URI-prefix>/...        (Direct Access)
                           |  HTTPS <redir-public-ip>/<URI-prefix>/...     (Tunneled Access)
                           |  X-Request-ID: <token>
                           v
              +------------------------------------------+
              |              Redirector                   |
              |                                           |
              |  1. redirect.rules  (Direct Access only)  |
              |     scanner / AV / TOR IP  ->  403        |
              |                                           |
              |  2. X-Request-ID header check             |
              |     missing or wrong token  ->  decoy     |
              |                                           |
              |  3. URI prefix routing                    |
              +---+------------------+------------------+-+
                  |                  |                  |
                  v                  v                  v
     /cdn/media/stream/   /cloud/storage/objects/  /edge/cache/assets/
                  |                  |                  |
                  |    VPC Peering   |                  |
                  v                  v                  v
              +------+          +-------+          +-------+
              |mythic|          |sliver |          |adaptix|
              +------+          +-------+          +-------+

  No valid header or URI prefix  ->  CloudEdge CDN decoy page (200)
  Scanner / AV / TOR IP match    ->  403 Forbidden  (Direct Access only)
Run terraform output network_architecture after deploy to see the diagram populated with your actual IPs, URI prefixes, and header token.
See Redirector for the full security model.
| Resource | Default CIDR | Configured in |
|---|---|---|
| Teamserver VPC | 10.50.0.0/16 |
vpc_cidr in tfvars |
| Redirector VPC | 10.60.0.0/16 |
redirector_vpc_cidr in tfvars |
| WireGuard tunnel (Tunneled Access) | 10.100.0.0/30 |
hardcoded in setup scripts |
| Cyber-range target routing |
10.10.0.0/16, 10.13.0.0/16, 10.129.0.0/16
|
vpn_tunnel_cidrs in tfvars |
Adjust VPC CIDRs if they collide with your home network or existing VPN. The WireGuard 10.100.0.0/30 tunnel is private and rarely conflicts.
No. You cannot switch modes on a running deployment. WireGuard configuration runs as part of cloud-init at first boot and cannot be retrofitted onto a running instance with a re-apply. The entire lab must be destroyed and redeployed with updated tfvars.
-
Direct Access → Tunneled Access: add
enable_vpn_tunnel = trueand clear the domain, thenterraform destroyandterraform apply. -
Tunneled Access → Direct Access: set your domain and remove the VPN flags, then
terraform destroyandterraform apply.
terraform apply completes in ~5-10 minutes. Allow ~10 more for Windows and Mythic to fully initialize.
This information is also available in deployment_info.txt in the redStack/ directory. To reprint it at any time, run from redStack/terraform/:
terraform output network_architecture← Previous: Prerequisites | Next: Deploying Terraform →
"Defenders think in lists. Attackers think in graphs. As long as this is true, attackers win."
John Lambert, Microsoft (2015)