Repository navigation
15. OpenVPN Tunnel Environments
Route traffic from the internal lab (Windows operator, Kali, C2 servers) through the redirector's OpenVPN tunnel to targets that are only reachable over a closed VPN network. For supported platforms and Direct Access environments, see Deployment Architecture.
Note
Tunneled Access only. The default redStack uses a public domain, trusted TLS, and htaccess scanner filtering. Only follow this page when connecting to an isolated platform via OpenVPN where targets cannot reach the public internet.
| At a glance | |
|---|---|
| tfvar to enable | enable_vpn_tunnel = true |
| Recommended companion | enable_redirector_htaccess_filtering = false |
| Default routed CIDRs |
10.10.0.0/16, 10.13.0.0/16, 10.129.0.0/16
|
| Setup time | Fully automatic at boot. ~5 min after apply. |
| Manual step per session | drop .ovpn file in ~/vpn/ on redirector, sudo systemctl start vpn-tunnel
|
+----------------------------------------------------------------+
|         TeamServer VPC (10.50.0.0/16)                          |
|                                                                |
|   mythic / sliver / adaptix / windows / kali                    |
|       (clients sending traffic to cyber-range target IPs)      |
|                          |                                     |
|                          |  cyber-range-bound traffic          |
|                          |  10.10/13/129.0.0/16                |
|                          v                                     |
|   guacamole                                                    |
|   10.50.x.x                                                    |
|   wg0: 10.100.0.2/30                                           |
|   (1) VPC route -> guacamole ENI                               |
|   (2) MASQUERADE on wg0                                        |
+--------------------------+-------------------------------------+
                           |
                           |  (3) WireGuard UDP :51820
                           |       over VPC peering
                           v
+--------------------------+-------------------------------------+
|         Redirector VPC (10.60.0.0/16)                          |
|                                                                |
|   redirector                                                   |
|   10.60.x.x  +  Elastic IP                                     |
|   wg0: 10.100.0.1/30                                           |
|   (3) decapsulate WG -> forward to tun0                        |
|   (4) MASQUERADE on tun0                                       |
+--------------------------+-------------------------------------+
                           |
                           |  (5) OpenVPN UDP from Elastic IP
                           v
                  Cyber Range VPN Server
                           |
                           v
                  Target Networks:
                    10.10.0.0/16
                    10.13.0.0/16
                    10.129.0.0/16
Double NAT path: teamserver source IP → 10.100.0.2 (guacamole MASQUERADE on wg0) → tun0 IP (redirector MASQUERADE on tun0). The cyber-range target replies to tun0 IP; conntrack reverses both NATs on the way back.
AWS VPC peering only delivers packets whose destination falls inside one of the two peered VPC CIDR blocks. Routing cyber-range target traffic (e.g. 10.13.38.33) directly via peering causes silent drops at the AWS fabric. Route tables, security groups, and source_dest_check=false make no difference.
WireGuard solves this with a Layer 3 encrypted tunnel between Guacamole (in the team server VPC) and the redirector (in the redirector VPC). Guacamole receives cyber-range-bound packets via normal same-VPC routing, encapsulates them in WireGuard UDP frames, and ships them to the redirector over VPC peering. Because the WireGuard frames are addressed to the redirector's VPC IP (10.60.x.x), they pass peering cleanly. The cyber-range target IP rides inside the encrypted payload.
WireGuard configuration is fully automatic. Guacamole generates both keypairs at boot, writes its own config, and SSHes into the redirector to push the server config and start the service. No pre-deployment key generation required.
Edit terraform.tfvars:
enable_vpn_tunnel                  = true   # installs OpenVPN + WireGuard, enables routing
enable_redirector_htaccess_filtering = false  # disables scanner/AV blocking (not needed in lab)
This change does the following:
- Installs the OpenVPN client and the
vpn-tunnelsystemd service on the redirector - Installs WireGuard on both endpoints
- Enables IP forwarding
- Disables AWS
source_dest_checkon both ENIs (required for forwarding) - Routes the configured cyber-range CIDRs in the team server VPC to Guacamole's ENI
Custom target CIDRs (optional):
The default covers common cyber range tunnel networks. Adjust if your platform uses different subnets (see Supported Platforms in Deployment Architecture for per-platform CIDRs):
vpn_tunnel_cidrs = ["10.10.0.0/16", "10.13.0.0/16", "10.129.0.0/16"][!TIP] Build each entry from the target's IP: the first two octets followed by
.0.0/16(a target at10.10.28.5needs10.10.0.0/16). Route only the /16s you need, never a supernet that contains the lab VPCs (10.50.0.0/16,10.60.0.0/16) or the WireGuard endpoint. If a target is reset or rebooted on the range portal it can come back with a different IP; if the new IP falls outside a routed /16,terraform destroyand redeploy with the updated CIDR, since Guacamole's WireGuardAllowedIPsis baked at boot and a plainapplywill not re-route it.
Note
If you already deployed without enable_vpn_tunnel = true, a full terraform destroy followed by a fresh terraform apply is required. The WireGuard setup runs as part of cloud-init at first boot. It cannot be retrofitted onto a running instance via re-apply.
- Deploy with
terraform apply. - Wait for cloud-init on all instances (~5 minutes). Guacamole automatically configures the WireGuard tunnel during this window.
- Download your
.ovpnfile from your cyber range platform (see Supported Platforms in Deployment Architecture).
Drop any .ovpn file into ~/vpn/ on the redirector. The service picks up whichever file is there.
Option A, Guacamole sidebar upload (browser only):
- In Guacamole, open the Redirector (SSH) connection.
- Press
Ctrl+Alt+Shiftto open the sidebar. - Click Devices > upload your
.ovpnfile (it lands in~). - Move it:
mv ~/*.ovpn ~/vpn/.
Option B, SCP from Windows:
scp lab.ovpn admin@<REDIR_PRIVATE_IP>:~/vpn/Tip
MobaXterm has a built-in SFTP browser. Open a session to the redirector's private IP, navigate to ~/vpn/, and drop the file.
SSH to the redirector from Windows:
ssh admin@<REDIR_PRIVATE_IP>Start the VPN service:
sudo systemctl start vpn-tunnelThe vpn-tunnel service runs OpenVPN under systemd. No screen or tmux needed. It persists as long as the redirector instance is running and stops cleanly with systemctl stop.
Stop:
sudo systemctl stop vpn-tunnelStatus and logs:
sudo systemctl status vpn-tunnel
journalctl -u vpn-tunnel -f
The service uses --pull-filter ignore "redirect-gateway" (critical: prevents the VPN from hijacking the redirector's default route, which would break VPC peering and C2 proxy connectivity). iptables MASQUERADE rules apply automatically when tun0 comes up and are removed when it goes down.
Note
The vpn-tunnel service fails to start if no .ovpn file exists in ~/vpn/. If multiple files are present, it picks the first one alphabetically.
The C2 callback address is almost always the redirector's public Elastic IP, not tun0.
Default to the public Elastic IP with HTTPS on 443. The self-signed cert carries the public EIP as its SAN, and any target with outbound internet egress can reach it. Hack Smarter Labs does not route the tunnel client IP back to targets, so HSL callbacks must use the public EIP. This is the path the workshop and most platforms use.
| Framework | Callback address (public EIP, default) |
|---|---|
| Mythic |
callback_host = "https://<REDIR_PUBLIC_IP>", callback_port = 443
|
| Sliver | --http https://<REDIR_PUBLIC_IP>/cloud/storage/objects/ |
| Adaptix | Callback: <REDIR_PUBLIC_IP>:443
|
Use the tun0 IP with HTTP on 80 only when the target is fully isolated from the internet AND your range routes the tunnel client IP back to targets. The self-signed cert does not cover tun0, so those callbacks must be HTTP. If you are unsure, use the public EIP. Get the tun0 IP after the tunnel is up:
ip -4 addr show tun0 | grep -oP '(?<=inet\s)\d+(\.\d+)+'| Framework | Callback address (tun0, isolated targets only) |
|---|---|
| Mythic |
callback_host = "http://<tun0-ip>", callback_port = 80
|
| Sliver | --http http://<tun0-ip>/cloud/storage/objects/ |
| Adaptix | Callback: <tun0-ip>:80
|
URI prefix and X-Request-ID header remain the same in both cases.
Why Apache works on tun0 without a reload
Apache listens on 0.0.0.0:80 and 0.0.0.0:443 across all interfaces. The VirtualHost configs use <VirtualHost *:80> and <VirtualHost *:443>, and UFW allows 80/443 on all interfaces. When tun0 comes up, Apache automatically handles traffic arriving on that IP with no reload or restart. Header validation and URI routing apply to all requests regardless of arrival interface.
If the target has outbound internet access (most standalone machines do), use the public Elastic IP with HTTPS instead. The tun0 IP is only needed when targets are fully isolated to the VPN network.
Note
This IP is only known after the VPN connects. Generate your C2 agents after running sudo systemctl start vpn-tunnel. The IP changes each reconnect.
From the Windows workstation (no nmap on Windows, use a TCP probe):
ping <target-ip>
Test-NetConnection <target-ip> -Port 445
From Kali or any C2 host (via Guacamole SSH), where nmap is available:
ping <target-ip>
nmap -sC -sV <target-ip>
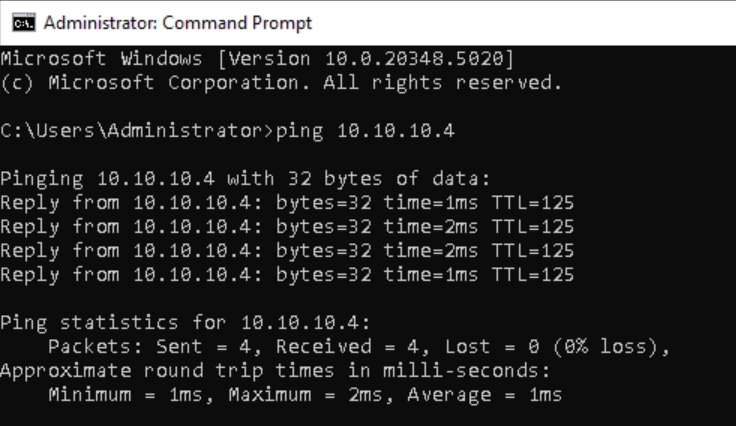
[Figure 15.7.1: Successful ping from Windows operator to DC01 (10.10.10.4) in the Hack Smarter Labs DarkHaven range, confirming the VPN routing path through WireGuard and OpenVPN is live]
sudo systemctl stop vpn-tunnelStops OpenVPN and removes the tun0 MASQUERADE rules. The .ovpn file is preserved in ~/vpn/ so you can restart without re-uploading.
-
Only the configured CIDRs are routed: Traffic to other destinations is unaffected. Add CIDRs to
vpn_tunnel_cidrsin tfvars if your platform uses different subnets. -
The
.ovpnfile persists across reboots: The tunnel itself doesn't auto-start. Runsudo systemctl start vpn-tunnelafter a reboot. WireGuard (wg-quick@wg0) is enabled at boot on both instances and comes up automatically. - All internal machines can reach cyber-range targets: Routing is configured at the VPC level. Windows, all C2 servers, Kali, and Guacamole can all reach targets through the tunnel.
-
tun0 IP is dynamic: It changes with each VPN reconnect. Agents baked with a stale
tun0IP stop working after reconnect. Check after each reconnect and regenerate if the IP changed. -
Callback address choice: Targets with internet access: use the public Elastic IP (stable, no regeneration). Targets isolated to the VPN: use the
tun0IP with HTTP.
Kali sits in the same Teamserver VPC, so it inherits the routing. To use Kali for AD enumeration / attack against a cyber-range target:
- Bring up the VPN as above.
- From Kali (via Guacamole SSH):
ip routeshould show the configured cyber-range CIDRs routing through the Guacamole ENI. - Tools that hit those targets work:
nmap -p- 10.13.x.x,netexec smb 10.10.x.x, etc.
For raw TCP callbacks back into the lab from cyber range targets in this mode, see Kali > Port Forwarding for Callbacks.
← Previous: Kali | Next: Cost Management →
"Hack to learn, don't learn to hack."
Phineas Fisher, HackBack! manifesto (2016)