Installing Authentication Plugin
PKI authentication plugins are only relevant to CA subsystems.
To install this authentication plugin to be unique to a particular CA instance, perform the following commands for each desired CA subsystem:
-
Assume the role of the root user.
-
Execute:
$ cp SSNAuth.class <pki-instance>/webapps/<pki-subsystem>/WEB-INF/classes
where <pki-instance> is the complete path to the desired CA instance, and <pki-subsystem> is always ca for all authentication plugins. (For example, the default instance directory for the first instance is /var/lib/pki-ca).
-
Execute:
$ chown <pki-instance-owner>:<pki-instance-group> <pki-instance>/webapps/<pki-subsystem>/WEB-INF/classes/SSNAuth.class
where <pki-instance-owner> is the user id of the owner of the specified instance, <pki-instance-group> is the group id of the owner of the specified instance, <pki-instance> is the complete path to the specified CA instance, and <pki-subsystem> is always ca for all authentication plugins.
-
Execute:
$ cp SSNEnroll.cfg <pki-instance>/conf
where <pki-instance> is the complete path to the desired CA instance.
-
Execute:
$ chown <pki-instance-owner>:<pki-instance-group> <pki-instance>/conf/SSNEnroll.cfg
where <pki-instance-owner> is the user id of the owner of the specified instance, <pki-instance-group> is the group id of the owner of the specified instance, and <pki-instance> is the complete path to the specified CA instance.
* Dismiss the command line window on the Linux host.
NOTE: It was recently reported that these <pki-instance> specific paths no longer work in newer versions of Dogtag; as root, try executing the following instead:
$ mkdir -p /usr/share/pki/ca/webapps/ca/WEB-INF/classes
$ cp SSNAuth.class /usr/share/pki/ca/webapps/ca/WEB-INF/classes/SSNAuth.class
-
Invoke a command line window on the Linux host.
-
Invoke the PKI console and login.
-
Login to a PKI instance, providing the requested Username and Password.
-
A new screen entitled Certificate System should appear with two tabs labeled Configuration, and Status.
-
Select the Configuration tab.
-
Click on the Authentication option presented in the menu on the left-side of this panel.
-
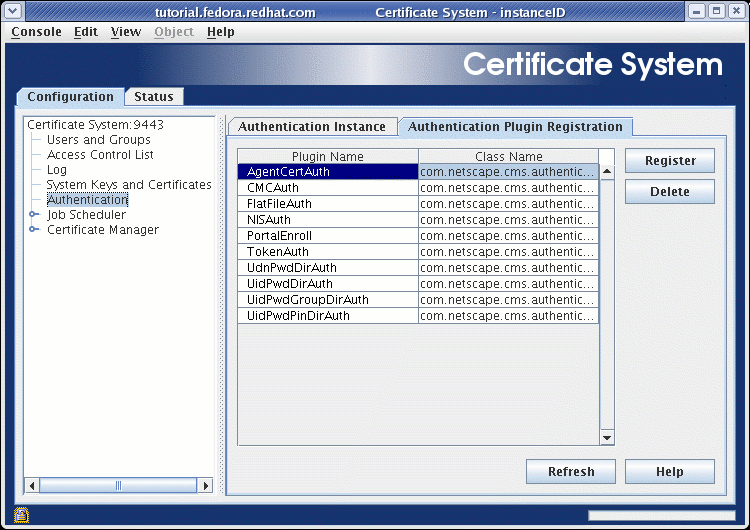
Two tabs should appear on the right-side labeled Authentication Instance and Authentication Plugin Registration.
-
Select the Authentication Plug-in Registration tab:
-
Press the Register button, and a dialog box entitled Register Authentication Plug-in Implementation appears:
-
For the Plug-in name: field, type in
SSNAuth. -
For the Class name: field, type in the path to the
SSNAuth.classclass finishing with the nameSSNAuth(do NOT type in the.classextension).
-
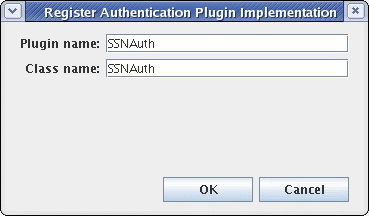
NOTE: For the purposes of this tutorial, it is ONLY necessary to type in a Class Name of SSNAuth. This is due to the fact that the default search path order for plugins ALWAYS searches for plugins in the following order:
-
the
<pki-instance>/webapps/<pki-subsystem>/WEB-INF/classesdirectory (and all subdirectories under this directory for this specific instance) -
a combination of default PKI JAR files and default PKI JRE JAR files
For example, if the SSNAuth.class had been placed in a directory called <pki-instance>/webapps/<pki-subsystem>/WEB-INF/classes/mydir/mysubdir, the java source code would need to contain a package mydir.mysubdir; statement, be rebuilt, and the subsequent SSNAuth.class binary would then need to be placed into this directory. Finally, the user would need to type mydir.mysubdir.SSNAuth within this dialog box to register their plugin.
-
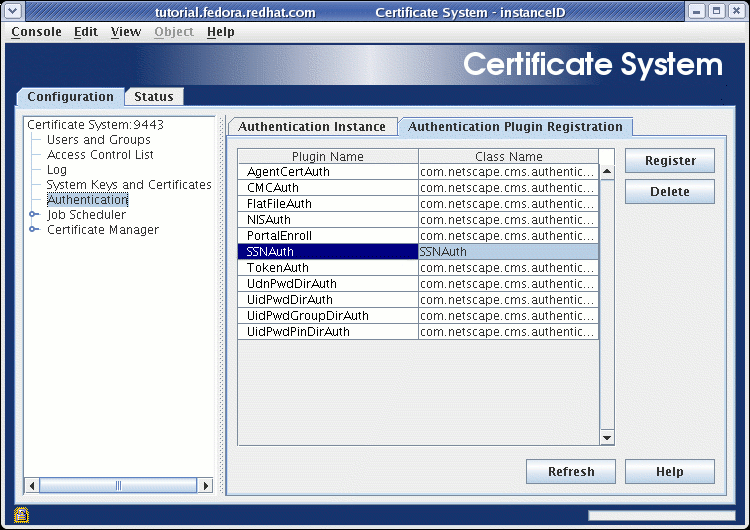
Press the OK button to dismiss the dialog box, and this plugin should now appear in alphabetical order on the list of authentication plugins displayed on this panel. If it does not, try pressing the Refresh button until it does:
-
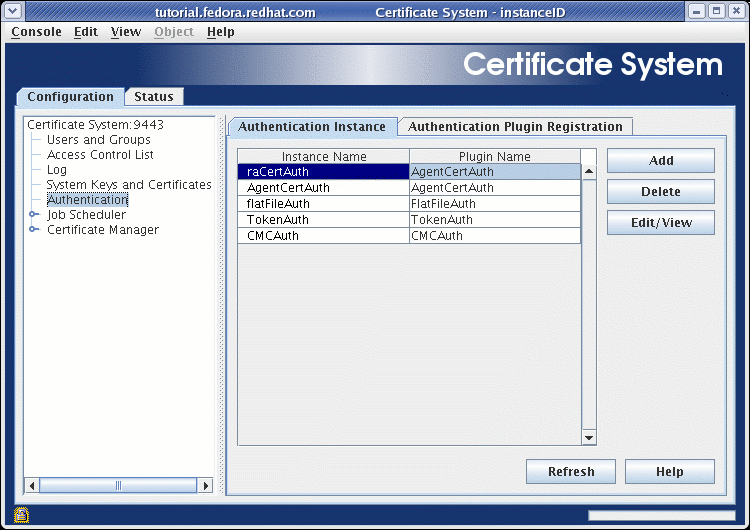
Select the Authentication Instance tab:
-
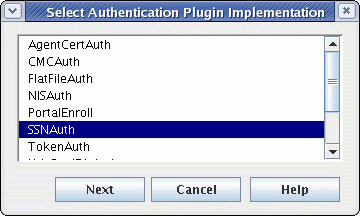
Press the Add button, and a dialog box entitled Select Authentication Plugin Implementation appears:
-
Highlight
SSNAuth, and press the Next button. A dialog entitled Authentication Instance Editor appears:-
For the Authentication Instance ID: field, type in
SSNEnroll. -
For the Authentication Plugin ID: field, the string
SSNAuthshould already be present (and non-editable). -
For the required baseSubjectDN: field, type in the desired base subject DN to be appended to the UID on each certificate.
-
For the required ssnfile: field, type in the fully qualified path to the
SSNEnroll.cfgfile.
-
| Field | Example Value |
|---|---|
Authentication Instance ID: |
SSNEnroll |
Authentication Plugin ID: |
SSNAuth |
baseSubjectDN: |
|
ssnfile: |
|
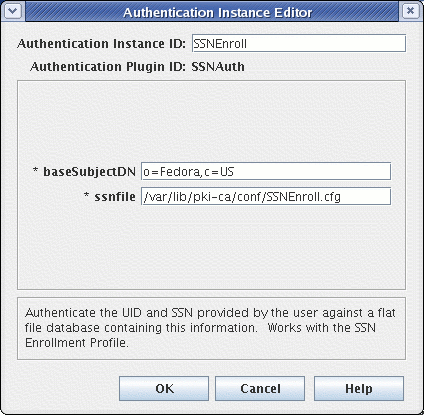
-
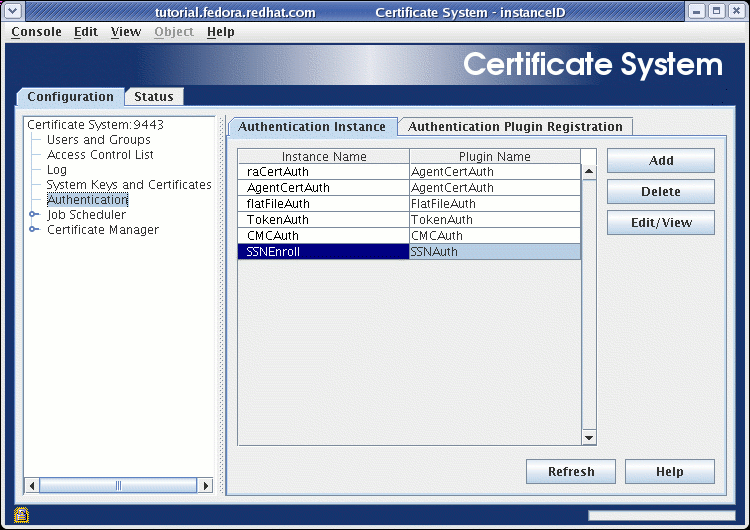
Press the OK button to dismiss the dialog box, and this plugin should now appear on the list of authentication plugin instances displayed on this panel. If it does not, try pressing the Refresh button until it does:
-
Close the console.
-
Dismiss the command line window on the Linux host.
Stop each selected PKI instance by performing the following shutdown sequence:
-
Invoke a command line window on the Linux host.
-
Assume the role of the root user.
-
Type
cd /etc/init.d. -
For each selected PKI instance, execute
./<pki-instance> stop, where<pki-instance>is the name of the selected PKI instance, to shutdown this instance of the PKI server. -
Optional Verification: At this time, to verify that the
SSNEnrollauthentication plugin was actually installed, the user may verify that the<pki-instance>/conf/CS.cfgfile, where<pki-instance>is the complete path to the specified CA instance, contains the following values:
    .
    .
    .
auths.impl.SSNAuth.class=SSNAuth
    .
    .
    .
auths.instance.SSNEnroll.baseSubjectDN=o=<Organization>,c=US
auths.instance.SSNEnroll.pluginName=SSNAuth
auths.instance.SSNEnroll.ssnfile=<pki-instance>/conf/SSNEnroll.cfg
    .
    .
    .
-
Dismiss the command line window on the Linux host.
Perform the following customization to automatically create a profile for this authentication plugin which will be directly available from the end-entity (EE) port (default EE port number is 9443). Perform the following tasks for each selected instance of the PKI server:
-
Invoke a command line window on the Linux host.
-
Assume the role of the root user.
-
Execute:
$ cd <pki-instance>/profiles/<pki-subsystem>
where <pki-instance> is the complete path to the desired CA instance, and <pki-subsystem> is always ca for all authentication plugins.
-
Execute:
$ cp -p caDirUserCert.cfg caSSNUserCert.cfg
to create a new customized enrollment page, and preserve the permissions of the owner of this CA instance.
-
Edit the
<pki-instance>/profiles/<pki-subsystem>/caSSNUserCert.cfgfile to make the following highlighted changes:
desc=This certificate profile is for enrolling user certificates with SSN authentication.
visible=true
enable=true
enableBy=admin
name=SSN User Dual-Use Certificate Enrollment
auth.instance_id=SSNEnroll
    .
    .
    .
-
Execute:
$ cd <pki-instance>/conf
where <pki-instance> is the complete path to the same CA instance.
-
Edit the
<pki-instance>/conf/CS.cfgfile to make the following highlighted changes:
    .
    .
    .
profile.list=caUserCert,caDualCert,caSignedLogCert,caTPSCert,caRARouterCert,caRo
uterCert,caServerCert,caOtherCert,caCACert,caInstallCACert,caRACert,caOCSPCert,c
aTransportCert,caDirUserCert,caAgentServerCert,caAgentFileSigning,caCMCUserCert,
caFullCMCUserCert,caSimpleCMCUserCert,caTokenDeviceKeyEnrollment,caTokenUserEncr
yptionKeyEnrollment,caTokenUserSigningKeyEnrollment,caTempTokenDeviceKeyEnrollme
nt,caTempTokenUserEncryptionKeyEnrollment,caTempTokenUserSigningKeyEnrollment,ca
AdminCert,caInternalAuthServerCert,caInternalAuthTransportCert,caInternalAuthDRM
storageCert,caInternalAuthSubsystemCert,caInternalAuthOCSPCert,DomainController,
caDualRAuserCert,caRAagentCert,caRAserverCert,caSSNUserCert
    .
    .
    .
profile.caRouterCert.class_id=caEnrollImpl
profile.caRouterCert.config=<pki-instance>/profiles/<pki-subsystem>/caRouterCert.cfg
profile.caSSNUserCert.class_id=caEnrollImpl
profile.caSSNUserCert.config=<pki-instance>/profiles/<pki-subsystem>/caSSNUserCert.cfg
profile.caServerCert.class_id=caEnrollImpl
profile.caServerCert.config=<pki-instance>/profiles/<pki-subsystem>/caServerCert.cfg
    .
    .
    .
-
Dismiss the command line window on the Linux host.
Refresh each selected PKI instance by performing the following startup sequence:
-
Invoke a command line window on the Linux host.
-
Assume the role of the root user.
-
Execute:
$ cd /etc/rc.d/init.d
-
For each selected PKI instance, execute
./<pki-instance> start, where<pki-instance>is the name of the selected PKI instance, to startup this instance of the PKI server. -
Dismiss the command line window on the Linux host.