Repository navigation
Driver Installation
Before you can flash or communicate with your ESP8266 board, your computer needs the correct USB-to-Serial driver installed. Without it, the board won't show up as a COM port.
- 🔍 Identify Your Chip
- 🔵 CP2102 Driver — Silicon Labs
- 🟢 CH340 / CH341 Driver — WCH
- 🖥️ Linux & macOS Notes
- ✅ Verify Installation
Most ESP8266 boards use one of two USB-to-Serial chips. Look at the small IC component near the USB port on your board — it will be labeled either CP2102 or CH340G.
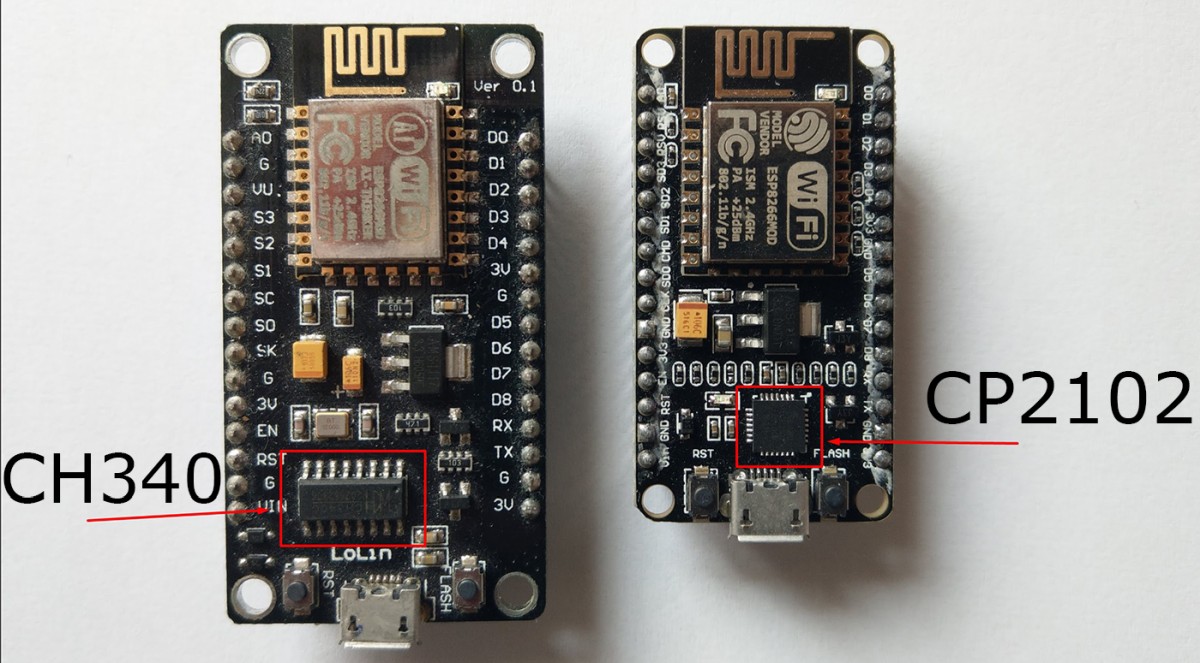
| 🔵 CP2102 | 🟢 CH340 / CH341 |
|---|---|
| Slim, black chip labeled CP2102 | Chip labeled CH340G or CH341 |
| Common on NodeMCU v1, DSTIKE boards | Common on NodeMCU v3 (Lolin), Wemos D1 Mini, cheap clones |
| Made by Silicon Labs | Made by WCH |
Linux permission fix — if Arduino IDE can't access the port, run:
sudo usermod -a -G dialout $USER
Then log out and log back in for the change to take effect.
After installing the driver and reconnecting your board:
- Press
Win + X→ Device Manager - Expand Ports (COM & LPT)
- Look for
CP210xorCH340— note the COM number (e.g.COM3) - Open your flasher or Arduino IDE and select that COM port
- Open Terminal and run:
ls /dev/cu.*        # macOS
ls /dev/ttyUSB*     # Linux
- Your board should appear in the list
- Select it in Arduino IDE under Tools → Port
- 🔁 Try a different USB cable — many are charge-only with no data lines
- 🔌 Try a different USB port on your computer
- 🔄 Restart your computer after driver installation
- 🪟 On Windows, check Device Manager for any
⚠️ unknown devices and update driver manually - 🔍 If you see the device but it has an error — uninstall the device in Device Manager, unplug, then reinstall the driver fresh
📖 More help → Troubleshooting
Driver working? Time to flash! →
- ⚡ Installation — NodeMCU Flasher — easiest, Windows only
- ⚙️ Installation — Arduino IDE — full source compile
<div align="center">
🌐 haybnz.web.app · 🐙 GitHub · 📖 Home
</div> # 🔧 Driver InstallationBefore you can flash or communicate with your ESP8266 board, your computer needs the correct USB-to-Serial driver installed. Without it, the board won't show up as a COM port.
- [🔍 Identify Your Chip](#-identify-your-chip)
- [🔵 CP2102 Driver — Silicon Labs](#-cp2102-driver--silicon-labs)
- [🟢 CH340 / CH341 Driver — WCH](#-ch340--ch341-driver--wch)
- [🖥️ Linux & macOS Notes](#️-linux--macos-notes)
- [✅ Verify Installation](#-verify-installation)
Most ESP8266 boards use one of two USB-to-Serial chips. Look at the small IC component near the USB port on your board — it will be labeled either CP2102 or CH340G.
| 🔵 CP2102 | 🟢 CH340 / CH341 |
|---|---|
Slim, black chip labeled CP2102
|
Chip labeled CH340G or CH341
|
| Common on NodeMCU v1, DSTIKE boards | Common on NodeMCU v3 (Lolin), Wemos D1 Mini, cheap clones |
| Made by Silicon Labs | Made by WCH |
💡 Not sure? Try the CH340 driver first — it's more common on budget boards. If that doesn't work, try CP2102.
| 🖥️ OS | 🔗 Link |
|---|---|
| Windows | [Silicon Labs — CP210x VCP Drivers](https://www.silabs.com/developers/usb-to-uart-bridge-vcp-drivers) |
| macOS | [Silicon Labs — CP210x VCP Drivers](https://www.silabs.com/developers/usb-to-uart-bridge-vcp-drivers) |
| Linux | ✅ Built-in — no install needed |
1. 📥 Go to the [Silicon Labs driver page](https://www.silabs.com/developers/usb-to-uart-bridge-vcp-drivers) and download the CP210x Windows Drivers .zip
2. 📂 Extract the .zip file
3. CP210xVCPInstaller_x64.exe
Use
CP210xVCPInstaller_x86.exeif you have a 32-bit version of Windows
4. ✅ Follow the installer prompts and complete installation
5. 🔌 Unplug your board and plug it back in
6. Open Device Manager → expand Ports (COM & LPT) You should see:
Silicon Labs CP210x USB to UART Bridge (COM3)
The COM number may differ — that's normal.
1. 📥 Download the macOS driver from the Silicon Labs page
2. 📂 Open the .dmg and run the installer package
3. ⚙️ Go to System Preferences → Security & Privacy → General and allow the driver if prompted
4. 🔄 Restart your Mac
5. 🔌 Plug in your board — it should now appear in Arduino IDE under Tools → Port
| 🖥️ OS | 🔗 Link |
|---|---|
| Windows | [WCH — CH341SER.EXE](https://www.wch-ic.com/downloads/CH341SER_EXE.html) |
| macOS | [WCH — CH341SER MAC ZIP](https://www.wch-ic.com/downloads/CH341SER_MAC_ZIP.html) |
| Linux | ✅ Built-in (kernel 2.6+) — no install needed |
1. 📥 Download CH341SER.EXE from the [WCH download page](https://www.wch-ic.com/downloads/CH341SER_EXE.html)
2.
3. Click INSTALL in the installer window
4. ✅ Wait for the Driver install success! confirmation message
5. 🔌 Unplug your board and plug it back in
6. Open Device Manager → expand Ports (COM & LPT) You should see:
USB-SERIAL CH340 (COM4)
The COM number may differ — that's normal.
1. 📥 Download the .zip from the WCH macOS link above
2. 📂 Extract and open the .pkg installer
3. ⚙️ Go to System Preferences → Security & Privacy → General and allow the extension if blocked
4. 🔄 Restart your Mac
5. 🔌 Plug in your board — it should appear under Tools → Port in Arduino IDE
| 🐧 Linux | 🍎 macOS |
|---|---|
| CP2102 — built into kernel, no install needed | May need to approve driver in Security & Privacy settings |
| CH340 — built into kernel 2.6+, no install needed | Restart required after install |
Board appears as /dev/ttyUSB0 or /dev/ttyUSB1
|
Board appears as /dev/cu.usbserial-XXXX
|
Linux permission fix — if Arduino IDE can't access the port, run:
sudo usermod -a -G dialout $USERThen log out and log back in for the change to take effect.
After installing the driver and reconnecting your board:
- Press
Win + X→ Device Manager - Expand Ports (COM & LPT)
- Look for
CP210xorCH340— note the COM number (e.g.COM3) - Open your flasher or Arduino IDE and select that COM port
- Open Terminal and run:
ls /dev/cu.*        # macOS
ls /dev/ttyUSB* # Linux- Your board should appear in the list
- Select it in Arduino IDE under Tools → Port
- 🔁 Try a different USB cable — many are charge-only with no data lines
- 🔌 Try a different USB port on your computer
- 🔄 Restart your computer after driver installation
- 🪟 On Windows, check Device Manager for any
⚠️ unknown devices and update driver manually - 🔍 If you see the device but it has an error — uninstall the device in Device Manager, unplug, then reinstall the driver fresh
📖 More help → Troubleshooting
Driver working? Time to flash! →
- ⚡ Installation — NodeMCU Flasher — easiest, Windows only
- ⚙️ Installation — Arduino IDE — full source compile
🌐 [haybnz.web.app](https://haybnz.web.app/) · 🐙 [GitHub](https://github.com/h9zdev/EthiFi) · 📖 Home