Repository navigation
Installation — Arduino IDE
Compile and upload EthiFi from source using the Arduino IDE. This method works on Windows, macOS, and Linux and is recommended for developers who want to customize the firmware or contribute to the project.
⚡ Just want to flash a pre-built binary? Use Installation — NodeMCU Flasher instead — no coding required.
- 📋 Requirements
- 📥 Downloads
- 💾 Choosing the Right Flash Size
- 🔧 Setup Steps
- ⬆️ Uploading
- ✅ Verify It Worked
- 🩺 Something Went Wrong?
| ✅ Item | 📝 Notes |
|---|---|
| ESP8266 board | NodeMCU, Wemos D1 Mini, etc. — see Supported Devices |
| USB data cable | Must carry data — many cheap cables are charge-only |
| USB driver installed | CP2102 or CH340 — see Driver Installation |
| Arduino IDE | Version 1.8+ or 2.x — download below |
| EthiFi source code | Download below |
📖 Full solutions → Troubleshooting & FAQ
- 🚀 Getting Started — Connect to EthiFi and use the Web UI
- ⚡ Installation — NodeMCU Flasher — Prefer a simpler GUI flasher?
- 🩺 Troubleshooting & FAQ — Something not working?
<div align="center">
🌐 haybnz.web.app · 🐙 GitHub · 📖 Home
</div> # ⚙️ Installation — Arduino IDECompile and upload EthiFi from source using the Arduino IDE. This method works on Windows, macOS, and Linux and is recommended for developers who want to customize the firmware or contribute to the project.
⚡ Just want to flash a pre-built binary? Use Installation — NodeMCU Flasher instead — no coding required.
- [📋 Requirements](#-requirements)
- [📥 Downloads](#-downloads)
- [💾 Choosing the Right Flash Size](#-choosing-the-right-flash-size)
- [🔧 Setup Steps](#-setup-steps)
- [⬆️ Uploading](#️-uploading)
- [✅ Verify It Worked](#-verify-it-worked)
- [🩺 Something Went Wrong?](#-something-went-wrong)
| ✅ Item | 📝 Notes |
|---|---|
| ESP8266 board | NodeMCU, Wemos D1 Mini, etc. — see Supported Devices |
| USB data cable | Must carry data — many cheap cables are charge-only |
| USB driver installed | CP2102 or CH340 — see Driver Installation |
| Arduino IDE | Version 1.8+ or 2.x — download below |
| EthiFi source code | Download below |
| 📦 File | 🔗 Link |
|---|---|
| 🛠️ Arduino IDE | [arduino.cc/en/software](https://www.arduino.cc/en/software) |
| 📡 EthiFi Source Code (.zip) | [github.com/h9zdev/EthiFi/releases](https://github.com/h9zdev/EthiFi/archive/refs/tags/EthFi.zip) |
⚠️ This is important! Selecting the wrong flash size will cause the firmware to crash or the Web UI to fail to load.
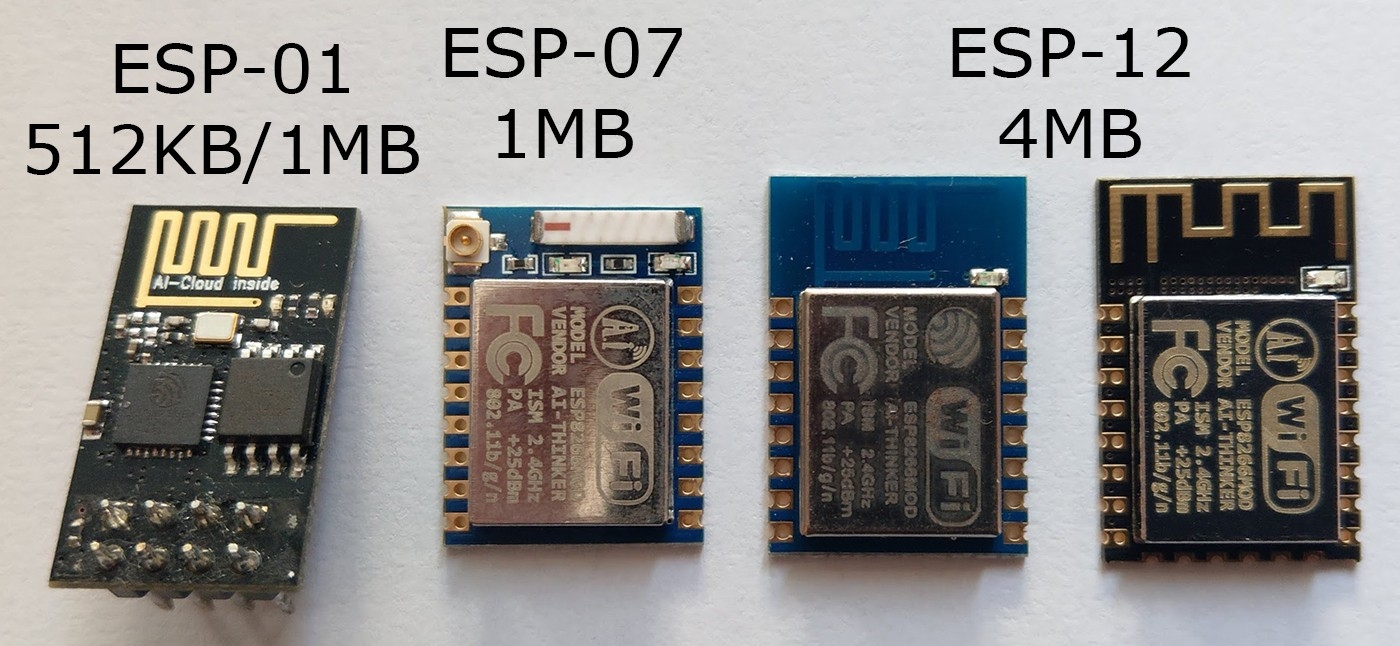
| 📦 Module | 💾 Flash Size |
|---|---|
| ESP-01 (old) | 512 KB |
| ESP-01 (new) | 1 MB |
| ESP-07 | 1 MB |
| ESP-12E / NodeMCU | 4 MB |
| Wemos D1 Mini | 4 MB |
💡 Most modern NodeMCU and Wemos D1 Mini boards use 4 MB. When in doubt, start with 4 MB.
Download and install the Arduino IDE from [arduino.cc/en/software](https://www.arduino.cc/en/software).
Open it once after installing to let it finish first-run setup.
📥 Download the EthiFi source .zip and extract it to a folder of your choice.
📂 Navigate into the extracted folder and open:
esp8266_deauther / esp8266_deauther.ino
Arduino IDE will open the project with all its tabs.
Go to File → Preferences.
Find the field labelled Additional Boards Manager URLs and paste in the following URL:
https://raw.githubusercontent.com/SpacehuhnTech/arduino/main/package_spacehuhn_index.json
💡 If you already have other URLs in that field, click the icon to the right of the field to open a multi-line editor, then add this URL on a new line.
Click OK to save.
Go to Tools → Board → Boards Manager.
Search for:
deauther
Find Deauther ESP8266 Boards and click Install.
Wait for the download to complete, then close the Boards Manager.
Go to Tools → Board and look under the Deauther ESP8266 Boards section.
Select the board that matches your hardware — for example:
NodeMCU 1.0 (Deauther)WEMOS D1 Mini (Deauther)
⚠️ Make sure your board is listed under Deauther ESP8266 Boards — not under ESP8266 Modules. Selecting the wrong category will cause compile errors or incorrect behaviour.
Go to Tools → Flash Size and select the correct size for your board.
| 📦 Board | 💾 Flash Size |
|---|---|
| NodeMCU / ESP-12E | 4M (3M SPIFFS) |
| Wemos D1 Mini | 4M (3M SPIFFS) |
| ESP-01 (512K) | 512K (no SPIFFS) |
| ESP-01 (1MB) | 1M (no SPIFFS) |
If your board has a specific configuration (OLED display, button layout, etc.) go to:
Tools → Deauther Config
Select the configuration that matches your hardware. If you're unsure, leave it as default.
If you're upgrading from a previous version of EthiFi or another firmware, it's recommended to erase the flash first to avoid conflicts with old settings.
Go to:
Tools → Erase Flash → All Flash Contents
⚠️ This will wipe all saved settings. Skip this step if you want to keep your existing configuration.
🔌 Plug your ESP8266 into your computer.
Go to Tools → Port and select the COM port that corresponds to your board.
If no port appears, your driver isn't installed — see Driver Installation.
Windows: Looks like COM3, COM4, etc.
macOS: Looks like /dev/cu.usbserial-XXXX
Linux: Looks like /dev/ttyUSB0
Click the Upload button
Arduino IDE will:
- 🔨 Compile the sketch
- 📤 Upload the binary to your board
- 🔄 Reboot the board automatically
This may take 1–3 minutes depending on your system speed.
💡 If upload fails with
Connecting...stuck on screen, press and hold the BOOT / FLASH button on your board, then click Upload again. Release the button once uploading begins.
After uploading completes:
1. 📶 On your phone or laptop, open WiFi settings and scan for networks
2. You should see a new network:
| 🔑 Setting | 📝 Value |
|---|---|
| 📶 SSID | EthiFi |
| 🔐 Password | deauther |
3. Connect to it, open your browser, and navigate to:
http://192.168.4.1
4. The EthiFi Web UI should load 🎉
💡 If it doesn't appear straight away, wait 15–20 seconds and try again — first boot can take a moment.
| ❌ Problem | 🔗 Fix |
|---|---|
| No COM port under Tools → Port | Driver Installation |
Connecting... stuck, upload times out |
Hold BOOT button during upload, lower upload speed to 115200
|
| Compile error — board not found | Re-check board URL in Preferences, restart IDE |
| Board crashes or Web UI won't load | Wrong flash size — re-check Tools → Flash Size |
| Can't find Deauther boards in Tools → Board | Boards Manager install may have failed — reinstall the package |
| Upload succeeds but no WiFi network appears | Power cycle the board, wait 20 seconds, scan again |
📖 Full solutions → Troubleshooting & FAQ
- 🚀 Getting Started — Connect to EthiFi and use the Web UI
- ⚡ Installation — NodeMCU Flasher — Prefer a simpler GUI flasher?
- 🩺 Troubleshooting & FAQ — Something not working?
🌐 [haybnz.web.app](https://haybnz.web.app/) · 🐙 [GitHub](https://github.com/h9zdev/EthiFi) · 📖 Home