For Contributors Simulator Architecture
The simulator is organized into distinct layers to separate concerns:
- API Layer: Handles HTTP requests and responses using FastAPI.
- Service Layer: Manages business logic and coordinates between API and infrastructure.
- Domain Layer: Defines core entities (e.g., Printer, Head, Extruder) using structured models.
- Infrastructure Layer: Simulates hardware (e.g., print head) and manages state persistence.
- Test Layer: Includes unit and integration tests for reliability.
This structure supports maintainability, scalability, and future integration with real datasets or hardware.
printer_simulator/
├── simulator/
│   ├── v2/
│   │   ├── backend/
│   │   │   ├── app/
│   │   │   │   ├── api/                    # API Layer: Handles HTTP requests and responses
│   │   │   │   │   ├── endpoints/         # Route definitions
│   │   │   │   │   │   ├── printer.py     # Printer status API endpoints
│   │   │   │   │   │   ├── authentication.py # Authentication endpoints
│   │   │   │   │   ├── schemas/           # Pydantic schemas for data validation
│   │   │   │   │   │   ├── printer_schemas.py
│   │   │   │   │   │   ├── auth_schemas.py
│   │   │   │   │   ├── swagger_api.py     # Aggregates routes and generates Swagger docs
│   │   │   │   ├── domain/                # Domain Layer: Core business logic
│   │   │   │   │   ├── models/            # Entity definitions
│   │   │   │   │   │   ├── printer_models.py
│   │   │   │   │   │   ├── authentication_models.py
│   │   │   │   ├── infrastructure/        # Infrastructure Layer: Hardware simulation and storage
│   │   │   │   │   ├── repositories/      # State persistence
│   │   │   │   │   │   ├── printer_repo.py
│   │   │   │   │   │   ├── authentication_repo.py
│   │   │   │   │   ├── simulators/        # Hardware simulation
│   │   │   │   │   │   ├── print_head.py  # Simulates print head
│   │   │   │   ├── services/              # Service Layer: Business logic coordination
│   │   │   │   │   ├── printer_service.py
│   │   │   │   │   ├── auth_service.py
│   │   │   ├── main.py                    # FastAPI entrypoint
│   │   │   ├── requirements.txt           # Dependency list
│   │   ├── tests/                         # Test directory
│   │   │   ├── unit/                      # Unit tests
│   │   │   │   ├── service/
│   │   │   │   │   ├── test.py
│   │   │   │   ├── domain/
│   │   │   │   │   ├── test.py
│   │   │   ├── integration/               # Integration tests
│   │   │   │   ├── api/
│   │   │   │   │   ├── test_printer.py
The high-level design outlines the simulator’s architecture, emphasizing a layered approach to separate concerns:
-
API Layer: Exposes RESTful endpoints (e.g.,
GET /api/v1/printer) and WebSocket for real-time updates, built with FastAPI and Pydantic for validation. - Service Layer: Orchestrates business logic, bridging API requests with infrastructure operations.
-
Domain Layer: Defines structured entities (e.g.,
Printer,Head) to encapsulate core business concepts. -
Infrastructure Layer: Simulates hardware (e.g.,
PrintHeadSimulator) and persists state (e.g.,PrinterRepository, currently in-memory, future-ready for databases). - Test Layer: Ensures reliability through unit and integration tests.
This design ensures modularity, scalability, and maintainability, supporting both simulated and real printer interactions.
The layered architecture:
- Improves Maintainability: Clear separation of concerns simplifies updates and debugging.
- Enhances Scalability: Supports future features like database integration, G-code parsing, and multi-printer management.
- Ensures Realism: Stateful simulators and structured models mimic real 3D printer behavior.
- Facilitates Testing: Isolated layers allow targeted unit and integration tests, ensuring robust functionality.
The class diagram illustrates the relationships between key components across layers:
(Mermaid code, matches PNG below)
``` mermaid
classDiagram
    class PrinterAPI {
        +get_printer()
        +get_printer_status()
        +set_printer_status()
        +get_printer_bed()
        +get_printer_heads()
    }
```
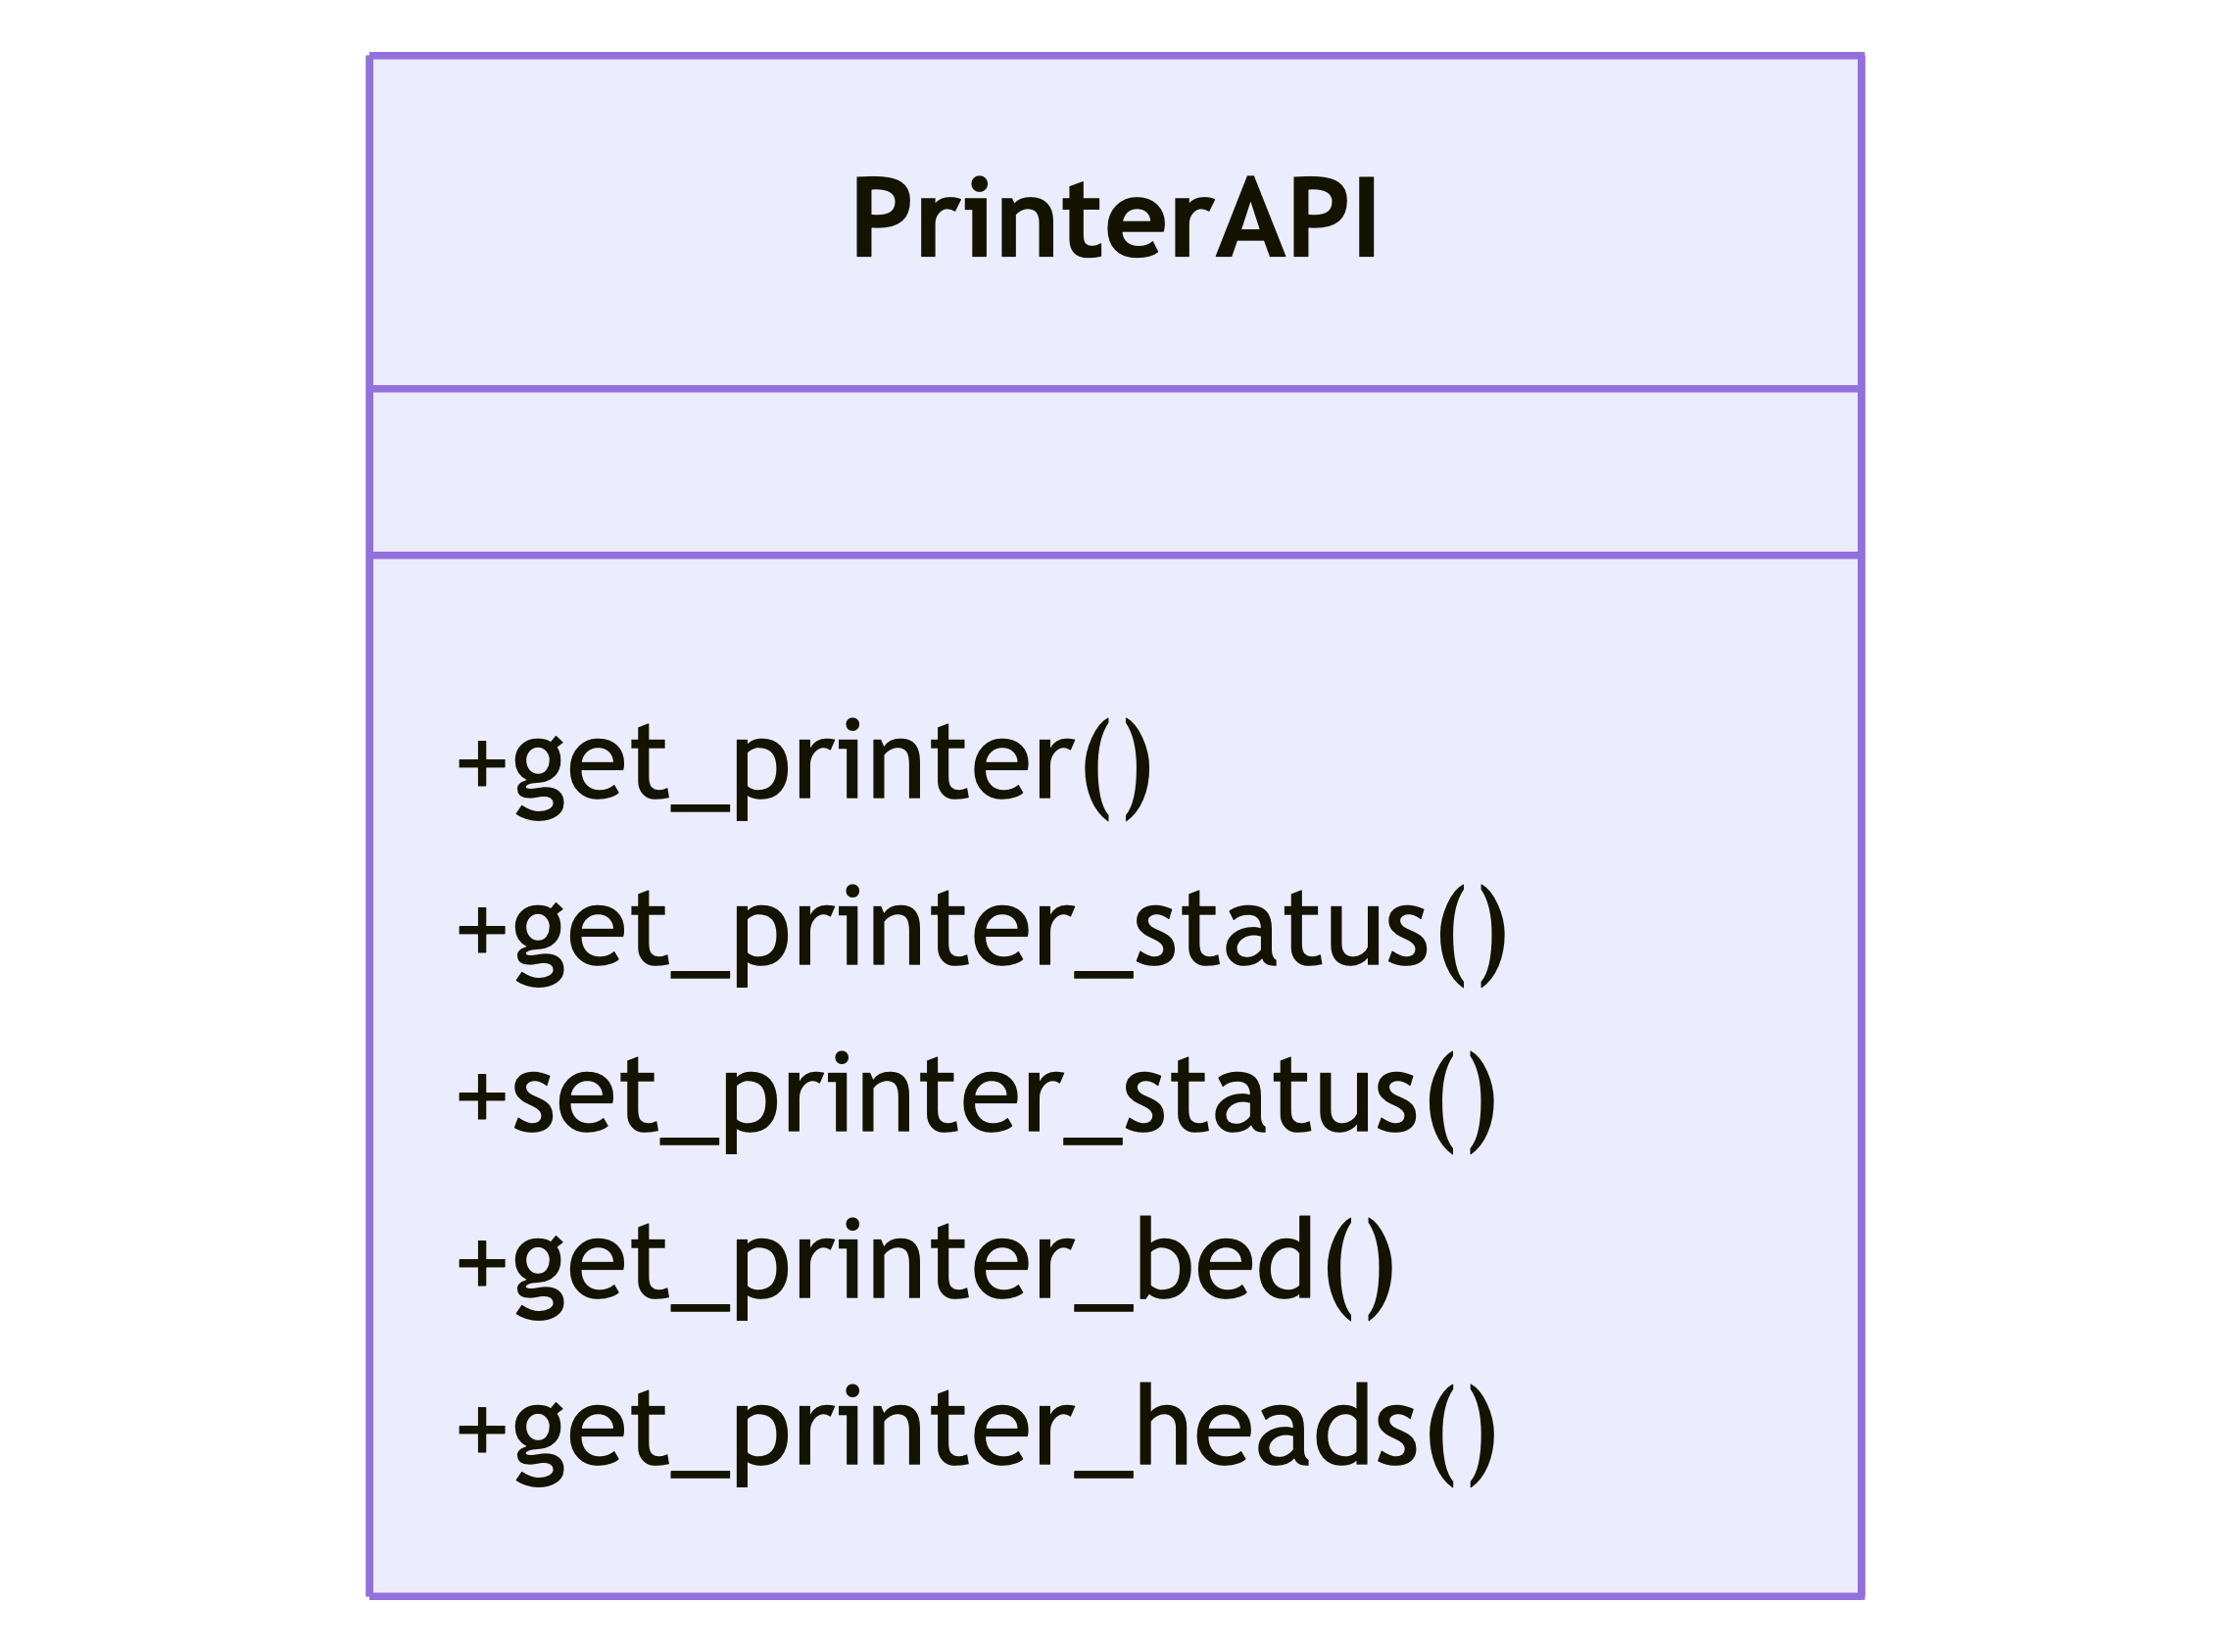
Description:
-
PrinterAPI (API Layer): Defines REST endpoints, using
PrinterSchemasfor validation. - PrinterSchemas (API Layer): Pydantic models for request/response validation.
- PrinterService (Service Layer): Coordinates logic, managing state transitions.
-
PrinterRepository (Infrastructure Layer): Persists printer state, constructing
PrinterModel. - PrinterSimulator (Infrastructure Layer): Simulates dynamic hardware behavior (e.g., temperature).
- PrinterModel (Domain Layer): Structured entity representing the printer.
This diagram shows the workflow for a GET /api/v1/printer request in v1, highlighting its simplicity and limitations:
(Mermaid code, matches PNG below)
```mermaid
sequenceDiagram
    actor User
    participant Frontend
    participant APIRouter as "API (printer.py) [API Layer]"
    participant Service as "PrinterService [Service Layer]"
    participant Generator as "PrinterDataGen [Data Generator Layer]"
    participant DataGen as "DataGen [Low Level Generator]"

    User->>Frontend: GET /api/v1/printer
    Frontend->>APIRouter: HTTP GET /api/v1/printer
    APIRouter->>Service: get_printer()
    Service->>Generator: generate_printer_data()
    Generator->>DataGen: low-level data call
    DataGen-->>Generator: generated data
    Generator-->>Service: printer data
    Service-->>APIRouter: printer data
    APIRouter-->>Frontend: JSON response
    Frontend-->>User: Rendered printer info
```
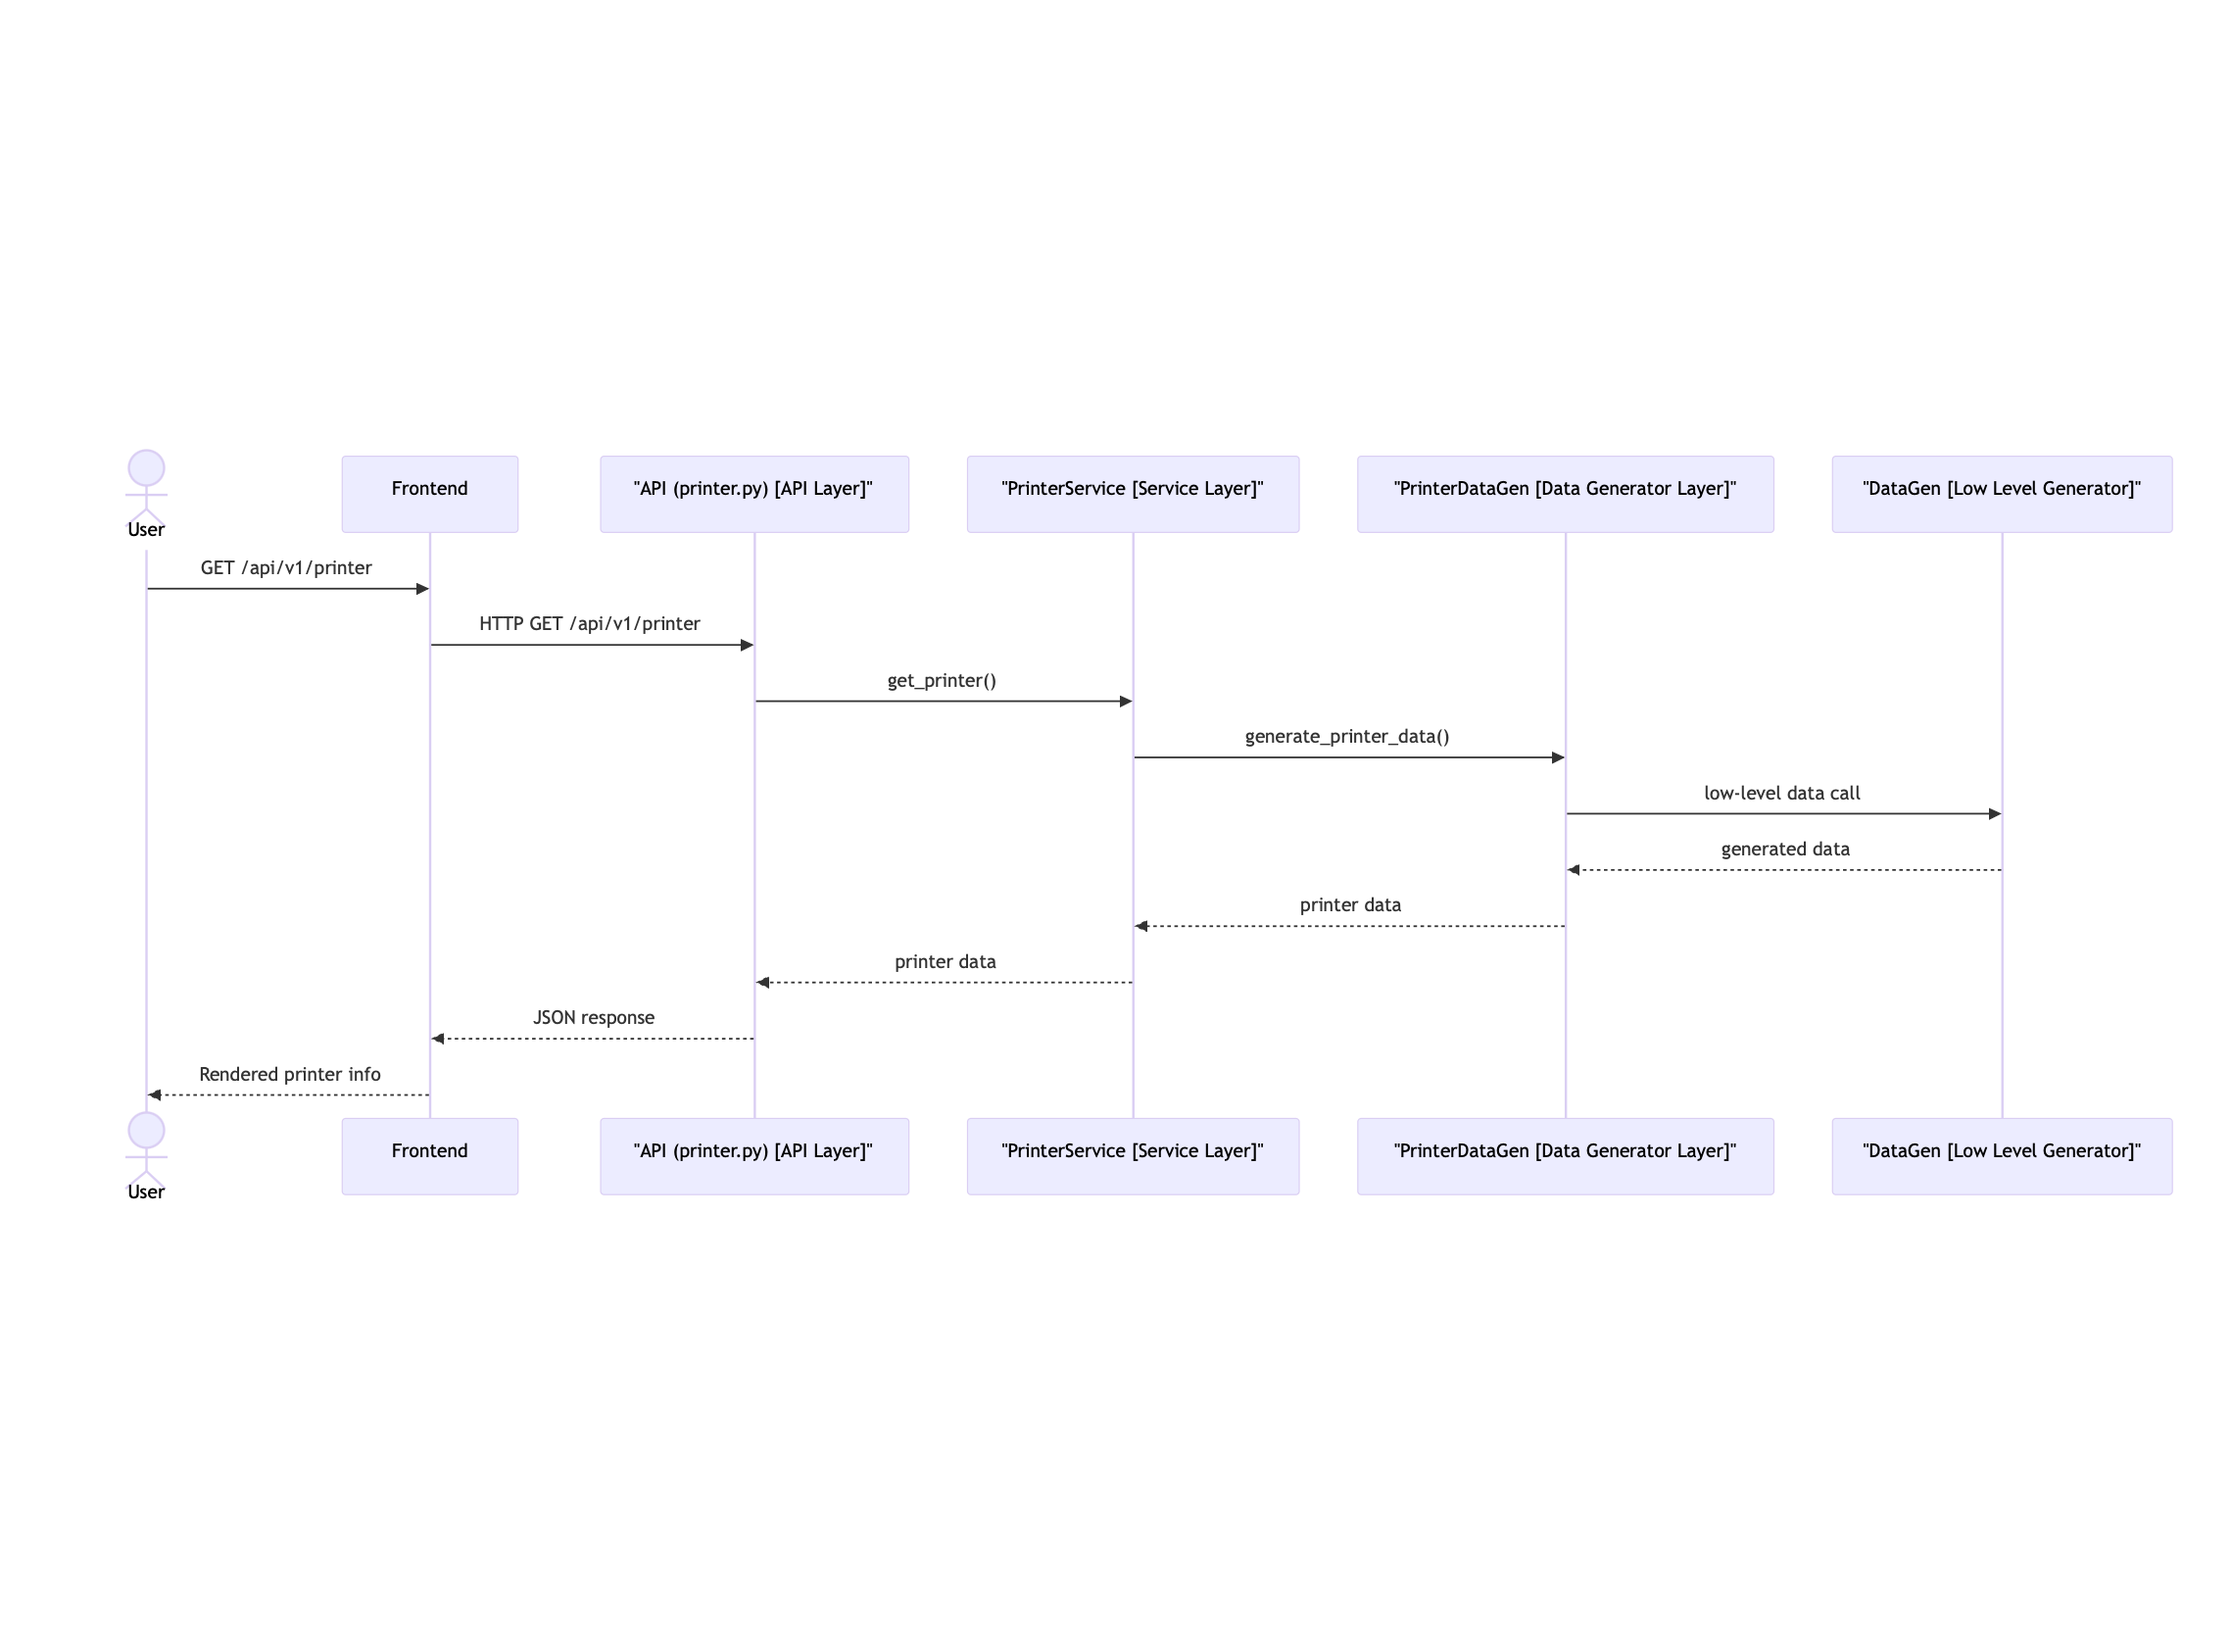
Notes:
-
Layers: API Layer (
printer.py) → Service Layer (PrinterService) → Data Generator Layer (PrinterDataGen). - Limitations: Random, stateless data generation leads to inconsistent responses; no domain models or schemas.
This diagram illustrates the improved workflow for a GET /api/v1/printer request in v2, showcasing layered interactions:
(Mermaid code, matches PNG below)
```mermaid
sequenceDiagram
    actor User
    participant Frontend
    participant APIRouter as "API (printer.py) [API Layer]"
    participant Schema as "PrinterSchemas [API Layer]"
    participant Service as "PrinterService [Service Layer]"
    participant Repository as "PrinterRepository [Infrastructure Layer]"
    participant Model as "PrinterModel [Domain Layer]"
    participant Simulator as "PrintHeadSimulator [Infrastructure Layer]"

    User->>Frontend: GET /api/v1/printer DEFAULT
    Frontend->>APIRouter: HTTP Request
    APIRouter->>Schema: Validate request schema
    APIRouter->>Service: get_printer()

    Service->>Repository: get()
    Repository->>Model: Load printer model
    Model-->>Repository: PrinterModel instance
    Repository-->>Service: Printer data

    Service->>Simulator: simulate_head_data()
    Simulator-->>Service: simulated data

    Service->>Schema: Construct PrinterSchemas.PrinterResponse
    Schema-->>Service: Serialized response

    Service-->>APIRouter: Printer response
    APIRouter-->>Frontend: JSON response
    Frontend-->>User: Render printer info
```
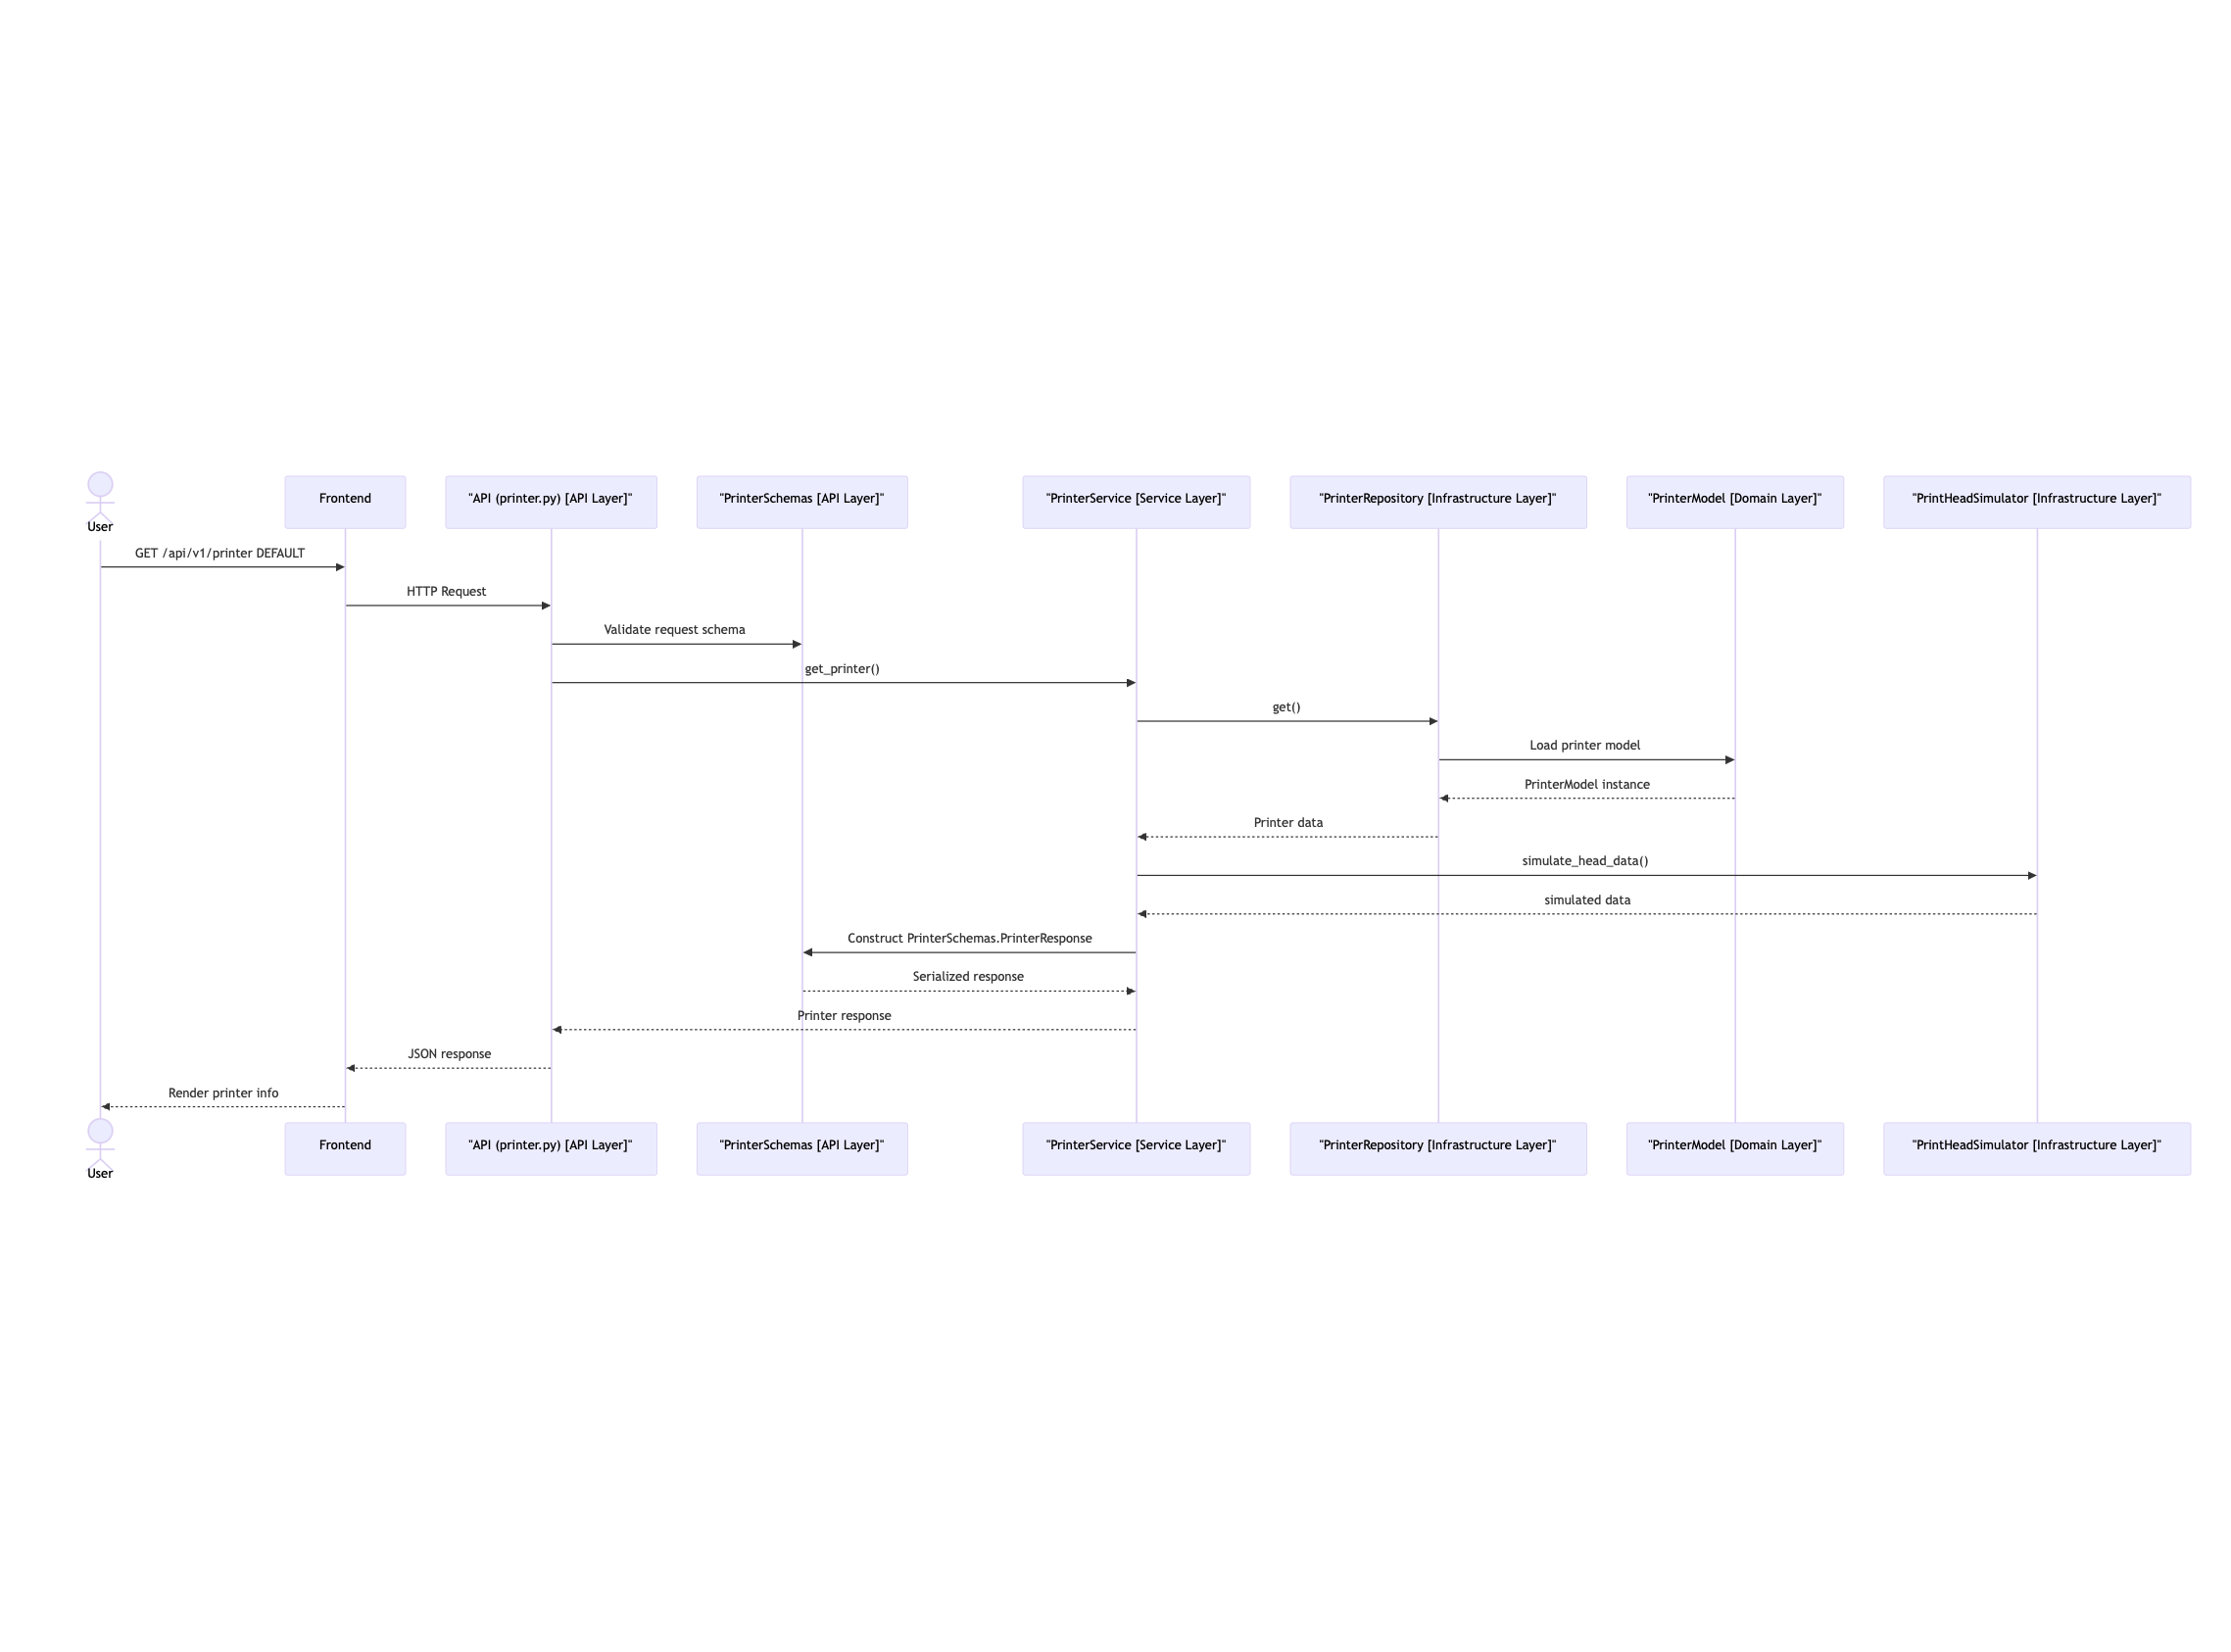
Notes:
-
Layers:
-
API Layer:
printer.pyfor routing,PrinterSchemasfor validation. -
Service Layer:
PrinterServicefor logic coordination. -
Infrastructure Layer:
PrinterRepositoryfor state,PrintHeadSimulatorfor dynamic data. -
Domain Layer:
PrinterModelfor structured entities.
-
API Layer:
- Improvements: Structured models, validated responses, persistent state, and dynamic simulation.
This diagram demonstrates real-time interaction, aligning with planned WebSocket support:
(Mermaid code, matches PNG below)
```mermaid
sequenceDiagram
    participant User
    participant Frontend as Frontend (React/Vue)
    participant Backend as Backend (FastAPI)
    participant Simulator as Printer Simulator

    Note over User,Simulator: 1. Initialize Connection
    User->>Frontend: Open browser and access frontend page
    Frontend->>Backend: HTTP GET /api/v1/printer (fetch initial state)
    Backend->>Simulator: Query current status
    Simulator-->>Backend: Return status data
    Backend-->>Frontend: Return JSON {status: "idle", progress: 0}
    Frontend->>User: Display initial status

    Note over User,Simulator: 2. User Starts Printing
    User->>Frontend: Click "Start Print" button
    Frontend->>Backend: HTTP POST /api/v1/print (with filename parameter)
    Backend->>Simulator: Call start_print("demo.gcode")
    Simulator->>Simulator: Start printing thread
    Simulator-->>Backend: Return confirmation message
    Backend-->>Frontend: Return {"message": "Printing started"}

    Note over User,Simulator: 3. Real-Time Status Updates (WebSocket)
    Frontend->>Backend: Establish WebSocket connection ws://localhost:8000/ws
    loop Push every 1 second
        Backend->>Simulator: Get latest status
        Simulator-->>Backend: Return real-time status {status: "printing", progress: 25}
        Backend->>Frontend: Push status via WebSocket
        Frontend->>User: Dynamically update progress bar and status
    end

    Note over User,Simulator: 4. Printing Completed
    Simulator->>Simulator: Progress reaches 100%
    Simulator-->>Backend: Status updates to {"status": "idle", "progress": 100}
    Backend->>Frontend: Push final status
    Frontend->>User: Display "Printing completed"
```
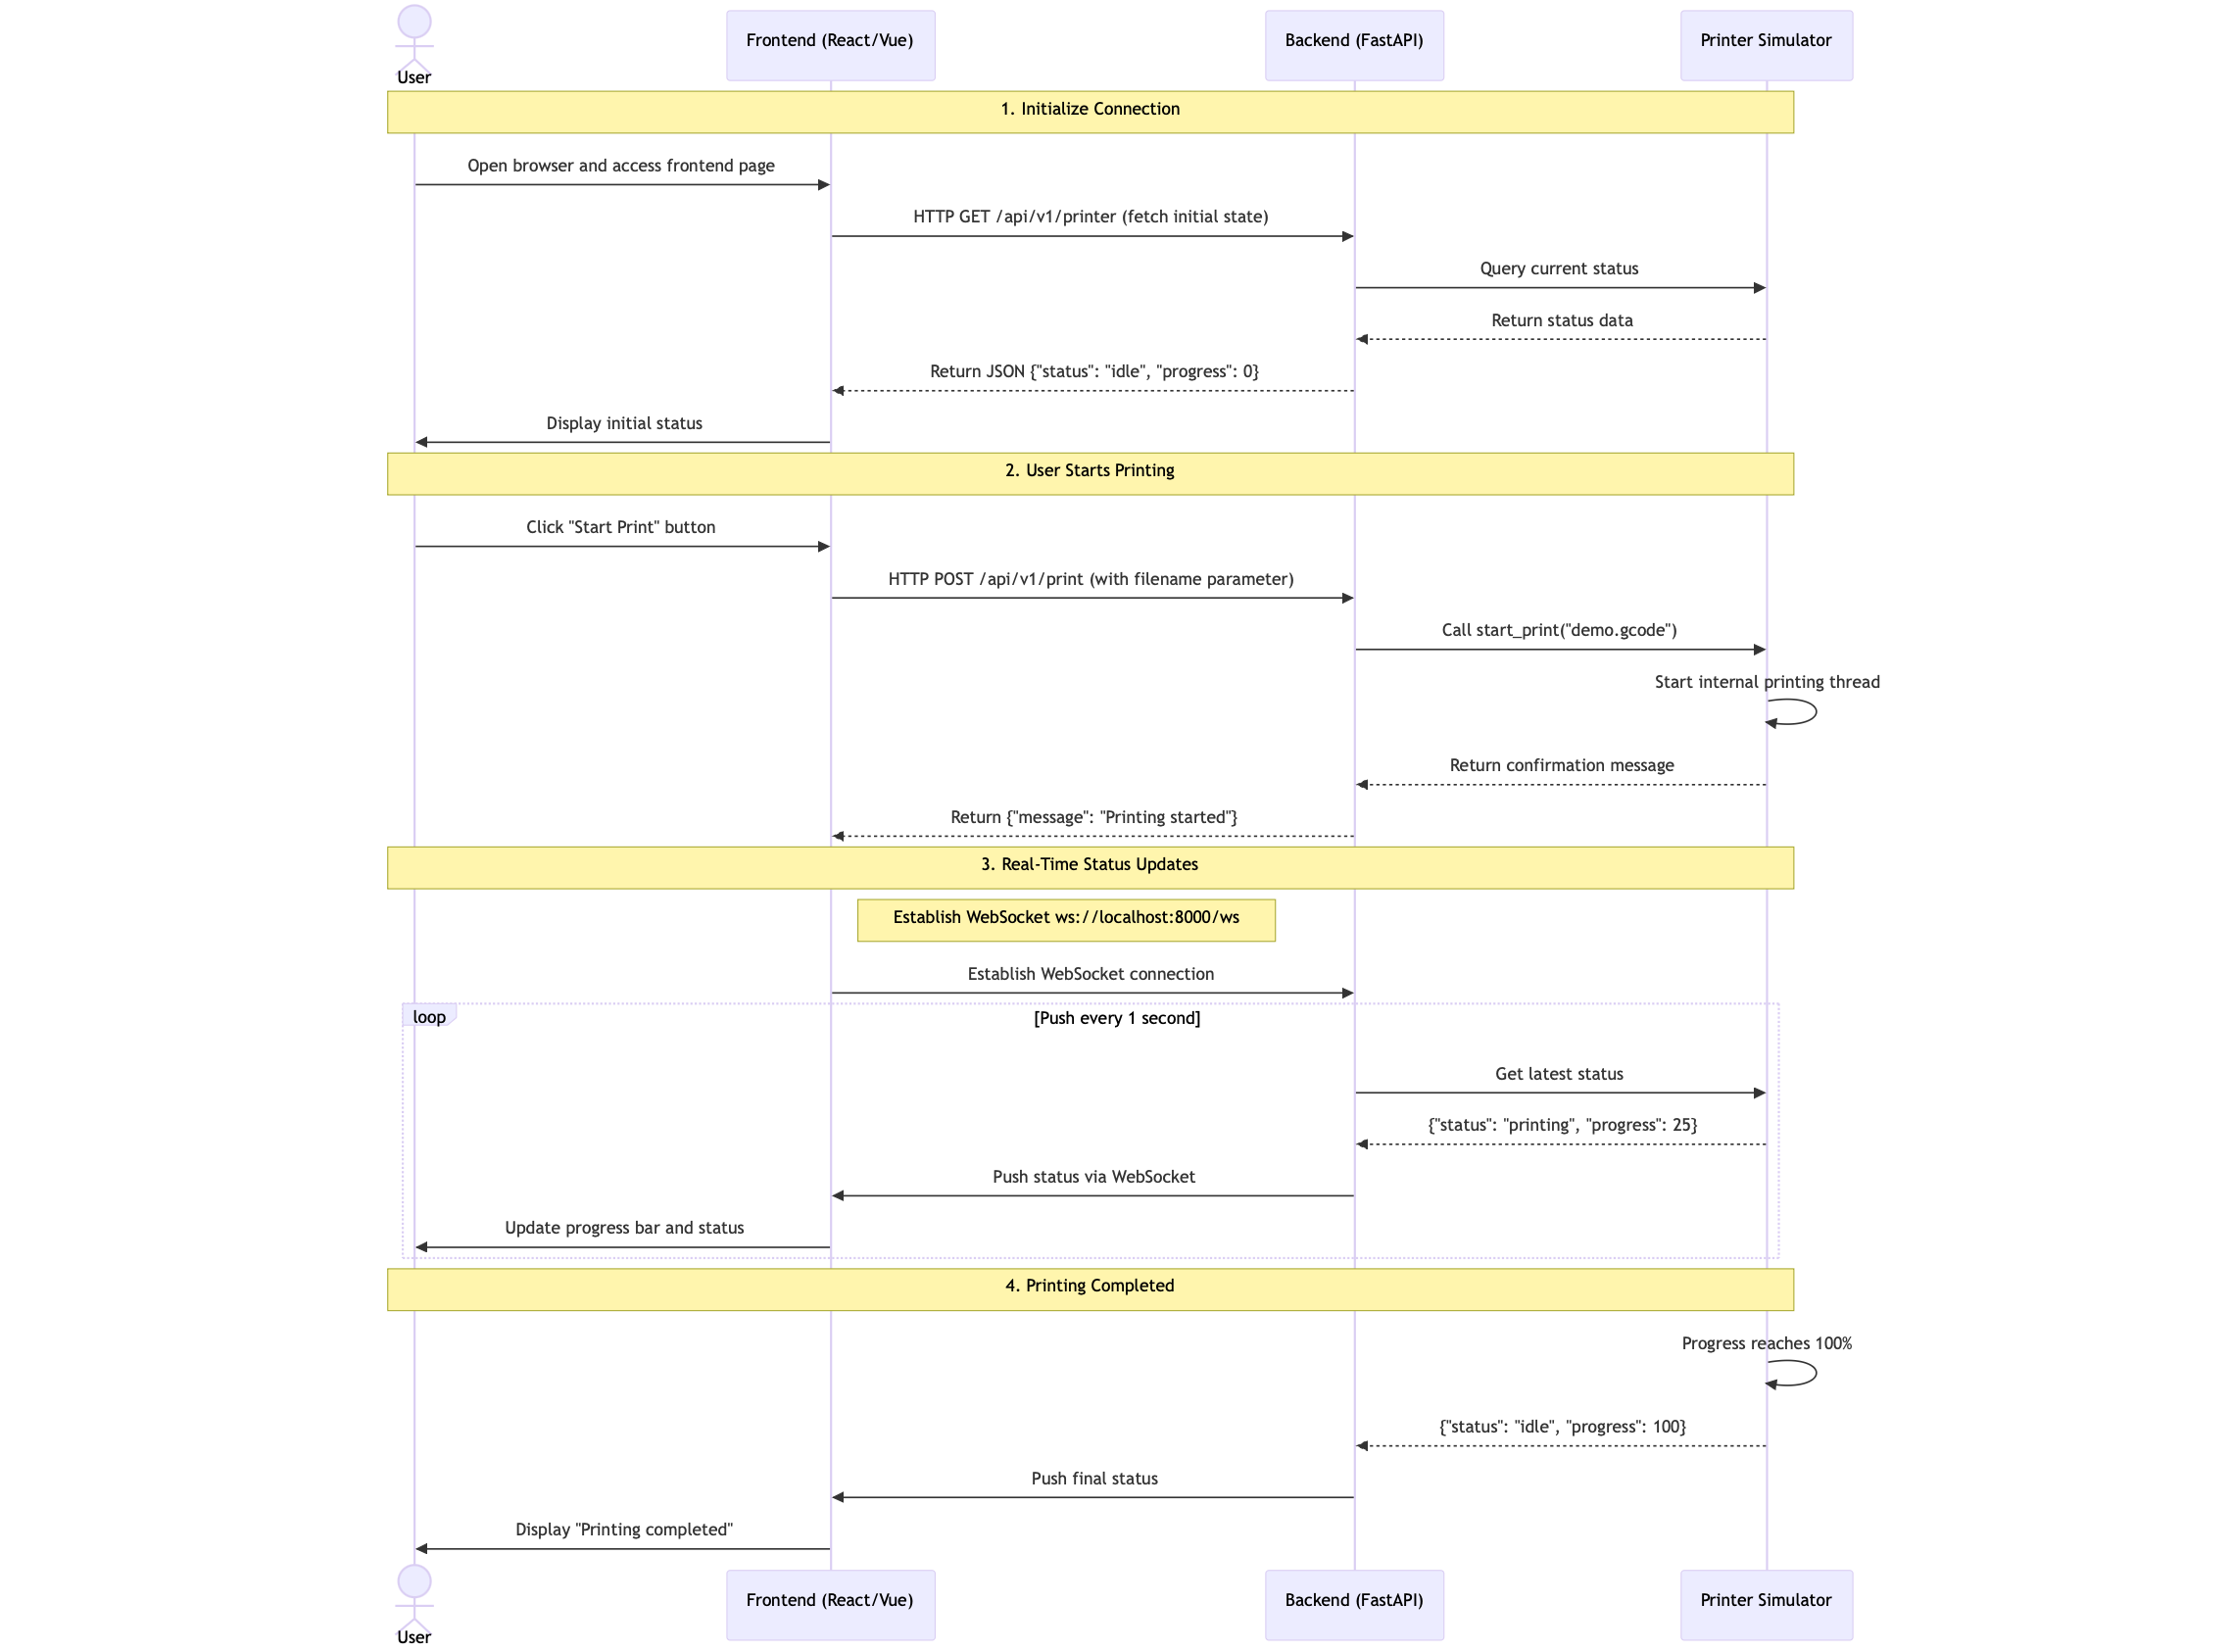
Notes:
- Demonstrates end-to-end interaction, from initialization to real-time updates via WebSocket.
- Highlights planned WebSocket support for future real-time features.