Configuring user profiles
Working sessions in siguanet-desktop are tied to user profiles. The concept is introduced in the Generating remote settings files and the Application configuration pages. These are the points you should already be familiar with:
- You should create one .srs file per profile, so that standard users don't have to manually connect to PostgreSQL.
- You should deploy the corresponding .srs file through HTTP so that, upon application login, siguanet-desktop can build the PostgreSQL connection string according to the user's profile.
- You should create one .sgd file per profile in order to define the set of functions which meets the needs of each user's profile.
- You should deploy the corresponding .sgd file through HTTP so that, upon application login, siguanet-desktop can enable and load those tools that are suitable for the user's profile.
Here we'll focus on profile management and how to create and deploy profile definition documents, also named siguanet-desktop documents, which are XML files with an .sgd extension.
As of version 1.2, there are 4 predefined user profiles embedded in siguanet-desktop's object model, as seen in the ProfileType enumerated type:
- Anonymous is intended for users who choose anonymous access on application login, that is, people who don't strictly belong to your organization and are not provided with means of identification.
- Normal is intended for users within your organization.
- Manager is intended for users that have governing or executive responsibilities within your organization (e.g. university chancellors or vice-chancellors).
- Root is a special profile reserved for application and system administrators.
You should create an .sgd file for each of these 4 base profiles, typically in a cumulative way.
The default profile discovery method uses the personal table in your SIGUANET database as a backend, although you can provide your own discovery logic, as explained in the Implementing user authentication page.
As for the built-in discovery method, users who access siguanet-desktop anonymously or cannot be authenticated are assigned the Anonymous profile. On the other hand, authenticated users are assigned the Normal profile. From the SIGUANET database point of view, you should assume that Normal users are those present in your personal table. Finally, Manager and Root users are those who belong to your personal table and are explicitly assigned one of these two user profiles. So, you simply run this SQL insert to assign a particular user within your organization the Manager profile:
# UPDATE personal SET perfil = 'MANAGER' WHERE nif = '00000014Z';Or this one to assign the Root profile:
# UPDATE personal SET perfil = 'ROOT' WHERE nif = '00000014Z';where '00000014Z' is the personal identifier of the user in question.
The application allows one user to have multiple profiles. Having said that, there's no need for a Root user to have multiple profiles since, by design, siguanet-desktop allows Root users to impersonate any other user profile upon application login. There's no point either for Manager users to also access as Normal users, since in practice the Manager profile should be thought of as a functional superset: the Manager profile definition document will normally enable the same tools and functions that the Normal one, plus some others. Multiple profiles are simply stored in personal.perfil field as a comma separated list.
Multiple profiles make sense when you need to provide individual users with custom profiles in addition to their base profile. There is no restriction on the number of custom profiles that a user may be assigned. In the end it's just a matter of providing the corresponding profile definition document. A custom profile will always reference a base profile, and its implementation differs slightly between Anonymous users and authenticated users. Let's see both cases.
Imagine you want an external collaborator to evaluate some functionality which is not intended for Anonymous users but, since she doesn't belong to your organization there's no way for her to login as an authenticated user. The way for you to go is:
- take a copy of the Anonymous profile definition document;
- edit the document and enable the target tool or functions;
- tag the document with a custom profile name, that is a short significant string in a single word;
- save and deploy the new document to your .sgd HTTP directory;
- eventually communicate the custom profile name to your collaborator so that she can supply it on application login.
There's currently no way to revoke an Anonymous custom profile. Removing the XML document file from the .sgd HTTP directory makes no solution, since the user may still have a local copy that the application can load. So, do not grant Anonymous custom profiles if you think that the information provided by the functions in question may be sensible.
Let's say there's someone named Pickwick within your organization who is in charge of collecting all kinds of aggregated data for making up some really serious statistical charts and reports. This guy desperately needs access to a subset of the siguanet-desktop functions that are intended for Manager users, but he works as an administrative assistant and you want the application to deal with him as a Normal user. This is what you should do:
- take a copy of the Normal profile definition document;
- edit the document and enable the target tool or functions;
- tag the document with a custom profile name (a single word), e.g. 'PICKWICK';
- save and deploy the new document to your .sgd HTTP directory;
- let's say the identifier of our good friend Pickwick is '000000042X'; hence, to assign him the new custom profile you'll need to run the following SQL using the naming convention [base_profile_name].[custom_profile_name]:
# UPDATE personal SET perfil = 'NORMAL.PICKWICK' WHERE nif = '00000042X';- whenever you want to revoke Mr. Pickwick's custom profile, you should simply run:
# UPDATE personal SET perfil = NULL WHERE nif = '00000042X';You'll find .sgd file samples in the profile_samples/ folder, so in practice there's no need for you to start from scratch. You can work your own profile definition documents out from these templates. Anyhow, for the sake of completeness, we'll go over the process step by step.
First of all, remember .sgd files are human readable XML: you can modify them by hand. Moreover, an .sgd file is nothing but a product of serializing instances of the siguanet-desktop's document object model. So, there isn't any particular format involved, just plain objects.
Secondly, siguanet-desktop is itself an .sgd editor provided that you log in to the application as a Root user. Let's assume you've got a raw build of siguanet-desktop with no configuration file and no extensions, that is, you're using the built-in profile discovery method. In this case, you need write privileges in your SIGUANET database personal table in order to assign yourself the Root profile. The assignment is made simply running the following SQL insert:
# UPDATE personal SET perfil = 'ROOT' WHERE nif = 'your_identifier_here';As stated in the Application configuration page, you need an HTTP directory to deploy your .sgd files to. Since you're using a raw build without application configuration file, we'll use Minserve, siguanet-desktop's embedded HTTP server supporting GET requests. Open a terminal, from your siguanet-desktop's base folder go to the build folder (the one where SIGUANETDesktop.exe lives, typically bin\Debug) and create a subfolder named minserve\:
> cd SIGUANETDesktop\bin\Debug
> mkdir minserve
To get your profile, the application needs access to your SIGUANET database. Therefore you need to create an .srs file bounded to the Anonymous profile. Therefore, run siguanet-desktop in .srs edition mode:
> SIGUANETDesktop.exe --srsProvide database connection parameters as explained in the Generating remote settings files page and save the output file in your minserve\ subfolder. Make sure the PostgreSQL user account tied to the Anonymous profile has SELECT privilege on the personal table. Once you're done, check whether you have your new .srs file in the right place:
> dir /B minserve\
Anonymous_1.2.srs
Now run the application with Minserve enabled:
> SIGUANETDesktop.exe --minserveUse your personal identifier to log in to the application. Since you're a Root user, you'll be asked to choose among your own or any other available profiles. Select Root access and create an .sgd for Root users following these steps (use the image below as your GUI reference):
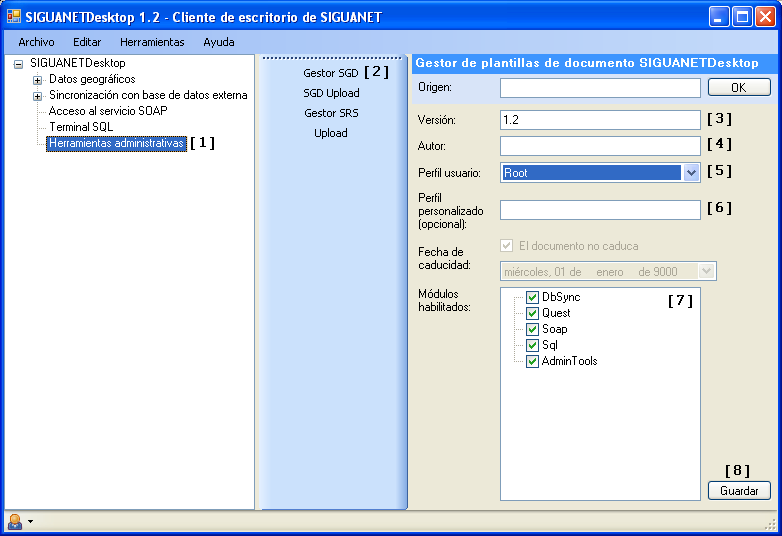
- [1] Expand the application tree and select the Administrative Tools node.
- [2] In the button menu select the .sgd Editor button. The editor dialogue will load in the right panel.
- [3] Leave the application version field as is, since it matches the present siguanet-desktop version.
- [4] Fill in the author field. This is optional metadata but recommended.
- [5] Select the Root profile in the dropdown box.
- [6] Leave the custom profile name field blank.
- [7] Make sure all application modules are enabled. Let's review each one of them:
- DbSync module is a rule based bridge for data transfer from a corporate ORACLE database to your SIGUANET database.
- Quest module is a siguanet_quest PostgreSQL extension client which allows running aggregation queries through a treeview interface. It includes a map viewer offering detail views of query results and a PDF printing utility.
- Soap module is a SOAP web service client which generates the proxy assembly at run time.
- Sql module is a simple interface for executing arbitrary SQL sentences.
- AdminTools module is a set of useful utilities for application administrators. In fact, the sgd editor is one of them!
- [8] Save to your
minserve\subfolder.
Equally use the .sgd editor for creating the corresponding .sgd files for Anonymous, Normal and Manager profiles. Just remember to select the right profile in the dropdown box. Also, bear in mind that certain application modules may not be suitable for non Root profiles. As a rule of thumb, always disable DbSync, Sql and AdminTools application modules for Anonymous, Normal and Manager profiles.
As for custom profile management, just supply a a single word name in the custom profile name text field. Remember that a custom profile is always paired with its base profile and that there's a subtle difference between custom profiles for Anonymous users and those for authenticated users, as seen in the previous section.
As of version 1.2, the output XML file will be named following the pattern [ProfileName]_1.2.sgd. Do not change the name of an .sgd file which is to be used in development or production. The application depends on the file name pattern to match the user profile enumerated type, the custom profile name (if any) and the current version.
That's all you need to know with regard to user profile configuration at the main application level. Quest and DbSync modules, however, need to be further configured in order to be of any use. The Quest module is eventually executing a bunch of PostgreSQL functions using different criteria and levels of aggregation. You should decide which users will run which functions, and configure .sgd files accordingly. The Quest module configuration page will guide you through this process.
On the other hand, the DbSync module helps system administrators in regular data transfer from a corporate ORACLE database into your SIGUANET database. This means your Root profile definition document should store commands and rules that allow the correct mapping between relations in both sides. You'll find a thorough explanation on how to define DbSync commands in the DbSync module configuration page.
There's nothing special about deploying .sgd files. In fact, what you've done in the previous section is deploying them to your minserve\ subfolder. So you just copy your .sgd files to the corresponding HTTP directory when you're in production, and distribute a suitable application configuration file along with the binaries.