Generating remote settings files
Most standard users will probably run siguanet-desktop in order to query SIGUANET data through the siguanet_quest client. The siguanet_quest extension encompasses several hundreds of functions useful in terms of data aggregation. The client inside siguanet-desktop provides a tree view interface that allows users to easily navigate across different levels of aggregation, either spatial or non-spatial, retrieve well organized sets of figures within a particular aggregation level, and render and print maps that show detail information for the selected aggregated figure and building floor plan. In short, this is sort of a statically defined OLAP tool.
That's a big job for the database server, since tens of requests may be fired by a single user upon a single click. Therefore, we chose to develop a TCP client using Npgsql and SharpMap as data providers. Although we gain speed since there aren't any layers between the client and the database server, the disadvantage is that users in your organization must authenticate themselves against PostgreSQL. To avoid users manually logging in to PostgreSQL, application administrators should deploy siguanet-desktop with the remote settings download behaviour enabled. Read the Application configuration page for instructions on how to do so.
Here we'll go through the steps to generate and deploy remote settings files ( .srs ). These are XML files which store information on PostgreSQL connection parameters and user account. Remember that .srs files are encrypted using a symmetric encryption method as explained in the Things to do before you build page (you should have follow the instructions on that page before going ahead!). When configured to do so, instead of requesting users to manually configure a PostgreSQL connection, siguanet-desktop will download the proper .srs file from the predefined HTTP directory, decrypt it, build the connection string and connect to your SIGUANET database. All of it behind the scenes upon user login to the application. This way, the siguanet_quest client is ready to run.
Once you've set the symmetric encryption keys (read the Things to do before you build page if yo haven't done so) you must generate one .srs file per user profile. An .srs editor is included with siguanet_desktop's main executable. From the command line, go to your build folder (typically bin\Debug) and run the application in .srs edition mode:
> cd SIGUANETDesktop\bin\Debug
> SIGUANETDesktop.exe --srs
You'll be presented with an .srs editor, which is a form resembling a typical PostgreSQL connection dialogue (see the screen capture below).
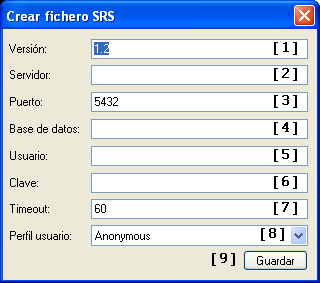
Let's see the elements you should set as numbered in the .srs editor's screen capture:
- [1] Application version. Default is the present siguanet-desktop version.
- [2] Your PostgreSQL database server address.
- [3] Your PostgreSQL service port. Default port is 5432.
- [4] Your SIGUANET database name.
- [5] The PostgreSQL user name. Please, remember to always assign a user account with read-only access.
- [6] The PostgreSQL user account password.
- [7] Connection timeout. Default is 60 seconds.
- [8] The siguanet-desktop user profile which this .srs file is bounded to. As of version 1.2, there are 3 profiles available: Anonymous, Normal and Manager. There's no point on having an .srs file for Root users (application and system administrators) since the application enforces manual PostgreSQL connection on them. Read the Configuring user profiles page for further details on user profiles.
- [9] On saving, you'll be asked for a folder location on which to store the new srs file.
As of version 1.2, the output XML file will be named following the pattern [ProfileName]_1.2.srs and all fields except the version element will appear encrypted according to the encryption keys you set before buiding your siguanet-desktop main executable binary. Do not change the name of an .srs file which is to be used in development or production. The application depends on the file name pattern to match the user profile enumerated type and the current version.
Once you're done with your .srs files, you should place them in your web server according to the .srs HTTP directory you've indicated in the application configuration file (see the Application configuration page).
In case your PostgreSQL server is reachable from two IP addresses (e.g. one for LAN and another one for WAN connections) you can configure alternate .srs files and place them in an alt/ folder directly below the .srs HTTP directory. The application will automatically look for an .srs file in the alternate folder in case of failure when trying to connect to PostgreSQL using the one in the parent directory.