DbSync module configuration
Spatial infrastructure management systems such as SIGUANET are heavily dependent on data input from disparate sources. It's one of those situations when you, as a system admin, ironically realize that the fancy cross-cutting approach of GIS may eventually blow up in your face if you're not able to normalize, automate, and schedule data capture in order to keep your geodatabase up-to-date. Broadly speaking, a SIGUANET database depends upon three kind of inputs:
- CAD floor distribution plans.
- Enclosures data updated by the users themselves or obtained from fieldwork. This includes answering to questions such as "what's this enclosure's primary use?" or "who works in here?" or "which organizational unit does this room belong to?".
- Data from corporate databases, which mainly encompass records about employees, organizational units and their relationships. The DbSync module helps Root users in coping with this corporate data by providing a configurable interface which allows to define, simulate and execute a command sequence for incremental copy purposes. So, periodically running a consistent DbSync sequence makes keeping your SIGUANET database reasonably in synch with corporate databases feasible.
In short, DbSync is an ADO.NET based data bridge for performing incremental copies from an ORACLE database hosting corporate data into your SIGUANET database. Thus, DbSync must run on a client machine with access to an ORACLE server instance in which your ORACLE user account has read privileges on views or materialized views storing data about employees and organizational units. Remember that the .NET ORACLE data provider requires the Oracle Instant Client to be installed on your client machine. You'll also need a PostgreSQL user account with read and write privileges on SIGUANET tables which hold these corporate data in the public schema. Having a look at the DbSync candidate tables in the Appendix B: SIGUANET corporate data tables page will help you better understand what kind of data should be requested from ORACLE.
As opposed to the Quest module, which is suitable for all user profiles, the DbSync module is specifically designed for Root users, that is system administrators with deep knowledge on the SIGUANET data model. Let's go now for a tour of DbSync! Remember you'll be working with Minserve as Root, so everything related to your user profile should have been set up previously. If not, go to the Configuring user profiles page. This is a key point since all DbSync commands configuration will be kept in your Root profile definition document ( .sgd ) and you don't want to end up having configurations split across two .sgd files and merging them manually.
As usual, run the application with Minserve enabled:
> SIGUANETDesktop.exe --minserveLog in to the application using your personal identifier and select Root access.
Set up source and destination database connections first so that you can use siguanet-desktop's schema browser and test any command you define on the go. The screen capture below helps you setting your source database connection, that is the ORACLE database instance where your corporate data can be read from:
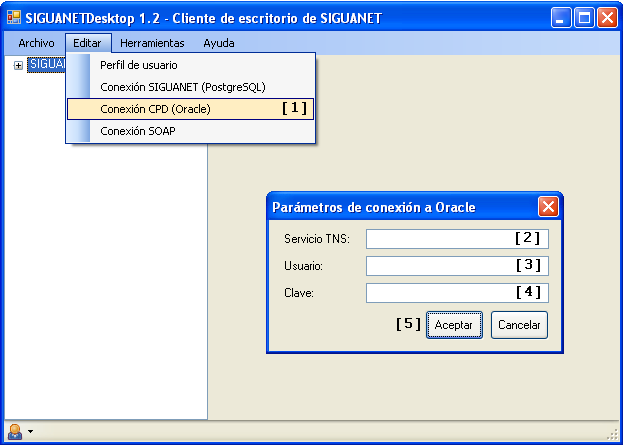
- [1] In the main menu, select Editar > Conexión CPD (Oracle) to invoke the connection dialogue.
- [2] In the Oracle connection dialog, type the name of the service as set in your TNSNAMES.ora file.
- [3] Enter your ORACLE user name.
- [4] Type your ORACLE user account password.
- [5] Press the Accept button to resume.
Follow these steps to define your PostgreSQL destination database connection, that is your SIGUANET database, as shown in the image below:
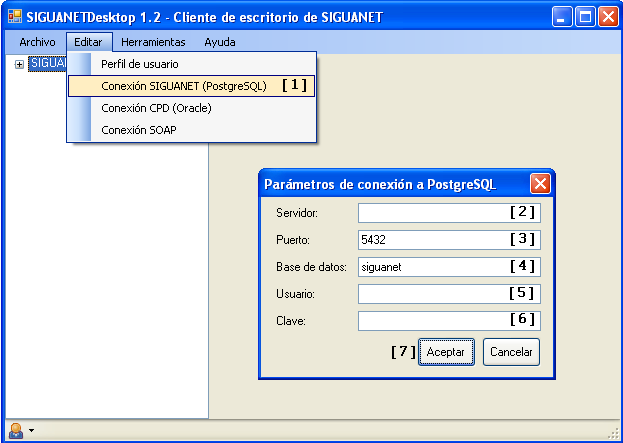
- [1] In the main menu, select Editar > Conexión SIGUANET (PostgreSQL) to invoke the connection dialogue.
- [2] In the PostgreSQL connection dialog, type your database server address.
- [3] Enter your PostgreSQL service port. Default port is 5432.
- [4] Supply your SIGUANET database name. Default name is siguanet.
- [5] Enter your PostgreSQL user name.
- [6] Type your PostgreSQL user account password.
- [7] Press the Accept button to resume.
At this point you should be able to use the database schema browser (select Herramientas > Visor de esquemas de base de datos in the main menu) provided that you've correctly set the PGSQLTargetSchemas and ORATargetSchemas application configuration variables (have a look at the Application configuration page for details). We've already mentioned DbSync lets you run a command sequence in order to get your SIGUANET database in sync with corporate data in ORACLE. In fact, DbSync is an API that allows configuring such a sequence through XML serialization of different class instances, that is an object hierarchy which basically lays out as follows:
operations
         ⎿ tasks
                ⎿ commands
In this brief guide we'll create one operation and learn different types of tasks and commands by example. You can create as many operations as you need. Within one operation you usually group commands that perform transactions in one or possibly a set of related SIGUANET entities. Therefore, operations are just a mechanism for you to get commands together and arranged according to SIGUANET's data model. In our case we'll focus on job positions, so let's create an operation for that (just follow the steps numbered in the screen captures below):
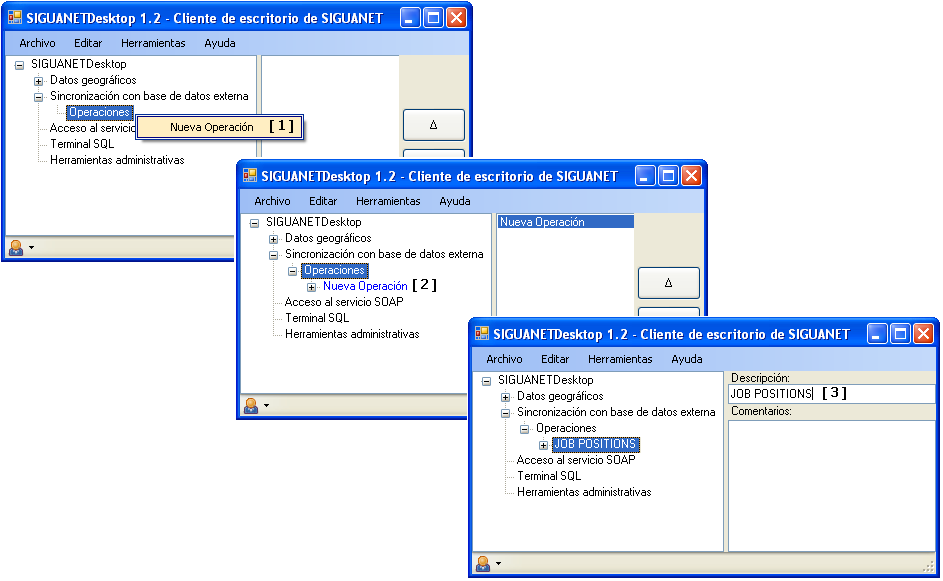
- [1] In siguanet-desktop module tree, expand DbSync node, right click on the operations node and select the new operation item in the context menu.
- [2] A new operation child node will be instantly created and expanded. Click on it to edit its name.
- [3] Enter "JOB POSITIONS" in the operation name field shown in the right panel dialog. The operation node name will change as you type.
Expanding your JOB POSITIONS operations node, you'll get 4 child task list nodes. Task lists are predefined according to timeline criteria, namely: pre-check, copy, post-check and manual update task lists. That is to say DbSync sequencer goes through task lists always in this order: execute pre-check tasks first, then do an incremental copy in SIGUANET database, perform a post-check afterwards and, finally, let the user manually update records if needed. Each task within a particular list will accept a common set of command types as we'll see next.
Let's start by adding a pre-check task to your JOB POSITIONS operation, as shown below:
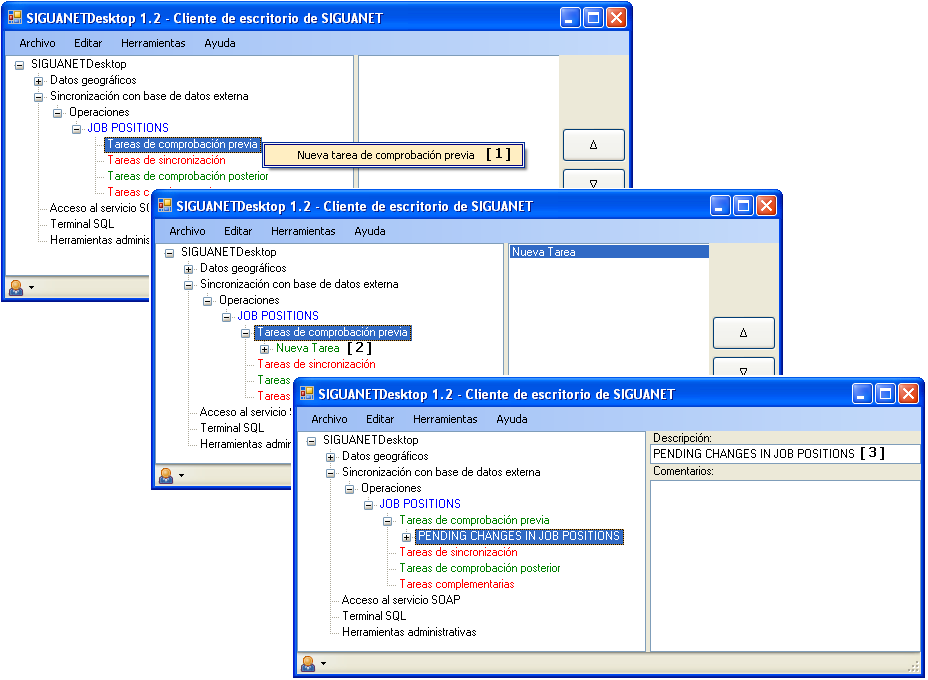
- [1] Right click on the pre-check task list node and select the new pre-check task item in the context menu.
- [2] A new task child node will be instantly created and expanded. Click on it to edit its name.
- [3] Enter "PENDING CHANGES IN JOB POSITIONS" in the task name field shown in the right panel dialog. The task node name will change as you type.
Assume we wan't to know what are the new job positions pending for insert since the last copy. You'd define a command for this inside your PENDING CHANGES IN JOB POSITIONS task. So expand it and follow the steps in the screen capture:

- [1] Right click on the command list node and select the check pending additions command item in the context menu.
- [2] A new command child node will be instantly created and expanded. Go and click on it to edit the command configuration.
At this point, mapping between source and destination fields is unavoidable. Let's say your job positions view in ORACLE is CORPDATA.POSITIONS_VIEW and has the following structure:
ID_POS      NOT NULL VARCHAR2(8)      //position id
DES_POS     VARCHAR2(40)              //position name
Then there is your SIGUANET job positions table named public.puestos:
cod_puesto character varying(10) NOT NULL    //position id
txt_puesto character varying(40) NOT NULL    //position name
pdi_pas character varying(7) NOT NULL DEFAULT 'CAMBIAR'::character varying    //class tag
investigador boolean                         //true if position involves research
etic smallint                                //minimum area available for this position (in m²)
With these data structures in mind, you easily configure the command using the dialogue in the right panel. Just follow the steps below:
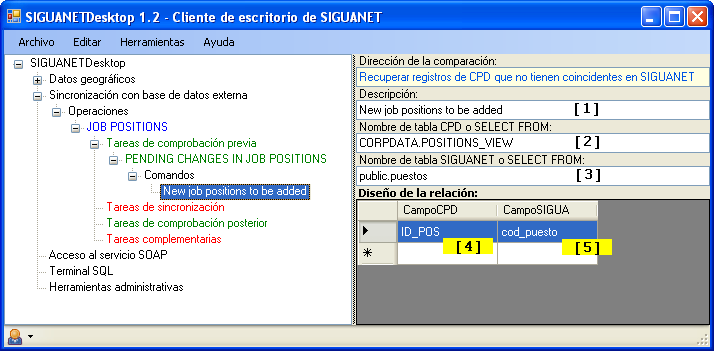
- [1] Enter "New job positions to be added" in the command name field. The command node name will change as you type.
- [2] Enter the name of the source view, CORPDATA.POSITIONS_VIEW in our example. Remember it could be a table or an arbitrary SQL SELECT sentence as well.
- [3] Enter the name of the SIGUANET destination table, that is public.puestos.
- [4] In the field mapping grid type the name of the identifier field in the source view, that is ID_POS.
- [5] Finally, type the name of the identifier field in the destination table, which is cod_puesto.
You would do it similarly to manage job positions pending for delete since the last copy. Again, define a command inside your PENDING CHANGES IN JOB POSITIONS task, as shown in the screen capture below:

- [1] Right click on the command list node and select the check pending deletions command item in the context menu.
- [2] A new command child node will be instantly created and expanded. Go and click on it to edit the command configuration.
Now configure the command following the same guidelines as in the previous command:
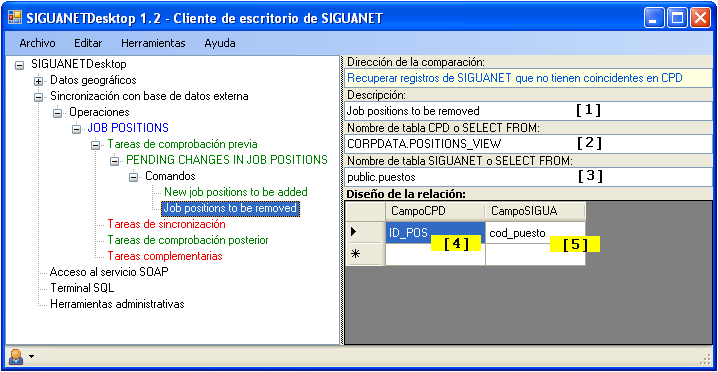
- [1] Enter "Job positions to be removed" in the command name field. The command node name will change as you type.
- [2] Enter the name of the source view, CORPDATA.POSITIONS_VIEW in our example.
- [3] Enter the name of the SIGUANET destination table, that is public.puestos.
- [4] In the field mapping grid type the name of the identifier field in the source view, that is ID_POS.
- [5] Finally, type the name of the identifier field in the destination table, that is cod_puesto.
You should now configure your copy task list. We'll have just one task and define 3 commands for it: one for deleting old job positions, one for inserting new ones and another one for updating position names that may have been changed.
First, add a copy task to your JOB POSITIONS operation, as shown below:
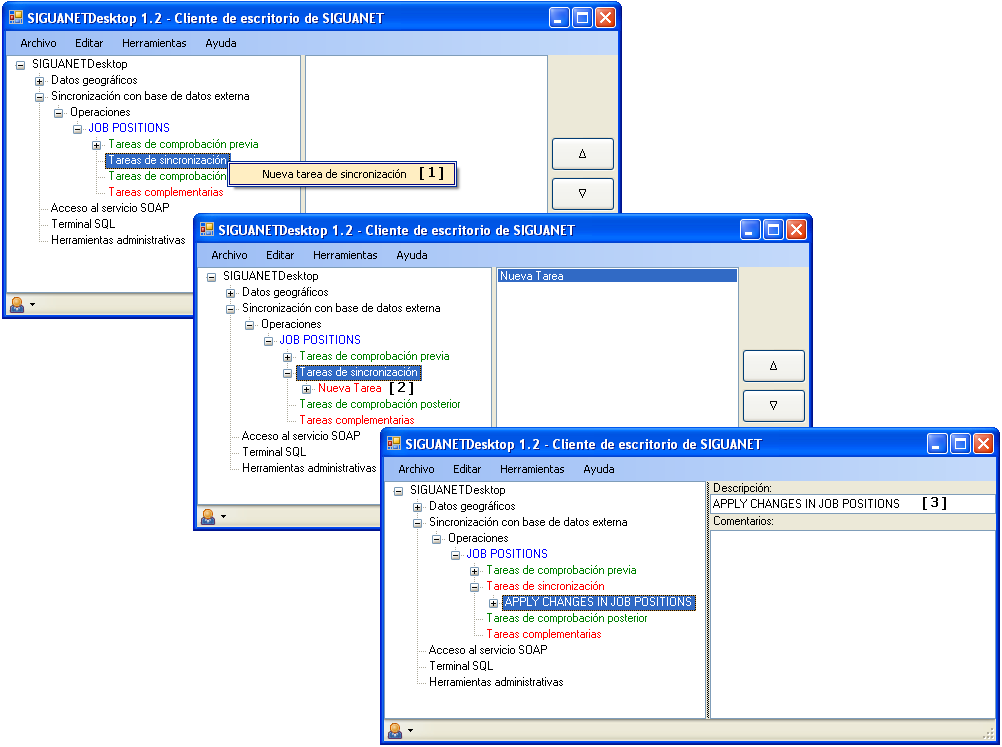
- [1] Right click on the copy task list node and select the new copy task item in the context menu.
- [2] A new task child node will be instantly created and expanded. Click on it to edit its name.
- [3] Enter "APPLY CHANGES IN JOB POSITIONS" in the task name field shown in the right panel dialog. The task node name will change as you type.
We want to get rid of old (unused) job positions in the SIGUANET database. Let's define a delete command for that inside your APPLY CHANGES IN JOB POSITIONS task. So expand it and follow the steps in the screen capture:
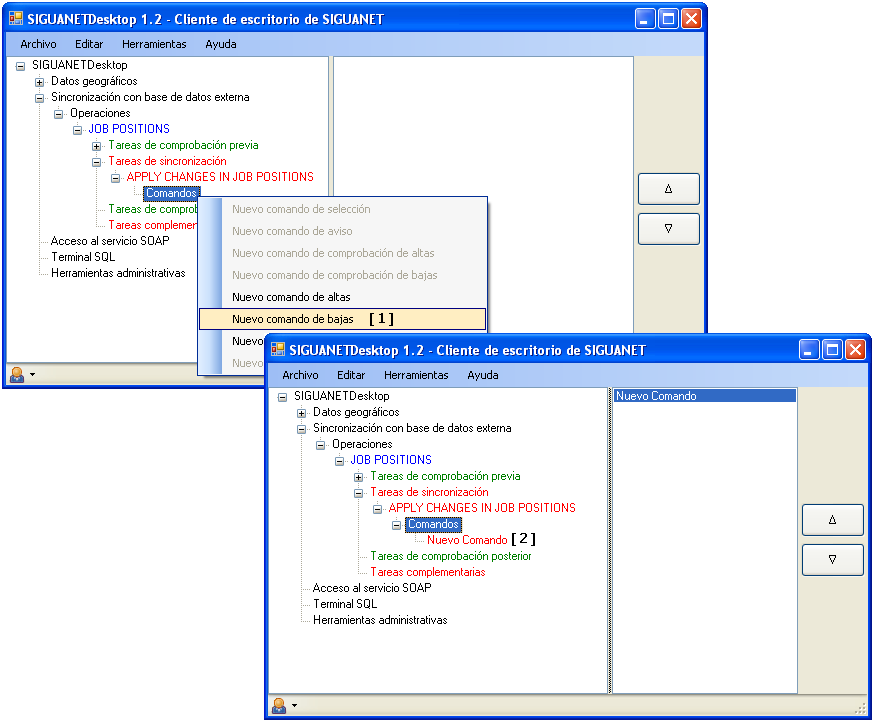
- [1] Right click on the command list node and select the delete command item in the context menu.
- [2] A new command child node will be instantly created and expanded. Go and click on it to edit the command configuration.
Configuring delete commands involves mapping identifier fields between the source and destination relations. Follow the steps below to complete field mapping as in our example:
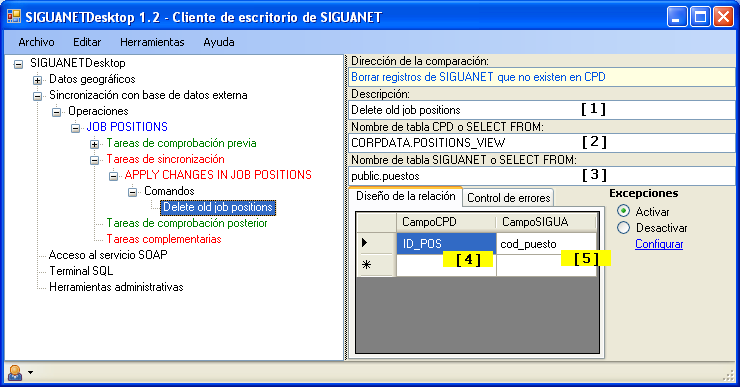
- [1] Enter "Delete old job positions" in the command name field. The command node name will change as you type.
- [2] Enter the name of the source view, CORPDATA.POSITIONS_VIEW in our example.
- [3] Enter the name of the SIGUANET destination table, that is public.puestos.
- [4] In the field mapping grid type the name of the identifier field in the source view, that is ID_POS.
- [5] Finally, type the name of the identifier field in the destination table, that is cod_puesto.
Deleting records is a sensitive operation when dealing with identifiers acting as foreign keys. If you want your delete command to issue warnings about foreign key issues instead of failing due to referential integrity errors, you may configure it that way. Assume you want to know whether there are records in SIGUANET's teaching and research staff table (public.personalpdi) that store job position identifiers affected by your delete command. Just follow the steps below to push a proper notification:
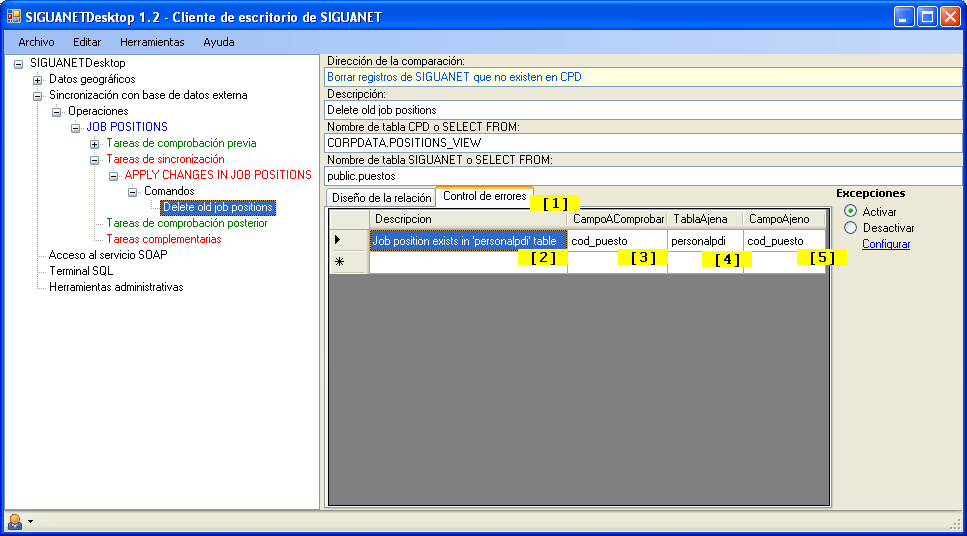
- [1] Click the warning configuration tab header.
- [2] Enter the warning message: "Job position exists in 'personalpdi' table", for instance.
- [3] Enter the referenced field in public.puestos table, that is cod_puesto.
- [4] Enter the name of the referencing SIGUANET table, that is personalpdi.
- [5] Enter the foreign key field name in personalpdi table, that is cod_puesto.
You'd do it similarly for every table holding a reference to public.puestos.cod_puesto field.