Repository navigation
Installer Configuration Workspace
Deployment Guidance → Installer configuration workspace
Since Stable 1852 the installer uses a left-hand navigation tree, not tabs, grouped into Configuration, Infrastructure and Deployment. Work through Overview, Workloads, Accounts & permissions, Azure environment, Hosting & services, Azure AI, Database & storage, Networking, Prerequisites (from Stable 1857), SharePoint, Release & packages, then Review & deploy.
Screenshot context: the released native workspace is shown with synthetic Contoso configuration and explicitly labelled design-preview messages. A preview or simulated log is not a successful deployment, Azure permission test, consent operation or health-alert acceptance result. Historic
installer-tab-*.pngfilenames are retained for link stability; the pictured UI is the current workspace.

Pick the data-sources you wish to import:

Later, you can also reconfigure which sources to include or ignore.
At this point you should have both service accounts filled out in the installer from the above configuration.
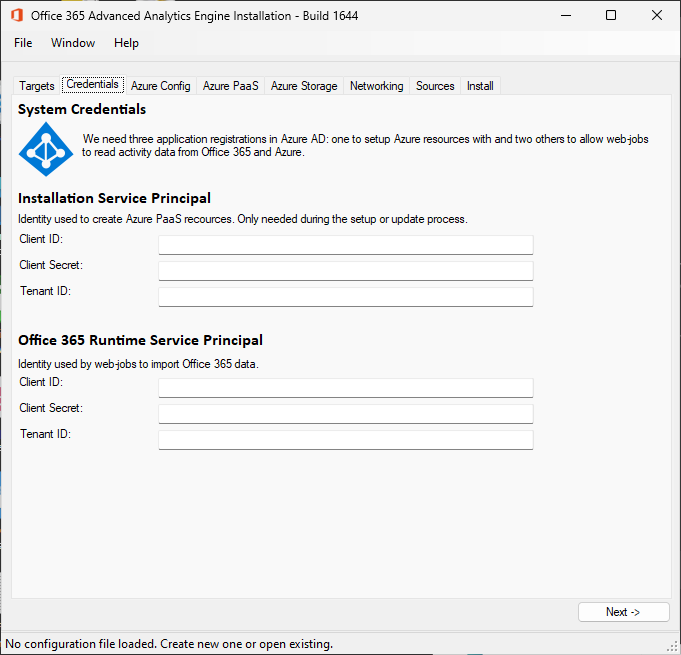
The resource group needs to be the same name as the group we created previously (or not if we wish the installer to try and create the group).

Make sure a subscription is selected. The refresh button will use the supplied installer account details to try and refresh this. If it fails, you can enter the details manually.
The performance tier configuration gives you a chance to configure an initial pricing tier for the environment. This only applies for resources created for the 1st time (if Azure resources are found already the performance settings are left untouched) and are the general recommendations for each type of environment.
Later, we highly recommend tuning the performance tier to your specific needs.
The following resources use Azure service endpoint hostnames and need names that are unique within their Azure DNS namespace:
- Key vault
- Storage
- SQL Server
- App Service name (the plan can be shared)
- Cognitive Services
Change these to something that's unlikely to exist already.
App Service plan. Since Stable 1859 (PR #828) a plan the installer creates gets the plan name you configure; earlier installers named it after the web app. An existing web app stays on the plan it runs on. A plan in another resource group is used as it is: the installer doesn't add its tags to it.
These hostnames do not mean public network access must remain enabled. For a private-only deployment, configure the VNet and private endpoints under Networking.

Configure optional Azure Monitor health alerts here. Review the notification email, 15–1440-minute heartbeat threshold, ownership, costs and opt-out behaviour in Installer health monitoring. Saving the configuration does not provision alerts.
On this page, Azure PaaS storage related resources related can be configured. Again, names must be unique. You can use the default SQL server username if you'd like.

Runtime state uses the existing Storage/Table account, not Redis. Table permissions and a private table endpoint matter independently of blob access. Select SQL authentication deliberately; see SQL Entra Access before changing the logical server administrator.
Azure AI Language and optional OpenAI provisioning are under Azure AI. Enable prompt categorisation service defaults off; choose/review its model, version, capacity/quota and actual processing boundary. Browse available models... lists the compatible models Azure offers in your subscription and region, and fills in the model, version, deployment type and capacity together; enter the installer identity, subscription and region first. See Choose the model and where prompts are processed. It writes task-specific endpoint/deployment settings and grants inference access, but does not authorise sending prompts. Enable the separate interaction-history import/consent and explicit durable portal opt-in only after governance approval. See Prompt categories.

If you want the solution's PaaS resources locked to a virtual network with private endpoints (no public access), configure the VNet, subnets and options under Networking. Leave it disabled for a standard public deployment.
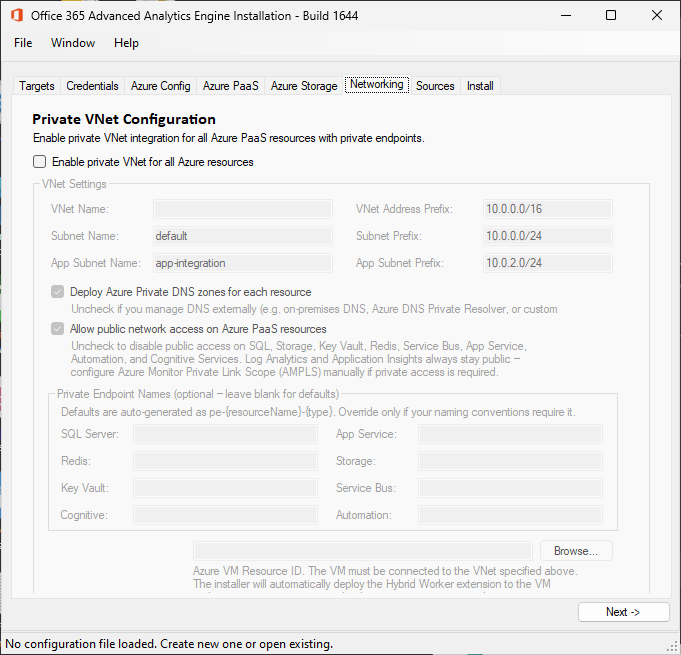
See Private endpoints for the full private-networking guide and what still needs doing manually afterwards.
From Stable 1857, Deployment → Prerequisites lists what the options you have chosen need: permissions, licences, Azure resources, and network and access requirements. Export it as Markdown to hand to whoever has to grant something. It works offline: it doesn't look at your tenant or change any permission.
Note: SharePoint configuration applies when Web sessions or Audit data (SharePoint) is ticked under Workloads — the site list scopes both. But the SharePoint install (and its sign-in) only happens when Web sessions is on. With web tracking off, the site list is purely a URL filter: nothing is deployed to SharePoint and no SharePoint sign-in is requested.
This page lists the site collections where AITracker is to be installed, and the app-catalogue URL to install the SharePoint Framework Extension package to.
How to create an app-catalogue: https://learn.microsoft.com/en-us/sharepoint/use-app-catalog
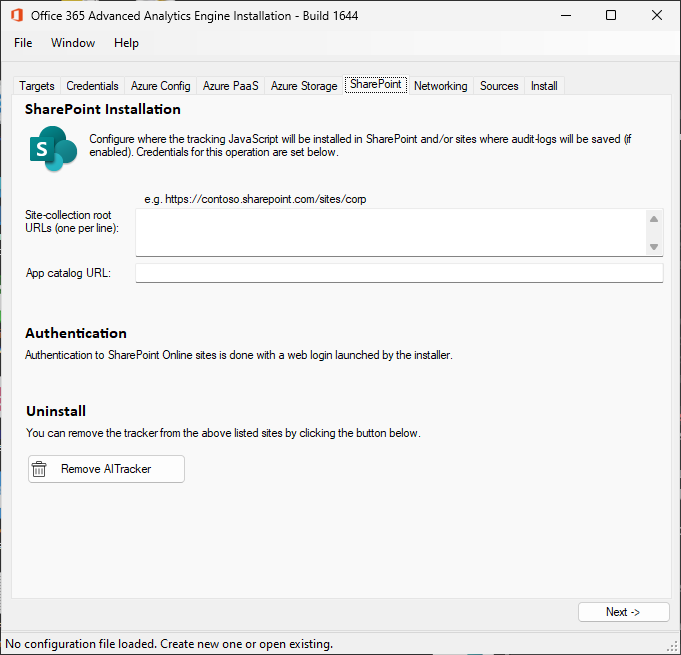
The "domain" field is taken from the Entra ID domain backing SharePoint & Microsoft 365.
Installing the tracker is a highly privileged operation, so the installer asks you to sign in interactively. When the install reaches the SharePoint stage it opens your default web browser once; the resulting token is reused for the app catalog and for every target site, and is held in memory for the duration of the install only. No SharePoint password is ever stored in the configuration file.
The account you sign in with needs:
- SharePoint Administrator (or Global Administrator) — to upload and tenant-deploy the SPFx package to the tenant app catalog.
-
Site Collection Administrator on each site collection listed above — to create and secure the
SPOInsightslibrary and register the tracking custom actions.
Because this is a normal browser sign-in, MFA, Conditional Access, passkeys and FIDO2 all work.
No app registration is required. Any OAuth sign-in needs an Entra ID app registration behind it; rather than make you create one, the installer reuses an app Microsoft already publishes — the one behind the SharePoint Online Management Shell PowerShell module, the same identity Connect-SPOService uses. In most tenants it's already present, so there is nothing to create or consent to. It is a delegated sign-in, so it grants no standing access: the installer can only do what the signed-in administrator could already do.
Sign-in app ID and Sign-in tenant are only for tenants that block that app, or organisations that want their own consent record — see Optional: use your own Entra ID app registration. If you do set your own app ID, the tenant is required too.
Upgrading from an older release? The old embedded Internet Explorer pop-up login has been replaced by this browser sign-in. Nothing about already-tracked sites changes, and there is nothing to re-run. See Legacy SPO web setup for the previous behaviour.
Before installing, click Test configuration to validate the settings and connectivity. It makes no changes and can auto-detect an existing SQL target. Resolve anything that fails before you install.
From Stable 1857 it also checks, read-only, that the Azure resource providers the deployment needs are registered, and the deployment repeats the check before it changes anything in Azure. A provider confirmed as not registered stops the deployment, and the installer lists every missing one with the command to register it. Registering is only a warning, and a status the installer can't read is reported as unverified rather than missing. The installer never registers a provider itself.
App Service content deployment uses Kudu over HTTPS/443. There is no separate FTP connectivity test or passive-port requirement.
When everything's filled out, you should be ready to install. You can specify what tasks are to be done by the installer, from complete install & validation to just updating the solution components if needed.
On Release & packages, Check latest version opens the latest stable release and its upgrade notes on GitHub in your browser. It doesn't download anything or change which release you've selected.
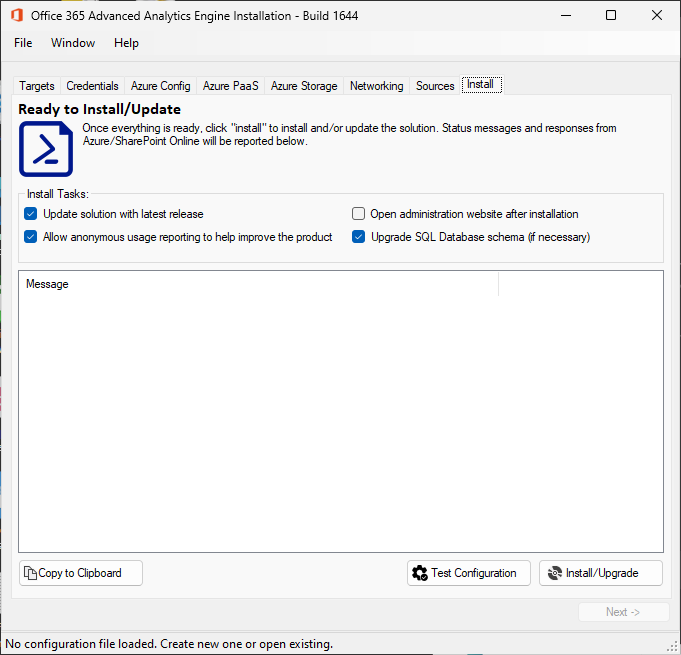
Select Review & deploy to review the acknowledgement and deployment plan. It is a review boundary, not confirmation that Azure resources exist.

Deploy now is the real action. Use it only after checking the exact target, selected build, planned writes and maintenance approval. Resolve validation errors before continuing.
Assuming there are no validation errors, the installer settings are saved locally so you don't need to configure everything again.
Handle Installer Errors
If possible that errors will occur the first time at least; naming conflicts etc. These should be logged by the installer so you can make any configuration changes needed.
Save Configuration file
In order so you don't have to fill out everything again, you can save the configuration data as a JSon file for later. The files are encrypted (or at least the sensitive fields in the file are), so a password is needed to load & save configuration files:
Choose a private configuration path and a password under your organisation's credential policy. Keep the password separately from the file; do not capture either secrets or the file's real deployment values in a screenshot. Loading later uses the saved-file password, not the Runtime client secret.
Saved secrets and older installers (schema 3.6.0)
The file encrypts three secrets with its password: the SQL administrator password and the client secrets of the two app registrations. Since Stable 1859 (PR #825, PR #835) the installer writes them in a stronger format, and stamps the file "ConfigSchemaVersion": "3.6.0". No setting is added, renamed or removed.
- The 1859 installer opens every file an earlier installer saved, with the same password. Every save writes the new format: File → Save Configuration, Save Configuration As, the save Install makes before it starts, and the private-networking checkpoint during an installation.
- Installers from 1857 and earlier can't read the secrets in a file the 1859 installer has saved, and their message is misleading. They load every other setting, then say Could not decrypt this file so some configuration is not loaded. Wrong password?, whatever password you type. If you then save there, including the save their Install makes, the three secrets are stored empty.
-
The first save over an older file keeps a copy of it first:
Contoso.jsongetsContoso.v1-backup.jsonbeside it, byte for byte. A message box says where it is; if the networking checkpoint made the copy, a warning in the installation log says so instead. The copy is written once, and never overwritten. - If the copy can't be written, for example because the folder is read-only, the disk is full or the path is too long, nothing is saved and the file stays as it was. You get Retry and Cancel, and Install doesn't start. To carry on, use Save Configuration As to save a new file.
-
To go back to an older installer, open the
.v1-backup.jsoncopy in it, with the same password. Don't open the converted file there and save it. - Delete the copy once you no longer need it. It holds the secrets under the old, weaker encryption (Security model), and it has the folder's default permissions, not any you tightened on the original.
- A wrong password now asks what to do: Yes tries another password; No opens the other settings without the three secrets and leaves the file unchanged, so saving asks for a new file; Cancel leaves the file closed.
The operation centre tracks the selected operation's messages and outcome. A synthetic capture of that window demonstrates navigation, not actual provisioning or successful imports.

Stable 1859 and later save installer JSON schema 3.6.0, which changes only how the secrets are encrypted (above). Schema 3.5.0 (Stable 1856) added the default-off CopilotCostManagement switch for Copilot credit history (preview), and 3.4.0 (Stable 1854) optional health monitoring, Teams crawl budgeting and prospective network-creator provenance. Older files load with compatibility defaults and are upgraded when you save them; review every new opt-in before saving. Keep the encrypted file and its password private, retain a pre-upgrade copy, and never put real configuration into Git or support screenshots.
The installer may create missing resources and perform the actions you selected. A retry is not risk-free: inspect the failure and partial changes before rerunning the same target build. Keep importers stopped if schema/content deployment is incomplete. Finish with Verify, not a screenshot of a green preview.