1. Installation
There are multiple ways to compile the actor: Custom Actor Toolkit, Z64ROM or manual make compilation.
To add the actor to a Z64ROM build:
- Go into the src/actor folder and create a new folder following the Z64ROM naming convention (eg. 0x3-NPCMAKER). The number you assign here will end up being the actor ID in-game.
- Copy the include and source folders from the NPC Maker's Actor folder to that newly made folder in the Z64ROM structure.
- Update make.toml in the source folder to set the correct parameters. Most importantly, make sure GAME_VERSION is set correctly - 0 is the Debug ROM, 1 is NTSC 1.0. See the "Debugging Switches" section below to see what the other switches do.
- Open npc_maker.c and scroll all the way down. Adjust the "id" in the sNpcMakerInit struct to the actor ID you chose in step 1.
- Build your rom with Z64ROM. The actor will be automatically compiled.
Download the tool, extract it and run.
CAT can compile actors for ZZRTL and ZZRT projects, as well as ROMs. Below are instructions on how to insert the actor into a ROM:
- Select Help->Download z64hdr.
- Select Settings->Change C compile flags and add
-fno-builtinto the end. - Select File->Load ROM and select the Master Quest Debug ROM, or open a ZZRP/ZZRTL project.
- Select Import overlay and select the
CustomActorToolkit.cfile from the actor folder. - Select the actor ID to use, for example 3 (which is blank in the original game).
- Check Use z64hdr, select which version of the game to compile for, and then click Compile nOVL. There should be a message stating that the compilation was successful in the terminal.
- If using a ZZRP/ZZRTL project, click "send to .zzrp". If using a ROM, click "Find Empty Space" and then "Inject to ROM".
Note: You can make the actor smaller by going into Settings->Change C compile flags and changing -O1 into -Os
Setting this up with the OoT decompilation can be done, but it wouldn't be very convenient and is not recommended right now.
+=========================================+
Some debugging features can be enabled by changing the definitions in the code.
To edit them, go into either CustomActorToolkit.c (if compiling with CAT), source/make.toml (if compiling with Z64ROM) or include/npc_maker.h (if compiling with make) files and change their defined value - 0 means that the functionality is disabled, and 1 means that it is enabled.
The switches consist of:
- DIRECT_ROM_LOAD - Makes it so that the actor definition file is not loaded in as an object, and instead read directly from the ROM, which saves an object slot as well as some RAM. The actor definition file needs to stay decompressed for this to work.
- ZZROMTOOL - A legacy switch for ZZROMTOOL compatibililty. Needs to be enabled only if DIRECT_ROM_LOAD is also enabled.
- COLLISION_VIEWER - Enables the in-game collision viewer if the Draw collision (DEBUG) checkbox is checked in the GUI. On by default, can be turned off to save some space in release builds.
- DEBUG_STRUCT - Required to be on for any of the below switches to work.
- LOGGING - Makes the actor report things to the IS64 debugout. Use the Project 64 provided with the release to see these.
- EXDLIST_EDITOR - If enabled, and the appropriate checkbox is checked in the actor's data, it enables an in-game exdlist editor for easy positioning.
- LOG_VERSION - Writes the actor version to screen if the appropriate checkbox is checked.
- LOOKAT_EDITOR - If enabled, and the appropriate checkbox is checked in the actor's data, it enables an in-game tool allowing you to easily find the correct "Look at Link" parameters.
To create a new actor settings file, simply go into the File menu and select New. Each actor settings file can contain multiple actors, each doing completely separate things and loading entirely separate files.
Each actor has their own NPC ID assigned, which can be seen to the left of their name:
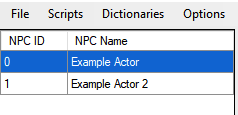
To save the file for further editing use the File->Save/File->Save as... commands. To save the file into the game-ready format, use the File->Save binary... command. This is the file that should be imported into the game, into a free object slot. Note that the binary cannot be edited by NPC Maker directly - only the JSON file you get by using "Save/Save as".
There are many ways to import the file into the game.
Simply create a new folder in the ROM/object folder named using the Z64ROM convention (eg. 0x3A - NPC Maker Object) and place the zobj in it. The zobj must be named "object.zobj".
- Select the Objects tab.
- Click Import ZOBJ and select the file you got from NPC Maker.
- Select the object number, for example 0x3A (which is blank in the original game).
- If using a ZZRP/ZZRTL project click "send to .zzrp". If using a ROM, click "Find empty space" and then "Inject to ROM"
Using your scene editing tool, add the actor to the scene (ID depends into which slot the actor was compiled into - for example, the above instructions on how to compile the actor chose slot 3). Fill out its data as follows:
- "Variable" should be set to the object slot the NPC Maker zobj was imported as (0x3A, if following the example above).
- "Z Rotation" should be the NPC ID from NPC Maker.
If your actor will be going between multiple rooms, then you need to add the NPC Maker zobj to the Scene Objects list, as well as all of the objects it uses (for animations, models, etc). Otherwise, the actor automatically loads the necessary files when spawned.