2. Using the editor
This section describes the fields found in the NPC Maker GUI.
This tab is used to define the general actor appearance.

- NPC Name - A reference name for the actor. This must be an unique name.
- Header - A list of paths to the .h or .xml files containing offset definitions (such as the one exported by z64convert). The definitions in the .h files should be in the following format:
#define [SYMBOL_NAME] [OFFSET_VALUE] - Object ID - The main object ID to load for the actor. This object is loaded into memory automatically when the actor is spawned - it doesn't need to be added to the scene object list, unless it needs to exist in multiple rooms. Click the
Listbutton to view a list of retail objects. - Hierarchy/Skeleton - Offset into the object to where the model skeleton is found. You can find this out by using Z64Utils or the OoT decompilation. If a header file is specified, a textbox appears next to this field, where the symbol name can be specified. The offset is then automatically loaded from the header file during compilation.
- File Start - Offset into the object to where the file starts. This is useful only if two objects have been merged to work around the 19-object per scene limit.
- Draw type - Selects the function to use for drawing the skeleton. Generally, most models use the "Matrix, full opacity" mode. Some older models use Non-Matrix, and horses in particular use the Skin hierarchy type. If your model is setup to change their opacity, and you wish for this to be the case, you should select the "transparency-enabled" modes. If unsure what to select, just try each option and see what works best.
- Animation type - Should only be changed for Link hierarchy models.
- Model draw offset - Each of the spin boxes corresponds to an axis: X, Y, Z, in that order. Changes where the model is drawn relative to the actor placement.
- Scale - The model's size. Applies to all three axis.
- Opacity - Model transparency. Lower = more transculent. Note that the model needs to be specially prepared for this to work.
- Global environment color - The environment color set before the model is drawn. Environment colours are used for things like colouring Link's tunic. If disabled, the environment color is set to white. Double click this window to open a color picker.
This is used to define the animations for the NPC. By default, three animations are added: Idle, Walking and Attacked. These animations cannot be removed, because their slots are used by the actor's internal logic. This doesn't mean that each NPC must fill them out - if your NPC doesn't move, then the walking animation may just stay blank.
- Purpose - The name for the animation. This name is then used to reference the animation in the scripts.
- Header definition - Only visible if a header file is specified. A couple symbol names from the linked header file can be specified here - for the File Start and Offset fields. The values are then loaded from the header file. Double click on this field to select the symbols.
- File Start - Offset into the object to where the file starts. This is useful only if two objects have been merged to work around the 19-object per scene limit. Set this to -1 to use the main object's file start.
- Offset - The offset into the object file where the animation header is found. You can find this out by using Z64Utils or the OoT decompilation.
- Start frame - The frame the animation is supposed to start at.
- End frame - The frame the animation is supposed to end at. If set to 255, then the actor will automatically find the last frame of the animation.
- Speed - The speed the animation is supposed to play at.
- Object - The object to load the animation from. If set to -1, then the main actor object is used. Link animations do not support this - they are always loaded from the
link_animetionfile. This object is loaded into memory automatically when the actor is spawned - it doesn't need to be added to the scene object list, unless it needs to exist in multiple rooms.
This is used to set the environment color separately for each limb. For example, you can make it so that the NPC's shirt and pants are coloured differently.
- Start limb - The limb ID to set the environment color on. The color then persists for all further limbs, unless another entry on this list sets it to something else.
- Color - Double click this cell to open a color picker.
This tab is used to define additional models and textures.
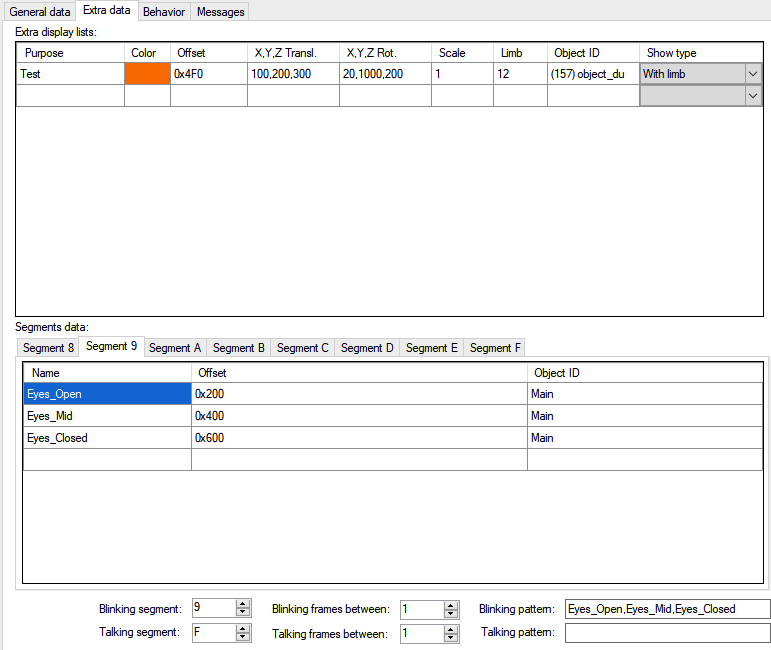
Used to define additional display lists. Can be used to make the NPC hold props, switch parts of their model, disable parts of the model, and draw display lists in general. To make it easier to set the translation and rotation values, an in-game editor can be enabled by recompiling the actor with the EXDLIST_EDITOR flag set to 1 and setting the actor's X Rotation to 2.
-
Purpose - The name of the entry. Used later in scripts to refer to an entry.
-
Header definition - Only visible if a header file is specified. A couple symbol names from the linked header file can be specified here - for the File Start and Offset fields. The values are then loaded from the header file. Double click on this field to select the symbols.
-
Color - The environment color to set while drawing this display lists. After being drawn, the color is reset to what it was before. Double click this cell to open a color picker.
-
File Start - Offset into the object to where the file starts. This is useful only if two objects have been merged to work around the 19-object per scene limit. Set this to -1 to use the main object's file start.
-
Offset - Offset into the specified object to where the display list is defined.
-
X,Y,Z Transl. - Position offset for the display list.
-
X,Y,Z Rot. - Rotation offset for the display list.
-
Scale - Scale for the display list. Display lists inherit the scale of the limb they're attached to - if your main actor has scale of 0.01, setting this scale to 0.01 as well will result in the display list being drawn at 0.0001 scale.
-
Limb - The limb of the main actor's object to attach this display list to. There are special settings for this field:
- If set to -1, the display list is drawn relative to the actor position.
- If set to -2, the display list is drawn at absolute level coordinates.
- If set to -3, the display list is drawn directly in front of the camera.
- If set to -4, the display list is drawn directly in front of the display.
- If set to -5, the display list is drawn in an orthographic mode, directly in front of the display. Orthographic mode is broken on WiiVC and GameCube Collector's Edition. For WiiVC there is a workaround; as faces are drawn in the wrong order, you can set the scale for the display list to a negative value to reverse them. Note that the method of detecting that the game is being played on Wii VC is left to your own discretion.
-
Object ID - Object to use for this display list. This object is loaded into memory automatically when the actor is spawned - it doesn't need to be added to the scene object list. You can double click this field for a list of available objects.
If set to -1, the main actor object is used. If set to -2, no object is used, and the offset is instead used as a direct offset into RAM. -
Show type - How the display list should be drawn. If limb is set to one of the special settings (i.e is negative), then this field only behaves like a flag: any setting other than "Not visible" will cause the display list to be drawn.
-
Not visible - display list is not drawn.
-
Replaces limb - The display list attached to the main object's model's specified limb is not drawn, and this one is drawn instead.
-
With limb - Both the original display list and the one specified in this list are drawn.
-
In skeleton - Like "replaces limb", but the display list is drawn as part of the original skeleton. This can be used as a way to create a "handle" to control specific limbs from the scripts.
-
Control existing - Like "In skeleton", but you don't need to specify the Display List offset.
Typically used to define extra textures for facial expressions, blinking, etc. N64 models can specify that a certain texture is found inside virtual memory (a segment). Setting the segment to point to the texture's location in physical memory causes that texture to be drawn.
Initially, the segment is always set to the first entry in this list. Blinking and talking animations are supported automatically. The selected segment data entry can also be changed with the use of scripts.
- Name - Name for this entry. Used later in scripts to refer to an entry.
- Header definition - Only visible if a header file is specified. A couple symbol names from the linked header file can be specified here - for the File Start and Offset fields. The values are then loaded from the header file. Double click on this field to select the symbols.
- File Start - Offset into the object to where the file starts. This is useful only if two objects have been merged to work around the 19-object per scene limit. Set this to -1 to use the main object's file start.
- Offset - Offset into the specified object to the place where the display list is defined.
- Object ID - Object to use for this entry. This object is loaded into memory automatically when the actor is spawned - it doesn't need to be added to the scene object list, unless it needs to exist in multiple rooms. You can double click this field for a list of available objects.
If set to -1, the main actor object is used. If set to -2, no object is used, and the file start + offset is used as a direct RAM location. If set to -4, the offset is ignored, and the segment is set to a display list that enables transparency in models setup for it (see, for instance, the Re-Dead Actor). If set to -5, the offset is ignored, and the segment is set to an "end display list" command.
- Blinking / Talking segment - Used to select which segment's textures should be used for blinking and talking.
- Blinking / Talking frames between - Used to select how often the blinking/talking textures should update.
- Blinking / Talking pattern - Used to specify the order of textures to use for blinking and talking. Should take the form of a comma-separated list of segment data entry names, e.g
Eyes_1,Eyes_2,Eyes_3
Note: If your model maps each eye to separate segments, you will need to handle blinking separately using scripts. Below is an example script that can do this.
    set SEGMENT_ENTRY SEGMENT_8 EyeL_1
    set SEGMENT_ENTRY SEGMENT_9 EyeR_1
    await frames 1
    set SEGMENT_ENTRY SEGMENT_8 EyeL_2
    set SEGMENT_ENTRY SEGMENT_9 EyeR_2
    await frames 1
    set SEGMENT_ENTRY SEGMENT_8 EyeL_3
    set SEGMENT_ENTRY SEGMENT_9 EyeR_3
    await frames 1
    set SEGMENT_ENTRY SEGMENT_8 EyeL_2
    set SEGMENT_ENTRY SEGMENT_9 EyeR_2
    await frames 1
    set SEGMENT_ENTRY SEGMENT_8 EyeL_1
    set SEGMENT_ENTRY SEGMENT_9 EyeR_1
    await frames random.40->120
This tab is used to define the general actor behavior.

- Look at Link type - Decides how the NPC will respond to Link moving around them.
- Body - Makes the entire NPC turn their whole model to look at Link,
- Head - Makes the NPC move the limb chosen in the "Head" section below to look at Link,
- Waist - Makes the NPC move the limb chosen in the "Waist" section below to look at Link,
- Head and Waist - Makes the NPC move both the limbs chosen in the sections below. Waist is moved less than the head to make the action look natural.
- Head/Waist section - Decides which limb and at which axes the limbs are moved for the "Look at Link type" setting above.
- Degrees Horizontally/Degrees vertically - Decided how much each limb will move for the "Look at Link type" setting above.
- Offset - Normally, the NPC tracks Link's head position. This can be used to adjust this position. Each numeric box corresponds to an axis: X, Y, Z, in that order.
- Draws shadow - Causes the NPC to draw a shadow underneath it. If the NPC does not have collision, it uses an alternate shadow draw function which uses raycasting to locate the floor. This can be optimized by setting Mass to 0, which will just draw the shadow at the NPC position - useful for NPCs that do not move vertically in any way.
- Radius - The radius of the drawn shadow.
- Has collision - Causes the NPC to have collision. NPC Maker NPCs all have cyllindrical collisions.
- Radius - The radius of the collision cyllinder.
- Height - The height of the collision cyllinder.
- Y Offset - The vertical position offset of the collision cyllinder (negative values push the cyllinder down, positive ones upward).
- Mass - Decides whether the NPC can be displaced by the player and other NPCs by being pushed. Mass of 254 is the default, and makes the NPC only be pushed by objects with mass of 255. NPC with mass of 255 cannot be pushed by anything. Sometimes, having a lower mass is beneficial in case NPC collisions can occur.
- Movement type - Decides which movement style the NPC should use.
- Roam - Makes the NPC walk around randomly. "Movement distance" defines the maximum distance the NPC can move by at once. "Roam Max dist" defines the radius of the circle the NPC can move in. If the NPC gets to the edge of this radius, their next move will angle them towards the middle of the circle. "Movement delay" is the time between each movement. If movement delay is set to 0, then the time between each move will be random.
- Follow - Makes the NPC walk towards Link. "Movement distance" defines the distance the NPC will stop at away from Link.
- Run away - Makes the NPC walk away from Link. The NPC will start walking away once Link gets within 3x their collision radius. "Movement distance" defines how far they will move away.
- Path - Makes the NPC follow a path. "Path ID" decides which path the NPC will take (numbering starts at 1 - i.e path 0 is invalid. This means that Path ID 1 in current versions of Sharp Ocarina will be Path 2 here). "Loop start" and "Loop end node" fields define loop nodes - if you want the NPC to move infinitely, upon setting these and checking "Loop", once the NPC reaches the "loop end node", it will move towards the "loop start" one and keep moving from there. If "Loop" is not checked, these define the start and end nodes on the path. "Movement delay" field defines the delay taken between each loop - if set, the NPC will pause on the "loop end" node.
- Timed path - Makes the NPC follow a path, but when the movement starts and the movement speed is directly defined by the "Path start" and "Path end time" fields. The NPC will follow this path every single day.
- Smoothing constant - attempts to make the NPC curve its path smoothly between nodes to appear more natural. If set to negative values, the NPC will follow the path exactly. The higher the value, the more smoothing is applied. Too- high smoothing may make the NPC move in a circle.
- Gravity force - the downward movement applied to the NPC, i.e how fast the NPC will fall if placed in mid air. Gravity doesn't apply if the NPC has no collision, to prevent falling through the floor.
- Ignore Y node axis - checking this makes the NPC follow the level's collision instead of adhering strictly to the path node placement, allowing for easier placement of the nodes.
- Targettable - Makes the NPC possible to be targetted.
- Target limb - Which NPC's limb should be targetted.
- Talk/trade radius - radius of the circle away from the NPC in which Link's A button command changes to "Speak" or "Pick up" if appropriate script functions (
TALK, TRADE, PICKUP) are used. - Target distance - Defines how far the NPC may be targetted from.
- Offset - Normally, the targetting reticle falls directly onto the selected NPC's limb's base position. These fields can be used to offset that position - each number box corresponds to axis X, Y, Z, in that order.
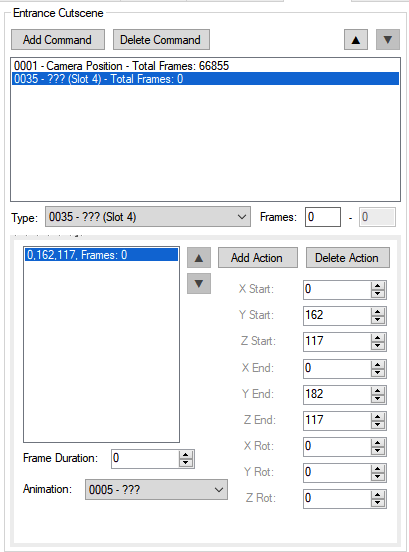
- Cutscene slot - If a cutscene is started, the NPC will follow the actions defined for this slot. Animation number in NPCMaker = Animation ID in Sharp Ocarina - 1. Below is a screenshot from SharpOcarina with a cutscene action defined for slot 4, where the NPC will play its sixth defined animation.
- NPC To Ride - If set, the NPC's movement will be sychronized with another NPC Maker NPC. If either NPC is attacked, both will react. If either NPC is talked to, both will stop. Can be used to create NPCs riding horses.
- Uncull Zone - Sets the actor's draw distance. "Forward" field dictates how far this is in XZ space, "Down" dictates how far this is when the camera is under the actor. "Scale" can be used to change both at once.
- Scripts variables - The amount of script variables to allocate. See the scripts section for more details.
- Scripts float variables - The amount of script floating point variables to allocate. See the scripts section for more details.
- Animation interpolation frames - The amount of frames it takes for the model to interpolate from one animation to another.
- Update even out of camera - the NPC will not despawn when it goes out of camera, preserving its position and state no matter where in the level you are.
- Draw even out of camera - the NPC will continue to draw when it goes out of camera. This can be used for NPCs you're meant to see from very far apart, but is taxing on the hardware.
- Presses switches - the NPC will depress floor switches if it walks over them.
- Affected by Lens of Truth - the NPC will become visible only if the Lens of Truth is used or vice-versa if the appropriate setting is set for the scene.
- Draw collision (DEBUG) - If the COLLISION_VIEWER debug switch was set to 1 when the NPC was compiled (as it is by default), this will make the game draw the collision cyllinder defined for the NPC. This can be used to adjust your collision to it matches the NPC closely.
- Opens doors if they're on path - If the NPC gets near a door when moving, it will swing open.
- Fade out if player far away - Reproduces the fading effect used by the Kokiri NPCs. The NPC will fade once the player gets 500 units away from it. Note that for this to work, the NPC must be using a model properly set up for variable transparency and use the "Transparency-enabled" draw mode.
- Just run script - The NPC doesn't perform any of its functions apart from the ones defined by the scripts.
- Invisible - The NPC is not drawn.
- Exist in all rooms - The NPC will persist on room changes.
- React if attacked - If an attack is directed at the NPC, it will play its "Attacked" animation. Note that, by default, all attacks trigger this. If you need a specific attack to trigger a reaction, scripts must be used. See
IF ATTACKED_BY. - Sound effect - The sound to play upon being attacked.
- Hit effect - The particle effect to show once the NPC is attacked.
- Generate light - Makes a circle of light appear. Can be used if the NPC is meant to hold lamps, etc. The light will illuminate nearby actors.
- Color - Color of the generated light. Double click this button to open a color picker.
- Glow - Makes the circle of light shimmer instead of staying constant.
- Radius - Size of the generated light.
- Limb - The limb to draw the circle of light at.
- Offset - Normally, the circle of light is drawn exactly at the chosen limb's base position. This can be used to adjust that position. Each of the number boxes corresponds to an axis - X, Y, Z, in that order.
Used to define the textboxes the NPC can display. The controls for adding and removing messages should be self-explanatory - use the "Add" and "Delete" buttons below the message list. A preview of the messages is displayed below the editing field.
You can change the font used for the message previews by putting font.font_static and font.width_table files extracted from the game into a font folder located in the same folder as the json you're editing, or into the same folder as the NPC Maker executable (The former files take precedence over the latter).
For internal messages to work, message 0x011A (an unused message in the original game) has to exist and remain unchanged. You can change this message slot and data by editing npc_maker_defines.h (defines DUMMY_MSG_DATA and DUMMY_MESSAGE).

- Box type - Changes the message background.
- Position - Changes the message positioning on the screen.
- Space width from font - By default, the space width in Ocarina of Time is hardcoded. By checking this checkbox, the actual kerning value from the font will be used.
- Show default language preview - Display the default language preview alongside the one for the currently selected language
- "..." icon - By double-clicking this, comments can be added to messages. The icon turns blue when a comment is present. The comment can be viewed by hovering over the "..." icon with the mouse pointer.
Special tags are used for extra message functions, such as playing sounds, setting message color, etc. You can find all the tags by right clicking the editable message field. Click the desired tag to insert it into the message.
By utilizing the Localization dropdown, you can choose additional languages to edit.
Localizations can be added and removed in the Project -> Localizations menu.
To add a localization to an individual actor, first select the actor from the list, and then choose the localization in the Localization dropdown on the Messages tab. To remove a localization from an actor, click the "Remove" button next to dropdown.
Whenever a localization is added to an individual actor, copies of all of the default language's messages are added automatically. The message list is also automatically kept in sync whenever new messages are added or removed.
An individual actor does not need to have messages for all the defined languages; if the game asks for an undefined language, the default messages are loaded instead.
In order for the language to be displayed in the game, npc_maker_user.c must be edited to return the currently selected language from the NpcM_GetLanguage function.
Separate fonts and language definitions can be loaded for the additional languages. For example, to load a separate custom font and definition for the "French" language, place French.font_static, French.width_table into the font folder, and French.json into the Dicts folder. (The filenames depend on the name of the localization in NPC Maker). See the "Language Definition" section for further details.
Message encoding is controlled by JSON files. These files define how messages are interpreted and encoded.
For the default language, the file must be named MessageBase.json. For localized languages, the file should be named after the language (for example, French.json).
The definition file can be placed in one of two locations:
- A
Dictsfolder in the same directory as the actor definitions JSON you are editing - The
Dictsfolder located in the NPC Maker executable directory
If definition files exist in both locations, they are merged together. When conflicts occur, the definitions from the Dicts folder next to the actor definitions JSON take priority over those from the NPC Maker executable folder.
NPC Maker includes a built-in message definition file designed for the original game. You only need to modify or replace this file if your game changes how messages are written or encoded.
Basic entry structure for a given language definition JSON is as follows:
{
  "EndMessage": 2,
  "EndMessageType": "x",
  "NewLine": 1,
  "NewLineType": "x",
  "Entries": [
    {
      "Token": "<TOKEN_NAME:VALUE1:VALUE2>",
      "Value": "ENCODED_VALUE:$1:$2",
      "DefaultValues": "0x1;0x2",
      "ContextGroup": "",
      "ContextName": "",
      "Description": "",
      "NewBoxSpecialHandling": true
    }
  ]
}
- "EndMessage" field - Specifies the numeric value used to encode the “end of message” tag. (Default is 2 in Ocarina of Time.)
- "EndMessageType" field - Specifies the data type for the end-of-message tag: (x - 8 bit value, h - 16 bit value, w - 32 bit value).
- "NewLine" field - Specifies the numeric value used to encode line break tags. (1 by default in Ocarina of Time)
- "NewLineType" field - Specifies the data type for the line break tag: (x - 8 bit value, h - 16 bit value, w - 32 bit value).
The Entries array defines all tokens that can appear in the message text. Each entry represents a single token. By default, ASCII characters are encoded as their ASCII equivalents, unless explicitly defined.
- "Token" field - A unique identifier for the token. Can be:
- A literal character (e.g. "¥")
- A macro-style token using angle brackets (e.g. "PAUSE:x")
- Tokens may include parameters separated by colons. Parameters can be: x (8-bit value), h (16-bit value), w (32-bit value), or the name of a collection defined in
MsgDefs.json
-
"Value" field - A semicolon-separated list of hexadecimal byte values that this token encodes into. Token parameters are referenced using $1, $2, etc.
-
"DefaultValues" field - A semicolon-separated list of default values used when the token is inserted without explicitly provided parameters.
-
"ContextGroup" field - Determines which group this token appears under in the right-click context menu of the message editor.
-
"ContextName" field - The display name of the token as shown in the context menu.
-
"Description" field - Tooltip text shown when hovering over the token in the context menu.
-
"NewBoxSpecialHandling - When set to true, the encoder skips the next line break tag after this token. This is mainly for convenience, so the raw message text more closely matches the preview.
Example collection definition (MsgDefs.json):
{
  "Identifier": "Icons",
  "ValueType": "x",
  "Entries": {
    "DEKU_STICK": 0,
    "DEKU_NUT": 1
  }
}
-
"Identifier" field - The name used to reference this collection in token definitions. For example, this collection would be used in a token like:
<ICON:Icons> - "ValueType" field - Specifies the data type of the values in the collection (x - 8 bit value, h - 16 bit value, w - 32 bit value).
- Entries - A list of named values.