BookFederationTutorial
In this tutorial, we are going to introduce data federation over multiple and possibly different data sources. Data federation technology provides an organization with the ability to aggregate data from disparate sources into a virtual database where it can be used for more comprehensive analysis. The tool we are going to use is called Teiid from JBoss community.
Before we start, follow these instructions first to have Teiid ready in your machine. In addition, you should already have the Books and BookStores databases installed. If you haven't installed them, see Installing the Tutorial Databases and return here when you've completed the installation.
These steps will show you how to create a metadata model for our sample databases using Teiid Designer in Eclipse.
- Select File > New > Others... from the menu bar.
- Create a new project Teiid Designer > Teiid Model Project and name the project BookFederation. Accept all the default settings by clicking "Finish".
- Select File > Import... from the menu bar.
- Select Teiid Designer > JDBC Database in the Import window.
- Create a new Connection Profile by selecting New....
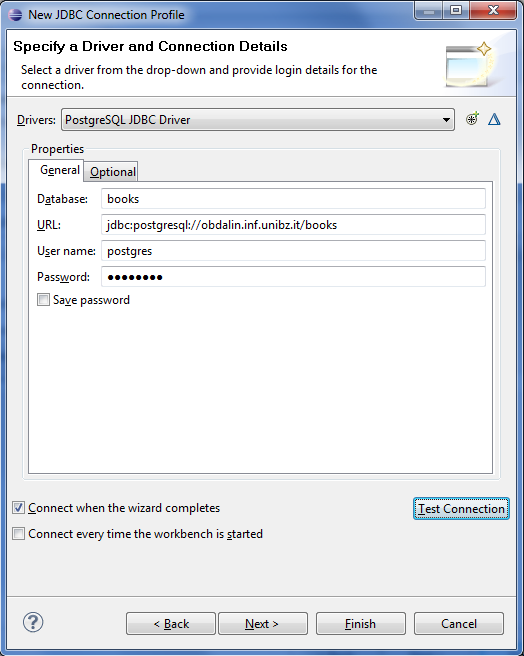
- Choose PostgreSQL as the "Connection Profile Types" and type the value books in the "Name" field.
IMPORTANT: The input "Name" field in the Connection Profile MUST follow the target database name. The reason is because the value will become the namespace for each table across different databases.
- Select the JDBC driver for PostgreSQL from the selector field. You may add the driver JAR from the external directory.
- Fill in all the connection parameters according to your settings. Perform test connection to ensure the parameters are typed correctly. Select "Finish".
- Proceed to "Next" to "Select Database Metadata" dialog. Choose TABLE in "Table Types" list. Select "Next".
- In the next dialog, put a check mark on public schema that will mark all the tables in books database. Select "Next"
- Accept all the default values in the "Specify Import Options" dialog. Select "Finish".
- Once the import operation finishes, the plugin will create an XMI metadata file called `books.xmi. You should be able to find it in the "Model Explorer" tab under BookFederation project folder.
- Repeat the above steps for creating the metadata for the bookstores database.

These steps will show you to create a server instance in Eclipse for data source deployment:
- Click on the "No default server defined" link at the bottom of "Model Explorer" tab. A dialog window will pop out to create a new Teiid server connection.
- Put the "Display Name": BookFederationServer
- Click on "New..." link for the "JBoss Server" and another dialog window will pop out.
- Select "JBoss EAP 6.1+ Runtime Server"
- Put the server's host name according to your server installation (by default, use localhost for local installation). Accept the other default values by selecting "Next".
- Adjust the "Home Directory" to your JBOSS_HOME location.
- Adjust the "Configuration file" to JBOSS_HOME/standalone/configuration/standalone-teiid.xml. Accept all the default values until it reaches "Finish".
- Optional: You can create security questions for password protection.
- Put the "User name" and "Password" according to your initial server installation. Select "Finish".
- Run the server by clicking the start icon in "Servers" tab. If the tab doesn't show, go to Window > Show View > Other... in the Eclipse main menu. Select Server > Servers.
- Look at the "Console" tab and make sure the server runs properly (i.e., no error messages).

- Go to "Teiid Server" tab (see image above). If the tab doesn't show, go to "Servers" tab, expand "Teiid Server Configuration" and do double-click on "BookFederationServer".
- Go to "JDBC Connection" section in the "Teiid instance" tab and modify the "User name" as user and "Password" as user1664! (if you have created an application user as described in Teiid).
- Click on "Test JDBC Connection" link and "Test Administration Connection". Both must return OK.
You can perform data preview through your metadata models without creating VDBs. To preview the records of Books database:
- Select "books.xmi" in "Model Explorer' tab and do right-click followed by selecting Modeling > Set Connection Profile.
- Expand the "Database Connections" and select "books". Select "OK".
- Expand "books.xmi" and select a table (e.g., "tb_books").
- Do a right-click and select Modeling > Preview Data.
- Browse the "SQL Results View" tab to see the returned data.

There might be a deployment issue when you try to preview data for other different databases. To solve it, you have to delete all the deployment files in the JBOSS_HOME/standalone/data/teiid-data/ folder, i.e., all files begin with PREVIEW_ prefix. This action will force Designer to redeploy the files and redo the connection to the new database.
The BookStores database consists of 2 tables. This database has a relationship with the BookPublication. This section will show you how to integrate both databases into a single Virtual Database (VDB).
In order for a VDB to be executable, a Data Source (or, Connection Factory) needs to be deployed in the server instance.
- Select "books.xmi" in "Model Explorer" tab.
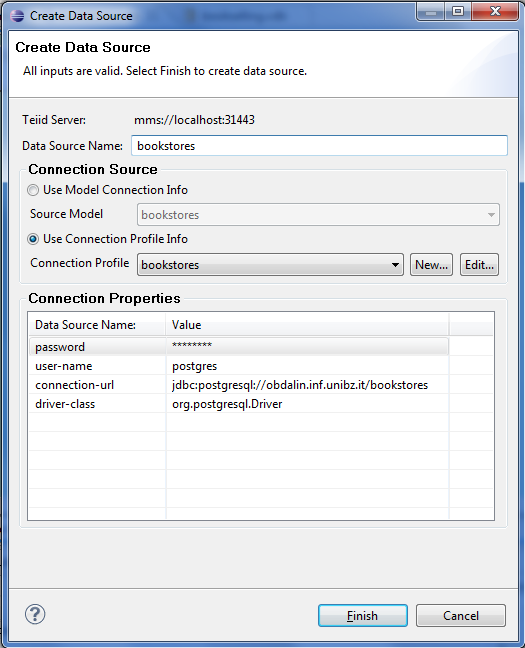
- Do a right click and then select Modelling > Create Data Source
- Put the "Data Source Name": books
- Select the "Connection Source" by selecting "Use Connection Profile Info" option and choose books in the drop menu. Select "Finish".
- Repeat all the steps to setup the data source for "bookstores.xmi" model.
We are now ready to create a virtual database (VDB) for the two relational models.
- Select both "books.xmi" and "bookstores.xmi" in Model Explorer and do right-click New > Teiid VDB
- Put the "VDB Name": bookselling. Select "Finish"
- The VDB Editor will open and it displays your model description (see image below)
- Select one of the models (e.g., "books.xmi") and check the "Translator Name" and "JNDI Name" are properly given (Note: both properties are available in "Source Binding Definition" tab).
- If the "Translator Name" is empty, enter the appropriate value based on the target DBMS. In this case select postgresql from the combo box.
- Save the VDB if any modification occurs.

Select "bookselling.vdb" in "Model Explorer" and do right-click Modeling > Execute VDB. This action will deploy the VDB to the server and Eclipse will switch to "Database Development" perspective.
After the VDB is successfully deployed to the server, we can treat it like an ordinary database using common SQL query language.
- Expand "Database Connections" in "Data Source Explorer" tab ans select "bookselling".
- Do a right click and select "Open SQL Scrapbook"
- Enter an example query:
select st_name, bk_title
from tb_books,
     tb_seller,
     tb_stores
where tb_books.bk_code = tb_seller.bk_code and
      tb_seller.st_code = tb_stores.st_code order by st_name
- Do a right-click inside the editor and select Execute All.
- Check the results in the "SQL Results" tab.

This section will guide you how to access VDB data using Ontop.
Download these resources for the tutorial:
- Launch Protégé and open the downloaded files.
- Go to "Datasource Selector" tab and select the "Books" data source.
- Take a brief look at the connection parameters for Teiid:
- JDBC URL: "jdbc:teiid:bookselling@mm://localhost:31000"
- Database Username: "user"
- Database Password: "user"
- JDBC Driver: "org.teiid.jdbc.TeiidDriver"
- Download the JDBC driver.
- Select "File > Preferences..." in Protégé main menu and go to "JDBC Drivers" tab. Select "Add"
- Fill the parameters as follow:
- Description: "Teiid Driver"
- Class Name: "org.teiid.jdbc.TeiidDriver"
- Driver File (jar): (The JDBC jar location).
- Select "OK" and close the Preference window.
Go to the "OBDA Query" tab and try to run these query samples.
- Get the full description for each store.
PREFIX : <http://meraka/moss/exampleBooks.owl#>
PREFIX rdf: <http://www.w3.org/1999/02/22-rdf-syntax-ns#>
select ?x ?y ?z where {?x rdf:type :Store. ?x :name ?y. ?x :address ?z}
- Get all the books that are sold by 'Athesia'
PREFIX : <http://meraka/moss/exampleBooks.owl#>
PREFIX rdf: <http://www.w3.org/1999/02/22-rdf-syntax-ns#>
select ?title where {?x rdf:type :Store. ?x :sells ?y. ?y rdf:type :Book. ?y :title ?title. ?x :name "Athesia"}