Easy Tutorial: Using Ontop from Protege
1. Set up a database. You can download a pre-bundled H2 server and run it in your memory (h2.bat file on Windows, and sh h2.sh command from terminal on Linux/Mac). Alternatively, you can install your own database server, create a books database and populate it using the SQL script.
2. Download Protege 4.3 bundled with -ontopPro- (you will need to register). Then run Protege 4.3 (run.bat file on Windows, and sh run.sh command from terminal on Linux/Mac). Note that only Java 7 is supported.
3. Create and save an ontology (about books): specify a URI, for instance:

Create two concepts, e.g., Book and Writer, an object property, e.g., writtenBy, and two data properties, e.g., bookTitle and personName.
4. Add tabs ontop Mappings and ontop SPARQL in the menu Window -> Tabs -> ..
Go to the ontop Mappings tab and add a new data source by pressing the button Create New ....

If you are running the H2 database, fill the fields as follows:
- Connection URL:
jdbc:h2:tcp://localhost/books;DATABASE_TO_UPPER=FALSE - Database Username:
sa - Database Password:
(note, the password is stored uncrypted in the .obda file) - Driver class:
org.h2.Driver
Then add a JDBC driver for H2 databases in Preferences -> JDBC Drivers:
- Description:
h2 jdbc driver(you can give any name) - Class Name:
org.h2.Driver - Driver File (jar):
.../h2folder/h2-1.3.168.jar(the path to the jar file in the H2 folder)
If you are using a different database server, refer to this page for more information on how to configure a data source (you will need a different Connection URL, Driver class and a different JDBC driver for database systems different from H2).
Now you can test connection.
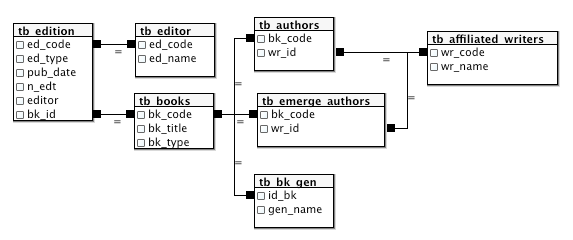
5. The relational schema of the books database is as follows:
6. Switch to the Mapping manager tab, select the datasource you added, and create the following mapping:
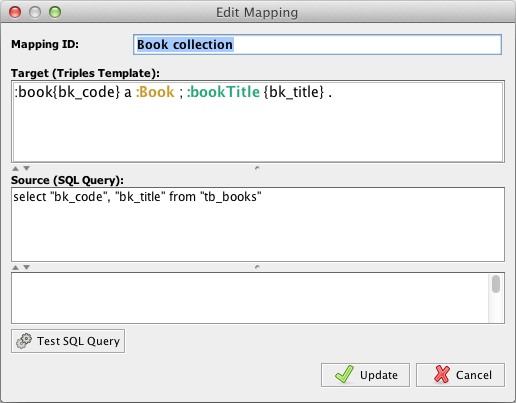
Note that here, : denotes the default prefix (the URI of your ontology), a is a predefined alias for the predicate rdf:type, Book is a concept name in our ontology (hence :Book is the URI of that concept). The triple :book{bk_code} a :Book asserts that the individuals identified by the string :book{bk_code} are instances of the concept Book. Moreover, :bookTitle is a data property in our ontology. More information about the mapping syntax can be found here.
7. Now you can test your mapping. Switch to the ontop SPARQL tab, create a new query and call it Booktitles. In the Query Editor field write the query:
PREFIX : <http://my.org/books#>
SELECT * WHERE {?book a :Book; :bookTitle ?title}
Then click on Save Changes, select the Quest reasoner and start it. Finally, execute your query. The result should look as follows:
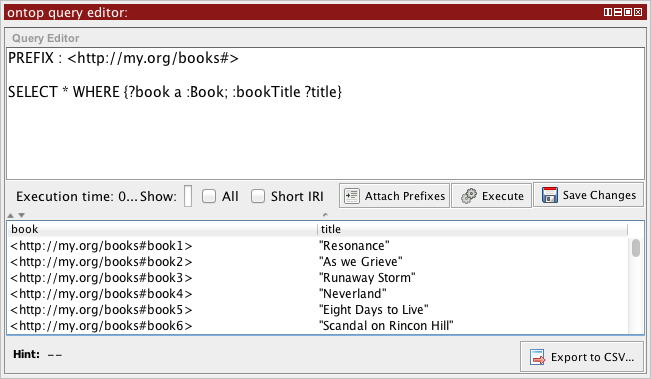
Pay attention to your prefix. You can attach your default prefix by clicking on Attach Prefixes.
8. You can now extend your ontology and add other mappings so that you can reason about books, authors, book genres, editors, and ask complex queries, for instance, retrieve all authors and publication date of books with genre Horror.