PuTTY TCP User Guide
This guide provides instructions for installing, configuring, and using PuTTY to communicate with and control ESPEC chambers equipped with GL, P300, SCP220, ES102 controllers, and Watlow F4T controller via TCP/IP interface. PuTTY is a free and open-source terminal emulator and remote access client. While PuTTY is most commonly used on MS Windows to access Linux and UNIX systems via SSH (Secure Shell), in this guide, we will illustrate how to use it to connect to a controller device over a network.
The following procedure outlines the steps to download and install PuTTY on your MS Windows PC or execute it from the download folder. If the software is intended to be used regularly, then the install one would be recommended.
Procedure:
-
Open a web browser.
-
Go to the PuTTY official webpage:
https://www.chiark.greenend.org.uk/~sgtatham/putty/latest.html
-
Download the MSI (Window Installer) file (64-bit x86). Note: It should also be available from the Microsoft Store.
-
To install:
-
In the Downloads folder, double-click the installer (e.g., putty-64bit-[version]-installer.msi)
-
Follow the installation prompts.
-
Accept the default installation settings unless changes are required; add shortcut to PuTTY on the Desktop.
-
Click Install, then click finish when ths installation is done.
-
The following table summarizes the communication options available for using PuTTY with different controller types.
| Controller | Communication Interface and Operation |
|---|---|
| GL | TCP/IP communication interface is available by default |
| P300 | 1. TCP/IP communication through ESPEC Web Controller port forwarding. 2. TCP/IP communication using an Ethernet-to-RS232 serial adapter (not covered in this document). |
| SCP220 | TCP/IP communication through ESPEC Web Controller port forwarding |
| ES102 | TCP/IP communication through ESPEC Web Controller port forwarding |
| Watlow F4T | 1. TCP/IP communication through ESPEC Web Controller port forwarding. 2. Direct TCP/IP communication via native communication interface through port 5025 using SCPI command protocol |
By default, the GL controller system uses TCP/IP to establish remote communication. Refer to the GL Communications Manual for details on how to obtain the IP address.
Complete the following steps to set ESPEC Web Controller (EWC) to allow TCP/IP port forwarding.
Procedure:
- Log in as admin (or into an account with admin privileges)
- Click Settings in the menu bar, followed by the API Settings submenu
- Click to select No Authentication from the list in the Authentication Mode field (see arrow)
- Check the box under the Direct Controller Acccess (see arrow). Note: The default TCP port for the P300, SCP220, and ES102 is 10001. The Watlow F4T uses TCP port 502 by default for Modbus TCP communications.
- Click the Save icon in the upper-right corner (see arrow)
- Click Server Settings (2nd submenu from the bottom)
- Click the Power button icon (upper-right corner), and click Yes to reboot EWC
- Proceed to Section 3 to launch PuTTY.
Watlow has implemented ASCII plain-text SCPI (short for Standard Commands for Programamble Instruments) commands sent over TCP/IP to communicate with their F4T models via Modbus TCP with default TCP port 5025. SCPI commands are sent over a raw TCP socket. A client opens a TCP socket connection and sends ASCII commands terminated by a line feed (\n) to the F4T.
This process can be achieved by connecting the F4T to the main network using DHCP or static IP configuration. The F4T IP address can be found in the Network Settings on the Ethernet page. To establish communication with the F4T using PuTTY, configure the connection with the controller's IP address, TCP port 5025, and RAW connection type. The F4T must have Firmware Revision 03:06:0011 or higher (release in May 5, 2017 and later).
Once the F4T IP address is known, proceed to the next section to launch PuTTY.
IP address of the device, it's specific port number and the communication type are three important components required to establish communication through PuTTY.
Procedure:
-
Launch PuTTY. Its UI is depicted as follows:
-
Enter IP address (or hostname) in the field indicated by the arrow
-
Set 10001 in the Port field (see arrow)
-
Select connection type to RAW
-
Click Open to start the session (see arrow)

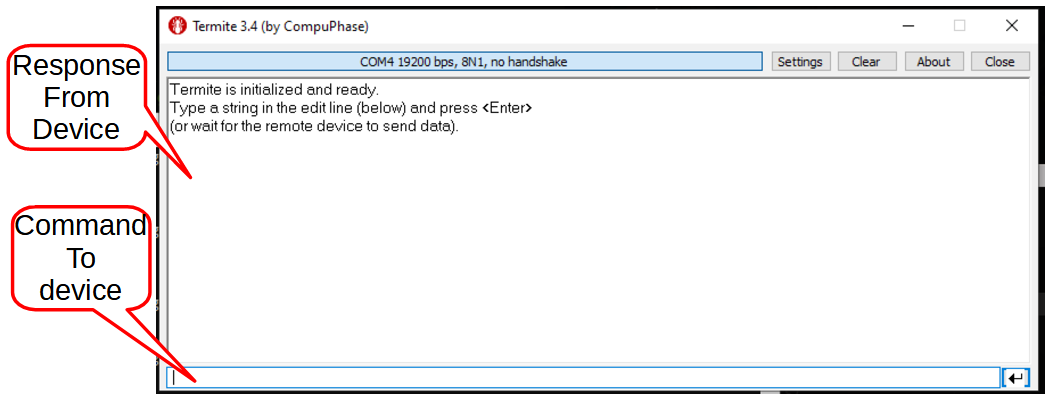
The command prompt at the bottom of the Termite UI is used to send commands to the controller. Responses returned by the controller are displayed in the main buffer at the top (see figure below).
Procedure:
-
Enter command: To read the chamber's ROM information, enter the command ROM? and press Enter. The following figures illustrate how to enter the command and how the chamber's response is displayed in the terminal window.
-
Commands may be entered using either lowercase or uppercase letters. The following figures show how to read the chamber temperature, vibration and operating mode.
Refer to the P300 Communications Manual for details on interpreting the chamber's response and how to issue other commands.


