Repository navigation
GitHub
Complete at least the required tasks listed below (Tasks 1 & 2). The remaining tasks (3-5) are optional unless stated otherwise in your [Brightspace] course.
- Create a new GitHub account
- Configure your GitHub account
- Customize your GitHub profile (optional)
- Apply for GitHub Education benefits (optional)
- Learn more about GitHub (optional)
Follow the directions below to create a new GitHub account. If you already have a GitHub account that you want to use, skip to Configure your GitHub account. Otherwise, follow the instructions below.
-
Go to https://github.com/signup.
-
Sign up for GitHub using one of the following methods:
- Continue with Google (recommended for all users with a Gmail account)
- Continue with Apple (recommended for macOS users without a Gmail account)
- Manually enter the requested information. Use a personal email address and a strong, unique password.
-
Enter a professional username that you are comfortable sharing publicly. For guidance, see GitHub Usernames. Note your GitHub username, you may need it later.
-
Review GitHub’s Terms of Service and Privacy Statement, if desired. An AI chatbot can help you understand these documents. Just provide it with the URLs.
-
Click the Create account button.
-
If you did not use a Continue with... option, check your email inbox or junk mail folder for a verification message from GitHub. Follow the instructions in the verification email to complete the sign-up process.
-
Sign in to GitHub, if prompted.
-
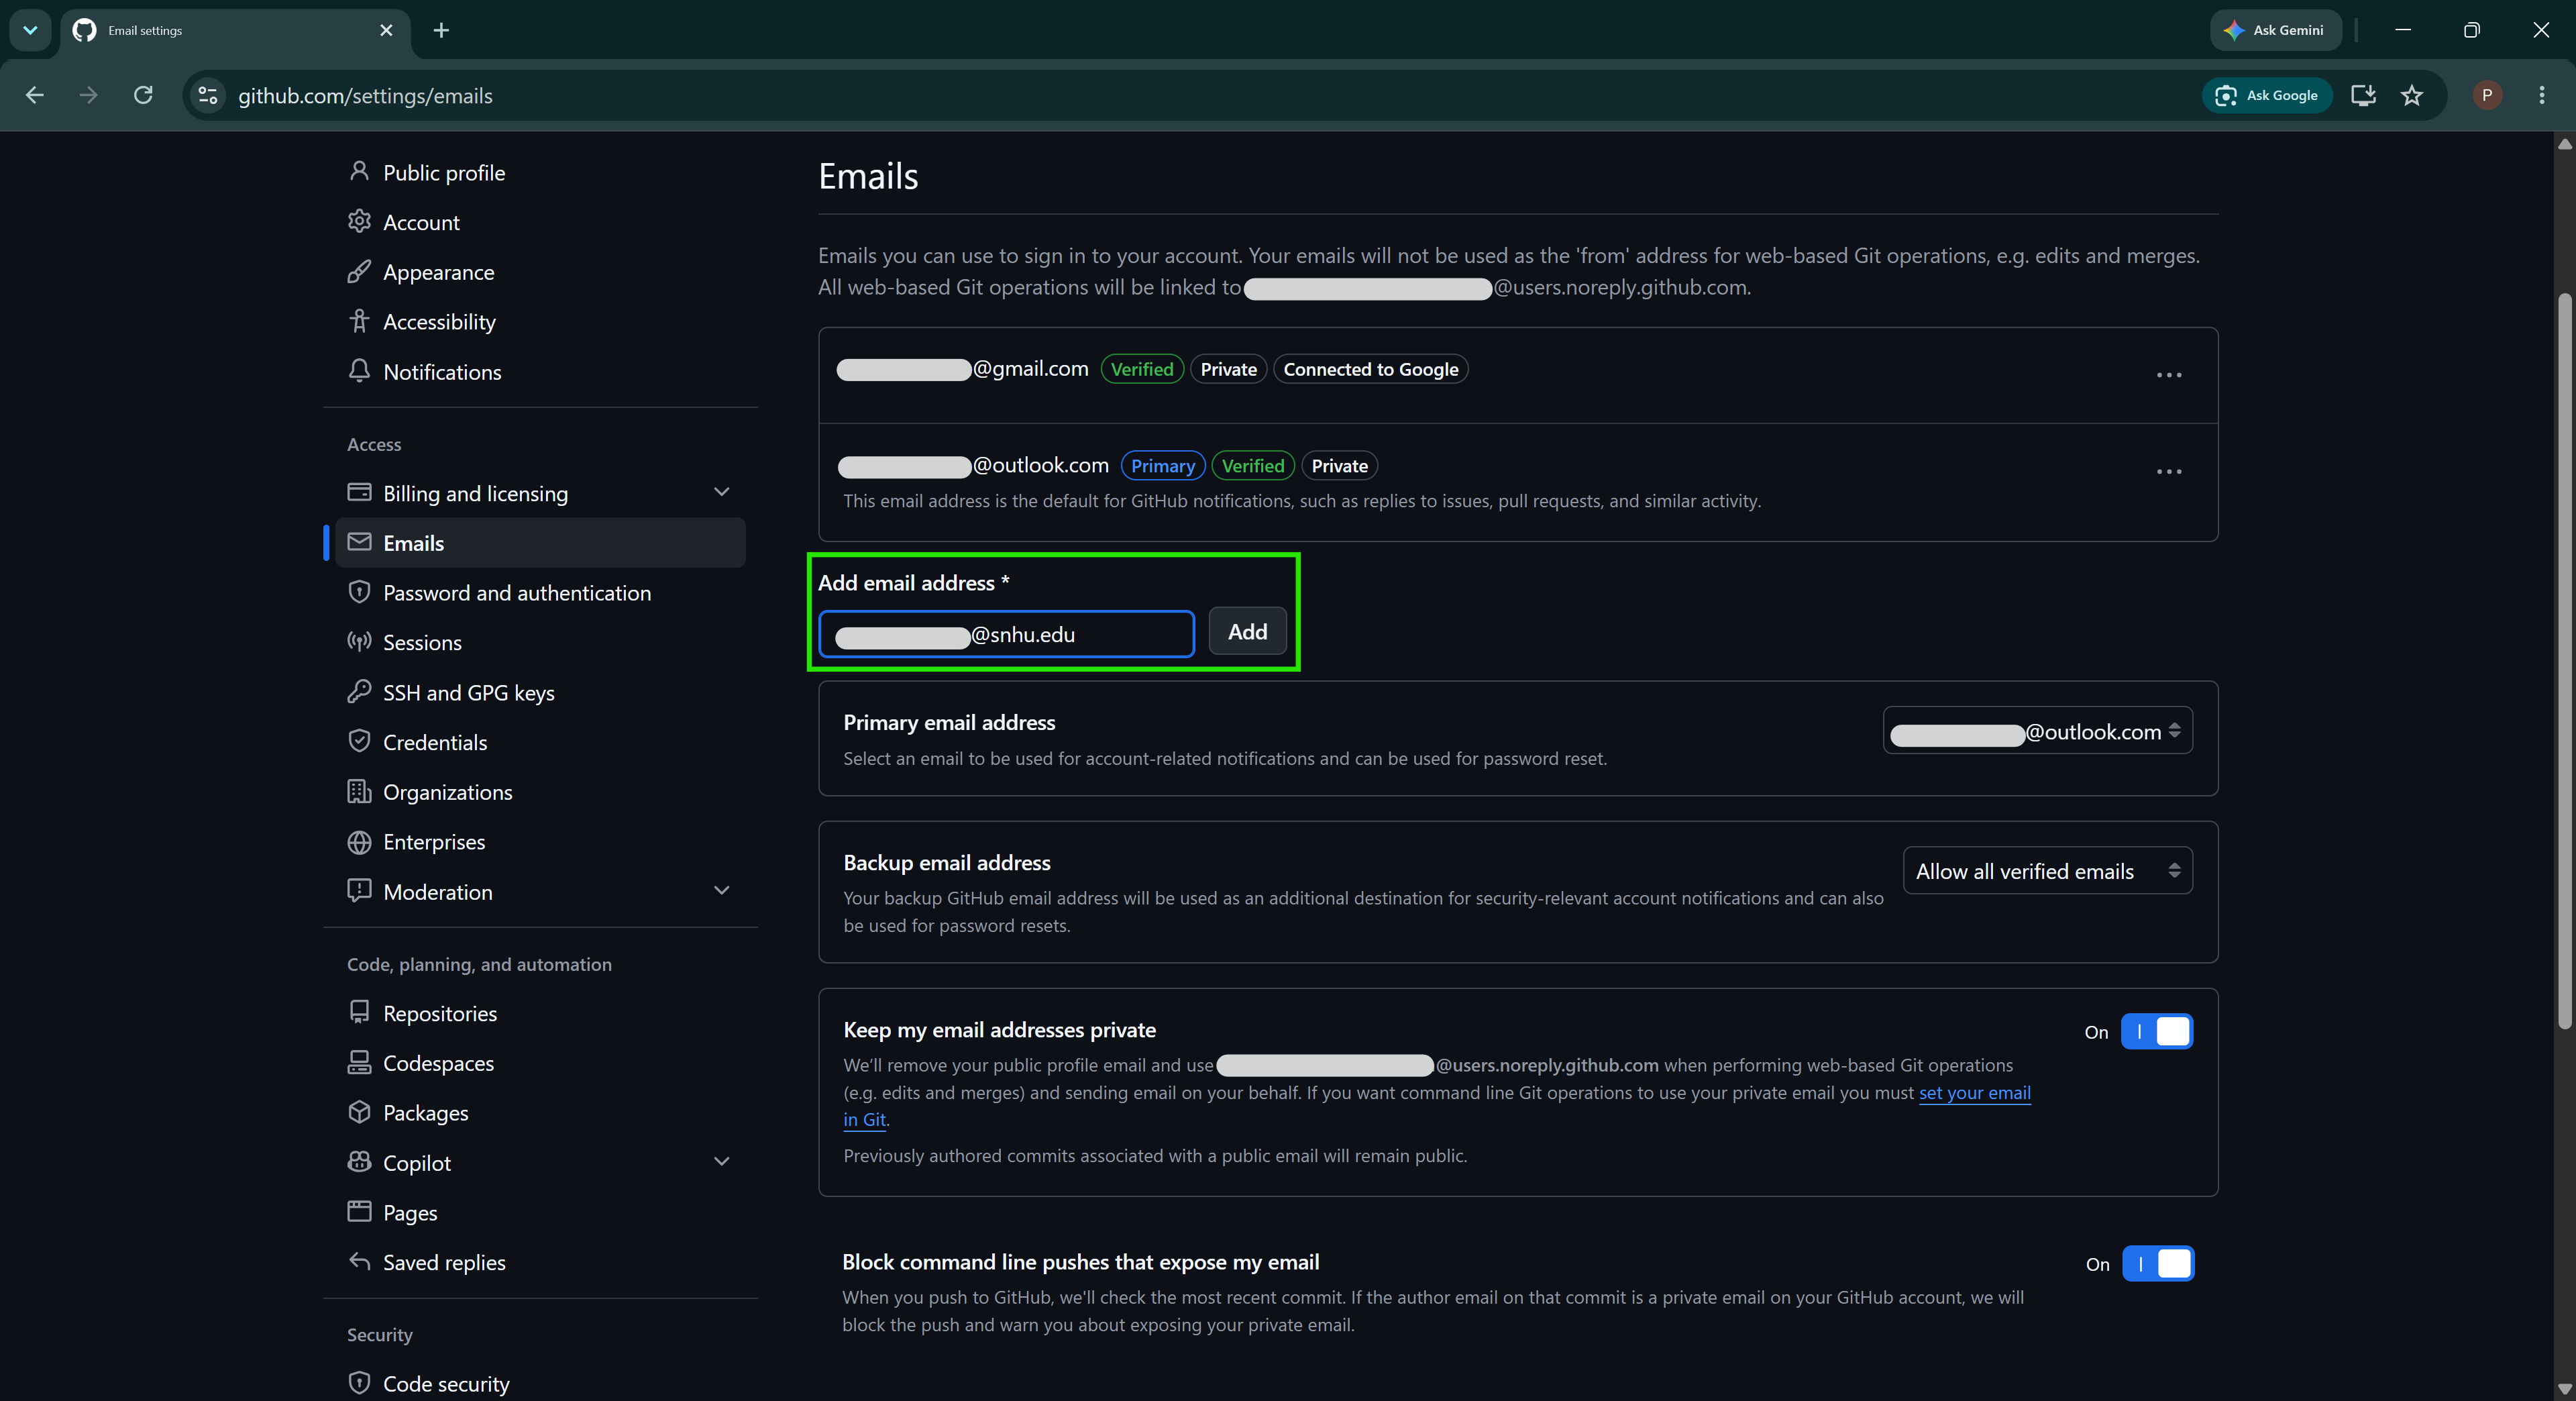
In the Add email address field, enter your
...@snhu.eduaddress and click Add.- Optional. Add other email addresses as backups, if desired.
-
Check your email inbox for a verification message from GitHub.
- If you do not see a message for each email address added, check your Junk or Spam folder.
- Click the Verify email address button in the message to confirm that you own the email address, or copy and paste the URL into your browser.
- Repeat this step for each email address you added to your GitHub account.
-
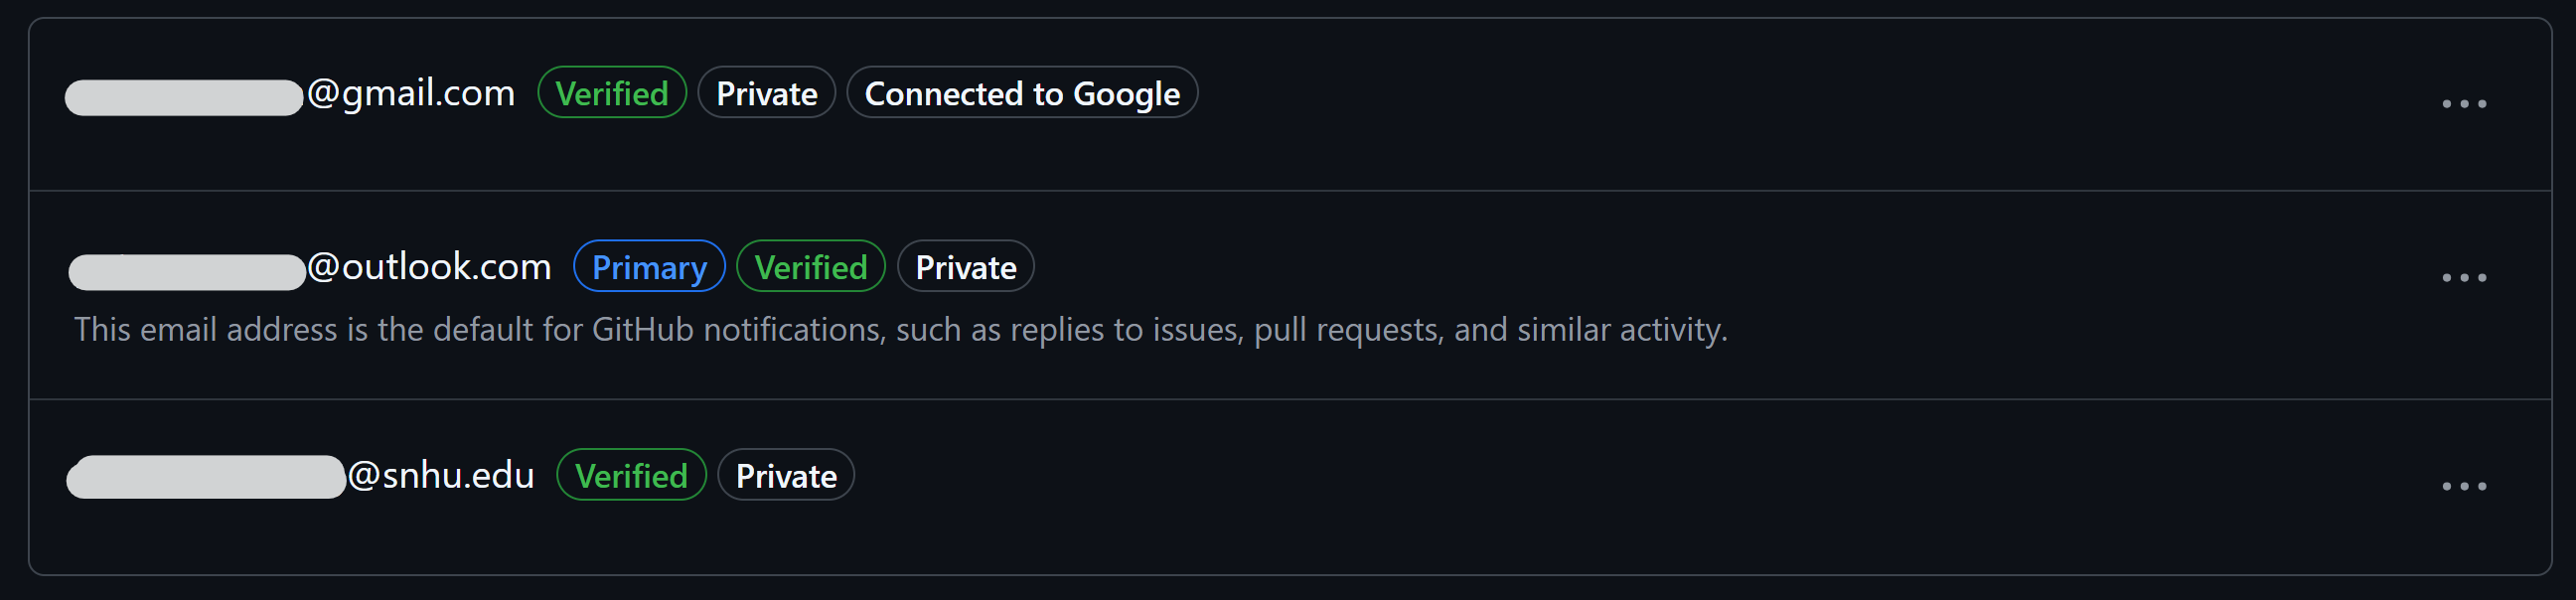
Back in GitHub > Settings > Emails, refresh the page to confirm that all email addresses are listed as verified.
-
Optional. Change your Primary email address from the list of verified addresses to the one you desire. This is the address that GitHub will use for notifications and other communications.

-
Scroll down and turn on Keep my email addresses private.

-
Remember your GitHub-provided public email address. You will need it to configure your development environment. The public email address will look similar to
123456789+your-username@users.noreply.github.com. Note your GitHub public email address, you may need it later. -
Turn on Block command line pushes that expose my email.

GitHub requires users who contribute code to configure two-factor authentication (2FA). Two-factor authentication requires an additional form of verification when you sign in and helps protect your account if someone obtains your password.
-
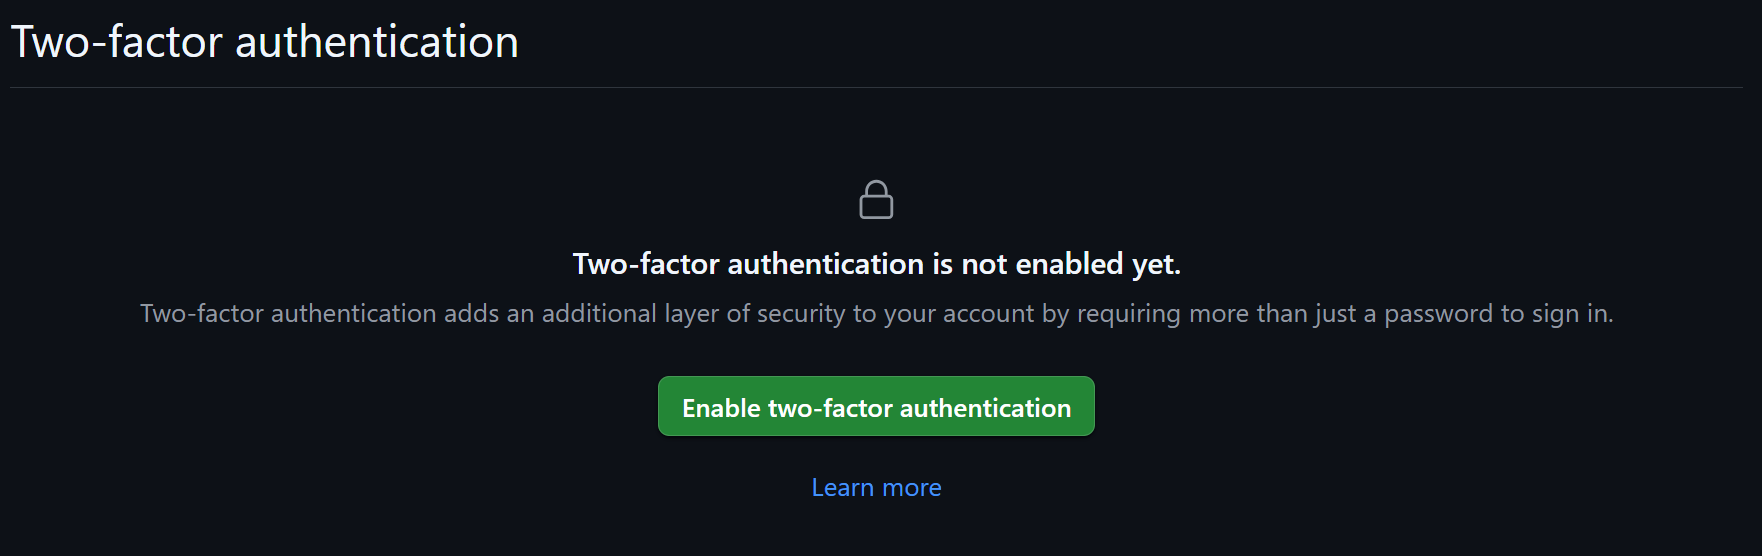
Under Two-factor authentication, click the Enable two-factor authentication button.
-
Follow GitHub’s on-screen instructions to configure a two-factor authentication (2FA) method. This step is time-sensitive. One-time codes expire quickly.
TIP. Use the same authenticator app you use for your SNHU account. This is usually the Microsoft Authenticator app from the Apple or Google Play stores.
WARNING. Only enable SMS text messages authentication if you have no other option. SMS is less secure than other methods, such as an authenticator app or a security key.
-
Download or copy your recovery codes when prompted.
-
Store your recovery codes in a secure location separate from the device you normally use to sign in.
Important. Recovery codes can help you regain access to your account if you lose access to your normal authentication method. Store them securely. Do not save your only copy on a device that could be lost or damaged.
-
Recommended. Add a passkey if your device and browser support one.
Warning
Do not share your password, passkey, authentication codes, or recovery codes with anyone. Neither GitHub nor SNHU will ever ask you for this information. If someone asks for it, report the request to GitHub and SNHU immediately.
The profile-customization step below can help you begin building a professional GitHub presence, but it is not needed unless course activities specifically require it.
-
Sign in to GitHub, if prompted.
-
Optional. Add or change profile information that you wish to share publicly. Remove any information you do not want to be public. For example, you can:
- Add an avatar image;
- Include a brief bio;
- Add links to social media;
- Add a profile README (advanced);
- Click the Update profile button to save your changes.
For an example user profile with custom README, see Petey Penmen's profile.
-
Scroll down to Contributions & activity.
-
Consider leaving the Make profile private and hide activity checkbox unchecked. Checking this box only hides your activity and social information, such as your contribution graph, achievements, activity feed, organization memberships, and follower information. It does not make public repositories private or hide the profile information noted above. It can help to build a history of GitHub activity that employers look for.
-
Consider checking the Include private contributions on my profile checkbox. This lets your GitHub contribution graph reflect work you do in private repositories (e.g., course assignments) without revealing the repositories or their contents.
-
Click the Update preferences button to save your changes.
-
-
Scroll down to Profile settings.
-
Check the Show Achievements on my profile checkbox, if desired. This lets your GitHub profile display badges for achievements you earn.
-
Click the Update preferences button to save your changes.
-
-
If your preferred spoken language is not English, scroll down to Trending settings and update your Preferred spoken language, if desired, and Save Trending settings.
Eligible students can apply for GitHub Education to receive free access to the GitHub Student Developer Pack, which includes GitHub Copilot Pro, additional developer tools, and expanded access to GitHub Codespaces.
One particularly useful benefit is 60 additional GitHub Codespaces core hours per month, increasing the free monthly allowance from 120 to 180 core hours. Codespaces lets you write and run code in a cloud-based development environment without installing software on your computer.
Important
Applying for GitHub Education benefits is entirely optional. These benefits are not required to complete this course or other SNHU coursework. Applications and benefits are managed directly between you and GitHub. SNHU cannot review your application status, influence approval decisions, or provide technical support for GitHub Education benefits. For assistance, contact GitHub Support.
Before applying for GitHub Education for Students, obtain an Enrollment Certificate from SNHU. GitHub may request this document to verify your current enrollment.
- Log into your mySNHU account.
- Under Self-Service > Academics, find the Request/Review Enrollment Verification link.
- Follow the instructions to obtain your Enrollment Certificate.
- Save the certificate to your computer so it is available if GitHub requests proof of enrollment.
For additional information, see SNHU's Enrollment Verification Instructions.
Before applying for GitHub Education for Teachers, obtain a {{SME TODO: faculty verification document}} from SNHU. GitHub will need this document to verify your faculty status.
- Go to Payment information.
- If prompted, sign in using the method you used when creating your GitHub account.
- Edit your billing name and address so it matches your school documentation exactly.
- Click the Save billing information button.
Important
No payment method is required to receive GitHub Eduction benefits—they are free. Do NOT enter a payment method unless you WANT to pay for premium GitHub services. Premium services are not required and unlikely to benefit you in this course or throughout your program of study.
- Go to your Education benefits.
- Sign in to GitHub, if prompted.
- Click the Start an application button.
- Follow the instructions and provide the requested information.
- Watch your Education benefits for status updates.
- Understand the difference between Git and GitHub
- Explain the GitHub flow
- Open and merge a pull request
- Create a repository
Prerequisites: Completion of Understanding Git and Version Control or basic understanding of Git and version control
- Watch YouTube Video: What is GitHub?
-
Complete MS Learn Module: Introduction to GitHub. This includes a GitHub skilling exercise to do the following:
- Create a branch
- Commit a file
- Open a pull request
- Merge your pull request
- Watch YouTube Video: How to create your first GitHub repository: A beginner's guide
- Read GitHub Docs: Quickstart for repositories
- Watch YouTube Video: How to upload files and folders to GitHub
- Read GitHub Docs: Adding a file to a repository